Setting up a Connection to a Map Service
This topic applies to Accela Silverlight GIS.
Connect Accela Silverlight GIS to your agency’s GIS system, or map provider, through a map service.
You can associate multiple map services with the same map integration environment, which allows agency users the flexibility of working with different map services in the map viewer.
The Map Service Connection page provides sections where you can configure basic map viewer settings. Use these sections to identify your map provider, set the initial extent of the map viewer, import map layers, and retrieve Civic Platform Dynamic Themes. Optionally, you can also use this page to retrieve your geocoding and routing services.
Topics
Configuring GIS Server Settings
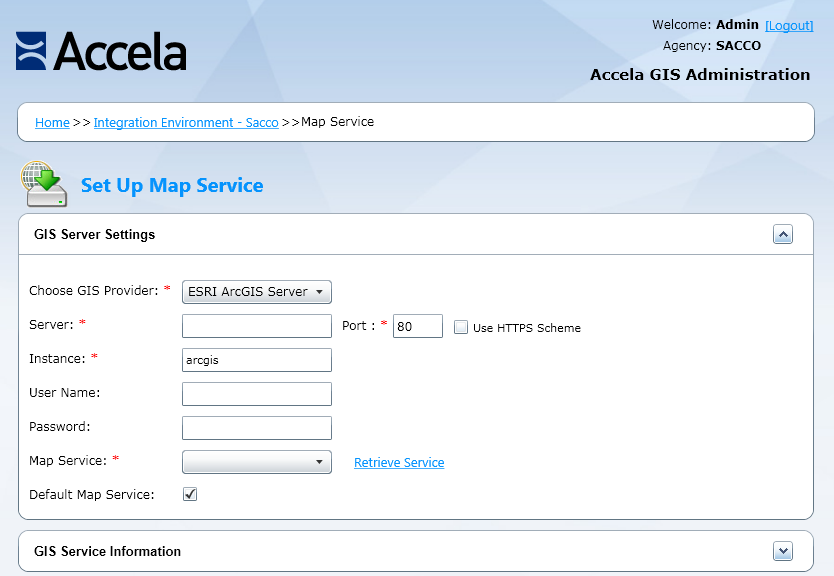
Use the GIS Server Settings section to identify your map provider, such as Esri ArcGIS Engine, Esri ArcGIS Server, Esri ArcGIS Online Base Map, Esri ArcGIS Online Web Map, Esri Image Server, Microsoft Bing Maps, or your agency’s GIS server.
In addition, Accela Silverlight GIS supports map providers that meet the Open Geospatial Consortium (OGC) Web Mapping Service (WMS) and the Web Feature Service (WFS) Interface Standards. The Interface Standards support geospatial and location-based services.
Accela Silverlight GIS currently supports two map providers that meet the Open Geospatial Consortium Standards: MapInfo MapXtreme 2008 7.0.0 and Intergraph GeoMedia WebMap 6.1. The two map providers plug in to Accela Silverlight GIS and are compatible with current Accela Silverlight GIS map functions. You can also use the map providers to create map mash-ups with Bing Maps.
Accela Silverlight GIS also support using HTTPS to communicate between the map viewer and Accela Silverlight GIS Server, and between Accela Silverlight GIS Server and ArcGIS Server. For instructions about how to secure communication, see Securing Communications.
If your agency’s ArcGIS Server map services are secured, then enter your User Name and Password to access secured Web services in the GIS Server Settings section. By default, ArcGIS Server settings are secured.
You must also enter credentials if the map service connection is for Mobile Office offline mapping integration. Mobile Office offline mapping must download GIS data from the GIS server to the local device. To download data, Accela Silverlight GIS connects to ArcGIS Server using ArcGIS Server local connection. To connect locally, Accela Silverlight GIS must pass valid ArcGIS Server user credentials.
Before you can configure GIS server settings, you must define a map integration environment. For instructions, see Integrating Your Environment.
To configure GIS server settings
-
Navigate to the Map Service Connection page.
The Accela Silverlight GIS Administration site displays the Map Service Connection page.
-
Select your map provider from the Choose GIS Provider drop-down list.
You can choose one from these options:
ESRI ArcGIS Engine Use ESRI ArcGIS Engine for Mobile Office offline mapping. ESRI ArcGIS Server Use ESRI ArcGIS Server for online mapping in Civic Platform, Mobile Office, and Citizen Access. Microsoft Bing Maps Bing Maps is a Microsoft Web mapping service. Note: As of June 30, 2016 Accela has deprecated the complimentary use of Bing Maps with Accela Silverlight GIS. Continued use of Bing Maps as a map service provider requires your agency to obtain a Bing Maps license key from Microsoft, and enter it in the Bing Maps License Key masked field on the Global Variable Settings page. (Alternatively, Accela has made available a complimentary ArcGIS Online Account for geocoding and routing services.)Intergraph OGC Select this option if your agency uses Intergraph GeoMedia WebMap 6.1 as a map provider. MapInfo OGC Select this option if your agency uses MapInfo MapXtreme 2008 7.0.0 as a map provider. ESRI Image Server ArcGIS Image Server is an enterprise-wide image distribution platform from Esri, which provides fast access and visualization of large quantities of imagery, processed on the fly and on demand. You can use ArcGIS Image Server to create map mash-ups with dynamic and cached map services from Esri ArcGIS Server, with ArcGIS Online map services, or with Microsoft Bing Maps. ESRI ArcGIS Online Base Map ArcGIS Online is Esri’ system for organizations or individual users to manage and share their GIS content, maps, and apps. Select this option if you want to use a basemap provided by ArcGIS Online as the map service. You can use ArcGIS Online Base Map to create mash-ups with dynamic map services that you publish to Esri ArcGIS Server or with image services from ArcGIS Image Server. ESRI ArcGIS Online Web Map Select this option if you want to use the web map hosted on ArcGIS Online as the map service. The web map might contain tiled map services for map visualization and feature services for Accela data querying and integration. You can use ArcGIS Online Web Map to create mash-ups with dynamic map services that you publish to Esri ArcGIS Server or with image services from ArcGIS Image Server.
-
Complete the fields according to your choice of the map provider:
-
If you choose ESRI ArcGIS Engine, ESRI ArcGIS Server, or ESRI Image Server, complete the fields in Table 1.
-
If you choose Microsoft Bing Maps, complete the fields in Table 2.
-
If you choose Intergraph OGC or MapInfo OGC, complete the fields in Table 3.
-
If you choose ESRI ArcGIS Online Base Map or ESRI ArcGIS Online Web Map, complete the fields in Table 4.
The Accela Silverlight GIS Administration site displays the map service settings in the GIS Service Information section.
-
-
Complete the GIS Service Information section. For instructions on completing the GIS Service Information section, see Configuring GIS Service Information.
Table 1. GIS Server Settings Fields for ArcGIS Engine and Server Server Enter the ArcGIS Server name or IP address. Port Enter the port number that corresponds to the map server’s IP address. The default port number for the HTTP server is 80 while the default port number for the HTTPS server is 443. Use HTTPS Scheme Mark this check box to support using HTTPS to communicate between Accela Silverlight GIS Server and ArcGIS Server. Instance Enter the server instance in this field. The default value that populates this field is arcgis. User Name Enter your ArcGIS Server user name. If your agency’s map services are secured or used for Mobile Office offline mapping, then you must enter your ArcGIS Server user name. The user must belong to the “agsusers” group on the ArcGIS Server machine.For more information about how to configure ArcGIS server security, see ArcGIS Server documentation > Configuring ArcGIS Server Security. Password Enter your ArcGIS Server password. If your agency’s map services are secured or used for Mobile Office offline mapping, then you must enter your ArcGIS Server password. The user password must belong to the “agsusers” group on the ArcGIS Server machine.For more information about how to configure ArcGIS server security, see ArcGIS Server documentation > Configuring ArcGIS Server Security. Map Service If you retrieve a map service from ArcGIS Server, this drop-down list populates with map services that you have published to the root folder or its subfolders in ArcGIS Server. Select a map service from the drop-down list.For more information about how to publish map services in ArcGIS Server, see “Setting up Map Functionality” in the Accela Silverlight GIS for ArcGIS Server Configuration Guide. Retrieve Service Click this link to retrieve map service information from your map provider. Default Map Service This check box applies to agencies that use multiple map services to create map mashups in one integration environment.
Mark this check box to set a map service as the default. When you mark this check box, common settings, such as the initial extent of the selected map service, display in the map viewer.
If your agency uses map services from ArcGIS Server and Bing Maps or from ArcGIS Server and ArcGIS Online Base Map, set an ArcGIS Server map service as the default map service. You cannot set a map service from Bing Maps or ArcGIS Online Base Map as the default map service in an integration environment with the map mashups.
Only one map service can be the default.
Table 2. GIS Server Settings Fields for Bing Maps Map Service This field is read-only and displays the Bing Map Service URL. Note: As of June 30, 2016 Accela has deprecated the complimentary use of Bing Maps with Accela Silverlight GIS. Continued use of Bing Maps as a map service provider requires your agency to obtain a Bing Maps license key from Microsoft, and enter it in the Bing Maps License Key masked field on Accela Silverlight GIS Administration > Global Variable Settings. (Alternatively, Accela has made available a complimentary ArcGIS Online Account for geocoding and routing services.)Retrieve Service Click this link to retrieve map service information from your map provider. Note: When you click the Retrieve Service link for a Bing Map service, the map service thumbnail does not display. This is a known limitation with Bing Maps REST Services.Default Map Service This check box applies to agencies that use multiple map services to create map mashups in one integration environment.
Mark this check box to set a map service as the default. When you mark this check box, common settings, such as the initial extent of the selected map service, display in the map viewer.
If your agency uses map services from ArcGIS Server and Bing Maps or from ArcGIS Server and ArcGIS Online Base Map, set an ArcGIS Server map service as the default map service. You cannot set a map service from Bing Maps or ArcGIS Online Base Map as the default map service in an integration environment with the map mashups.Only one map service can be the default.
Table 3. GIS Server Settings Fields for OGC Map Providers WMS Service URL Enter a Web Mapping Service URL for an Open Geospatial Consortium map provider. The Web Mapping Service URL must come from the same data source as the Web Feature Service URL. WFS Service URL Enter a Web Feature Service URL for an Open Geospatial Consortium map provider. The Web Feature Service URL must come from the same data source as the Web Mapping Service URL. User Name If you are using a MapInfo MapXtreme 2008 7.0.0 or GeoMedia WebMap 6.1 secured map service, then you must enter your user name. Password If you are using a MapInfo MapXtreme 2008 7.0.0 or GeoMedia WebMap 6.1 secured map service, then you must enter your user name. Map Service This field is read-only and displays the map service URL. Retrieve Service Click this link to retrieve map service information from your map provider. Default Map Service This check box applies to agencies that use multiple map services to create map mashups in one integration environment.
Mark this check box to set a map service as the default. When you mark this check box, common settings, such as the initial extent of the selected map service, display in the map viewer.
Only one map service can be the default.
Table 4. GIS Server Settings Fields for ArcGIS Online (Base Map and Web Map) Server For ESRI ArcGIS Online Base Map only: If you are using ESRI ArcGIS Online Base Map as the map provider, select any of the ArcGIS Online servers: services.arcgisonline.com
server.argisonline.comArcGIS Online provides two servers, which are exactly the same. In case one server in your map integration environment goes down, you can use the other as a backup server.
Note: Make sure the URL of the selected ArcGIS Online server is accessible from a web browser.
If you are using ESRI ArcGIS Online Web Map as the map provider, this field displays “maps.arcgis.com” in read-only.
Port For ESRI ArcGIS Online Base Map only: Enter the port number that corresponds to the map server’s IP address. The default port number for the HTTP server is 80 while the default port number for the HTTTPS server is 443. Use HTTPS Scheme For ESRI ArcGIS Online Base Map only: Mark this check box to support using HTTPS to communicate between the Accela Silverlight GIS Server and the ArcGIS Online server. User Name For ESRI ArcGIS Online Web Map only: If you are using ESRI ArcGIS Online Web Map as the map provider, enter the user name for logging in to ArcGIS Online. Password For ESRI ArcGIS Online Web Map only: If you are using ESRI ArcGIS Online Web Map as the map provider, enter the password for logging in to ArcGIS Online. Map Service If you retrieve a map service from ArcGIS Online Web Map, this drop-down list populates with web maps that you have published to ArcGIS Online. Select a web map from the drop-down list. Retrieve Service Click this link to retrieve map service information from your map provider. Default Map Service This check box applies to agencies that use multiple map services to create map mashups in one integration environment.
Mark this check box to set a map service as the default. When you mark this check box, common settings, such as the initial extent of the selected map service, display in the map viewer.
If your agency uses map services from ArcGIS Server and Bing Maps or from ArcGIS Server and ArcGIS Online Base Map, set an ArcGIS Server map service as the default map service. You cannot set a map service from Bing Maps or ArcGIS Online Base Map as the default map service in an integration environment with the map mashups.
Only one map service can be the default.
Configuring GIS Service Information
Once you retrieve and select your primary map service, you can configure additional map service settings.
The settings you configure in this section, such as the initial extent, determine how Accela Silverlight GIS presents the map service in the map viewer.
Before you can configure GIS server settings, you must define a map integration environment. For instructions, see Integrating Your Environment. Additionally, you must configure GIS Server settings. For instructions, see Configuring GIS Server Settings.
To configure GIS Service Information:
-
Navigate to the GIS Service Information section on the Map Service Connection page.
The Accela Silverlight GIS Administration site displays the map service settings in the GIS Service Information section.
-
Complete the fields in the GIS Service Information section.
For a complete list of fields, see Table 5.
The Accela Silverlight GIS Administration site saves your GIS Service Information settings.
-
Continue with the map service setup according to your choice of the map provider.
-
If you choose ESRI ArcGIS Engine, ESRI ArcGIS Server, or ESRI ArcGIS Online Web Map, import and configure map layer settings. For instructions on how to import and configure map layer settings, see Importing and Configuring Map Layer Settings.
-
If you choose Microsoft Bing Maps or ESRI ArcGIS Online Base Map, set a default map style. For instructions on the map style settings, see Configuring Map Style Settings.
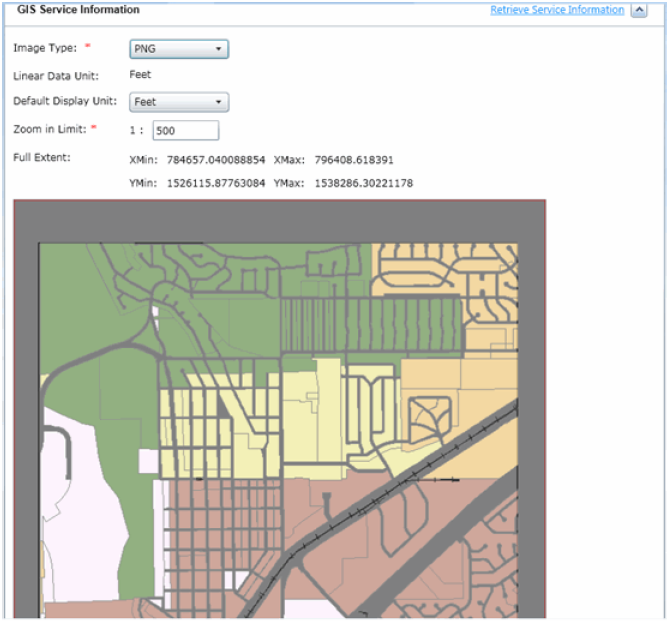
Table 5. GIS Service Information Fields Default Display Unit Select the default display unit from this drop-down list. The available map measurement display units include meters, kilometers, feet, yards, and miles. Full Extent The full extent is the complete map area zoomed out to its farthest point. The XMin and XMax and YMin and YMax fields in this section display the map coordinates at their full extent. Image Type Select the map viewer image type from the drop-down list. By default, Accela Silverlight GIS supports PNG8 image types.If you select Microsoft Bing Maps, ESRI ArcGIS Online Base Map, or ESRI ArcGIS Online Web Map as the map provider, this field is not available. Initial Extent The initial extent is the default extent of the map when the map viewer is opened. If you select a map provider other than ESRI ArcGIS Online Web Map, you can draw a rectangle polygon on the map to define the initial extent. The area you select, measured by numerical X and Y coordinates, populates the XMin and XMax and YMin and YMax fields. Initial Extent XMax The right most extent of the map when the map viewer is first opened.For example, if you want agency users to initially view a zoomed area of the map, this value is the right most extent of the zoomed area. Initial Extent XMin The left most extent of the map when the map viewer is first opened.For example, if you want agency users to initially view a zoomed area of the map, this value is the left most extent of the zoomed area.The map area you select with the polygon automatically populates this field. Initial Extent YMax The top most extent of the map when the map viewer is first opened.For example, if you want agency users to initially view a zoomed area of the map, this value is the top most extent of the zoomed area.The map area you select with the polygon automatically populates this field. Initial Extent YMin The bottom most extent of the map when the map viewer is first opened.For example, if you want agency users to initially view a zoomed area of the map, this value is the bottom most extent of the zoomed area.The map area you select with the polygon automatically populates this field. Linear Data Unit This field is read-only and displays the units of measurement for the selected map service. Accela Silverlight GIS users can switch the map units using the Map Control.There are three possible values for this field: Decimal - Degrees are based on the 360 degree circumference of the Earth.
Feet - US standard unit of measure for distance.
Meters - International standard unit of measure for distance.
Retrieve Service Information Click this link to replace the attribute settings of the selected map service with the default map service attribute values. Zoom in Limit Set the map zoom-in limit by entering a value in this field.
-
Importing and Configuring Map Layer Settings
Once you retrieve a map service, you can import map layer information from the map service. Use the Map Layer Settings section to retrieve map layers and select the map layer ID Field. This section only displays if you are configuring ArcGIS Server, ArcGIS Engine, ArcGIS Online Web Map, or OGC map services.
The ArcGIS Server map services can be either dynamic or cached. If you retrieve the dynamic map service, you can use the Layer Settings section to configure map layers for editing. When you configure a map layer for editing, mark a check box to indicate that a layer is editable. You also determine which attributes for each layer are editable. Editable attributes display in the Edit Attributes dialog box in Accela Silverlight GIS. As a prerequisite of configuring map layers for editing, you must enter the correct user name and password in the GIS Server Settings section.
For example, you might configure a fire hydrant map layer for editing, and then determine which related hydrant attributes are editable, such as the hydrant’s address, manufacturing date, model, and owner.
When you configure a map layer for editing, you must set the ID Field for the selected map layer as editable. For example, if the ID Field for the Buildings map layer is BUILD_ID, then you must mark the check box next to the BUILD_ID field when you configure the attributes.
Editable layers give agency users the option to create and edit GIS features. Agency users can only create and edit features on editable map layers. Once you configure editable map layers and save the settings, the Accela Silverlight GIS Administration site prompts you to enter your user name and password. You must enter valid credentials.
When you select an ID Field for a map layer, you indicate the field within the geodatabase feature class table that you want to map to the Accela Silverlight GIS database. The ID Field connects the map layer in your map provider’s geodatabase to the Accela Silverlight GIS database. You can configure whether Accela Silverlight GIS generates the ID automatically or asks users to enter the ID manually when they create a GIS feature. If you want to auto-generate the ID, you need to set the map layer as editable and then define the current sequence and the cache size for the ID field. The OBJECT_ID number cannot be auto-generated because the OBJECT_ID field is maintained by ArcGIS.
For example, if you select HYD_NUMBER as the ID Field for Hydrants, then objects in the Hydrants map layer are identified by the HYD_NUMBER field in the Accela Silverlight GIS database. The ID Field you select for each feature class must be unique and fixed.
If your agency plans to synchronize a GIS layer with an Asset Type in Accela Asset Management, you must select the same value in the Asset ID and ID Fields.
Before you can import and configure map layer settings, you must define a map integration environment. For instructions, see Integrating Your Environment. Additionally, you must configure GIS Server settings and GIS Service information. For instructions, see Configuring GIS Server Settings and Configuring GIS Service Information.
To import and configure map layer settings
-
Navigate to the Layer Settings section on the Map Service Connection page.
The Accela Silverlight GIS Administration site displays the Layer Settings section.

Note:Accela Silverlight GIS allows users to create or edit geometry only on the editable layer of a dynamic ArcGIS Server map or an ArcGIS Engine map. So for an OGC map service or an ArcGIS Online Web Map service, the Layer Settings section does not have the Editable or Auto ID column.
-
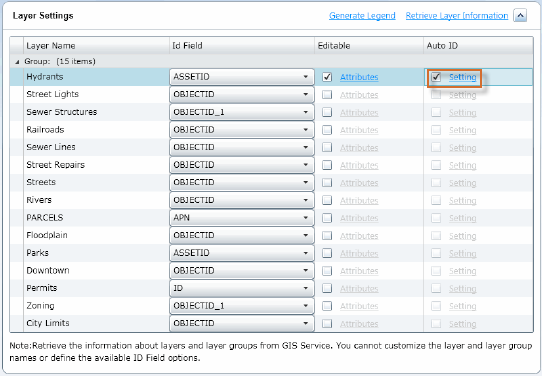
Expand the ID Field drop-down list for each map layer group.Note: The selected Id Field value appears as the object name on the map viewer's Contents Panel. The Id Field value must be no more than 70 characters.For a complete list of fields, see Table 6.
The Accela Silverlight GIS Administration site displays the attribute list.

-
Select a unique, fixed attribute field for each map layer from the ID Field drop-down list. If your agency plans to synchronize a GIS layer with an Asset Type in Accela Asset Management, you must select the same value in the Asset ID and ID Fields.
-
To configure a map layer for editing, mark the check box in the Editable column.
The Accela Silverlight GIS Administration site activates the Attributes link.

-
Click the Attributes link.
The Accela Silverlight GIS Administration site displays the Setup Attributes for the editing layer dialog box.

-
Mark the check box next to each attribute that you want to be editable. You must set the ID Field for the selected map layer as editable.
-
Click the OK button.
The Accela Silverlight GIS Administration site saves the attribute settings.
-
To auto-generate the feature ID when users create a GIS feature, mark the check box in the Auto ID column.
The Accela Silverlight GIS Administration site activates the Setting link.
-
Click the Setting link.
The Accela Silverlight GIS Administration site displays the ID Generator Setting dialog box.

-
Complete these fields:
ID Field This is a read-only field. It displays the name of the ID field. The ID field is used to link the Civic Platform data with the GIS data. Each feature created on the map layer must have a unique ID field value. The ID field value can be populated either manually or automatically based on the ID Generator setting. Current Sequence It specifies the current sequence value of the ID field. The next ID field value is auto-generated based on this value.
During initial setup, if the map layer does not have any features on it, this value can be set to 1; if it already has some features, get the maximum ID field value from the geodatabase and enter a greater value into this field. For example, the Road Repairs layer is used as an editable layer and has some features on it, get the maximum ID field value from the layer. If the maximum value is 1000, enter 1001 as the current sequence number.Cache Size It defines a set of sequence numbers in memory for auto-generating IDs in Mobile Office Offline Mode. The default value is 100.
-
Click the OK button.
The Accela Silverlight GIS Administration site saves the ID Generator setting.
-
Retrieve and select a geocoding service. For instructions, see Retrieving and Selecting a Geocoding Service.
Table 6. Map Layer Settings Generate Legend Click this link to generate a map legend. When you click this link, a PNG image of the map legend is generated and displays in the map viewer Table of Contents. Retrieve Layer Information This link only appears when you edit map layer settings.
Click this link to retrieve all the layers in the selected map service. Use this link to incorporate new layers added to the MXD (Map document). Similarly, if layers are removed from the MXD, then you can update the layer groups and names when you click this link.
Layer Name Layer groups and names are automatically retrieved when you select a map service. By default, this column is expanded and displays all the layer groups and names. ID Field This drop-down list displays the available attribute fields for the selected map layer. Select an identification field for each map layer. Editable Mark the check box next to the map layer that you want to make editable, then click the Attributes link to configure which attributes are editable.
Note: Cached map services do not support the Creating and Editing GIS Features functionality, so the Editable column is not available on the Layer Settings section for cached map services.
Auto ID Mark the check box next to the map layer if you want to auto-generate IDs for the features created on the map layer, then click the Setting link to configure the current sequence and cache size. When users create a feature in Accela Silverlight GIS and submit it, Accela Silverlight GIS auto-generates the ID number for the feature based on the ID Generator setting.
If you want users to enter the ID number when creating a GIS feature, clear the check box. This way, the ID Field displays in the Edit Attributes dialog box.
Note: Public users cannot create or edit GIS features in Citizen Access, so the Auto ID column is not available in the Layer Settings section for the Citizen Access map integration.
Configuring Map Style Settings
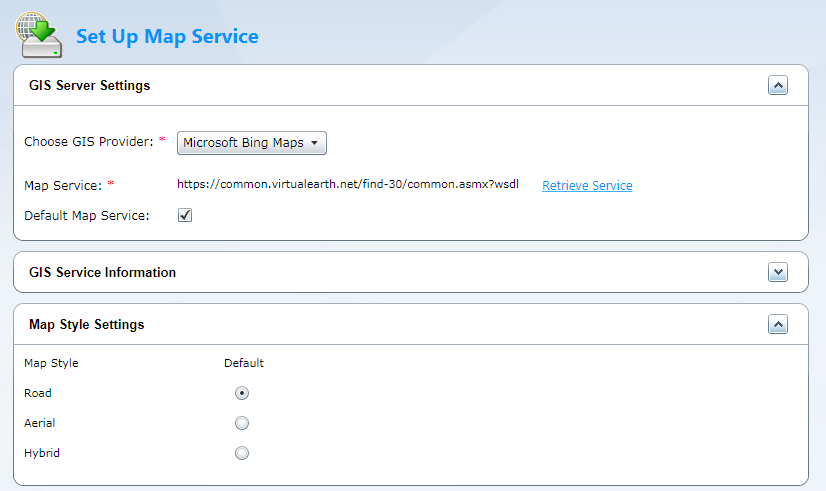
Use this section to configure the default map style display for Microsoft Bing Maps or ArcGIS Online basemaps. This section only appears if you are configuring a map service provided by Microsoft Bing Maps or ESRI ArcGIS Online Base Map.
Before you can configure map style settings, you must define a map integration environment. For instructions, see Integrating Your Environment. Additionally, you must configure GIS Server settings and GIS Service information. For instructions, see Configuring GIS Server Settings and Configuring GIS Service Information.
To configure map style settings
-
Navigate to the Map Style Settings section on the Map Service Connection page.
If you are configuring a map service provided by Microsoft Bing Maps, the Accela Silverlight GIS Administration site displays the Map Style Settings section.
If you are configuring an ArcGIS Online basemap, the Accela Silverlight GIS Administration site displays the ESRI Map Style Settings section.

-
Mark the option next to the map style you want to set as the default:
-
For Microsoft Bing Maps:
Road Map this option if you want the default map display to be a road overlay. This is the default map service display. Aerial Mark this option if you want the default map display to be set at an aerial view. Hybrid Mark this option if you want the default map display to be an aerial view with a road overlay.
-
For ArcGIS Online Base Map:
Street Map this option if you want the default map display to be Esri’s world street map. This is the default map service display. ImageryWithLabels Mark this option if you want the default map display to be Esri’s Imagery map.
-
-
Retrieve and select a geocoding service. For instructions, see Retrieving and Selecting a Geocoding Service.
Retrieving and Selecting a Geocoding Service
Optionally, if you plan to use geocoding in your map integration environment, you can use the Geocoding Service Settings section to retrieve a geocoding service. The geocoding service provider can be ArcGIS Server, Bing Maps, ArcGIS Online, or a custom geocoding web service. For more information about integrating a custom geocoding web service, see Accela Silverlight GIS Geocoding Web Service Integration Guide. Contact Accela Customer Support for this supporting document.
You can select a unique geocoding service for your map integration environment. The geocoding service you select can be different from the default map service. For example, you might want to use Bing Maps for geocoding and an ArcGIS Server map service for mapping, visualization, and layer interaction.
Before you can retrieve and select a geocoding service, you must define a map integration environment. For instructions, see Integrating Your Environment. Additionally, you must configure GIS Server settings and GIS Service information. For instructions, see Configuring GIS Server Settings and Configuring GIS Service Information.
To retrieve and select a geocoding service
-
Navigate to the Geocoding Service Settings section on the Map Service Connection page.
The Accela Silverlight GIS Administration site displays the Geocoding Service Settings section.
-
Select an option from the Geocoding Service Provider drop-down list. The available options are ESRI ArcGIS Server, Microsoft Bing Map, Geocoding Web Service, and ESRI ArcGIS Online.
The Accela Silverlight GIS Administration site refreshes the Geocoding Service Settings section and displays the associated fields based on your selection.
-
Do one of the following:
-
For ESRI ArcGIS Server:
-
Edit the fields in the Geocoding Service Settings section as needed.
For a description of the fields, see Table 7.
-
Click the Retrieve Services link.
The Accela Silverlight GIS Administration site displays the geocoding services retrieved from your geocoding server in the Geocoding Service drop-down list.

-
Select a geocoding service from the Geocoding Service drop-down list.
-
-
For Microsoft Bing Map:
Mark the Using this geocoding service for this integration check box if you want the geocoding service from Bing Maps to be the default geocoding service in your map integration environment. Otherwise, clear this check box.
The Accela Silverlight GIS Administration site retrieves the geocoding service from Bing Maps.

-
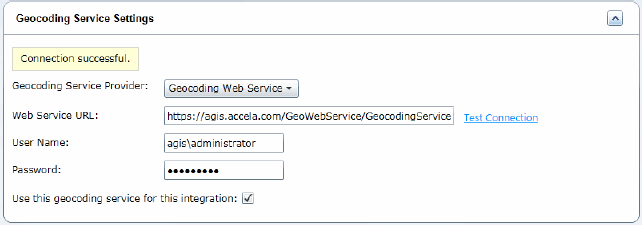
For Geocoding Web Service:
-
Edit these fields in the Geocoding Service Settings section as needed:
Web Service URL Enter the URL of a custom geocoding web service. User Name Optionally, enter your user name along with the password for connecting to the geocoding web service. Password Optionally, enter your password along with the user name for connecting to the geocoding web service. Using this geocoding service for this integration Mark this check box if you want the geocoding web service to be the default geocoding service in your map integration environment. Otherwise, clear this check box.
-
If necessary, click the Test Connection link.
The Accela Silverlight GIS Administration site tries to connect to the geocoding web service and displays an appropriate message for successful or unsuccessful connections.
-
-
For ESRI ArcGIS Online:
-
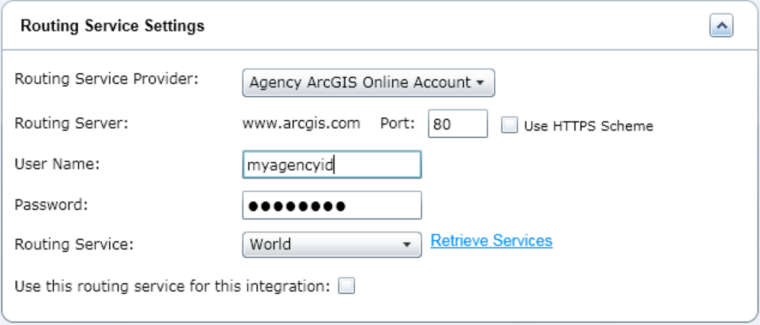
To use Accela's complimentary ArcGIS Online account, choose Accela ArcGIS Online Account as the Geocoding Service Provider. To use your agency's own ArcGIS Online account, choose Agency ArcGIS Online Account as the Geocoding Service Provider.
-
If you selected Agency ArcGIS Online Account as the geocoding service provider, enter the username and password of your agency's ArcGIS Online account.
For a description of the fields, see Table 7.
-
Click the Retrieve Services link.
The following example shows Accela ArcGIS Online Account as the geocoding service provider:
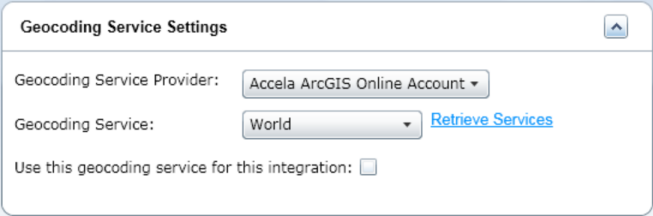
The following example shows Agency ArcGIS Online Account as the geocoding service provider:

-
Select a geocoding service from the Geocoding Service drop-down list.
-
-
-
Retrieve and select a routing service. For instructions, see Retrieving and Selecting a Routing Service.
Table 7. Esri Geocoding Service Fields Geocoding Server Enter the name of your Geocoding Map Server. If you select Agency ArcGIS Online Account as the geocoding service provider, this field displays the server URL in read-only format. Port Enter the port number that corresponds to your geocoding server’s IP address. The default port number for the HTTP server is 80 while the default port number for the HTTTPS server is 443. Use HTTPS Scheme Mark this check box to support using HTTPS to communicate between Accela Silverlight GIS Server and ArcGIS Server. Instance Enter the server instance. If you select ArcGIS Online as the geocoding service provider, this field is not available. User Name If you select ESRI ArcGIS Server as the geocoding service provider, this field is optional. Enter the user name for the geocoding service published to the ArcGIS Server.
If you select Agency ArcGIS Online Account as the geocoding service provider, this field is required. Enter the user name for the ArcGIS Online account. Please contact Esri to obtain a user account.
Password If you select ESRI ArcGIS Server as the geocoding service provider, this field is optional. Enter the password for the geocoding service published to the ArcGIS Server.
If you select Agency ArcGIS Online Account as the geocoding service provider, this field is required. Enter the password for the ArcGIS Online account. Please contact Esri to obtain a user account.Locator Name Enter the name of the address locator that is published as the geocode service in ArcGIS Server.
If you select ESRI ArcGIS Online as the geocoding service provider, this field is not available. Note: To allow the Accela Silverlight GIS server to download a data package from the ArcGIS Server for offline maps, you must enter the address locator name and its location. You can go to the Parameters tab of the ArcGIS Server - Geocode Service Properties window to get the locator name.
Location Enter the location of the address locator that is published as the geocode service in ArcGIS Server. If you select ESRI ArcGIS Online as the geocoding service provider, this field is not available. Note: To allow the Accela Silverlight GIS server to download a data package from the ArcGIS Server for offline maps, you must enter the address locator name and its location. You can go to the Parameters tab of the ArcGIS Server - Geocode Service Properties window to get the location. 
If the geocoding service uses SDE as its data source, enter the location in the format below.
<server>,<instance>,<database>,<user>,<password>,<version>Here are two examples:
Direct Connection “10.50.0.155,sde:sqlserver:10.50.0.155\sqlexpress,sde,sde,gisadmin,SDE.Default”
Connection with Port “10.50.0.155,5151,sde,sde,gisadmin,SDE.Default”
If the geocoding service uses a data source other than SDE, enter the location just as shown in the Location field of the ArcGIS Server - Geocode Service Properties window.
Geocoding Service When you click the Retrieve Services link, this drop-down list populates with the all the geocoding services set up on your geocoding server. If you select ArcGIS Online as the geocoding server, this drop-down list populates with the ArcGIS Online geocoding services such as World. Use this geocoding service for integration Mark this check box if you want the selected geocoding service to be the default geocoding service in your map integration environment.
Retrieving and Selecting a Routing Service
Optionally, if you plan to use routing in your map integration environment, you can use the Routing Service Settings section to retrieve a routing service.
You can select a unique routing service for your map integration environment. The routing service you select can be different from the default map service. For example, you might want to use Bing Maps for routing and an ArcGIS Server map service for mapping, visualization, and layer interaction.
Before you can retrieve and select a routing service, you must define a map integration environment. For instructions, see Integrating Your Environment. Additionally, you must configure GIS Server settings and GIS Service information. For instructions, see Configuring GIS Server Settings and Configuring GIS Service Information.
To retrieve and select a routing service
-
Navigate to the Routing Service Settings section on the Map Service Connection page.
The Accela Silverlight GIS Administration site displays the Routing Service Settings section.
-
Select an option from the Routing Service Provider drop-down list. The available options are ESRI ArcGIS Server, Microsoft Bing Map, and ESRI ArcGIS Online.
The Accela Silverlight GIS Administration site refreshes the Routing Service Settings section and displays the associated fields based on your selection.
-
Do one of the following:
-
For ESRI ArcGIS Server:
-
Edit the fields in the Routing Service Settings section as necessary.
For a description of the fields, see Table 8.
-
Click the Retrieve Services link.
The Accela Silverlight GIS Administration site displays the routing services retrieved from your routing server in the Routing Service drop-down list.

-
Select a routing service from the Routing Service drop-down list.
-
-
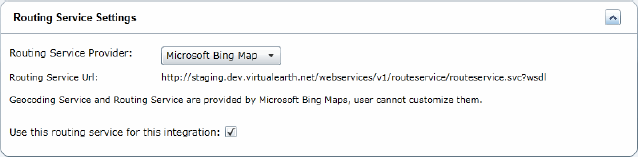
For Microsoft Bing Map:
Mark the Using this routing service for this integration check box if you want the routing service from Bing Maps to be the default routing service in your map integration environment. Otherwise, clear this check box.
The Accela Silverlight GIS Administration site retrieves the routing service from Microsoft Bing Map.
-
For ESRI ArcGIS Online:
To use Accela's complimentary ArcGIS Online account, choose Accela ArcGIS Online Account as the Routing Service Provider. To use your agency's own ArcGIS Online account, choose Agency ArcGIS Online Account as the Routing Service Provider.
-
If you selected Agency ArcGIS Online Account, enter the username and password of your agency's ArcGIS Online account.
For a description of the fields, see Table 8.
-
Click the Retrieve Services link.
The following example shows Accela ArcGIS Online Account as the routing service provider:
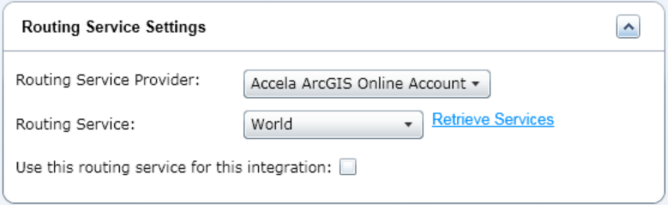
The following example shows Agency ArcGIS Online Account as the routing service provider:
-
Select a routing service from the Routing Service drop-down list.
-
-
Click the Save button.
-
If you are configuring a dynamic map service published by Esri ArcGIS Server, you can retrieve and configure dynamic themes.
For instructions on how to retrieve and configure dynamic themes, see Retrieving and Configuring Dynamic Themes in Accela Silverlight GIS.
| Routing Server | Enter the name of your routing server. If you select ESRI ArcGIS Online as the routing service provider, this field displays the server URL in read-only format. |
| Port |
Enter the port number that corresponds to your routing server’s IP address. The default port number for the HTTP server is 80 while the default port number for the HTTTPS server is 443. |
| Use HTTPS Scheme | Mark this check box to support using HTTPS to communicate between Accela Silverlight GIS Server and the routing server. |
| Instance | Enter the server instance. If you select ESRI ArcGIS Online as the routing service provider, this field is not available. |
| User Name |
If you select ESRI ArcGIS Server as the routing service provider, this field is optional. Enter the user name for the routing service published to the ArcGIS Server. If you select Agency ArcGIS Online Account as the routing service provider, this field is required. Enter the user name for the ArcGIS Online account. Please contact Esri to obtain a user account. |
| Password |
If you select ESRI ArcGIS Server as the routing service provider, this field is optional. Enter the password for the routing service published to the ArcGIS Server. If you select Agency ArcGIS Online Account as the routing service provider, this field is required. Enter the password for the ArcGIS Online account. Please contact Esri to obtain a user account. |
| Routing Service | When you click the Retrieve Services link, this drop-down list populates with the all the routing services set up on your routing server. |
| Use this routing service for this integration | Mark this check box if you want the selected routing service to be the default routing service in your map integration environment. Otherwise, clear this check box. |
Retrieving and Configuring Dynamic Themes in Accela Silverlight GIS
You can retrieve dynamic themes from the Civic Platform application server, select dynamic themes that belong to a map service, and define dynamic theme symbology in the Dynamic Themes section.
Once you retrieve dynamic themes, you can select the themes that belong to the map service and determine how they display in the map viewer, including the display order, line color, line thickness, fill color, and transparency.
Before you can retrieve and configure dynamic themes, you must define a map integration environment. For instructions, see Integrating Your Environment. Additionally, you must configure GIS Server settings and GIS Service information. For instructions, see Configuring GIS Server Settings and Configuring GIS Service Information.
You must configure dynamic themes before you can associate them with a map service. For instructions on how to configure dynamic themes, see Configuring Dynamic Themes in Civic Platform.
To retrieve and edit dynamic themes
-
Navigate to the Dynamic Themes section on the Map Service Connection page.
The Accela Silverlight GIS Administration site displays the Dynamic Themes section.

-
Click the Retrieve Dynamic Themes link.
The Accela Silverlight GIS Administration site connects to the Civic Platform application server and retrieves the configured Dynamic Themes.
-
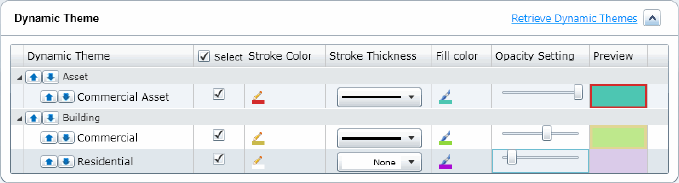
Click the up or down arrow buttons next to the dynamic theme group name to set the display order of the theme groups or click the up or down arrow buttons next to the dynamic theme name to set the display order of the themes within a group.
If two or more dynamic themes overlap a GIS feature, the GIS map viewer displays the dynamic themes on the GIS feature in the specified order.
-
Edit the characteristics for each dynamic theme by completing the related fields. For a complete list of fields, see Table 9.
-
Complete one of these steps:
-
If you want to configure additional map services for your map integration environment, follow the instructions described in Configuring Additional Map Services.
-
If you do not want to configure additional map services for your map integration environment, click the Next button to proceed to the next step in configuring a map integration environment. The next step is to define user groups and their permissions. For instructions on how to define user groups and their permissions, see Defining User Groups and Permissions.
Table 9. Dynamic Theme Fields Dynamic Theme This column displays the dynamic themes, including both groups and names, retrieved from the Civic Platform application server.
To collapse a dynamic theme group, click the “--” in the column next to each group name.
Fill Color Click the paint bucket icon to access the fill color menu. Use the fill color menu to choose a fill color for the selected dynamic theme. Opacity Setting Drag the slider left or right to change the transparency of each dynamic theme. The closer you drag the slider to the left, the more transparent the dynamic theme.
Setting the opacity to more or less transparent allows the map to display blended colors when an overlap of dynamic themes occurs. In this way, users can see the overlap on the map.
Preview This field displays a preview of each dynamic theme. Any changes you make to a dynamic theme, such as the fill color or line thickness, are automatically updated to the theme that displays in the Preview field. Select Mark this check box next to each dynamic theme you want to associate with the selected map service. Alternatively, you can mark the check box next to a dynamic theme group to select all the dynamic themes within a group.
You can also mark the Select check box next to the column header to select all the dynamic theme groups and names.
Stroke Color Click the pen icon to access the color menu. Use the color menu to choose a line color for the selected dynamic theme. You can select a color or manually enter a color value in the color menu. Stroke Thickness Click the line icon to access the line menu. Use the line menu to choose the line thickness for the selected dynamic theme.
-