Configuring Record Detail Tabs
This section describes how to configure record detail tabs.
Configuring the Related Records Tab
You can configure a related records tab that enables users to build and view hierarchical relationships between records. These relationships are referred to as parent, child, and sibling relationships in Civic Platform.
Building relationships between records streamlines communication between different departments in your agency and enables batch processing – an efficient way for users to execute common processes on multiple related records. For example, users can create a set of related records that share the same workflow, and execute a batch process that updates the workflow task status for the entire set.
This section focuses strictly on how to configure related records. For complete details on how to this feature, including how to designate records as parents and children, and the other practical uses of this feature, refer to the online help available from the Help menu in Civic Platform.
Setting Related Records FIDs and Standard Choices
To enable this feature you must configure the following FIDs and Standard Choices, according to your agency’s business objectives. For complete instructions on how to configure FIDs and Standard Choices refer to the Civic Platform Configuration Reference and the Administrator training modules available in Accela Success Community – specifically Configuring Related Records, parts 1 - 3.
Related Records FIDs
FID 8154 - Application Hierarchy: enables the related records tab
FID 8236 - Related CAPs Search: enables the Look Up button
FID 8292 - Create Multiple Related CAPs: enables the Clone Mult button
FID 8293 - Open New Related CAP in SPEAR: enables the Clone Sgl button
FID 8323 - Update Related CAPs: displays an Update Related Records button, enabling users to update or refresh the list of related records.
FID 8395 - CAP Summary: displays record summary information about related records. Works in conjunction with SC RELATED_CAP_SUMMARY; you must set both.
FID 8460 - Delete Related Records: displays a Delete button, enabling users to delete related records.
Related Records Standard Choices
RELATED_CAP_CONFIG specifies the fields (including the Application Name field) that display in the hierarchical view of the related records tab.
RELATED_CAP_SUMMARY enables users to display record summary information about related records. Works in conjunction with FID 8395; you must set both.
CAP_CHILD_DOCUMENT enables users to display documents associated with related records. Related documents only display on the parent record. Child records do not display the documents of the parent records.
Configuring the Application Summary Tab
You can create a customized Application Summary that contains a brief summary of the application, field information, and links to relevant portlets.
For a complete list of sections you can add to the Record Summary tab, see Table 1.
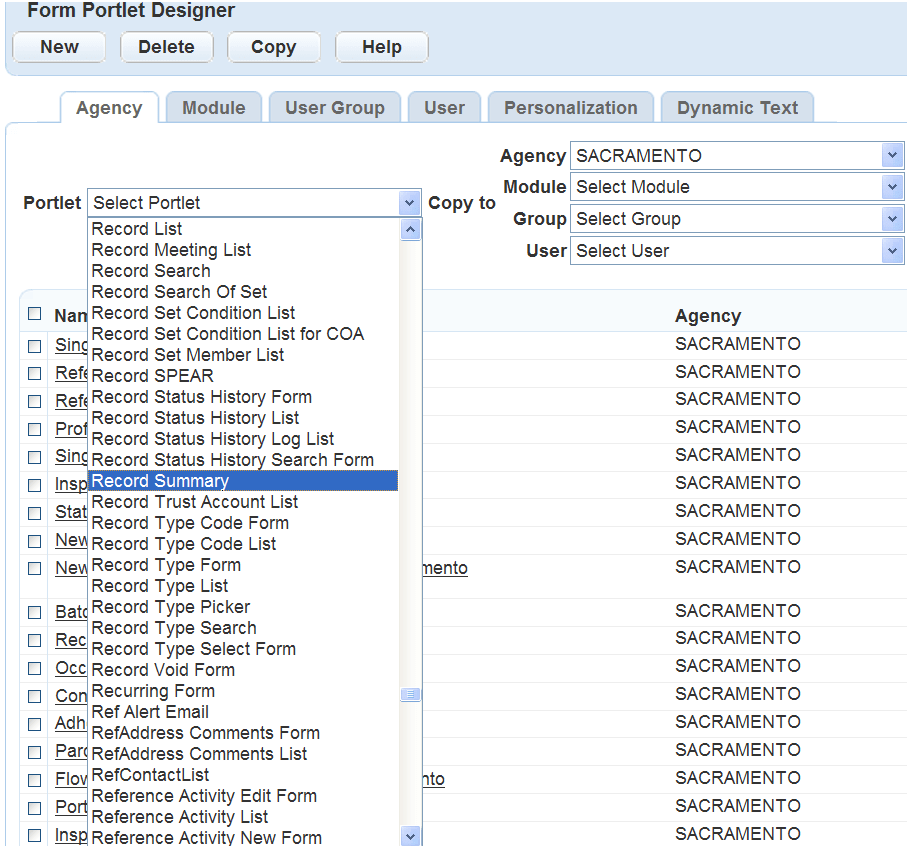
To configure the summary tab
- Access the Form Portlet Designer (Accessing the Form Portlet Designer).
- Select Portlet > Record Summary.
-
Click New and assign the view as described in Designing Forms for Pages. For example, select the level you need, such as Agency, and then Click Submit.
-
- For each field you want to display on the summary, select the field and Click OK on the Available Fields page. To manage fields, click Available Fields.
- Arrange the fields on the form in the same order you want them to appear to users when they complete the form. For instructions on arranging the form, see Designing Forms for Pages.
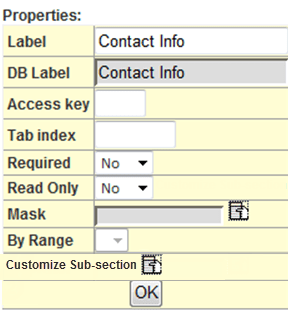
- Rename any of the field labels, according to your agency’s business objectives, as follows:
- Double click a field name to access the properties page for the field.
- Modify the text that displays in the Label field. You cannot change the database label (DB Label).
- Click OK.
Civic Platform displays the form with your customized field name.
- To modify the properties of fields that display as sections or lists on the Summary page:
- Double click a section name or list name to access its properties
page.
Civic Platform displays the Properties page for the section or list.
- Click Customize Sub-section. Refer to Designing Forms for Pages for details on modifying the properties of sections and lists.
- Double click a section name or list name to access its properties
page.
- To restrict the display of fields based on your agency’s business objectives, you can use
Expression Builder functions. For complete details, refer to Using Expression Builder.
Note, however, that because the Record Summary page is read-only, certain functions are not available for the Record Summary page. The only functions available for use with the Record Summary page are the OnLoad expressions.
- Enter a descriptive Filter Name. The Filter Name is the name you can use later to locate the form if you need to make additional changes.
- Click Save.
- Configure the Application Summary page in the Menu Navigation (Go To) drop-down list so that agency users can easily navigate to different record tabs. For instructions on how to configure Menu Navigation, refer to Customizing Menus, Tabs, and Drop-down Lists.
- Add the Summary tab to the Menu Navigation, so that it displays for users when they open a record.
- From the Setup portlet, click Agency Profile > Menu Navigation.
- From the Record Form Portlet, select the Agency > Module > Group > User > and Tab folder for whom you want the Summary tab to display.
- Go to the Menu Items tab, add the
Summary tab from the Built in Menu
Items list on the left, and then arrange the order using
the arrow buttons. See Adding Built-in Menu Items to a Menu.

- Click Submit.
Table 1. Application Summary Page Sections Application Summary Page Section Section Description Adhoc Task Status This section displays the status of any ad hoc tasks associated with the application. Application Comments This section displays application comments. Application Detail Click application detail to view the Record portlet. Custom Fields This section displays any Custom Fields your agency has added for the selected application type. Application Type Click application type to view the Record portlet. The application type displays as the record alias, if present. If a record alias is not present, the application type displays the 4-level organization path of the record. Application Status Click application status to view the Application Status portlet. Balance Click balance amount to view the Payment portlet. Conditions of Approval Click a condition name to navigate to the Condition of Approval portlet. Condition Status Click a condition to view the associated Condition Detail and History portlets. Contact Info This section displays the contact detail for application contacts. Description of Work Click description of work in this section to view the Record portlet. Documents This section displays documents associated with the application. Click a document’s file name to navigate to Document Information portlet, where you can change a document’s status and view document details, such as Document Review Tasks and Document Review History. File Date This section displays the date the application was submitted. Resulted Inspections This section displays completed inspections associated with the application. For more information on the Inspections section, see Configuring the Record Summary Tab Inspection Section. Scheduled/Pending Inspections This section displays scheduled and pending inspections associated with the application. For more information on the Inspections section, see Configuring the Record Summary Tab Inspection Section. Job Value Click job value amount to view the Additional Information Form detail portlet. Licensed Professional Info This section displays licensed professionals associated with the application. Click the license number of a licensed professional to view the Professionals detail portlet.
Parcel No This section displays parcels associated with the application. Click a parcel number to view the Parcel detail portlet.
Required Inspections This section displays inspections public users must complete for Civic Platform to accept the application. Structure This section displays structures associated with the application. Total Fee Assessed This section displays the total amount of fees assessed to the application. Click total fee assessed to view the Fee detail portlet.
Total Fee Invoiced This section displays the total amount of the fees invoiced to the application. Click total fee invoiced to view the Payment detail portlet.
Tracking # This section displays the application tracking number. Workflow Status This section displays the workflow tasks associated with the application, including an Assigned To field. The current application status displays as a link, which enables you to view the Workflow Task portlet.
Configuring the Record Summary Tab
Users can view a summary of an application by clicking the Record Summary tab in a record list. The Record Summary tab displays read-only information; users cannot edit the content that displays.
Configuring the Record Summary Tab Inspection Section
The Inspections section displays pending, scheduled, and resulted inspections associated with the selected application.
When agency users access the Inspections section, they can review the inspection type, the scheduled date, the inspector, and the status for any pending, scheduled, or resulted inspection. Agency users can also click the link for any inspection that displays and view the associated inspection detail.
For a complete list of the fields that display in the Inspections section, see Table 2.
To display the Inspections section, you must first configure the Application Summary page. For instructions on how to configure the Application Summary page, see Configuring the Application Summary Tab.
You can remove the Inspections section from the Application Summary page using the Form Portlet Designer. For instructions on removing a display section from the Application Summary page, see Designing Forms for Pages.
| Inspection Date | This field indicates the inspection date, and displays it in the Resulted subsection of the Inspections section. |
| Inspection Type | Displays the inspection category, such as electrical, insulation, or building. |
| Inspector | Displays the name of the inspector scheduled to conduct the inspection. |
| Resulted | Resulted inspections associated with the selected application display in this subsection. Inspection results must correspond to the Approved or Denied Result Type to display in this subsection. |
| Scheduled Date | This field displays in the Scheduled/Pending subsection and indicates the scheduled date for the inspection. |
| Scheduled/Pending | Scheduled or pending (requested) inspections associated with the selected application display in this subsection. |
| Status | This field displays in the Scheduled/Pending subsection and the Resulted
subsection. In the Scheduled/Pending subsection, this field indicates whether a public user has scheduled or requested an inspection. In the Resulted subsection, this field indicates the result of an inspection, such as Approved or Denied. |
Configuring the Conditions of Approval Tab
Use the Form Portlet Designer to customize what information displays and how it appears on the Conditions of Approval tab for a record, an inspection, or a record set.
You can also decide which condition of approval fields appear as links in the Sort By area on the Conditions of Approval tab. By default, the Group, Priority, and Applied Date links are available in the Sort By area. Clicking a Sort By link sorts the conditions of approval by the corresponding field. Civic Platform sorts the conditions of approval by group, type, status type, severity, and then priority, if users do not click any of the links in the Sort By area.
To customize the Conditions of Approval tab
- Access the Form Portlet Designer (Accessing the Form Portlet Designer).
- Select one of these options from the Portlet drop-down list:
-
Record Conditions of Approval List (Conditions of Approval tab for a record)
-
Inspection Conditions of Approval List (Conditions of Approval tab for an inspection)
-
Set Conditions of Approval List (Conditions of Approval tab for a record set)
-
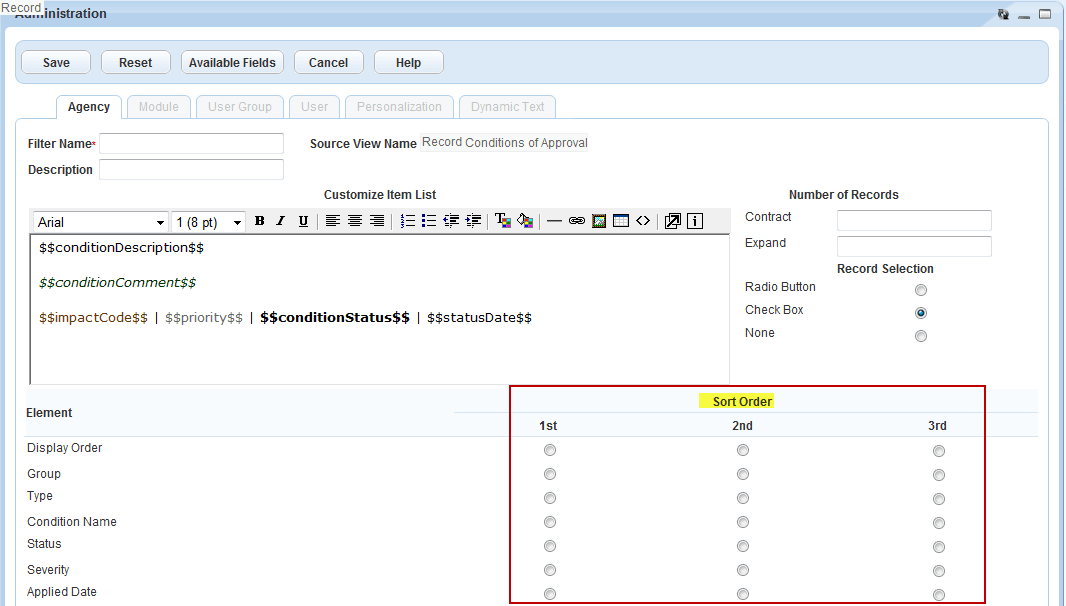
- Click New and assign the view as described in Designing Forms for Pages. For example, select the level you need, such as Agency, and then Click Submit.
Civic Platform displays a layout editor.

- Complete the following fields.
Filter Name Enter a descriptive name for the filter, so that you can identify it later if you need to locate it. After you save a form, the Filter Name displays in the Name column. Description Enter a descriptive name to help identify the purpose of the form. Source View Name The Source View Name is inactive; you cannot modify it. - Click the Available Fields button.
Civic Platform displays the Conditions of Approval fields.

- Double-click the field that you want to display for each condition of approval.
Civic Platform adds the field to the HTML editor as a predefined variable enclosed in the double dollar signs, for example, $$conditionDescription$$.
You can enter the predefined variables for the condition of approval fields into the HTLM editor, as needed. For a list of the condition of approval fields and the corresponding variables, see Table 3. For a description of the condition of approval fields, see the Civic Platform Online Help, and search for “Conditions Form Fields.”
- Use the HTML editor to format the fields, such as changing the font size and color.
- In the Sort Order area, choose the options (do not choose display order – see note below) you
want to appear as links in the Sort By area of the Conditions of Approval tab.
Note:Do not select the Display Order field, as Civic Platform does not allow you to sort conditions of approval by display order.
Civic Platform displays the fields as links on the Conditions of Approval tab.
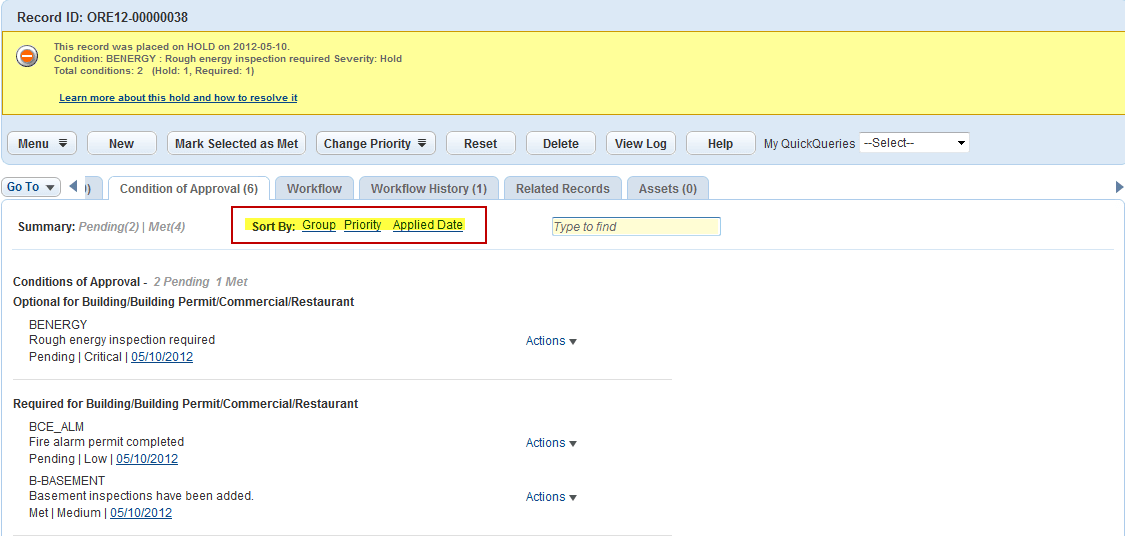
Table 3. Condition of Approval Variables Field Name Variable Action by Dept $$statusByUser.deptOfUser$$ Action by User $$statusByUser.fullName$$ Active Status $$auditStatus$$ Applied Date $$issuedDate$$ Applied by Dept $$issuedByUser.deptOfUser$$ Applied by User $$issuedByUser.fullName$$ Comment $$conditionComment$$ Condition Name $$conditionDescription$$ Condition Status Type $$conditionStatusType$$ Display Order $$displayOrder$$Note: Do not add the Display Order field or enter this variable into the HTML editor because the field is not visible on the Conditions of Approval tab. Effective Date $$effectDate$$ Expiration Date $$expireDate$$ Group $$conditionGroup$$ Long Comments $$longComment$$ Priority $$priority$$ Public Display Message $$publicDisplayMessage$$ Record ID $$capID$$ Resolution Action $$resolutionAction$$ Severity $$impactCode$$ Status $$conditionStatus$$ Status Date $$statusDate$$ Type $$conditionType$$