Selecting Map Features
Topics:
Selectable Map Layers
You can select GIS objects on map layers that are visible and selectable. The visible
and selectable map layer attributes are initially configured by the GIS
administrator on the GIS Administration site, and you (as a map user) can also
enable and disable these attributes on the Layers
 widget.
The following Layers widget shows that the user has permissions to the sample Petaluma_Demo map profile containing the Parcels and Buildings map layers, which are marked as visible and selectable.

Single Map Selection
Accela GIS shows GIS features and transactional information found on any location you click on the map. While you are navigating and analyzing an area of interest on the map, you can click on a map location to select it and to see what is at that location.
The following example shows a selected map location:
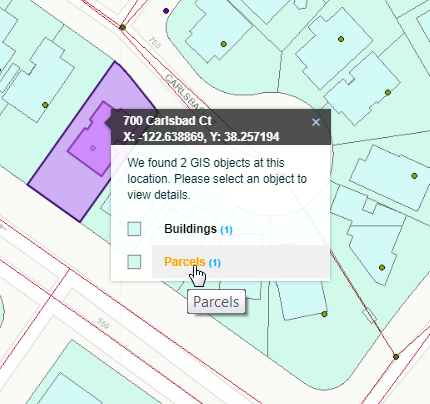
The context menu shows the location’s address, x and y coordinates, and all the GIS objects found on that map location. The context menu uses the GIS legend symbols used on the map, and indicates how many GIS objects for each type were found. In this example, the user is interested in seeing the parcel information, and clicked the found Parcels line item.
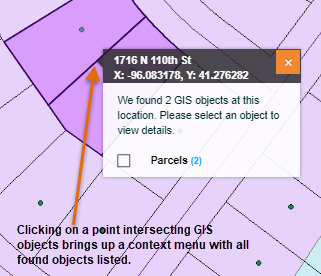
When you select a map layer (for example Parcels), the What’s Here menu shows the GIS object IDs found on that layer. If multiple GIS objects are found, for example, if you clicked on a point that intersects several parcels, the What’s Here menu lists all the intersecting parcel IDs, as shown below:
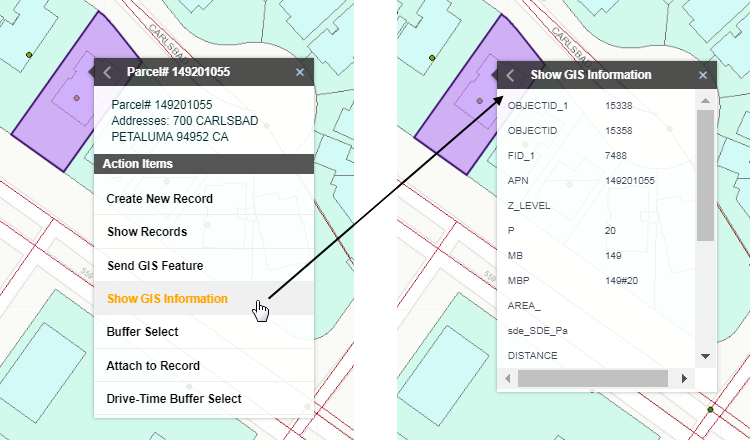
Select the object ID to see the actions that can be applied on that GIS object.
From the list of object IDs, you can select an The following example illustrates the Show GIS Information command from the Action Items menu, and the GIS information for the selected parcel:
Multiple Map Selections
Selecting Non-Contiguous Locations
Press and hold the Shift key while you click on multiple map locations. The following diagram shows three non-contiguous parcels that have been selected using the Shift key:
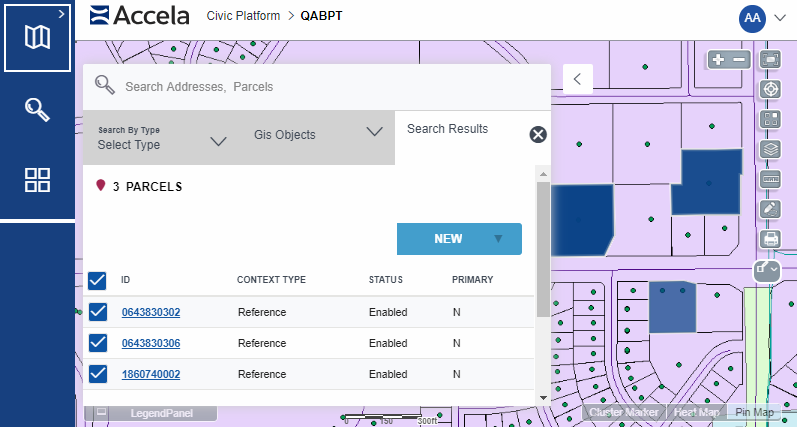
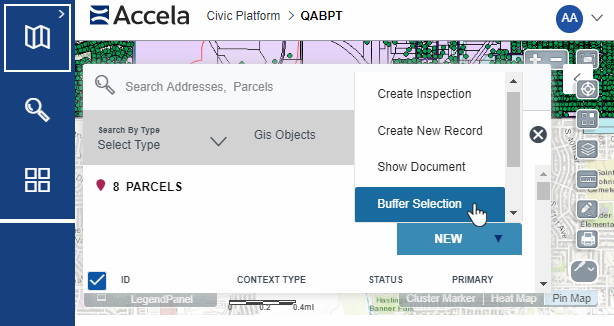
On the Search Results tab of the slide-out panel, scroll to the record type (Parcels, Assets, or Records), and hover the cursor on a line item to highlight the object on the map. Click the GIS Objects tab to see the list of GIS object ID(s) and apply an action on selected object ID(s).
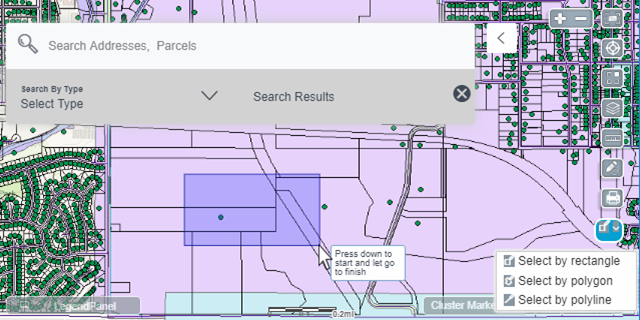
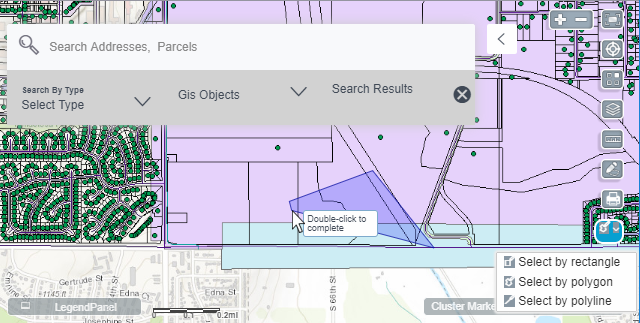
Using the Map Selection Tool
The map selection tool allows users to select GIS objects across map layers by rectangle, polygon, or polyline:
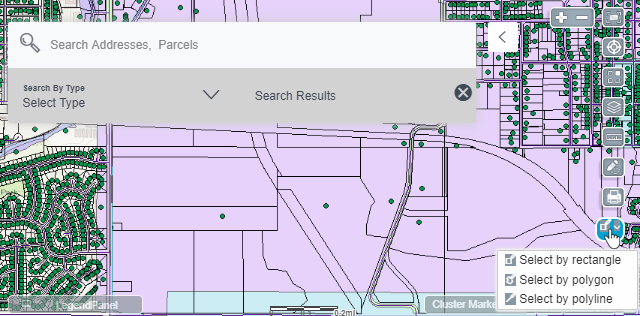
Using the map selection tool, users can select GIS objects on the visible and selectable map layers. The map selection tool provides the following options:
-
Select by rectangle - Selects GIS objects inside and intersecting the rectangle.
-
Select by polygon - Selects GIS objects inside and intersecting the polygon.
-
Select by polyline- Selects GIS objects intersecting the polyline.

Tips on using the map selection tool
- A highlighted selection tool (
 ),
indicates that the map view is in selection mode. To exit the selection mode,
click the selection tool to unhighlight it (
),
indicates that the map view is in selection mode. To exit the selection mode,
click the selection tool to unhighlight it ( ).
). -
If a user wants to choose another area to make a selection using the Select by rectangle tool, exit the selection mode, and pan the map to a different area.
-
A user can select up to 1000 GIS objects (from all layers). When the selection tool selects more than 1000 GIS objects, a message notifies the user to reduce the number of selected objects.
Distance Buffer Selection
Another way to select multiple locations on a map or query map features is to select a distance buffer. A distance buffer allows you to define an area around a selected point, line, or polygon feature so that all GIS objects located within the area are automatically selected. Distance buffer selection only applies to a single map layer.
For example, if you want to send a notification to the property owners that live within 300 feet of a certain parcel, click on that parcel and then define a distance buffer to automatically select all parcels within a 300 feet radius.
To select multiple GIS objects using a distance buffer
- Click a point on the map, and select a GIS object. Your selected location acts as the center point of your distance buffer.Note: You can also perform a distance buffer selection from the Actions menu on the Records panel when you are plotting parcels.
- On the Search Results tab, click .
OR
In the context menu, choose Buffer Select under the Action Items.

On the Buffer Select window, enter your distance buffer selection:
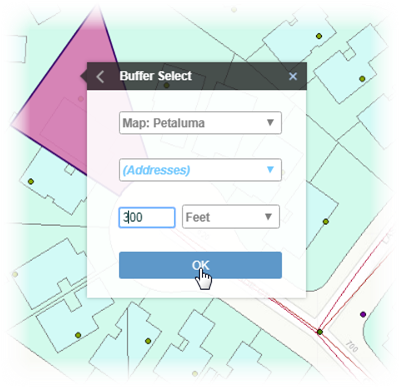
Map Service The default map service displays. If more than one map service is configured, you can choose another map service from the drop-down list. Map Layer The map layer containing the objects you want to include in the distance buffer. Distance The length around the point or map feature you clicked on. Enter the distance and unit of measure. The buffer selection result shows the records and GIS objects that match the buffer distance criteria. The following diagram shows the Search Results tab which lists parcels, assets, and records that match the buffer selection:
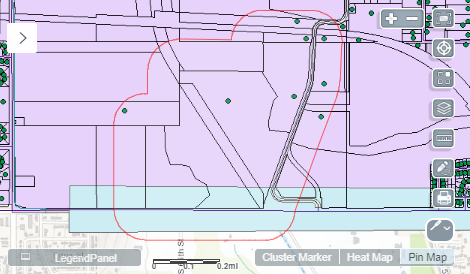
From the Search Results tab, you can select records or GIS objects, drill-down to get more details, or choose an action to perform.
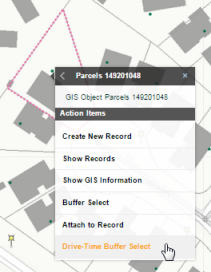
Drive-Time Buffer Selection
To select multiple GIS objects using a distance buffer
- Click a point on the map, and select either a found GIS object or the Use Location menu option. Your selected location acts as the starting point of your drive-time buffer.
-
On the next window, choose Drive-Time Buffer Select.
-
On the Drive-Time Buffer Select window, enter your drive-time buffer selection:
Map Service The default map service displays. If more than one map service is configured, you can choose another map service from the drop-down list. Map Layer The map layer containing the objects you want to include in the distance buffer. Minutes The number of driving minutes from the point or map feature you clicked on. The driving time is calculated by the map service based on speed limit and street network.