Working with List Portlets
A list portlet displays a list of items entered into Civic Platform. A list portlet may include work orders, assets, permit, applications, service requests, addresses, or contacts. A list may also be the result of a search. Civic Platform provides users with ways to manage lists, such as sorting, filtering, organizing, and exporting.
Topics
Viewing Lists
Portlet lists may have many items that populate the list view. Click any column title to sort the list. Use the portlet navigation controls to advance through the list to view additional or previous items. You can adjust the number of records displayed in a list by choosing Expand List or Contract List from the Menu button. To view examples of the icons and hyperlinks associated with contracting, expanding, navigating, and sorting lists, see the image below. Contact your agency administrator to redesign the layout of a list portlet.
Figure: List Portlet
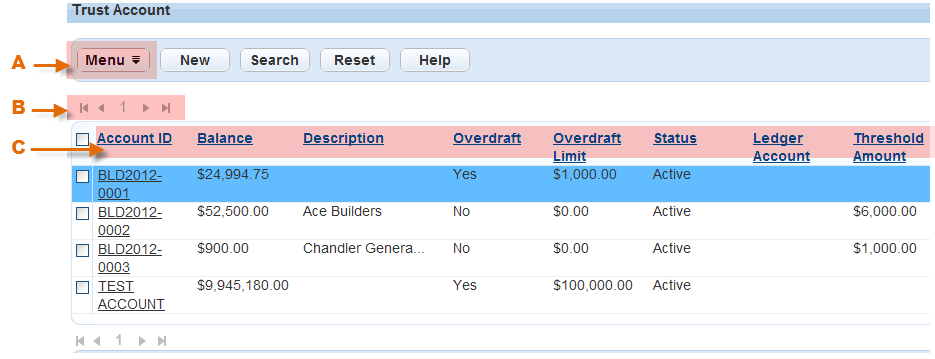
| A | Use the Menu button to access a menu of general tasks related to the records in the selected portlet. |
| B | Use the navigation controls to access other pages in a list. |
| C | Click any column title to sort a list. |
Managing the Display
Users can customize how information displays in a list. You can specify the field display, including the field sequence and the field width. Organize and sort lists by assigning a display or a sort order in numeric sequence.
Topics
Customizing Content
Use the Customize Content feature to define how you want a portlet list to display. First, choose the fields you want to display on the portlet and then customize the fields. You can do this by adding a label for the field, specifying the field width, and indicating the display order. You can also specify how many items to display for an expanded and a contracted list.
To customize the content of your list
Locate the list portlet that you want to customize.
Click the Menu button.
Choose Customize Content from the drop-down list.
Civic Platform displays a list of all available and currently chosen fields.
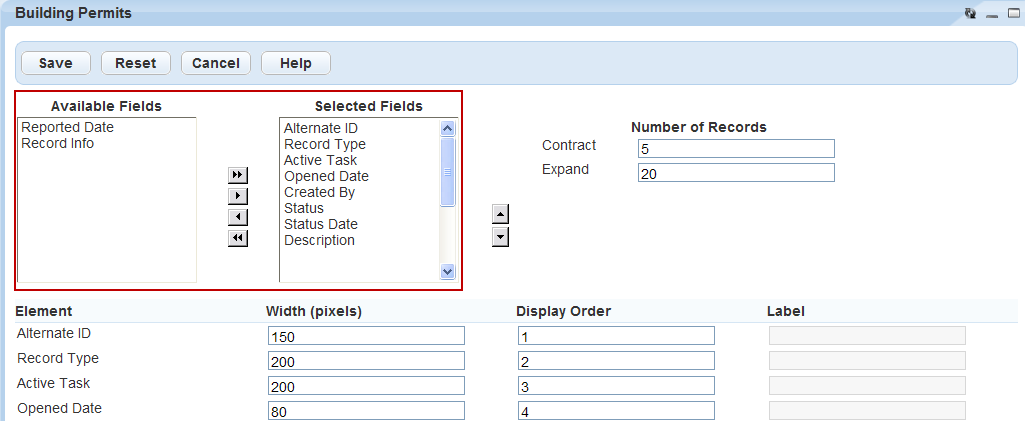
Show or hide fields for portlet display. Fields in the Selected Fields list box display in the portlet view. Fields in the Available Fields list box do not display in the portlet view.
Click a field name to highlight it. Press the CTRL key to choose multiple fields at a time.
Use the arrow keys to move the fields between the Available Fields or Selected Fields boxes. Double arrow keys move all fields, whether selected or not, to the destination box.
Arrange the sequence of the fields in the Selected Fields box.
Click a field name.
Use the up and down arrow buttons to move the field.
Complete the remaining fields as necessary.
Contract The number of items to display on a page when you contract the list. Display Order Where the field displays in the field order (from left to right). Element A list of fields in the Selected Fields box in their current order. Expand The number of items to display on a page you expand. Label Label for a field. Agencies can customize this value as needed. Width (pixels) The column width in pixels. Click Submit.
Editing Your View
The Edit View feature allows you to create a portlet list display to your specifications and name it as a filter. First, choose which fields you want to show. Then, apply the customization to those fields. You can add a label for the field, specify its width, apply a mask, define sort order, and define display order. You can also specify how many items to display for an expanded and a contracted list.
To edit the view of a portlet list
Navigate to the list portlet that you want to customize and hover the mouse cursor over the Menu button.
Civic Platform displays a command menu.
Choose Edit View from the drop-down list.
Civic Platform displays a list of available and currently selected fields.
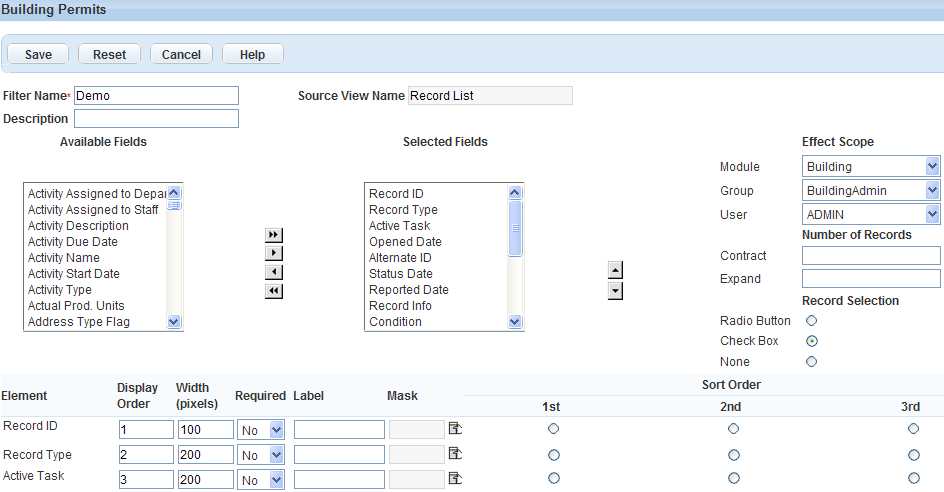
Show or hide fields to display in the selected portlet. Fields in the Selected Fields box display in the portlet view. Fields in the Available Fields box do not display in the portlet view.
Click a field name to highlight it. Press the CTRL key to choose multiple fields at a time.
Use the arrow keys to move the fields between the Available Fields or Selected Fields boxes. Double arrow keys move all fields, whether selected or not, to the destination box.
Arrange the sequence of the fields in the Selected Fields box.
Click a field name.
Click the up or down arrow to change its position.
Complete the remaining fields as necessary. For a list of field descriptions, see Edit View Field Descriptions.
Click Submit.
Table 1. Edit View Field Descriptions A > Z Ascending Use to sort field data alphabetically from A to Z. Contract The number of items to display on a page when you contract the list. Description The description for the filter you are creating. Effect Scope The availability of the customized sort/filter using the drop‑down feature for Module, Group, and User. Element Civic Platform lists the fields in the Selected Fields box in their current order. Expand The number of items to display on a page when you expand the list. Filter Name A descriptive name for the filter. Label A customized label for the field. Mask A mask to limit the type of data a field accepts. A mask might include symbols for currency, phone number, SSN, or zip code. Record Selection The type of record selection tool you want to choose for the list. Choices include Radio Button or Check Box. Sort Order Indicates the sort priority of an item. Defining sort order is useful for organizing as well as grouping list items. Source View Name The name of the form that you are modifying. Width (pixels) The number of pixels for the column width. Z > A Descending Use to sort field values alphabetically from Z to A.
Exporting Data to CSV
Civic Platform provides a CSV Export option in the menu of every list portlet or list tab. Use this option to export the list of records you see into a CSV (comma delimiter) file. A CSV file stores tabular data that you can view in other applications, such as Microsoft Excel.
Civic Platform also provides a CSV Export button beside an application-specific information (ASI) table, on the precondition that the ASI table has some data in the database. Users can click the button to export all the data stored in the database for the ASI table, not only the data on display, into a CSV file.
To export a list
Go to the desired list portlet.
Click the Menu button and choose CSV Export from the drop-down list.
If you want to export ASI table data, go to the ASI table you want to export and click CSV Export.
Civic Platform displays a file handling dialog box that prompts you to choose how you want to handle the CSV file you are creating.
Do one of the following:
To open the CSV file immediately after exporting the list, click Open.
You can save the file after opening it. Your operating system preferences determine which software application, such as a text editor or a spreadsheet program, opens this file by default.
To save the CSV file without opening it first, click Save. Specify the location where you want to save it.