Setting Up and Maintaining Supervisors
You can assign a user supervisory rights. After you assign a user supervisory rights, you can add users to the supervisor's team and create a master calendar. A master calendar allows supervisors to review team member assignments and manage workflow.
If you are a supervisor, you have the ability to view unassigned inspections and make inspection assignments.
Topics:
Assigning or Removing Supervisory Rights
To assign a user supervisory rights
Access the Calendar Administration portlet (Accessing the Calendar Administration Portlet).
Click the Supervisor Maintenance node from the navigation tree.
Civic Platform displays a list of supervisors.

Click Assign to make a user or group a supervisor.
Civic Platform displays the list of users and groups, per module.
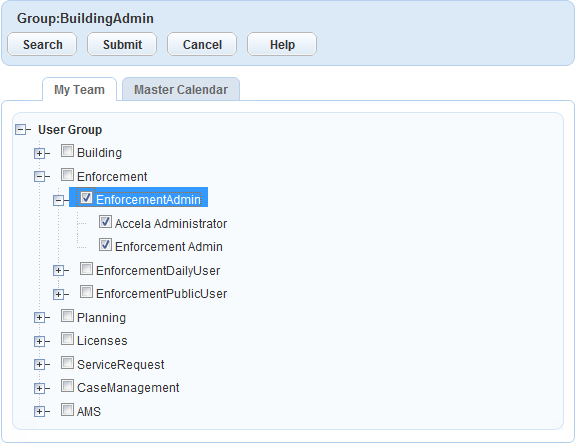
Select the user(s) and groups (s) you want to make supervisors.
Click Submit.
Remove a supervisor.
Select the user(s) and groups (s) you want to remove as supervisors.
Click Delete.
Click Submit.
Civic Platform adds the group(s) or user(s) to the list of supervisors.
Setting Up and Maintaining Supervisor Teams
To set up and maintain a supervisor team
Access the Calendar Administration portlet (Accessing the Calendar Administration Portlet).
Click the Supervisor Maintenance node from the navigation tree to list all supervisors or navigate the tree to select a specific user or a specific group supervisor.
Civic Platform displays all the defined supervisors or the specific supervisor selected.
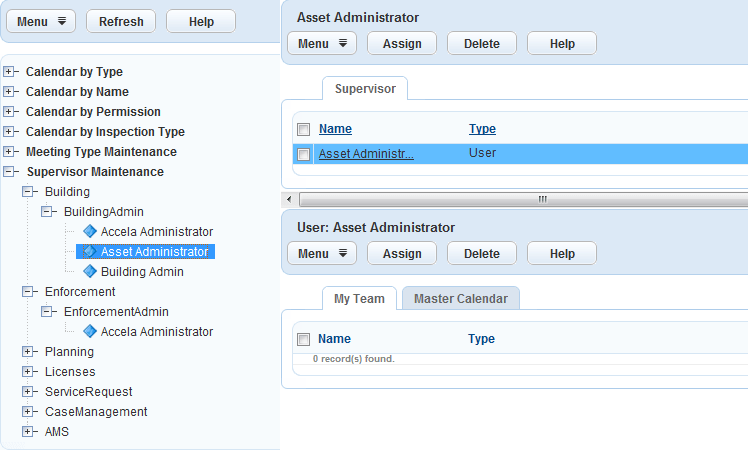
Select the supervisor for which you want to add or remove team members.
Click My Team tab.
Click Assign.
Civic Platform displays the list of users and groups, per module.
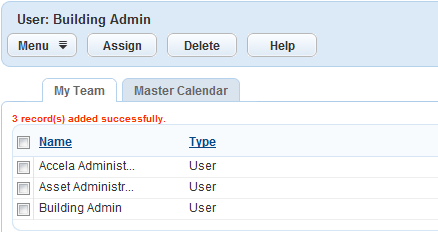
Select the user(s) and groups (s) to add to the supervisor team.
Click Submit.
Civic Platform adds the selected user(s) and group(s).
Remove a supervisor team member.
Select the user(s) and groups (s) you want to remove from the supervisor team.
Click Delete.
Civic Platform removes the selected user(s) and group(s).
Creating Master Calendars
You can create a master calendar that merges multiple calendars into a single calendar view. A master calendar makes it easier for supervisors to avoid conflicts when scheduling their team’s work assignments.
To create a master calendar
Access the Calendar Administration portlet (Accessing the Calendar Administration Portlet).
Click the Supervisor Maintenance node from the navigation tree to list all supervisors or navigate the tree to select a specific user or a specific group supervisor.
Civic Platform displays all the defined supervisors or the specific supervisor selected.
Select the supervisor for which you want to create a master calendar.
Click the Master Calendar tab.
Civic Platform displays currently assigned master calendars.

Add calendar(s) to your master calendar.
Click Look Up.
Civic Platform displays the calendar search form.

Complete the fields on the form (Table 1).
Table 1. Calendar Search Fields # Scheduling Attempts Enter the number of scheduling attempts defined for the calendar you want to find. # Units Allocated per Day Enter the number of units scheduled per day for the calendar you want to find. Calendar Name Enter the distinct name for the calendar you want to find. Status Select the status of the calendar you want to find from this drop-down list. You can select Active or Inactive. Type Select the type of calendar you want to find. You can select Meeting or Inspection. Click Submit.
Civic Platform displays calendars that match the search criteria.
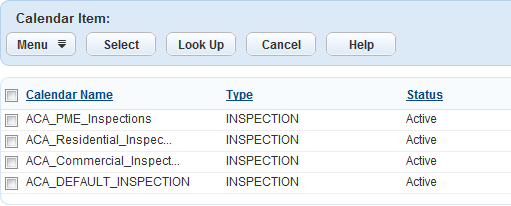
Select the calendar(s) you want to add to your master calendar.
Click Select.
Civic Platform adds the calendar to your master calendar.
Remove calendar(s) from you master calendar.
Select the calendar.
Click Delete.
Civic Platform removes the calendar from your master calendar.
Configuring Meeting Email Notifications
You can configure meeting email notifications so that meeting attendees receive a notice upon scheduling, changing, rescheduling, or cancelling a meeting.
To configure meeting email notifications
Access the Content Customize portlet (Navigating to the Setup).
Configure the four message types described below:
EMAIL_NOTICE_MEETING This is the subject line for the meeting notice email. Civic Platform sends this email when a user schedules a meeting. You can configure this email subject to include details provided by email subject and email body variables (Table 2 and Table 3).
EMAIL_NOTICE_MEETING_CHANGE This is the subject line for the meeting change notice email. Civic Platform sends this email when a user changes a scheduled meeting. You can configure this email subject to include details provided by email subject and email body variables (Table 2 and Table 3).
EMAIL_NOTICE_MEETING_RESCHEDULE This is the subject line for the meeting reschedule notice email. Civic Platform sends this email when a user changes a scheduled meeting. You can configure this email subject to include details provided by email subject and email body variables (Table 2 and Table 3).
EMAIL_NOTICE_MEETING_CANCELLATION This is the subject line for the meeting cancellation notice email. Civic Platform sends this email when a user changes a scheduled meeting. You can configure this email subject to include details provided by email subject and email body variables (Table 2 and Table 3).
| $AGENCY-DEPARTMENTS$ | The agency department responsible for the hearing, such as a planning commission or land use appeals board. |
| $ALTID$ | The alternate identification number for the application. |
| $NEW_HEARING_BODY$ | The new hearing body members assigned to a hearing. |
| $NEW_STATUS$ | The new hearing status. |
| $ORIG_HEARING_BODY$ | The original hearing body members assigned to a hearing. |
| $ORIG_STATUS$ | The original hearing status. |
| $PERMITID$ | The application identification number. |
| $AGENCY-DEPARTMENTS$ | The agency department responsible for the hearing, such as a Planning Commission. |
| $NEW_DURATION$ | The updated hearing duration. |
| $NEW_END_TIME$ | The updated hearing end time. |
| $NEW_HEARING_BODY$ | The updated hearing body. |
| $NEW_HEARING_DATE$ | The updated hearing date. |
| $NEW_LOCATION$ | The updated hearing location. |
| $NEW_MAX_ITEM$ | The updated hearing max item. The max item value is the number of applications reviewable at one hearing. |
| $NEW_NOTICE_ DATE$ | The updated hearing notice date. |
| $NEW_START_ TIME$ | The updated hearing start time. |
| $ORIG_DURATION$ | The original length of the scheduled hearing. |
| $ORIG_END_TIME$ | The original end time of the scheduled hearing. |
| $ORIG_HEARING_BODY$ | The original committee members/ individuals scheduled to attend the hearing. |
| $ORIG_HEARING_DATE$ | The original hearing date. |
| $ORIG_LOCATION$ | The original hearing location. |
| $ORIG_MAX_ITEMS$ | The original hearing max item. The max item value is the number of applications reviewable at one hearing. |
| $ORIG_NOTICE_ DATE$ | The original hearing notice date. |
| $ORIG_START_ TIME$ | The original hearing start time. |
| $RECIPIENT_ NAME$ | The primary applicant associated with the application scheduled for a hearing review. |
| $SENDER_FIRST_NAME$ | The email sender’s first name. |
| $SENDER_LAST_NAME$ | The email sender’s last name. |
| $SENDER_TITLE$ | The email sender’s official title. |