Configuring Agency-defined Fields for Workflows
Task-specific information (TSI) are the agency-defined fields that are unique to workflow tasks. Users complete these custom TSI fields when they update a workflow task.
Civic Platform workflows leverage TSI using the following organizational hierarchy:
Workflow tasks leverage TSI from TSI groups
TSI groups contain one or more TSI subgroups
TSI subgroups contain one or more TSI fields
Topics
Creating a Task-Specific Information Group
When you create a new Task-Specific Information group, you specify the group code and its name, as well as the first field that you want to include in the group. You can set up other information about the field, including the field type and a default value. You can set up additional fields, change the order of fields in the group, and change any values when you edit the task-specific group.
When you create a Task-Specific Information Group, you must also specify the category that the group belongs to. You can set up the first field so that it is searchable or required. You can also specify a default value and a fee indicator.
For example, you can require data entry in the field, but only after the user is ready to move to the next task. You can then set the Required Flag to No, the No Change to No, the Next Task to Yes, the Branch to Yes, and the Loop to Yes. When a daily user enters a status that moves an item to the next task, Civic Platform requires the user enter the Task-Specific Information before moving to the next task.
To add a task-specific information group
- Access the Classic Administration page (Accessing Classic Administration).
- Choose Workflow > Task-Specific Info.
Civic Platform displays the Task-Specific Information—Search page.
- Click Add.
Civic Platform displays the Task-Specific Info Group—Add window.
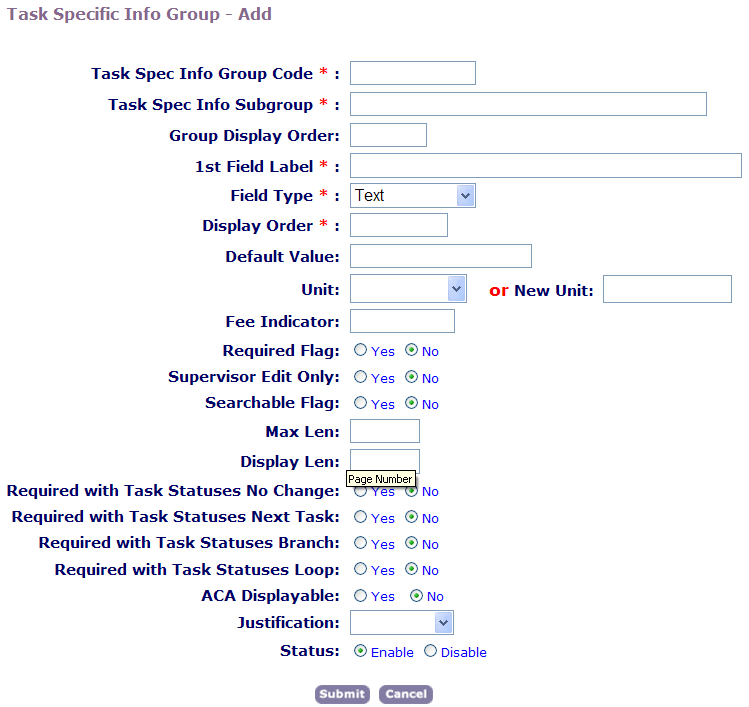
- Update the fields that display. For a description of the fields, see Table 1.
- Click Submit.
Table 1. Task-Specific Information Group Fields Task-Spec Info Group Code Enter a unique code to identify the category that the Application Specific Information group belongs to. Task-Spec Info Group Name Enter a name to identify the Specific Information group. There can be many groups in one category. This name only applies when there is more than one group in a category. Group Display Order Enter a number to determine the position of this information group on the Application Specific Information page in Daily Activities. For example, if you want this information group to appear second, enter 2. 1st Field Label Enter the label for the first field you want to add to your Application Specific Information group. For example, if you want to prompt users to specify a date, enter “Date.” Citizen Access Displayable If you want Citizen Access to display this information, choose Yes; otherwise, choose No. Citizen Access Searchable If you want users to be able to search for task-specific information, select Yes; otherwise, select No. Display Len Specify the maximum number of characters that Civic Platform displays. Display Order Enter a number to determine the position of the first field in your Application Specific Information group. For example, if you want the field to display before any other fields, enter 1. Default Value If you want to provide a default value for the first field in your Application Specific Information group, enter it here. If you are setting up a drop-down list, you can add values to the drop-down list so that a user has multiple values to choose from. For instructions, see Setting up Drop-down List Field Values.
Fee Indicator If you want to use the first field value in a fee calculation, enter the unique 5-digit indicator, that you use to identify this application specific variable in the fee formula. You must use a value between 10100 and 10599 and use the format: $fixxxxx$For example, enter $fi10101$ Field Type Choose the type of the first field in your Application Specific Information group. You can choose from Text, Date, Y/N, Number, Drop-down List, Text Area, Money, Time, and Check box field types. For more information on field types, see Adding a Field to a Task-Specific Information Group. Justification If you want the field label to be right or left aligned, select the drop-down list to select either Right Align or Left Align. Justification is useful when you are using a language other than English that requires justification. Max Len Specify the maximum number of characters that the field accepts. Required Flag If you want to require the Task-Specific Information on all status actions including a No Change, Next Task, Loop, and Branch, select Yes; if you want to make the Task-Specific Information collection optional, select No. Required with Task Statuses Branch If you set the Required Flag to No, but you want to make Task-Specific Information required when a user selects a status that leads to a task branch, select Yes; otherwise, select No. Required with Task Statuses Loop If set the Required Flag to No, but you want to make Task-Specific Information required when a user selects a status that leads to a task loop, select Yes; otherwise, select No. Required with Task Statuses Next Task If you set the Required Flag to No, but you want to make the Task-Specific Information required when a user selects a status that leads to the next task, select Yes; otherwise, select No. Required with Task Statuses No Change If you set the Required Flag to No, but you want to require Task-Specific Information when there is no change to the task status, select Yes; otherwise, select No. Supervisor Edit Only If you want only a supervisor to be able to edit the group options, select Yes; otherwise select No. Searchable Flag If you want to let users search for applications based on this field, click Yes; otherwise, click No. Status If you want to let users see this field in Civic Platform, select Enabled; otherwise, select Disabled. Unit If you want to attach a unit such as square feet, dollars, or miles to the first field value, enter it here. You can choose from standard choices, or enter a new unit.
Editing a Task-Specific Information Group
After you create a Task-Specific Information group, you might need to change it. You can update any fields that belong to the group by changing the field type or any other features about the field, including the display order. You cannot change the field label, but you can add new fields to the group, and delete fields that you no longer use.
To edit a task-specific information group
- Access the Classic Administration page (Accessing Classic Administration).
- Choose Workflow > Task-Specific Info.
Civic Platform displays the Task-Specific Information page.
- Complete these fields to search for the group that you want to edit:
Task-Specific Info Group Code Enter the group code associated with the Application Specific Information group you want to search for. Task-Specific Info Group Name Enter the name of the group you want to search for. There can be many groups in one category. This name only applies when there is more than one group in a category. - Click Submit.
To see a list of all groups, click Submit without entering details about an individual group.
- In the list of groups, click the red dot that appears next to the group that you want to edit.
- Update the fields that display. For a description of the fields, see Table 1.
- Click Update.
Adding a Field to a Task-Specific Information Group
You can add any number of fields to a Task-Specific Information group. You can choose from any of the eight basic types of agency-defined fields:
Number Field. Lets users enter only numeric characters in a number field. Number fields display the word number to the right of the field.
Text Field. Lets users enter only text characters in a text field. Text fields display the word text to the right of the field.
Text Area. Lets users enter multiple lines of text, such as a three line address.
Date Button. Lets users search for a date rather than entering a date manually.
Yes/No Radio Buttons. Lets users select one value by selecting Yes or No.
Drop-down List. Lets users choose a value from a list of predefined values determined by your agency.
Time. Lets users enter a time value.
Money. Lets users enter a dollar amount.
Check box. Lets users select a check box to select the option.
To add a field to a task-specific information group
- Access the Classic Administration page (Accessing Classic Administration).
- Choose Workflow > Task-Specific Info.
- Complete these fields to search for the group that you want:
Task-Specific Info Group Code Enter the unique code that identifies the category to which the Application Specific Information group belongs. Task-Specific Info Group Name Enter the name of the group for which you want to search. - Click Submit.
To see a list of all groups, click Submit without entering details about an individual group
Civic Platform displays the Task-Specific Info—Browse page.
- Click the red dot that appears next to the group to which you want to add a field.
Civic Platform displays the Task-Specific Information page.
- Click Add.
- Complete the fields that display. For a description of the fields, see Table 1.
- Click Submit.
Editing a Field in a Task-Specific Information Group
After you create a Task-Specific Information group, you might need to change it. You can add or delete fields; change the field type, display order, and the default value. You cannot however change the group code, group name, or the field labels when you edit the group.
To edit a task-specific information group
- Access the Classic Administration page (Accessing Classic Administration).
- Choose Workflow > Task-Specific Info.
- Complete these fields to search for the group that you want to edit:
Task-Specific Info Group Code Enter the unique code that identifies the category to which the Application Specific Information group belongs. Task-Specific Info Group Name Enter the name of the group for which you want to search. - Click Submit.
To see a list of all groups, click Submit without entering details about an individual group.
Civic Platform displays the Task-Specific Info—Browse window.
- Click the red dot that appears next to the group that you want.
- Complete the fields that display. For a description of the fields, see Table 1.
- Click Update.
Deleting a Field from a Task-Specific Information Group
If you no longer need a field in your Task-Specific Information group, or if you want to change the field label, you can delete the field.
To delete a field from a task-specific information group
- Access the Classic Administration page (Accessing Classic Administration).
- Choose Workflow > Task-Specific Info.
- Complete these fields to search for the group that you want.
Task-Specific Info Group Code Enter the unique code that identifies the category to which the Application Specific Information group belongs. Task-Specific Info Group Name Enter the name of the group for which you want to search. To see a list of all groups, Click Submit without entering details about an individual group.
- Click Submit.
- In the list of groups, click the red dot that appears next to the group from which you want to delete a field.
- Click Delete next to the field that you want to delete.
- Click OK.
Setting up Drop-down List Field Values
After you create a Task-Specific Information group, you can add fields to the group. If you add drop-down list fields, you must then set up the values that you want to include as options in the list. You can set up the values individually, or apply a shared drop-down list which has preconfigured values. For more information on how to apply a shared drop-down list, refer to Applying Shared Drop-down Lists.
Users can choose values when completing an application. For example, if you are adding a field to enter contact information, you can provide a drop-down list of contact types. Add, modify, or delete drop-down values to create the desired list.
To set up values for a drop-down list
- Access the Classic Administration page (Accessing Classic Administration).
- Choose Workflow > Task-Specific Info.
- Complete these fields to search for the group that you want.
Task-Specific Info Group Code Enter the unique code that identifies the category to which the Application Specific Information group belongs. Task-Specific Info Group Name Enter the name of the group for which you want to search. To see a list of all groups, click Submit without entering details about an individual group.
- Click Submit.
- In the list of groups, click the red dot that appears next to the group that you want.
- Click Edit next to the drop-down field that you want.
Civic Platform displays a page where you can add, edit, or delete drop-down list values.
- Do one of the following:
-
If you want to add a new value, click Add and enter the value in the Item Value field.
-
To update an existing value, replace the value text, and then Click Update.
-
If you want to delete a value, click Delete.
-
- Click Close to return to the list of fields in your group.
Applying Shared Drop-down Lists
After you create a task-specific information group and add a drop-down field to it, you must add values to populate the drop-down list. You can set up values individually or apply a drop-down list with pre-configured values, known as a shared drop-down list. This section provides instructions on how to apply shared drop-down list values to a drop-down list.
For information on how to create a shared drop-down list, refer to the Customizing Menus, Tabs, and Drop-down Lists.
To apply a shared drop-down list
- Locate the task-specific information group to which you want to apply a shared drop-down list. For instructions, see Editing a Task-Specific Information Group.
- Click the red dot next to the subgroup that contains the field for which you want to set
drop‑down list values.
Civic Platform displays the Task-Specific Info page.

- Click Edit next to the drop-down list you want.
Civic Platform displays the Task-Specific Info Drop-down List—Add page.
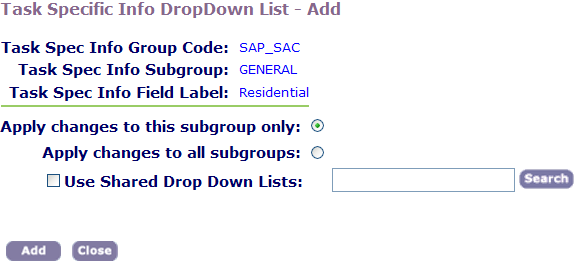
- Select the Use Shared Drop Down Lists option.
- Do one of the following:
-
Click Search to return all shared drop down lists.
-
Enter the first letter of the drop-down list or any other search criteria, then click Search.
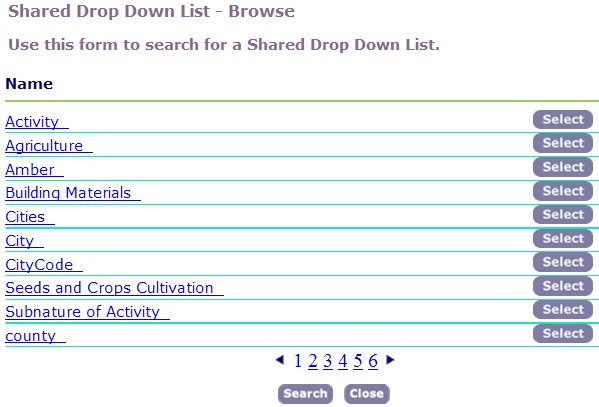
Civic Platform returns the Shared Drop Down List-Browse page.
-
- Click Select next to the drop-down list you want to apply.
Note:You can only select one shared drop-down list.
Civic Platform returns to the Task-Specific Info Drop-Down List-Add page with the Field Values from the shared drop down list in blue underlined text.
- Click Update.