Managing Export Jobs
This section describes how to create an export job, configure the data elements for export, and run the job. You can schedule the job to run at a specific date and time. You can also manually run the job.
Topics:
Planning Export Jobs
- Do not exceed 170 megabytes for the export file size.
- Keep the maximum number of records to be exported within 10,000.
- Create several smaller export jobs that contain different subsets of the entire desired export. For example, you can export configuration data in logical chunks such as exporting record types by module.
Creating an Export Job
Create an export job for extracting the data elements from a Civic Platform implementation.
To create an export job
Open the Data Manager panel. For instructions, see Navigating the Data Manager Panel.
Click the New Export Job button in the Export Jobs panel.
Civic Platform displays the Create New Export Jobs page.
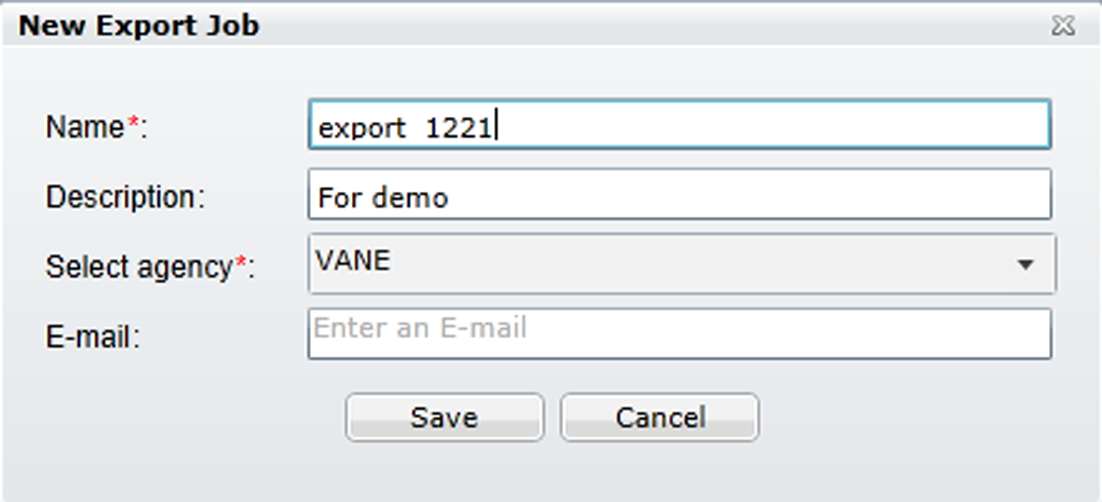
Complete the fields that display.
Description A description of the export job. E-mail Your email address. Name A name that identifies the export job. Select Agency The source agency used to create the export job. The default agency name that displays in this field is the current agency. If you have multiple agencies and you log in using the parent agency, then all the child agencies display in this drop-down list. Click the Save button.
Civic Platform displays the Export Job Summary page. See Figure 1.
Figure: Export Job Summary Page

Adding Data Elements to an Export Job
All the data elements available for export in each data element page display with check boxes. By default, the check boxes are not selected. If you select the check box for an data element, you add it into the export job.
To add data elements to an export job
Go to the Export Job Summary page. For instructions, see Creating an Export Job. To view the Export Job Summary page, see Figure 1.
Automation displays the exportable data element types in the left navigation panel.
For details on the configuration data that you can export for each data element type, see Exportable and Importable Data Element Information.
Click the type of data elements you want to add to the export job in the left navigation panel, for example, Record Types.
If you click the AA Configuration, Reference Data, or AAM Configuration link in the navigation panel, their sub types display under the link. You can then click a sub type and you can view the data elements in it.
When you select record types for inclusion in an import or export job, the related data from the record type is automatically selected in the relevant configuration sections of the tool. For example, if a record type is selected and saved, the same Fee in that record type is automatically selected in the Fee section of AA Configuration.
Note:If the selected type contains many data elements, Data Manager can take some time to load all the data.
Civic Platform loads the list of data elements for the type selected.

Do one of the following to filter long data elements list:
Enter text in the Find by field to display only the items that contain the text.
Select the All Selected option to display only the items that you have selected in the list.
For the Record Types data element page only, click the Set Filters button, and set filter criteria in the popup Record Type Filter page to filter the record types that display.
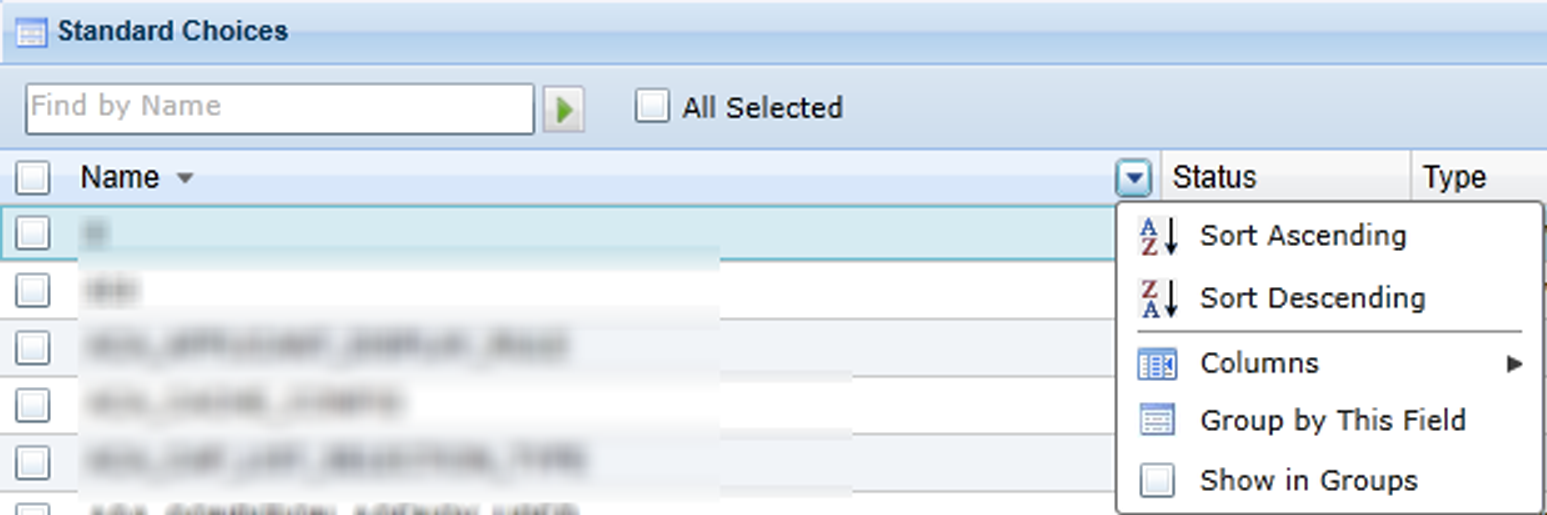
Click the column headings to activate the column filters. Use column filters to sort columns alphabetically, show and hide specific columns, and group the display based on column names.
Select the check boxes next to the data elements you want to export.
Each element entry and its associated element (for example, record type and its associated fee schedule) show in the list with check boxes. You can either click the check boxes individually to select/clear the data element one by one, or click the column name to select/clear all at one time.
You can select a data element entry but clear the associated elements in it to exclude the export of the associated elements.
If Civic Platform associates an element with multiple data element entries (a fee schedule associated with multiple record types, for example), you can add the element to the export job even though you only select one of its occurrences.
Click the Save button in the navigation panel to save your selection in the current data element type.
Repeat the previous steps for all the data element types you want to add to the export job.
Scheduling an Export Job
You can schedule an export job before, during, or after you configure the export job. The schedule sets the date and time to run the export job. If necessary, you can hold the schedule to prevent the export job from running.
To schedule an export job
There are two ways to schedule an export job.
Open the Data Manager panel, and select Schedule from the Actions list for the desired export job.

Go to the Export Job Summary page which contains the schedule section. For instructions, see Creating an Export Job.
Civic Platform shows the schedule section.
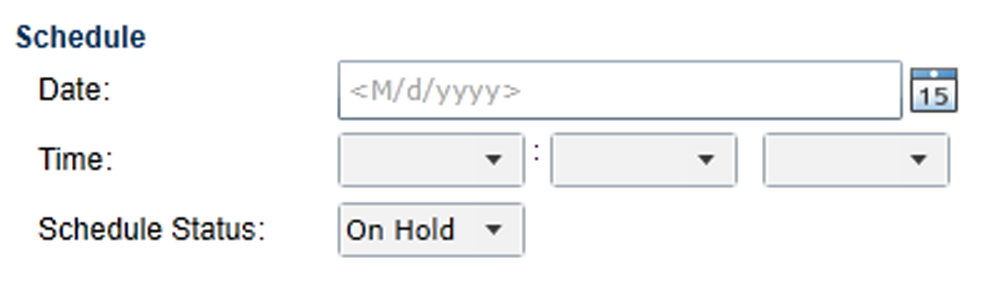
Complete the fields in the schedule section.
Date Enter the date or use the calendar icon to select the date to automatically run the export job. The default date that displays is the current date. This field only works when the Scheduled Status is Active.
Time Select the time when you want to run the export job. The default time that displays is the current agency’s time. This field only works when the Scheduled Status is Active.
Schedule Status Select the status as On Hold or Active. If the status is On Hold, you can only save the export job, but cannot run it, either on the scheduled time or manually. If the status is Active, the export job runs on the scheduled time. You can also run the job manually. Click the Save button in the navigation panel to save the schedule settings.
Working with the Export Jobs Actions Menu
Use the export jobs Actions menu in the list of existing export jobs (see Figure 1) to manage and run export jobs. You can use the Actions menu to start and stop an export job, schedule an export job, delete an export job, and download an export job to your local drive.
The status fields at each export job, including Schedule Status, Job Status, Start Date and End Time, show the job statuses from your previous actions.
You may have set the schedule status of an export job to be either Active or On Hold.
If the schedule status is Active, the job can run on the scheduled date and time. If the schedule status is On Hold, the job cannot automatically run.
The following job statuses are possible for an export job.
Completed. The job completed successfully as configured.
In Process Queue. You scheduled the job to execute at a later time.
Terminated. The job terminated without completing.
Running. The job is currently running.
Stopping. The job stopped and you can click Start to resume the job.
The start date and time are the schedule that you created for the job.
The commands available in the Actions menu for a job vary depending on the current statuses of the job. Table 1 describes the Actions menu commands of export jobs and explains how the schedule status and job status of each export job affect the availability of menu commands.
| Command | Schedule Status | Job Status | Command Effect |
|---|---|---|---|
| Delete | Active | Complete In Process Queue Terminated |
The Delete button is active and you can delete the export job from the database |
| Delete | Active | Running Stopping |
The Delete button is inactive. |
| Delete | On Hold | Any | The Delete button is active and you can delete the export job from the database. |
| Save As | Active | Complete In Process Queue |
The Save As button is active and you can download an export job to your local drive. |
| Save As | Active | Running Stopping Terminated |
The Save As button is inactive. |
| Save As | On Hold | Any status besides Complete | The Save As button is inactive. |
| Schedule | Active | Complete Terminated In Process Queue |
The Schedule button is active and you can schedule the date and time when you want the export job to run. |
| Schedule | Active | Running Stopping |
The Schedule button is inactive. |
| Schedule | On Hold | Any | The Schedule button is active and you can schedule the date and time when you want the export job to run. |
| Start | Active | Complete Terminated In Process Queue |
The Start button is active and you can manually run the export job (see Note below). |
| Start | Active | Running Stopping |
The Start button is inactive. |
| Start | On Hold | Any | The Start button is active and you can manually run the export job (see Note below). |
| Stop | Active | Complete In Process Queue StoppingTerminated |
The Stop button is inactive. |
| Stop | Active | Running | The Stop button is active. If you click the Stop button while the job is running, Data Manager terminates the job and updates the job status to Terminated. |
| Stop | On Hold | Any | The Stop button is inactive. |
Note:
Data Manager allows you to manually start a job even if the job schedule is undefined or the schedule status is On Hold. If you schedule a job to execute at a later time and then decide to start the job immediately, the started job cancels the scheduled job. |
Downloading Export Jobs
After you run an export job, you must download the export job data to your local workstation for importing.
Data Manager saves export jobs in zipped XML file format. This file format is compatible with Microsoft SQL Server and Oracle databases. You can open and edit the XML file. However, make sure not to disrupt the file structure.
Note:
To ensure the performance and success of the export jobs and import jobs, do not exceed 170 megabytes for the export file size. If the export file size exceeds 170 megabytes, create several smaller export jobs that address different subsets of the entire desired export. |
To download an export job
Open the Data Manager panel. For instructions, see Navigating the Data Manager Panel.
Expand the Export Job panel.
Civic Platform displays a list of existing export jobs.
Find the desired export job in the list.
Click the Actions Menu button. For more information on the available commands, see Working with the Export Jobs Actions Menu.
Civic Platform displays the Export Job Actions Menu Commands.
Click the Save As button.
Civic Platform displays a Windows Explorer Save As dialog box.
Identify the file system location where you want to save the export job data packet.
Click the Save button.
Civic Platform saves the export job data packet to the specified file system location.