Working with Workflows and Workflow Tasks
Select from the list of processes below to see how you can work with workflows, workflow tasks, and the My Tasks portlet.
Topics
Assigning and Reassigning Workflow Tasks
Workflow tasks can be assigned and reassigned from the My Tasks portlet.
To assign or reassign workflow tasks
Navigate to the My Tasks portlet.
Select the Workflow Tasks tab.
Locate the workflow task(s) you want to assign. Use search if needed.
Select the workflow task(s) you want to assign/reassign.
Click Assign.
Civic Platform displays the Assign Task form.

Populate the fields as described below.
Department Choose the department you want to assign the task to. Click the Current Department link to choose your department. Workflow Calendar Choose a workflow calendar. Staff Choose the individual you want to assign the workflow task to. Available options are dependent on your Department selection. Click the Current User link to choose yourself. Due Date Use the picker to select the due date for the task. Click Submit.
Civic Platform updates the selected workflow tasks.
To claim a task for yourself
Navigate to the My Tasks portlet.
Select the Workflow Tasks tab.
Locate and select the workflow task(s) you want to claim.
Click Claim.
Civic Platform assigns the indicated assignment changes to your queue.
To release a task from your queue
Navigate to the My Tasks portlet.
Select the Workflow Tasks tab.
Locate and select the workflow task(s) you want to release.
Click Release.
Civic Platform removes the task from your queue into the unassigned queue.
Updating a Task
If a task is assigned to you, you can edit ongoing task details such as status, responsible department, and staff members, and you can add information or instructions as needed.
To update a task
Locate the workflow you want to update, either from the Workflow Tasks tab on the My Tasks portlet or from the applicable record portlet.
See Accessing and Viewing Tasks for instructions.

With the Workflow tab displayed, identify the task to be updated in the task hierarchy on the left side of the display. If necessary, click the plus (+) sign to expand folders and reveal additional tasks.
Active tasks display in red. Completed tasks display in black.
Click the link for the workflow task in red.
Civic Platform displays the workflow task details and if applicable, task specific information.
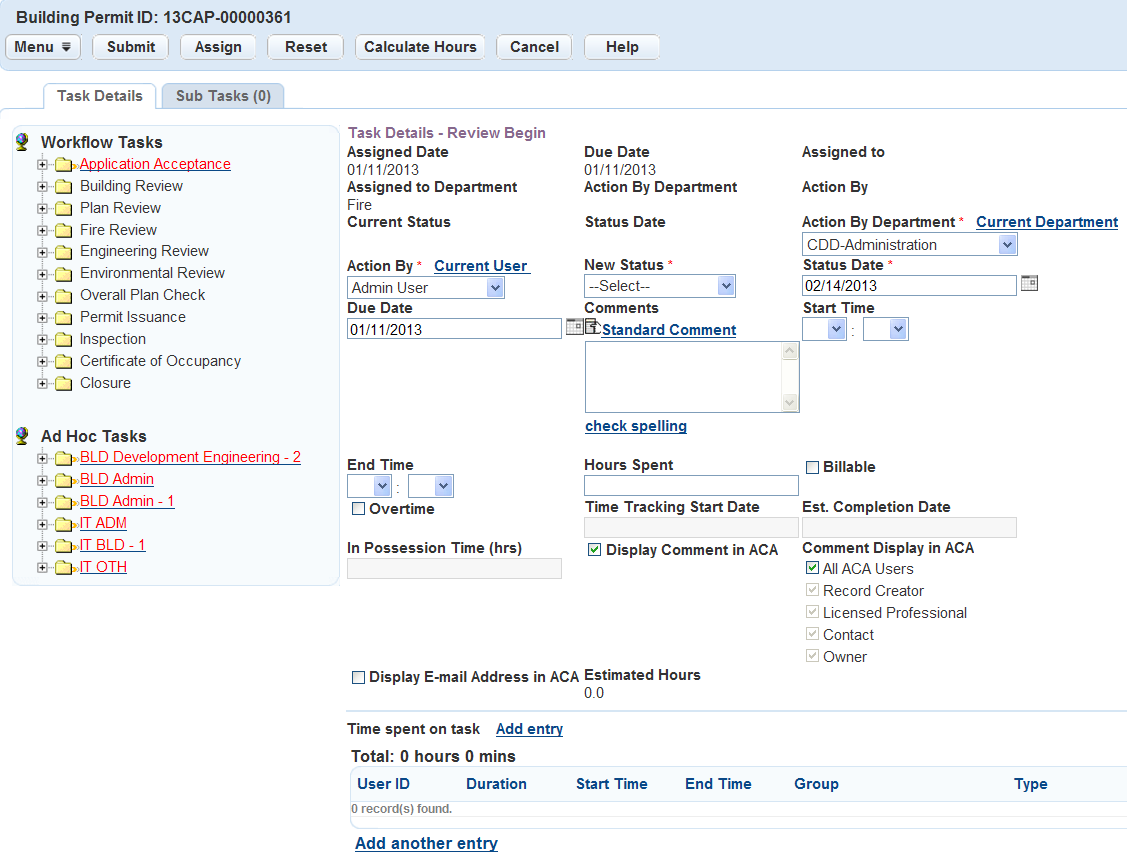
Modify the task details as needed. For descriptions of the fields, see Task Field Definitions.
Click Submit.
Deleting and Reassigning a Workflow
Your system may be configured to enable some users to delete the current workflow from an existing record and replace it with another workflow using the Delete & Assign Workflow command.
To delete and reassign a workflow
From the desired portlet, locate and open the record with the workflow you want to replace.
See Performing a Portlet Search for instructions on locating a record.
In the record details, click the Workflow tab.
Civic Platform displays the current workflow task list for the record.
Hover your mouse on the Menu button and then select Delete & Assign Workflow from the drop-down list.
The Delete & Assign Workflow form displays.

If you want to keep a read-only version of the old workflow history when you replace the workflow, choose Yes in the Delete Workflow History field. Otherwise, choose No.
Note:You may be required to enter a comment explaining the reason for the deletion/reassignment before it can take place.
If you choose No, you can always delete individual workflow history items as needed later. See Deleting a Workflow History for more information.
Choose a new workflow from the New Workflow drop-down list and click Submit.
Reviewing Workflow History
Workflow history provides a record of workflow task update actions. It shows the past statuses of each task in the workflow history as well as the user who updated the status and when it was updated. For example, it may show that an inspection, building review, or service request was rejected on a certain date and is now pending.
To review workflow history
Use Search to locate the record you want to work with.
Click the link for the record you want to work with in the Record ID column.
Civic Platform displays the record details.
Navigate to the Workflow History tab.
Civic Platform displays the workflow history. Active tasks are listed first.

Click the link to the task you want to review.
Civic Platform displays the details of the task.
Note:Depending on your agency's settings, the task details may be read-only.
Deleting a Workflow History
You can delete workflow history by locating the specific record and then using the Workflow History tab.
To delete a workflow
Navigate to the Building portlet and use Search to locate the record you want to work with.
Click the link for the record you want to work with in the Record ID column.
Civic Platform displays the record details.
Click the Workflow tab.
Civic Platform displays a workflow hierarchy of the processes and tasks prescribed for the record.
Select each task you want to delete.
Click Delete.
Note:You may be required to enter a comment explaining the reason for the deletion before it can take place.
The task items you selected are removed from the list of Workflow History for that record.
Working with Ad Hoc Tasks
Ad hoc tasks are useful when you need to keep a record of unplanned or immediate tasks that affect the record. For example, you may need to schedule a review meeting to discuss unexpected changes. Ad hoc tasks do not interrupt the standard workflow for a record, nor do they change the workflow templates that your agency administrator has established.
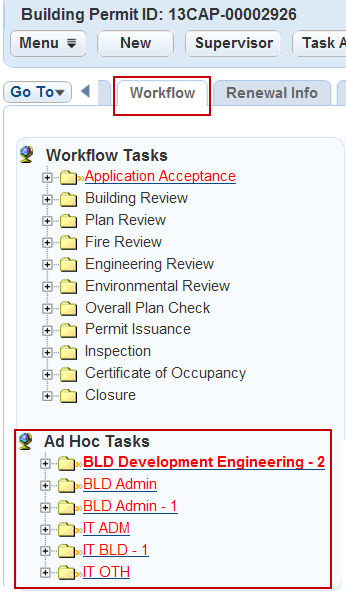
Ad hoc tasks display separately in the Workflow portlet as shown below.
Creating an Ad Hoc Task
Your agency administrator has already defined the types of ad hoc tasks that you can choose from. If you do not see the type of ad hoc task that you need, talk with your agency administrator about setting it up. After you create the ad hoc task, you can assign it to a department or individual.
Note:
When an ad hoc task is added to a record workflow, this action (along with any comments entered) is logged in the Workflow History and Workflow History Audit Logs. |
To create an ad hoc task
Use search to locate the record you want to work with.
Click the link for the record you want to work with in the Record ID column.
Civic Platform displays the record details.
Click the Workflow tab.
Civic Platform displays the workflow hierarchy.
Click New.
Civic Platform displays a blank form.
Complete the form with available data.
For a description of the fields, see Ad Hoc Task Fields.
Click Submit.
Activating Tasks
If your administrator activates this feature, you can activate or deactivate tasks, as well as change optional tasks to required tasks.
To activate tasks
Navigate to the Building portlet and use Search to locate the record you want to work with.
Click the link for the record you want to work with in the Record ID column.
Civic Platform displays the record details.
Click the Workflow tab.
Civic Platform displays a workflow hierarchy of the processes and tasks prescribed for the record.

Click the Task Activation.
Civic Platform displays the Task Activation portlet.

From the Workflow Tasks tree on the left, select the task you want to work with.
Select Active and/or Required as needed for the parallel tasks you want to activate/set to required.
To set all parallel tasks to active and/or required, select Active and/or Required in the Parallel Tasks header.
Click Submit.
Civic Platform changes the status the tasks as you indicated.
Overriding a Workflow Process
Users with sufficient access (for example, supervisors) can alter the current status of tasks in a workflow process. They can return completed tasks to previous levels, or complete tasks that are not yet active.
Note:
This function should be used with extreme caution. If done incorrectly, the normal workflow could be disrupted. Contact Civic Platform Implementation staff for further information. |
To override a workflow process
Use search to locate the record you want to work with.
Click the link for the record you want to work with in the Record ID column.
Civic Platform displays the record details.
Click the Workflow tab.
Civic Platform displays a workflow hierarchy of the processes and tasks prescribed for the record.
Click Supervisor. The button is available only if you have supervisory privileges.
Civic Platform displays the Workflow - Task Supervisor list portlet.
Select the workflow task from the list.
Civic Platform displays the details for the chosen task in the detail form portlet.
Modify the task details as needed (see Task Field Definitions and Ad Hoc Task Fields for field definitions).
Click Submit.
Attaching a File to a Workflow
You can attach files to a workflow by uploading them from your computer to Civic Platform. You may also link to an existing attachment that has already been uploaded and attached to another asset or work order
See Attaching Files for more information.
Querying an ASI Group Field
You can create a query that filters Application‑Specific Information (ASI) group fields in the My Tasks portlet. QuickQueries are generally simple to create, but you must refine your filter parameters when querying the ASI group field. Otherwise, the list of returned records is too long and can affect system performance. See 1-understandingQuickqueries.html#id7b225ea6-c25f-4411-a278-59eabca45a46 for more information about QuickQueries.
Before you create an ASI group QuickQuery, talk to your agency administrator to get the correct ASI group and subgroup information for the task set you want to view.
To query the ASI group field
Navigate to the My Tasks portlet.
Civic Platform displays a list of assigned tasks.
Hover on Menu to display a command menu, then choose My QuickQueries from the drop-down list.
Civic Platform displays a list of QuickQueries associated with the list in primary portlet
Click New.
Civic Platform displays the Create QuickQueries form.

Complete one or more of these fields:
Name Identifies the QuickQuery. Description A description that defines the purpose of the QuickQuery. Primary Defines whether a QuickQuery is the primary query for the list portlet. A primary QuickQuery is applied to the list portlet automatically each time you navigate to it. Only one QuickQuery can be primary at any given time. If one QuickQuery is designated as the primary, all other queries automatically reset to “No” for this field. In the Search By section, select Application Specific Info either from the drop-down list or by clicking the Data Picker button to the right.
Civic Platform displays a ASI Group Code information list.
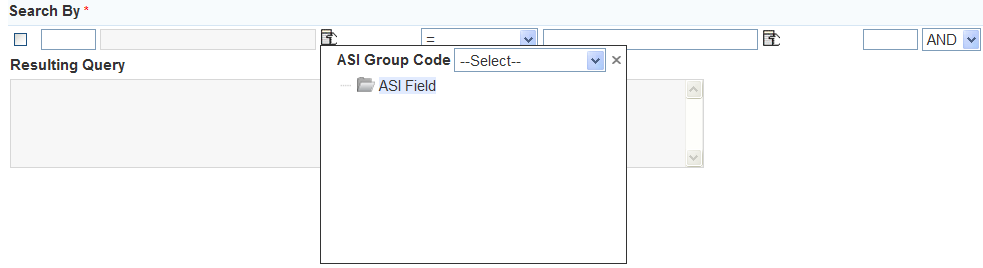
Select the ASI Group you want to use in your query.
Civic Platform displays the subgroups contained in the ASI group and the fields included in each subgroup.

Select a field from one of the subgroups. You can select only one field at a time.
Civic Platform adds the field to the query, along with additional fields.
Enter the desired value for the ASI field. The value must match a value in your agency’s database.
Use the Variable picker button to the right of the field to select a variable or enter the desired value into the field manually.
If you are querying a check box, the valid values are CHECKED and blank (no value).
If you are querying a radio button, the valid values are Yes and No.

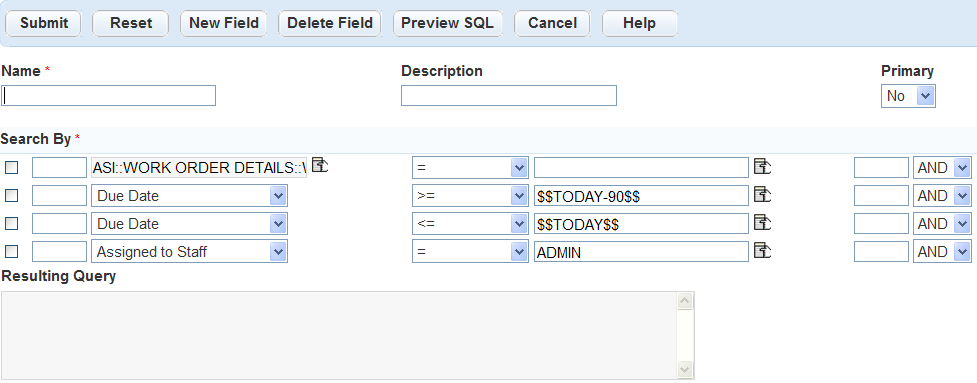
When you query an ASI field, it is a good idea to refine your search further. For example, you can query ASI fields for tasks within a due date range, for tasks assigned to a designated staff member, or for both.
Complete the following query parameter fields:
Due Date, >= The beginning date of the date range you want to view. Due Date, <= The end date of the date range you want to view. Assigned to Staff, = Enter a valid user ID. To add further fields to your query, see 1-understandingQuickqueries.html#id7b225ea6-c25f-4411-a278-59eabca45a46.
Click Submit.
Civic Platform informs you if you created the query successfully and updates the query list.
Managing Inspections in My Tasks
You can view and manage inspections from the Inspections tab in the My Tasks portlet. Supervisors can view all inspections assigned to the department, or filter the inspections to view those assigned to a certain user. Non-supervisor users can view inspections assigned to themselves. The information displayed and the options available in this tab are the same as those displayed in the Inspections portlet, such as scheduling and rescheduling inspections. For more information about managing inspections, see Inspections.
The benefit of the Inspections tab in the My Tasks portlet is that you can filter all the workflow tasks and inspections separately or at the same time. This could help you narrow the search for all workflow tasks and inspections you want to reassign. For example, if John Q Smith has inspections due today but called in sick, you can filter the inspections by choosing his name in the Assigned to Staff drop-down list, choosing the Assigned option in the Assigned Status drop-down list, and selecting the current day. Civic Platform filters the inspections and workflow tasks to display only those assigned to John Q Smith.
This option is set by your agency. If you do not see the Inspections tab in the My Tasks portlet, contact your agency administrator.
Managing Document Review in My Tasks
You can access documents assigned to you to review from the Document Review Tasks tab on the My Tasks portlet. Use the My Tasks Searching tools to find a particular document or use the columnar sort capabilities to organize the documents in your queue to your liking. An Action menu is available for each document that enables you to interact with the documents from the My Tasks portlet. For information about document review, see Electronic Document Review. For additional information about working with attachments, see Attachments.