Managing Users
Topics
Adding a User
Note: If a specific user is an inspector and you choose to automatically assign and schedule
inspections, identify the inspector profile. For instructions,
see Inspections.
|
- Access Classic Administration (Accessing Classic Administration).
- Choose .
- Click Add New User.
- Complete the fields as described in Table 1.
- In the User Group/Privilege section, mark the check box next to each module for the user to access.
- For each module marked, choose the user group (only one) to assign to the user.
- Click Save.
| Access Mode | Mark either the Standard or Alternate
option. In Standard access mode, pop-up windows sometimes display. In Alternate access mode, Civic Platform displays information in a new window instead of in pop-up windows. This accommodates users who depend on accessibility devices to interpret the content of web pages, because these devices typically cannot interpret the JavaScript used with pop-up windows. |
| Account Disable Time Frame | Enter the number of days a user account can
remain inactive before it becomes disabled. Enter this value as a
non-negative integer. When the number of days since the
Last Login Date is greater than the value
in this field, the account becomes disabled. Mark the
Enable option for the Status
field to manually reactivate an account. If this field is blank, Civic Platform uses the agency account disable time frame. If both the user and agency Account Disable Time Frame fields are blank, Civic Platform uses the default value of 90 days. |
| Billing Rate | Enter the billing rate per hour for the user. |
| Cashier ID | Enter the cashier identification number for the user. Civic Platform uses this number in the receipt number to identify the cashier and workstation. The ID number must be no more than 10 characters. |
| Confirm Password | This field displays on the User Profile Edit page. Civic Platform uses this field together with the New Password field to change a user password. Enter the same password typed in the New Password field. |
| Daily Inspection Units | Enter the units the user is available for inspections each day. Typically, a unit is one hour. |
| Department | Use this button to choose the department that
this user belongs to. You must choose all six levels or
organization. For the user account of a contract inspector or a self-certified inspector, this field is ready-only and Civic Platform sets the department to <agency>/<agency>/<agency>/PUBLIC/NA/NA/NA. |
| Display Initials in Citizen Access | Civic Platform uses this field to indicate the display of the user’s initials in Citizen Access. Mark the check box to display the user’s initials or clear the check box to display the user’s name in Citizen Access. |
| Distinguished Name | Enter the LDAP identifier (if user was previously authorized). Agencies often use LDAP as user's repository. |
| Enter the user's email address. Public users in Citizen Access can have permissions to view the email address provided in this field to notify the agency user of the completion of an action item or an inspection. | |
| Employee ID | Enter the ID, abbreviation, or code the agency uses to represent this user. |
| Initial | Enter the user initials to display in Civic Platform. Initials display as an indication of who re-scheduled an inspection or completed a task in workflow. Clear this field to not display user initials. |
| Initial (Default) | This is a read-only field displaying the default user initials based on the user’s first, middle, and last name. |
| Inspector Status | Enable this option to identify users as inspectors; otherwise, Disable this option. For the user account of a contract inspector or a self-certified inspector, Civic Platform marks the Enable option by default. |
| Integrated | This field displays only if integrating an Active Directory user into Civic Platform. Mark Yes to add an integrated user. Otherwise, mark No. |
| IVR User Number | An interactive voice response user number automatically generates in this field. |
| IVR Pin Number | Enter the user's IVR pin number. |
| Last Login Date | This read-only field automatically populates
with the most recent date the user logged into their
account. When an agency administrator manually changes the Status from Disabled to Enabled, this field resets. |
| Mobile Phone | Enter the user’s mobile phone number. |
| New Password | This field displays on the User Profile Edit
page. Civic Platform uses it together with the Confirm Password
field to change a user's password. The password strength indicator displays a visual representation of the password security strength against the agency's minimum password requirements. If having trouble entering a valid password, click the Requirements link to view the agency's minimum password requirements. |
| Password | Enter any combination of alphanumeric
characters for the new user to use to log into Civic Platform. As a
security measure, Civic Platform displays an asterisk instead of the
actual characters. The password strength indicator displays a visual representation of the password security strength against the agency's minimum password requirements. If having trouble entering a valid password, click the Requirements link to view the agency's minimum password requirements. Do not use special characters (@ * ! % $ #) in a password. |
| Password Change | Use these options to determine who sets the
user's password when it expires. This field defaults to agency
settings. Select the By User option to allow users to change their own password when their previous password expires. Select the By Administrator option to require the administrator to change passwords. |
| Password Time-out Time Frame | Enter the number of days a user password can remain valid before Civic Platform requires a password change. Integer must be positive (not negative). |
| Preferred Channel | Select the contact information to show as the preferred method of contact on Accela's Contractor app. Choices include Email, Mobile Phone, Office Phone (uses Agency level phone number), and None (default). |
| Section 508 Support | To enable the Accessibility mode for the user, mark the check box. Otherwise, clear the check box. For more information about configuration and usage instructions for the Accessibility features in Civic Platform and Citizen Access, see the Accessibility Configuration and Compliance Guide. |
| Status | Enable the user to access Civic Platform, or Disable the user's access. |
| Title | Enter the user's job title. Example: Building Inspector or Supervisor. |
| User cannot log in to Civic Platform and does not consume a Civic Platform license | When selected, the user cannot log in to
Civic Platform with this account, and does not need a Civic
Platform license. However, the user can log in to Accela
apps with this account but he must obtain an Mobile Office
license for app access. For user accounts of public users,
Civic Platform selects the check box by default. When cleared, the user must obtain a Civic Platform license and can log in to Civic Platform with this account. If the user wants to log in to Accela apps with this account, the user must also obtain an Mobile Office license. |
| User Group Permission | Use this section to define user access
permissions, and to assign the user to the to the appropriate user
groups. Select each module and user group to grant access. |
| User Login ID | Enter a unique combination of alphanumeric
characters that the new user wants to use to log in to Civic
Platform. Do not use special characters (@ ! # $ % *) in a login ID. However, the underscore symbol is available for use. Do not start a User ID with numbers. These are reserved for IVR User IDs. |
| User must change Password at next Logon | Use these settings to control when the user
should change their password. Select Yes to force the user to change their password at next login. Select No to allow the user to change the password when they reach the designated password Time-out Time Frame. |
| User Name | Enter the first, middle, or last name of the user. |
Viewing a User
Search for any user on the system, including ones previously disabled and Active Directory users (for integrating users).- Access Classic Administration (Accessing Classic Administration).
- Choose .
- To display all users, click Browse All Users.
- To search for a user, complete the applicable fields:
User Login ID Enter the user login identification. User Name Enter as much of the user name as known. Status Select the status types to search for. Exclude Public Users Choose Yes to display only agency users. Choose No to display agency and public users. Click Submit.
Civic Platform displays the User Browse window. Active Directory users see a "Yes" in the Integrated column when this feature is activated.- Click the red dot next to the user to view.
Editing a User
If using Active Directory, administrators can also either convert external users to Civic Platform users, or convert Civic Platform users to external users.
Instead of deleting a user from Civic Platform, disable a user that should no longer have access to Civic Platform.
- Access Classic Administration (Accessing Classic Administration).
- Choose .
- Search for the user to modify. For instructions, see Viewing a User.
- If using Active Directory, choose either Civic Platform user or External User, according to the agency's needs.
- Update the Table 1.
- In the User Group/Privilege section, select each module for the user to access.
- For each module selected, select the user group (only one) for the user.
- Click Save.
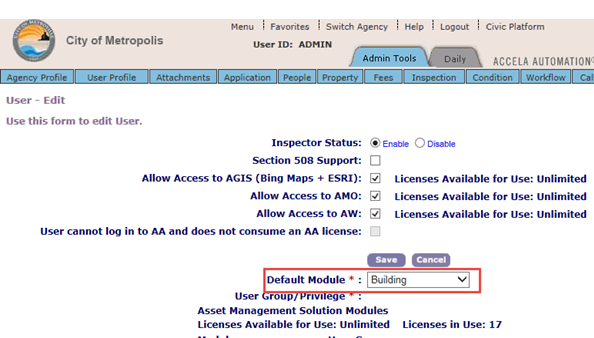
Setting a User's Default Module
Civic Platform provides enhanced user group management functionality, including the ability to: view and search all users in a group, add/remove a user from a group, move a user from one group to another, and view/change a user's default module setting.
Administrators can view and change users' default module settings using their Administrator login account to make such changes.
- Log in to Civic Platform as an Administrator.
- Navigate to Classic Administration > User Profile > User.
- Edit the user profile to change the user's module setting:
Setting a User Account Disable Time Frame
Configure the system to disable individual user accounts that are inactive for a set period of time. When an account becomes disabled, the user must contact the agency administrator, who can manually reactivate accounts. To manually enable an account, see Manually Enabling a User Account.
You can set account disable time frames at the agency and the individual user level. The user account disable time frame defaults to the agency-level account disable time frame, if one is specified. If the agency does not have an agency disable time frame set, Civic Platform uses the default time frame of 90 days. Any value set at the user level overrides the default value or the agency value. If the Account Disable Time Frame field in a User Profile is blank, Civic Platform defaults to the agency-level time frame. For information on setting an agency‑level account disable time frame, see "Adding an Agency" in the Civic Platform On-premise Administrator Supplement.
- Access Classic Administration (Accessing Classic Administration).
- Choose .
- Search for the user profile to create an account disable time frame. For instructions, see Viewing a User.
- In the Account Disable Time Frame field, enter the number of days an account can be inactive before it becomes disabled.
- Click Save.
Setting a User Password Time‑out Time Frame
Require users to regularly change their password to increase system security. If allowing users to change their own password, they begin receiving messages prompting them to change their password 15 days before it expires. Users can change their password immediately, at a later log in, or at any time during their Accela session. If users fail to change their password within the time frame, they must change their password or have it changed by their administrator before they can log in. To change a password during an Accela session, see Changing a User Password.
Administrators can set password time-out time frames at the individual user level, and multi-agency administrators can set it at the agency level. Any value set at the user level overrides the default time frame or the agency time frame, if one is set. If the Password Time‑out Time Frame field in a user profile is blank, Civic Platform defaults to the agency-level time frame (default is 90 days). For information on setting an agency-level account disable time frame, see "Adding an Agency" in the "Agencies and Functions" chapter in the Civic Platform On-Premise Administrator Supplement.
- Access Classic Administration (Accessing Classic Administration).
- Choose .
- Search for the user profile to create a password time-out time frame. For instructions, see Viewing a User.
- Complete these fields:
Password Time-out Enter the number of days that a password can remain active. Password Change Select By User to allow users to change their own passwords. Select By Administrator to only allow agency administrators to change passwords. For information on changing a password, see Changing a User Password. Must Change Password Next Login Civic Platform automatically sets this option to Yes after the password time-out time frame has passed. When the user or the administrator changes the password, Civic Platform sets this option to No. You can also set this option manually. - Click Save.
Manually Enabling a User Account
After a user account becomes inactive longer than the agency or user account disable time frame, or if the account password has expired, the user cannot access Civic Platform. The agency administrator must manually enable the account.
- Access Classic Administration (Accessing Classic Administration).
- Choose .
- Search for the user profile to enable. For instructions, see Viewing a User.
- Select Enable in the Status field.
- Click Save.
Changing a User Password
When setting the password time-out time frame, choose to allow users to change their own passwords or require that administrators change their password. For instructions, see Setting a User Password Time‑out Time Frame.
- Access Classic Administration (Accessing Classic Administration).
- Choose .
- Search for the user profile to change the password for. For instructions, see Viewing a User.
- Enter the new password, then reenter it to confirm. If experiencing trouble entering a valid
password, click the Requirements link to view the agency's minimum password
requirements.
Note: The password strength indicator displays a visual representation of the password security strength against the agency's minimum password requirements.
- Click Save.
Synchronizing External User Data
Synchronize external user data with user data already in the agency's database. To do this, add an Active Directory server to the Civic Platform security policies. When a user logs in and Civic Platform validates their credentials, Civic Platform compares the external user data with the existing user data on the Civic Platform server and updates the Civic Platform data as needed. Administrators can also add external users to the Civic Platform database if this feature is activated.
Additionally, administrators can either convert external users to Civic Platform users, or convert Civic Platform users to external users. For instructions, see Editing a User.
Note: An administrator user (ADMIN) and public users cannot be external users.
|
The Civic Platform user login procedure authenticates the user directly against the Civic Platform database. When an external user logs in, Accela sends the authentication request to the external source for validation. If the user passes the validation, Civic Platform compares the attributes of the external source and the Civic Platform database. If there are any changes in the external source, Civic Platform corrects the data in the Civic Platform database.
Because this procedure affects the Civic Platform database, it also affects all Accela products, including add-ons. This means that all external users who Civic Platform has validated using this process can log in to products such as Civic Platform, Accela Wireless, or Citizen Access.
Topics
Adding an Active Directory Server
- Access Classic Administration (Accessing Classic Administration).
- Choose .
- Click the External User Policy link.
- Complete the Table 2.
- Click Save.
Table 2. External User Policy Fields Provider URL Enter the IP address of the external user server for the specified domain controller. For example, enter the LDAP server URL. You can use SSL LDAP with “ldaps://” URL. Provider Port Enter the external user server’s IP port for LDAP access to Active Directory. This port number is usually 389. Access User Name Enter the ID of the user who can access Active Directory when performing a search to add new integrated users. Enter the CN (common name) from the DN of the access user entry. Access User Passwd Enter the password for the user ID that can access Active Directory. Access User OU Enter the base organization unit to use for searches. Access User OU is the location within Active Directory where Civic Platform should search for users. The Active Directory administrator provides this information. Access User DC Enter the DC (domain component) of the parent entry of the access user entry. The Active Directory administrator provides this. Note: Civic Platform accesses the LDAP server with the following user information: CN=<Access User Name>,<Access User OU>,<Access User DC>.OU Filter Required. OU Filter defines the organization unit from which to filter users in the Access User DC and Additional Directory Entries from the LDAP server. If undefined, Civic Platform searches all the OUs in the Access User DC and the Additional Directory Entries. Specify multiple filters, separated by comma, joined by OR. Additional Directory Entries Enter more organization units from which to retrieve user entries. Specify the DC and root of each organization unit. To enter multiple additional organization units, separate them by comma. Status To use Active Directory to synchronize the Civic Platform server, select Enable from the drop-down list; otherwise, select Disable.
Integrating a User from Active Directory
- Access the Classic Administration page (Accessing Classic Administration).
- Choose .
- Click Add.
- Select External User.
- Click External User Search.
- Complete any of these fields:
OU Search Root Enter the base organization unit to search. Common Name Enter the given, or first, name of the user to locate. Surname Enter the family, or last, name of the user to locate. - Click Search.
Civic Platform displays the search results.
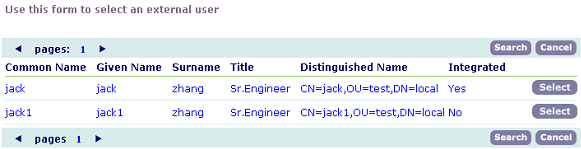
- Click Select for the user to integrate from Active Directory.
Note: If specifying an Active Directory attribute (for example, Common Name) in the Standard Choice DEFAULT_USER_LOGIN_ID, Civic Platform uses the attribute value of the selected user to populate the User Login ID field. Otherwise, Civic Platform uses userPrincipalName of the selected user from Active Directory to populate the field.
- Do one of these:
-
Enter the department to associate the integrated user with.
-
Click the Department button to choose a department from a list and click Submit.
-
- In the User Group/Privilege section, select each module for the user to access.
- For each module selected, choose the user group (only one) for the user.
- Click Save.