Understanding Script Control Branching
Each individual master script specifies the Standard Choice that provides the script controls for processing an event (Setting the controlString).
Figure: Setting the controlString
The master script represented in Setting the controlString is for the event ApplicationSubmitAfter event. The value of the controlString variable name of the Standard Choice. For most master scripts the controlString value matches the event name for which the Standard Choice contains the script controls.
Master script evaluation of script controls begins with the first line in the Standard Choice and ends with the last line in the Standard Choice.
You can branch a script control process from one Standard Choice to another Standard Choice. The branch script control action functions like a sub-routine in traditional programming.
When a master script encounters a branch script control action, the master script stops evaluation of the current standard choice and begins evaluation of the script controls in the branched to Standard Choice. Use the following syntax to specify a branch action:
branch(“<Standard Choice Name>”)where: <Standard Choice Name> is the name of the Standard Choice containing the branched to script controls.
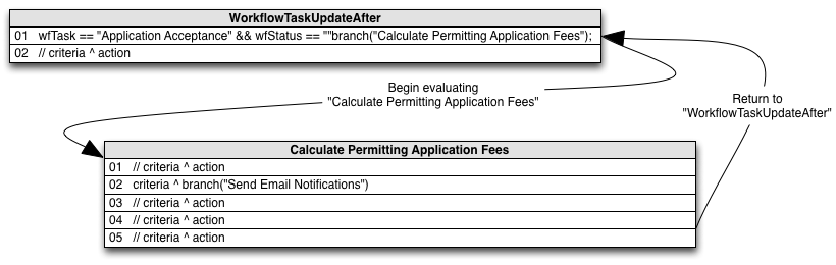
In the example branch action (Branch Action Example) the master script branches to the “Calculate Permitting Application Fees” Standard Choice when a workflow approves an application for processing. The master script then evaluates all the script controls in the “Calculate Permitting Application Fees” Standard Choice implement the application fees’ business rules.
| # | Value Description |
|---|---|
| 10 | wfTask == "Application Acceptance" && wfStatus == "Approve for Processing" ^ branch("Calculate Permitting Application Fees"); |
After the master script evaluates all script controls in the branched to Standard Choice, the master script returns to the place that contains the originating branch action, evaluates anymore actions that remain on the same line, then moves onto the next line in that Standard Choice (Branching Flow).
Figure: Branching Flow
You can branch to as many levels as required. The same rules that apply single level branching apply to multiple level branching. The master script completes evaluation of all script controls in the lowest level Standard Choice to which you branch first, and completes evaluation of all the script controls in the highest level Standard Choice, the Standard Choice that served as the entry point for the master script, last (Multiple Level Branching).
Figure: Multiple Level Branching
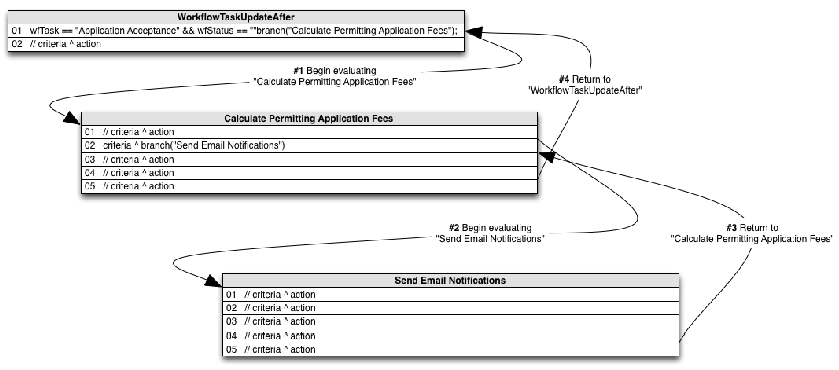
The flow of script control shown in Multiple Level Branching is as follows:
Begin script control evaluation with line 01 of “WorkflowTaskUpdateAfter”
Branch line 01 of “WorkflowTaskUpdateAfter” to “Calculate Permitting Application Fees”
Continue script control evaluation with line 01 of “Calculate Permitting Application Fees”
Branch line 02 of “Calculate Permitting Application Fees” to “Send Email Notifications”
Continue script control evaluation with line 01 of “Send Email Notifications”, and continue script control evaluation through line 05
Return to “Calculate Permitting Application Fees” and continue to evaluate script controls that follow the branch action, on line 02 through line 05
Return to “WorkflowTaskUpdateAfter” and continue to evaluate script controls that follow the branch action, on line 01 through line 02
End script control evaluation after evaluating line 02 of “WorkflowTaskUpdateAfter”
Topics:
Using Branching to Implement a For Loop
By default, JavaScript uses curly brackets { } to indicate the start and end of a unit of code for conditional statements or loops. In master script syntax, curly brackets indicate retrieval of a value (Understanding Curly Brackets) not the start and end of a unit of code. As a workaround, use branching to implement body of code functionality and loop functionality.
Incorrect Loop Using Curly Brackets provides an incorrect example of a loop implemented with curly brackets.
| # | Value Description |
|---|---|
| 01 | contactArray.length > 0 ^ for (ca in contactArray) { thisContact = contactArray[ca]; |
| 02 | ^ if (thisContact["email"] != "") email("noreply@accela.com",thisContact["email"],"Permit Update","Your permit has been issued."); } |
The master script returns several errors for these script controls due to incorrect use of curly brackets:
Line 01 opens a curly bracket but does not close the curly bracket on the same line
Line 02 closes a curly bracket but does not open the curly bracket on the same line
To workaround the syntax issue, you can use a branch action to designate a body of code for a loop (Branch Implementation for Body of Code Loop and Contact Email Loop).
| # | Value Description |
|---|---|
| 01 | contactArray.length > 0 ^ for (ca in contactArray) branch("Contact Email Loop"); |
| # | Value Description |
|---|---|
| 01 | true ^ thisContact = contactArray[ca]; |
| 02 | ^ if (thisContact["email"] != "") email("noreply@accela.com",thisContact["email"],"Permit Update","Your permit has been issued."); |
When using the branch action for a body of code loop, best practice prescribes appending the word “loop” to the end of the Standard Choice name.
Using Pop-Up Messages
Master scripts use two variables to specify whether or not to complete the transaction and the message contents to display in a pop-up window. The ScriptReturnCode variable specifies whether or not to complete the transaction.
aa.env.setValue("ScriptReturnCode", "<value>");where: <value> can be 0 or 1 and:
0 – indicates to proceed as normal
1 – stop the user action and return to the previous page.
The ScriptReturnMessage variable specifies the content of a message to display in a pop-up window.
aa.env.setValue("ScriptReturnMessage", "<myMessage>");where: <myMessage> contains the content of the message to display.
You can use the ScriptReturnMessage to:
notify users of an additional required activity
notify users of a completed an activity (sent an email and added a condition, for example)
notify users of useful information (the current location of the application, for example).
Note:
Civic Platform does not display an empty message. |
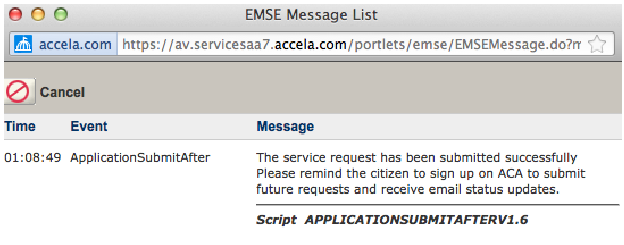
Pop-Up Message Example shows and example of a pop-up message and the accompanying variables in the master script.
Figure: Pop-Up Message Example

You can call the comment function for different script control actions to generate message text specific to evaluation of particular master script functions. Each message returned from the comment function displays on a new line in the pop-up window.
To display a pop-up message after evaluation of the last script control, set the showMessage function to true. If you do not set the showMessage function to true, no message displays, regardless of the number of times you call the comment function.
Script Controls for Displaying Pop-up Messages shows how to call the comment and showMessage functions from a script control.
| # | Value Description |
|---|---|
| 10 | true ^ showMessage = true; |
| 20 | true ^ comment("The service request submission is successful"); |
| 30 | true ^ comment("Please remind the citizen to sign up on Citizen Access to submit future requests and receive email status updates."); |
Message Window shows the resulting pop-up window generated by the script controls in Script Controls for Displaying Pop-up Messages resulting from submission of a service request in Civic Platform.
Figure: Message Window
Note:
If you set the showMessage function to true in an early evaluated script control, but the pop-up message never appears, you can set the showMessage function to false in a later evaluated script control. |
You can use HTML tags in the strings submitted to the comment function to add additional formatting (bold, underlined, additional blank lines, for example).
The EMSE_DISABLE_MESSAGES Standard Choice controls display of messages to internal and public users. If you set the entry for either InternalUsers or PublicUsers to “Yes”, no pop-up messages display to the user.
Using Data Validation
You can use a ‘before’ event type to validate submitted data, before saving to the database (Understanding Events), and cancel the transaction if the submitted data does not meet the data validation business rules that your scripts prescribe.
If a data submission attempt fails data validation, provide a message to the user as to why you cancelled the transaction (Using Pop-Up Messages). To stop the transaction, set the cancel variable in the script control to true.
cancel = trueScript Control for Data Validation provides script control example that cancels a transaction and tells the user why Civic Platform cancelled the transaction. Make sure that the message indicates the reason for cancelling the transaction so the user can correct the situation.
| # | Value Description |
|---|---|
| 01 | {Project Name} == "" ^ showMessage = true; comment(“You must designate a 'Project Name' in the ASI prior to processing the application"); cancel = true; |
Cancelled Transaction Message shows the message displayed to the user.
Figure: Cancelled Transaction Message
Data validation can be especially helpful for many events, including the following:
ApplicationSubmitBefore
WorkflowTaskUpdateBefore
InspectionScheduleBefore
InspectionResultSubmitBefore
PaymentReceiveBefore
ApplicationStatusUpdateBefore
Using Variable Branching
To enable variable branching for all master scripts, set the enableVariablebranching variable in the “User Configurable Parameters” section of the INCLUDES_ACCELA_GLOBALS script to true.
enableVariablebranching = true;Note:
When you set variable branching to true, the documentOnly functionality does not work. |
ApplicationSubmitAfter – Without Variable Branching shows an example of how the ApplicationSubmitAfter Standard Choice uses branching to organize scripts.
Figure: ApplicationSubmitAfter – Without Variable Branching
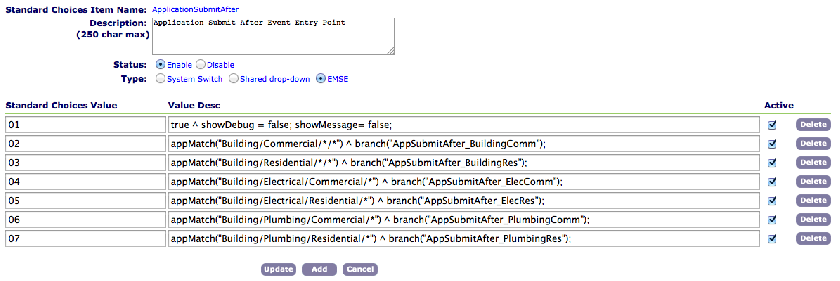
Without variable branching, you provide a separate script control branch action for each four level record type specification. If you have many unique record types in your implementation that require scripting, this approach involves many lines of script controls.
With variable branching, you use variables to specify the argument of the branch function instead of a literal string value. The master scripts resolve these variables and the branch function calls the appropriate Standard Choice.
Variable branching enables the branch function to accept string variables, in addition to hard coded strings concatenated together, as a single parameter. For example, with variable branching you can write the following:
true ^ branch("Assess Fees");like the following:
true ^ variable1 = "Assess";
true ^ variable2 = "Fees";
true ^ branch(variable1 + " " + variable2);
You can use this principle to represent all possible four level record type specifications (Group/Type/Subtype/Category) with the following six variables:
branch(appTypeArray[0] + "/*/*/*"); branch(appTypeArray[0] + "/" + appTypeArray[1] + "/*/*"); branch(appTypeArray[0] + "/" + appTypeArray[1] + "/" + appTypeArray[2] + "/*"); branch(appTypeArray[0] + "/*/*/" + appTypeArray[3]); branch(appTypeArray[0] + "/" + appTypeArray[1] + "/*/" + appTypeArray[3]); branch(appTypeString); where the appTypeArray number in square brackets represents the level, of the four-level record type specification, contained in the array. When an event triggers, the master script resolves these variables based on the record type specification for the selected record.
The following provides an example resolution for an instance of the Licenses/Business/Taxi/Application record type:
branch(Licenses/*/*/*) branch(Licenses/Business/*/*) branch(Licenses/Business/Taxi/*) branch(Licenses/*/*/Application) branch(Licenses/Business/*/Application) branch(Licenses/Business/Taxi/Applica tion) The branched to Standard Choices contain the script controls for all records in the record type hierarchy level indicated in the branch argument. For example, the script controls in the “Licenses/*/*/*” Standard Choice apply to all license record types, including the (Licenses/Business/Taxi/Application) record type, whereas the script controls in the “Licenses/Business/Taxi/Application” Standard Choice only apply to instances of the Licenses/Business/Taxi/Application record type.
The preceding example branches to the same Standard Choice, regardless of the event trigger. To branch to a different Standard Choice for each event trigger, manually add an event specification into the variable.
branch("<my_event>:" + appTypeArray[0] + "/*/*/*"); branch("<my_event>:" + appTypeArray[0] + "/" + appTypeArray[1] + "/*/*"); branch("<my_event>:" + appTypeArray[0] + "/" + appTypeArray[1] + "/" + appTypeArray[2] + "/*"); branch("<my_event>:" + appTypeArray[0] + "/*/*/" + appTypeArray[3]); branch("<my_event>:" + appTypeArray[0] + "/" + appTypeArray[1] + "/*/" + appTypeArray[3]); branch("<my_event>:" + appTypeString); where <my_event> is the three to five character abbreviation that represents the event (Scriptable Event Abbreviations). For example, you can use the ASA abbreviation to represent the ApplicationSubmitAfter/Before event in the branch variable.
branch("ASA:" + appTypeArray[0] + "/*/*/*"); branch("ASA:" + appTypeArray[0] + "/" + appTypeArray[1] + "/*/*"); branch("ASA:" + appTypeArray[0] + "/" + appTypeArray[1] + "/" + appTypeArray[2] + "/*"); branch("ASA:" + appTypeArray[0] + "/*/*/" + appTypeArray[3]); branch("ASA:" + appTypeArray[0] + "/" + appTypeArray[1] + "/*/" + appTypeArray[3]); branch("ASA:" + appTypeString); which resolves to the following:
branch(ASA:Licenses/*/*/*) branch(ASA:Licenses/Business/*/*) branch(ASA:Licenses/Business/Taxi/*) branch(ASA:Licenses/*/*/Application) branch(ASA:Licenses/Business/*/Application) branch(ASA:Licenses/Business/Taxi/Application) You must create a Standard Choice with the same name as each possible evaluation outcome of the branch argument variables. Use event acronyms and record type variables, in your branch arguments, to ensure a standard naming convention for your branched to Standard Choices, and to facilitate the organization and reuse of branched to script controls in the Standard Choices for group level record types (Licenses/*/*/*). When you apply this standard naming convention for your Standard Choices, you can use wildcard searches to return an inventory of Standard Choices setup for a specific record type. For example:
%Licenses/Business/Taxi/% - returns all Standard Choices for taxi business licenses across all events
%ASA:Licenses/Business/% - returns all Standard Choices for business licenses application submittal
%/Application/% - returns all standard choices for application record types.
Table 7. Scriptable Event Abbreviations Event Abbrev. Event Abbrev. AdditionalInfoUpdateAfter/Before AIUA / AIUB InvoiceFeeAfter IFA ApplicationConditionAddAfter ACAA LicProfLookupSubmitAfter/Before LPLSA / LPLSB ApplicationConditionDeleteBefore ACDB LicProfUpdateAfter/Before LPUA / LPUB ApplicationConditionUpdateAfter/Before ACUA / ACUB ParcelAddAfter/BeforeV360ParcelAddAfter PAA / PAB ApplicationSpecificInfoUpdateAfter/Before ASIA / ASIB ParcelUpdateAfter PUA ApplicationStatusUpdateAfter/Before ASUA / ASUB PaymentProcessingAfter/Before PPA / PPB ApplicationSubmitAfter/Before ASA / ASB PaymentReceiveAfter/Before PRA / PRB ContactAddAfter/Before CAA / CAB PaymentReceiveBefore PRB ContactEditAfter/Before CEA / CEB RenewalInfoUpdateAfter RIUA ContactREmoveAfter/Before CRA / CRB TimeAccountingAddAfter/Before TAAA / TAAB ConvertToRealCapAfter CRCA VoidPaymentAfter/Before VPA / VPB DocumentUploadAfter/Before DUA / DUB WorkflowTaskUpdateAfter/Before WTUA / WTUB FeeAssessAfter/Before FAA / FAB InspectionMultipleScheduleAfter/BeforeInspectionScheduleAfter/Before ISA / ISB InspectionResultSubmitAfter/BeforeInspectionResultModifyAfter/BeforeV360InspectionResultSubmitAfter/Before IRSA / IRSB
Branching to the Same Standard Choice from Different Events
If you branch to the same Standard Choice from different events:
Prefix the name of the branched to Standard Choice with the letters “CMN” (common).
Followed the prefix with the record type scope.
Append the end of the script control with a short description of its function.
wfTask == "Final Review" && wfStatus == "Ready to Issue" ^ branch("CMN:Permits/*/*/*:INVOICE_ALL_FEES");