Establishing Inspection Types
You can create different inspection types for a particular inspection group. For example, you can have a building inspection group, but there might be different inspection types for the different inspections that fall under the building category. You can add as many inspection types to an inspection group as you need. Inspection types within a group form the list of required inspections for any application associated with the inspection group.
Topics
Adding an Inspection Type
After you create an inspection group, you can add inspection types to the group. For example, you can include a Foundation Wall inspection and a Fire inspection in the same group. You can later edit an inspection type.
Note:
You cannot associate an inspection result group with an inspection type at the same time you create the inspection type. You can do that when you edit the inspection type. |
To add an inspection type
Access the Classic Administration page (Accessing Classic Administration).
Choose .
Search for the inspection group that you want.
For instructions, see Searching for an Inspection Group.
Click the Inspection Group Code link corresponding to the inspection for which you want to add an inspection type.
For field descriptions see Table 1.
Civic Platform displays the Inspection - Edit page.
Scroll to the Inspection - Edit screen and click the Add Type button.
Civic Platform displays the following.

Enter the name of the type in the Inspection Type field.
Click Save.
Table 1. Inspection Group Fields Citizen Access Inspection Display Select Yes to enable the display of these inspections in ACA. Select No to hide the inspections from Citizen Access. You can set a specific inspection to display in or hide from Citizen Access in V360. For complete information, see “Displaying an Inspection in Citizen Access,” in the “Inspections” chapter of the Accela Civic Platform User Guide. Citizen Access Multi-Inspection Schedule Select Yes to enable the scheduling of multiple inspections for this inspection type in Citizen Access. Select No to limit the number of inspections to one time only for each application intake form in Citizen Access.Use this feature to allow a customer to schedule repeat inspections. For example, contractors typically require multiple concrete inspections for a large project requiring many pours. Allow Failed Checklist Items Select Yes to allow the inspection to pass with failed checklist items for the current inspection type or from previous inspections. Select No to require all current and failed checklist items to pass inspection prior to signing off on the inspection.
Allow to edit inspection result / inspection grade / checklist total score / checklist major violation After users go through the inspection checklist items and enter their statuses, Civic Platform automatically populates the inspection result, inspection grade, checklist total score and checklist major violation option for the inspection. Inspection supervisors always have the right to override these auto-populated values. Select Yes to enable normal users (other than inspection supervisors) to edit the auto-populated values.
Select No to forbid normal users from editing the auto-populated values.
Auto Assign To activate the auto assign inspection scheduling feature, choose Yes from the drop-down list. To de-activate the auto assign inspection scheduling feature, choose No from the drop-down list. Cancel Restriction Select an option based on your agency’s policy for cancelling inspections. This restriction applies only to Citizen Access public users. If you want no restrictions on inspection cancellation, select No Restriction.
If you want to restrict inspection cancellation, select the Hours Prior or Days Prior option and then enter a time and a date. For example, if you want to restrict inspection cancellation to 11:00 AM one day prior to the inspection date, select Days Prior and choose One Day Prior at 11:00 AM in the associated drop-down lists.
Capture and Carry Over Failed Checklist Items Select a value from this drop-down list if you want failed checklist items to be transferred to the checklist of the next inspection that users schedule for the same application in Civic Platform or Citizen Access.
Select one of these values:
Auto: Select this option if you want selected failed checklist items automatically transferred to the checklist of the next inspection.
Auto-All: Select this option if you want all failed checklist items automatically transferred to the checklist of the next inspection.
Prompt: Select this option if you want a prompt to display that allows agency users to select which failed checklist items should be transferred to the next inspection checklist for an application. Note that with this option, Citizen Access does not carry over any failed checklist items.
For complete instructions on how to configure checklist items for carry-over, see Carrying Over Failed Checklist Items.
Configuration Select one of the following options from the drop-down menu. Inspection Disciplines:
Select this option if you want to assign a discipline to the selected inspection type. Civic Platform uses disciplines to categorize inspections. For example, you might assign Electrical inspection types, including Rough Electric and Electrical Outlet inspection types, to the Electrical Discipline. Administrators can set up discipline values with the Standard Choice USER_DISCIPLINES. For instructions on configuring this Standard Choice, see the Accela Civic Platform Configuration Reference. Civic Platform also uses disciplines as filtering criteria for automatic inspection scheduling. For more information on automatic inspection scheduling, see Setting Up Automatic Inspection Scheduling.Click Recurrence & Relationship Setting to configure those elements. You can configure automatic scheduling of recurring inspections based on a set period of time. You can base the time on the completion date of the previous inspection or on the initial creation date of the record. See Working with Recurring and Related Inspections.
This link provides a visual of related inspections and reportable linkage between inspections. It enables you to differentiate the parent inspection from follow-up inspections. To allow users to modify related inspections, see Relating Inspections.Inspection Categories:
Click the Inspection Categories link to assign the inspection type to one or more inspection categories. Civic Platform uses categories to organize inspection types. This helps public users, for example, to easily locate the desired inspection type when they try to schedule or request an inspection for a record in Citizen Access. Inspection categories are pre-defined by the Standard Choice INSPECTION_CATEGORY. For instructions on configuring this Standard Choice, see Accela Civic Platform Configuration Reference.
Configure By Select an inspection option, based on your agency’s preferences and best practices: Inspection Flow: Choose this option if you want to require public users to complete inspections in a certain order. With this option, you can enable the simultaneous completion of tasks, and you can allow public users to skip tasks that become unnecessary due to the completion of another task.
Inspection MileStone: Choose this option to implement inspection milestones as checkpoints in the inspection process. These checkpoints require public users to complete an inspection before they can move on to the next set of inspections within the inspection group.
To learn about setting up an inspection flow process, see Assigning Inspection Categories.
Department Click the Department button to select the department responsible for the inspection type. Display Order Enter a number to determine the position of the inspection type within a list of types. For example, if you want users to complete one type of inspection before any others, enter “1.” Flow Enabled To include the inspection in the inspection flow process, choose Yes from the drop-down list. For an explanation of setting up an inspection flow process, see Assigning Inspection Categories.
Grade Group Choose an active grade group that you want to assign to the inspection type. For instructions, see Managing Checklist Groups. Checklist Group Choose an existing group that you want to edit. For instructions, see Establishing Checklists. The Checklist Group field has a Configure the Required Checklist icon next to it. You can click the icon to set required checklists in the checklist group that inspectors must complete in the inspections of the inspection type. Inspection Flow Click this button to configure inspection flow process for a selected inspection group. To learn about setting up an inspection flow process, see Assigning Inspection Categories. Inspection Score Select the method for calculating total scores based on the sub scores of the checklist items. These are your options: Total sub scores (the default method) Displays the sum of all the checklist item scores.
Average of subtotal scoresDisplays the average score of all the checklist items.
Lowest subtotal scores Displays the lowest checklist item score.
Highest subtotal scores Displays the highest checklist item score.
Subtracted sum of the scores (this option works with the Total Score field)Subtracts the total score of all the checklist items from the Total Score defined for the inspection type.
Inspection Type Enter the name of the inspection type. IVR Number Enter a unique number for the inspection type within the inspection group if IVR access is available. Max Points Enter the maximum number of points allowed before this type of inspection fails. If the total score of an inspection (the sum of points for all items on all checklists) is equal to or greater than this maximum, the Inspection Result Code list does not display the Passed option and the Inspection fails. Required/Optional Specify whether you want to make inspections required or optional. Each inspection that specify as Required must pass for the application to be complete. Reschedule Restriction Select an option based on your agency’s policy for rescheduling inspections. This restriction applies only to Citizen Access public users. If you want no restrictions on inspection rescheduling, select No Restriction.
If you want to restrict inspection rescheduling, select Hours Prior or Days Prior and specify a time and date. For example, if you want to cut off inspection rescheduling at 11:00 AM one day prior to the inspection date, select Days Prior and choose One Day Prior at 11:00 AM in the associated drop-down lists.
Result Group Choose an existing group that you want to edit. See Inspection Result Groups. Total Score If you select the Subtracted sum of the scores option in the Inspection Score drop-down list, enter the total score from which to subtract the sum of the inspection sub scores for calculating the inspection total score. This field is not valid with other options in Inspection Score.
Units Enter the number of inspection units used as criteria when automatically scheduling inspections. An inspection type unit indicates the shortest length of time it takes to complete an inspection. Civic Platform measures all inspections as multiples of the unit value. For example, you might determine that the unit value equals the duration of electrical inspections, 30 minutes. Civic Platform then measures all inspections in 30 minute increments: hour-long inspections are two units and ninety-minute inspections are three units. The unit value should relate to the default time block you configure in your inspection calendars.
Editing an Inspection Type
After you add an inspection type to a group, you can change the type. For example, you can change the type name or the display order.
To edit an inspection type
Access the Classic Administration page (Navigating to the Setup).
Choose .
Search for the inspection group that you want.
For instructions, see Searching for an Inspection Group.
Click the Inspection Group Code link corresponding to the inspection for which you want to add an inspection type.
Complete the necessary fields as described in Table 1.
Click Update.
Deleting an Inspection Type
After you add an inspection type to a group, you can delete a type.
To delete an inspection type
Access the Classic Administration page (Accessing Classic Administration).
Choose .
Search for the inspection group that you want.
For instructions, see Searching for an Inspection Group.
Click the Inspection Group Code link corresponding to the inspection for which you want to add an inspection type.
Click Delete next to the Inspection Type that you want.
Click OK.
Assigning Disciplines to an Inspection Type
To assign disciplines to an inspection type:
Access the Classic Administration page (Accessing Classic Administration).
Choose .
Search for the inspection group that you want.
For instructions, see Searching for an Inspection Group.
Click the red dot for the Inspection Group Code link corresponding to the inspection type you want to modify.
Refer to field descriptions in Table 1.
Click the Configuration button at the far right side of the page.
The Configuration drop-down menu displays.
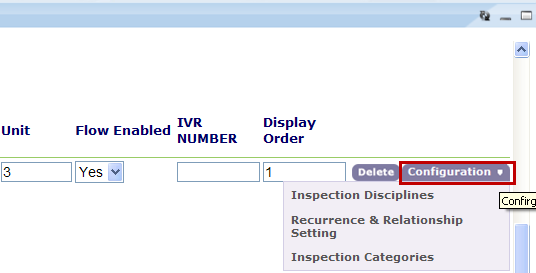
Click the Inspection Disciplines option.
Civic Platform displays the Inspection - Disciplines List.
Click the Add button on the Disciplines section of the Inspection Disciplines.
Civic Platform displays the Disciplines List.
Select each discipline that you want to assign to the inspection type. To choose all disciplines, click Disciplines.
Click Submit.
The selected districts display in the bottom section of the Inspection Disciplines List.’
To remove any of the listed disciplines click the corresponding Delete button located to the right of the discipline
Click Cancel.