Using Electronic Document Review
The Electronic Document Review feature fits seamlessly into a project workflow. This section describes how to perform several electronic document review processes.
Topics
See also: Attachments and Workflows and Workflow Tasks for related information.
Attaching a Document
Users can use Citizen Access to submit supporting documents as part of a permit application process. When users submit document files, Civic Platform attaches the files to a record where a permit clerk or similar can interact with them. a Civic Platform user can also submit supporting documents from the Documents tab for a record. For example, a clerk may add document attachments that a customer submitted via email, or submitted in hard copy (which the clerk converts to electronic format by scanning).
For documents to be eligible for Electronic Document Review processing, they must be in PDF file format when you attach them to the record. Most standard business and graphics applications have an option to save or print to PDF.
Note:
If you have a document to attach that is not in PDF format, but you want to incorporate it into your Electronic Document Review process, consider opening that document, then saving/printing it to PDF. You can then attach the PDF to the record. |
Topics
Attaching a Document to a Record via Citizen Access
If Citizen Access is available, homeowners, contractors, and other citizens can submit necessary documentation in support of permit applications from the Citizen Access portal. You can process and review documents using the Electronic Document Review functionality. You can also make annotated documents available to the submitter via the same Citizen Access portal as needed.
Note:
If you allow the public to submit documents via Citizen Access, make sure that you have defined PDF as a document attachment type. To learn more about defining document attachment types, see Document Attachments in the Citizen Access Administrator Guide. |
Attaching a Document to a Record via Civic Platform
You can attach one or more PDF files at a time from the Documents tab of any record type. Many agencies set limits on file size and/or file type. The Batch Upload window lists these limits at the top when you add a new attachment. For details instructions on attaching a document, see Attaching Files.
Searching for a Document
The Global Search portlet supports searches for document attachments by using document-related search criteria such as document name, document description, and document category.
When Civic Platform returns search results, it lists any matches to the search criteria in a Documents list. You can do any of the following:
Click the document name to view the Document Information window for any listed document.
Click the Review link in the Review column to open a document in Adobe Acrobat Pro, where you can comment, annotate, and use stamps.
Click the record number link to open the record that contains the desired document.
For more information about performing a global searches, see Using the Search Features.
Attaching a Document to a Workflow Task
You can attach one or more documents to a workflow task as needed. After you assign a document to a workflow task, the document becomes a workflow sub task. You can access the document and assigned it to reviewers from the Sub Tasks tab on the Workflow page.
Note:
You may want to reorganize your workflow task organization to incorporate the Electronic Document Review processes into your agency workflows |
To attach a document to a workflow task
Locate the document you want to assign. You can do this by going to the Documents tab for the selected record. You can also use Global Search to locate the document. See Searching for a Document for more information.
Select Assign from the Actions menu for the document you want to assign.
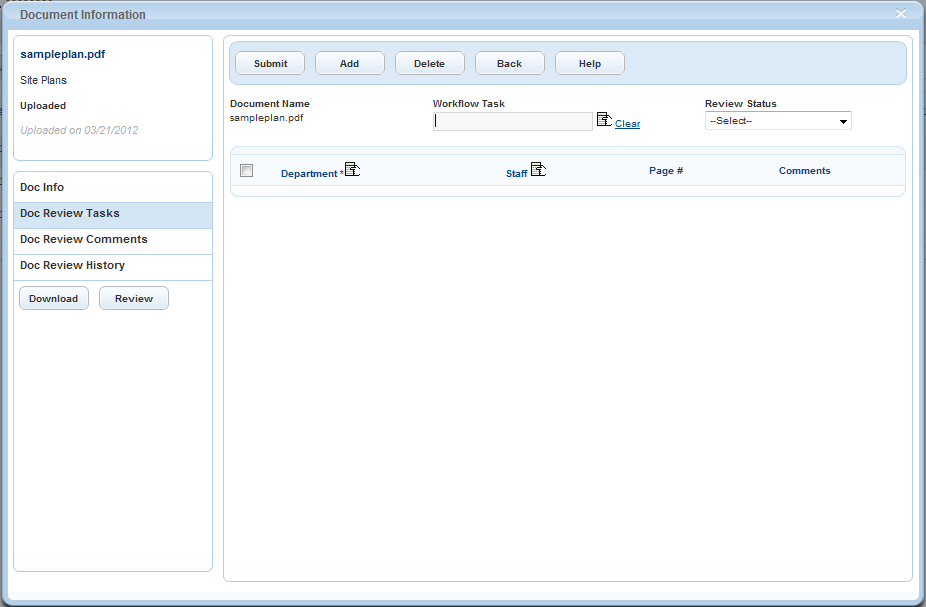
The Document Information window launches, with the Doc Review Tasks tab displayed.
-
Click the Workflow Task Selector
 button to the right of the Workflow Task field.
The available workflow tasks for the current record display.
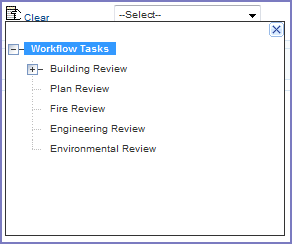
Select the Workflow Task to which you want to apply the current document.
The selected task appears in the Workflow Task box.
Click Submit to save or continue on to assign reviewers. See Assigning a Document to One or More Reviewers below.
Assigning a Document to One or More Reviewers
You can assign a document to one or more reviewers after you have attached the document to a workflow task. After you assign the document, the reviewer can use Electronic Document Review functionality to open the document in Adobe Acrobat Pro, review it, and save his comments back to Civic Platform.
To assign a document to a reviewer
Locate the document you want to assign. See Searching for a Document.
Select Assign from the Actions menu for the document you want to assign.
The Document Information window launches, with the Doc Review Tasks tab displayed.
If you have not done so yet, assign the document to a workflow task. See Attaching a Document to a Workflow Task.
-
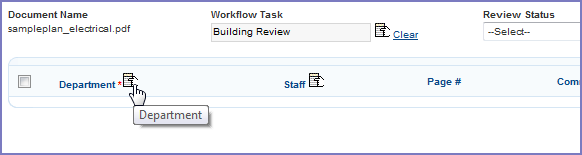
Click the Department Selector button
to the right of the Department label.A tree list of departments displays.
Check the box for the Department where the intended reviewer works, then close the department tree list.
-
Click the Staff Selector button
to the right of the Staff label.A tree list of staff in the selected department displays.
Select the individual to whom you want to assign this document review task.
Select the discipline of the document review task. The discipline is the area of focus in the task. Civic Platform tags all the comments from the reviewer with the discipline.
Use the Page # and Comments tab to give specific review instructions to the reviewer if needed.
If you want to assign this document to additional reviewers, click the Add button, then repeat steps 5 through 9.
Click Submit to save the Review assignment.
Civic Platform updates the task on the Sub Tasks list for the Workflow task, and the task appears on the Document Review Tasks tab of the My Tasks portlet for the assigned reviewer.
Viewing Document Review Tasks by Document
If you assign a document to more than one reviewer, you can view a list of review tasks for that document as needed.
To view a list of document review tasks by document
Locate the document that you want to work with. You can search the Documents tab for the selected record, the Sub Tasks tab on the Workflow page, or the Document Review Tasks tab on the My Tasks portlet.
You can also use Global Search to locate a document. See Searching for a Document for more information.
Select View Document Info from the Actions menu for the document you want to edit.
The Document Information window launches. Select the Doc Review Tasks tab.
Civic Platform displays a list of document review tasks.
Editing a Document Review Task
You may need to modify the details for a document review task for a number of reasons; for example, you may need to reassign the task, or you may need to add additional instructions in the Comments box.
To edit a document review task
Locate the document you want to edit. You can search the Documents tab for the selected record or the Sub Tasks tab on the Workflow page.
You can also use Global Search to locate a document. See Searching for a Document for more information.
Select View Document Info from the Actions menu for the document you want to edit.
The Document Information window launches. Select the Doc Review Tasks tab.
Highlight the task that you want to edit.
Civic Platform displays the document review task details.
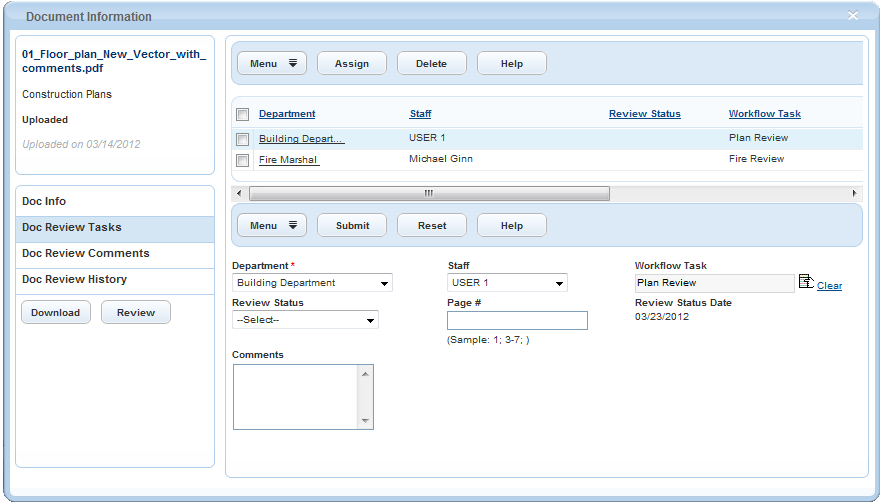
Modify the task details as needed.
Click Submit to save your changes.
Working with Document Review Checklists
Topics
Assigning One or More Checklists to a Document Review Task
You can assign one or more checklists to a document review task. The checklists are the guidelines for the reviewers to follow to ensure that they review all the required aspects of a document during the document review task.
To assign one or more checklists to a document review task
Locate the document you want to assign.
Select View Document Info from the Actions menu for the document you want to assign.
The Document Information window launches.
If you have not done so yet, assign the document to a document review task. See Assigning a Document to One or More Reviewers.
Go to the Checklists tab for the document with one of the following approaches:
Select the Doc Review Checklists tab;
Select the Doc Review Tasks tab. Click the link to the doc review task, and then click the Checklist tab of the doc review task.
The Document Information window displays the checklists added to the document or document review task. The Checklist ID column is empty for the checklists which you have not assigned to any doc review task.
The tab may already display a few checklists:
For a document which is submitted for the first time, Civic Platform automatically adds, if there are any, the Auto Create checklists in the checklist group which is associated with the document type. The Checklist ID column is empty because you have not assigned the checklist to a document review task yet.
For a document which is a re-submittal of an existing document, Civic Platform automatically not only carries over the open comments, but also carries over the checklist that has failed checklist items, of which administrators enabled the Carry-over Failed Items option, from the existing document. The Checklist ID shows the assigned reviewer and the assign date for each checklist as in the existing document.
To add more checklists to the tab, do the following:
Click Search.
From the Group drop-down list, choose the group that includes the checklist you want to assign to the document review task.
Civic Platform displays a list of checklists attached to the selected checklist group.
Select the checklists you want to add. To select all checklists, mark the check box that appears at the top of the list.
Click Submit.
To delete a checklist from the tab, select the checklist and click Delete.
If needed, you can add more checklist items to a checklist. Do the following:
Click the link at the checklist you want to add checklist items.
Civic Platform displays a list of checklist items included in the current checklist.
Click the Add link next to the Checklist Items heading in the list.
The checklist item selection window displays.

Locate the desired checklist item.
If known, choose the checklist group and checklist that contains the checklist item from the drop-down lists, or enter the checklist item key word and click the search icon.
Select the desired checklist item, and click Select.
Civic Platform adds the checklist item into the checklist.
If necessary, you can click the Delete link next to the checklist item that you newly added to remove the item from the checklist. Note that you cannot remove a checklist item that your agency administrator configured in the checklist.
Select each checklist you want to assign and click Assign.
The Document Information window displays the list of existing doc review tasks for the document.
Note:You can select and assign a checklist which you already assigned to a doc review task. After you assign the checklist to a new task, the previous assignment no longer exists, but the updates that the reviewers made to the checklist during the previous review task remain with the checklist.
Select the doc review task to which you want to assign the selected checklist(s) to, and click Submit.
The Document Information window returns to the checklists view. The Checklist ID shows the assigned reviewer and the assign date of each checklist.
Completing a Doc Review Checklist
To complete a doc review checklist, you can enter information and update the status of each checklist item. Completion of a checklist allows you to keep a record of detailed review results, and helps to ensure consistency and completeness in carrying out the doc review task.
To complete a doc review checklist
Find the checklist you want to complete with one of the following approaches:
In the Document Information window for the document you are reviewing, select the Doc Review Tasks tab. Click the link to the doc review task, and then click the Checklist tab of the doc review task.
In the Document Information window for the document you are reviewing, select theDoc Review Checklists tab.
While reviewing the document in Adobe Acrobat Pro, click the Open Checklists button in the Accela Add-on Tools.
Click the link to the checklist you want to complete.
Civic Platform displays a list of checklist items.
You can add more checklist items to the checklist in the Checklists or Doc Review Checklists tab. Do the following:
Click the Add link next to the checklist Items heading in the checklist.
The checklist item selection window displays.
Locate the desired checklist item.
If known, choose the checklist group and checklist that contains the checklist item from the drop-down lists, or enter the checklist item key word and click the search icon.
Mark the check box next to the desired checklist item, and click Select.
Civic Platform adds the checklist item into the checklist.
If necessary, you can click the Delete link next to the checklist item that you newly added to remove the item from the checklist. Note that you cannot remove a checklist item that your agency administrator configured in the checklist.
Do the following to update a checklist item:
Click the arrow next to a checklist item to expand the item details.
Complete the fields in the detail section as needed.
Add a comment for the item as needed.
Click the Standard Comment link to select a standard comment, or manually enter the comment.
While you are reviewing the document in Adobe Acrobat Pro, if you want to add the comment as a comment in the document and associate the checklist item with the comment, mark the Add to Document check box. If you want to remove the comment from the document, deselect the check box.
Note:If you set the checklist item to a status of the Approved result type, and the comment in the item is added in the document, Civic Platform closes the document comment when you submit the checklist. Closed document comments no longer display in Adobe Acrobat Pro in the subsequent document reviews.
In Adobe Acrobat Pro, if you set a document comment to the Canceled, Completed, or Rejected status and publish the change, Civic Platform closes the document comment but does not change the status of the corresponding checklist item.
Click the Sync link to set up synchronization between the comment in the checklist item and the comment in the document. When you click the Sync link, Civic Platform automatically marks the Add to Documentcheck box.
Note:You must manually publish the comment in the document after they are added to the document from the checklist item.
To upload a file to the checklist item, click the Attachment(s) icon, and follow the procedure for attaching a document as described in Attaching Files.
Update the item status.
Repeat steps 3 and 4 until you finish updating the checklist.
Click the Submit button to save the changes.
Reviewing a Document in Adobe Acrobat Pro
You can launch PDF document attachments for review in Adobe Acrobat Pro from several locations in Civic Platform. After you launch a document attachment, you can make full use of Adobe Acrobat’s commenting and annotation tools to mark up documents. After completing your review, you can use the Accela Toolbar Add-on tools to save your comments to the Civic Platform application server.
Topics
Opening a PDF document for review from Civic Platform
You can open a PDF document attachment in Adobe Acrobat Pro from the Documents secondary tab, the My Tasks tab, or the Global Search portlet.
Note:
If you do not see a Review link in these locations, either Civic Platform did not assign the listed document to you for review, or you do not have workflow supervisor access. Contact your system administrator. |
From the Documents tab
Locate and select the record containing the document you want to open.
Open the Documents tab for the record.
Identify the document you want to open and select Review from the Actions menu for that document.
From the My Tasks
Open the My Tasks portlet and click the Document Review Tasks tab.
Identify the document you want to open and select Review from the Actions menu for that document.
From the Global Search
Conduct a search for the document you want using the Document Name, Document Description, or Document Category as your search criteria.
In the Documents search results, identify the document you want to open, and click the Review link for that row.
Annotating Documents
Adobe Acrobat Pro comes with a number of annotation tools that Civic Platform users can use as they review digital documents and digital plans for a project. Users can use Acrobat tools to comment, highlight content, insert graphical indicators, and even use ‘stamps’ to apply a graphical image to the pages of a PDF file. You can customize stamps to include data from the project file (e.g., application number, applicant name), the current date/time, and other relevant information.
The following sections describe some of these tools as well as some possible uses for them when reviewing plans and other project documents. You can pattern your agency’s workflow from our examples. You can also use any of the additional Adobe Acrobat X Pro functionality to best help you achieve the outcome that you seek.
Note:
This document describes only some of the many possible uses you can leverage when working with Adobe Acrobat Pro and Electronic Document Review. Adobe provides full documentation for the all of the functionality that comes with their product. Refer to the Adobe Online Help to learn about additional functionality not described in this document. |
Topics
Using the Accela toolbar
When you run the Document Review Client Installation, it installs an Adobe Acrobat plug-in that includes several buttons for you to use when you review documents/plans. See the table below for descriptions of each of the buttons available in the Accela toolbar.
Accela recommends that you publish your comments and annotations frequently to avoid loss of work in the event of an unexpected application shutdown.
| Button | Description | |
|---|---|---|
 |
Check-in Revision | Use this button to save all comments made by the current user, and merge all comments added to the document by multiple users and the original PDF file into a new document that you must name. This button is typically the final action in a review process and it is accessible only if your administrator enables FID 8474. |
 |
e-Codes | You can add one or more buttons to your toolbar to launch pre-configured URLs in a new browser window. You must configure this button to point to the ICC eCode site that you want to reference. Your agency must have an account and licensing set up with ICC to use the site. |
 |
Publish Comments | Use this button to save comments made by the current user to the Civic Platform application server and allow others users to view the saved content. This button is typically the final action of a reviewer when all commentary is complete and ready for others to view. Note that Civic Platform saves comments to a file separate from the PDF file that you reviewed. You can merge the comments into the PDF file by using the Check-in Revision button. |
 |
Get Updates | Use this button to save comments made by the current user to the Civic Platform application server but not allow others to view the saved comments. At the same time, Civic Platform downloads and displays any published comments by other users. Note that Civic Platform saves comments to a file separate from the PDF file that you reviewed. You can merge the comments into the PDF file by using the Check-in Revision button. |
Inserting Annotations and Commentary
You can activate the annotation and drawing markup tools in several different ways. You can select a tool from the ‘Quick Tools’ toolbar at the top of the window, from the Comments or Tools side panels, from a right-click menu, or by entering keyboard shortcuts to invoke certain commands. Use the method that best suits you. In this documentation, we provide instructions to access commands via the side panel. If you prefer to use another method to access quick tools, you should do so.
Click a link to learn more about common annotating tasks.
To learn more about other annotation possibilities using Adobe Acrobat tools, refer to the Adobe documentation accessible via the Help menu in Adobe Acrobat Pro.
Note:
When you review PDF attachments that are part of a Civic Platform file, it is very important that you launch the PDF from Civic Platform. You should then use the Civic Platform tools in Acrobat Pro to save your comments and annotations back to Civic Platform. |
To insert a sticky note
Launch the PDF you are reviewing from Civic Platform.
Click Comment on the right side of the toolbar to open the side panel. If you are using another method to invoke Adobe tools, skip this step.
If you do not see the Annotations panel listed, use the Show/Hide Panels button to display a menu where you can choose which panels to display. Click Annotations to show the panel. A check mark next to the name means the panel is visible.

Click the Add Sticky Note button
 in the Annotations panel.
The mouse cursor changes to a sticky note.
Position the cursor where you want to place the sticky note on the document and click.
Civic Platform places a sticky note icon and a message box displays.
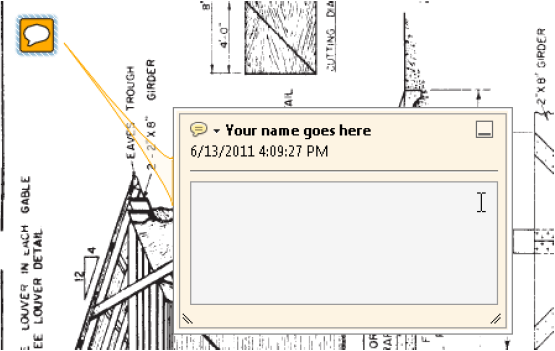
Enter your comments in the box.
To complete the task, click anywhere outside the box.
Use the Civic Platform toolbar to save or publish your comments.
To draw a cloud around an area, an object, or a group of objects
A cloud is an enclosed polygonal shape you can draw around objects or areas. A cloud is consists of multiple line segments you define by clicking.
Launch the PDF you are reviewing from Civic Platform.
Click Comment on the right side of the toolbar to open the side panel and then make sure you see the Annotations panel. If you are using another method to invoke Adobe tools, skip this step.
Click the Cloud button
 in the Annotations
panel.
in the Annotations
panel.The mouse cursor changes to a pointer.
Position the cursor where you want to start drawing the cloud perimeter and then click to define the start point.
Move the pointer to the next position on the perimeter of your cloud and click to create a line segment.
Continue moving the pointer and clicking to define your cloud’s perimeter.
To finish, either click the start point again, or right-click and select Complete.
To insert a comment about the area or object you just highlighted, double-click the cloud to open a message box.
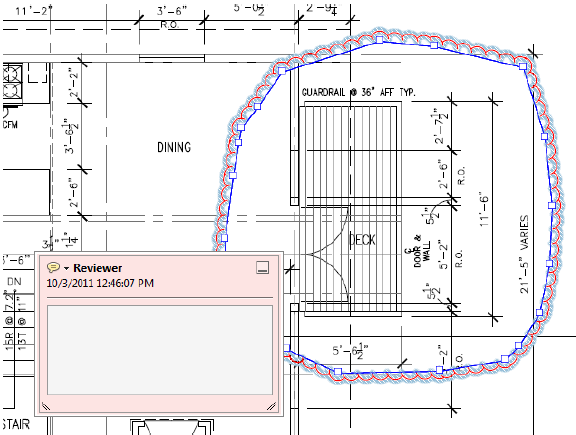
Enter your comments, then click anywhere outside the box.
Use the Civic Platform toolbar to save or publish your comments.
To draw a box around an object and commenting on it
Launch the PDF you are reviewing from Civic Platform.
Click Comment on the right side of the toolbar to open the side panel and then make sure that you can see the Drawing Markups panel. If you are using another method to invoke Adobe tools, skip this step.
Click the Rectangle button
 .
.Position the cursor where one of the corners of the rectangle is to be, then click and drag the cursor diagonally to the opposite corner of the rectangle. Release the mouse button.
Double-click the rectangle border to open a message box.
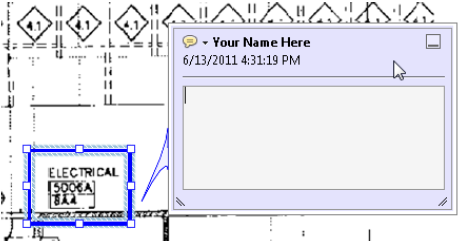
Enter your comments and then click anywhere outside the box.
Use the Civic Platform toolbar to save or publish your comments.
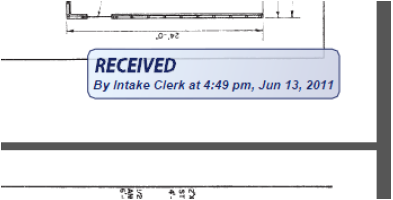
Using Stamps
One of the Annotations tools available for you to use in Adobe Acrobat Pro is the Stamp tool. When you click the Stamp button, a menu displays. The menu offers you a list of images that you can place on a PDF document as needed with a click of your mouse button. Included in this list is a sub-set of dynamic stamps that incorporate real-time data such as the time, the date, and identity information from the Identity form in Adobe Acrobat.
You can also create custom stamps that include images of your own design. For example, you can create stamps that include your agency’s name or logo. You can even create dynamic custom stamps that display the current time/date, the current user, and more.
Note:
For information about creating dynamic stamps in Adobe Acrobat Pro, check out http://acrobatusers.com, which is an Adobe-sponsored user community. |
To place a stamp on a document
Launch the PDF you are reviewing from Civic Platform.
Click Comment on the right side of the toolbar to open the side panel and then make sure you can see the Drawing Markups panel. If you are using another method to invoke Adobe tools, skip this step.
Click the Add Stamp button
 to display a menu of available
stamps.
to display a menu of available
stamps.Select the desired stamp from the menu.
The mouse cursor takes on the image of the selected stamp.
Position the cursor where you want to place the stamp on the document and click.
Civic Platform places the stamp.
Resize the stamp as needed.
Click the stamp image to turn on the resizing handles in each corner of the image.

Click and drag any resizing handle to make the stamp bigger or smaller. Release the mouse key when done.
Rotate the stamp as needed.
Click and drag the rotate handle (rounded handle located in the upper center of the image) to rotate your stamp image to the desired orientation. Release the mouse key when done.
Add comments to the stamp as needed.
Double-click the stamp image and enter your commentary in the box that appears.
Note:If you are stamping the same image on multiple pages; for example, a time/date received stamp, you can use the Keep Tool Selected command to use the stamp repeatedly without having to re-select the Add Stamp button each time. Simply use the desired stamp, then right click the Add Stamp button and select Keep Tool Selected. You can now stamp your document over and over again with the click of a button.
Using the Measuring Tool
Adobe Acrobat Pro provides you with an easy-to-use measurement tool that you can use to measure distance, perimeter, and area on a plan or drawing. You can define the units of measurement and the scale ratio of your measurements to reflect the units.
The Measuring tool is accessible from both the toolbar and the Analyze panel in the Tools panel.
Before you use the Measuring tool, it is useful to set the scale ratio you want to use, so that your measurements display in the proper units.
Note:
If you do not see the measuring tool in your toolbar or Tools panel

|
Processes
To set the scale ratio
-
Click the Measuring tool
 in either the toolbar or the side panel to
activate it.
in either the toolbar or the side panel to
activate it. -
Right click anywhere on the page
A command menu displays.
-
Click Change Scale Ratio to display a Change Ratio dialog.

-
Enter the numbers and units of measurement that reflect the scale of the drawing to the actual size of the objects.
Note:If you have a ratio that includes a fraction, such as 1/8 in =1 ft, you can enter this ratio in two ways:
-
Enter 1/8 as a decimal. Enter 0.125 in = 1 ft
-
Keep the same ratio but convert the fraction to a whole number by multiplying both 1/8 inch and 1 foot by 8. Enter 1 in = 8 ft
-
Click OK.
Your new scale ratio settings remain in effect until you change them again.
To measure the height, width, perimeter, or area of an object
-
Click the Measuring tool
 in either the
toolbar or the side panel to activate it.
in either the
toolbar or the side panel to activate it. -
Select a measurement type:
 Click the distance tool to measure the distance between two points.
 Click the perimeter tool to measure the outside edge of an object. You
can also use this tool to measure a series of line segments that do not
necessarily define a perimeter.
Click the perimeter tool to measure the outside edge of an object. You
can also use this tool to measure a series of line segments that do not
necessarily define a perimeter. Click the
area tool to measure the area of a region you define.
Click the
area tool to measure the area of a region you define. -
Draw one or more line segments to define the object that you are measuring.
-
Distance: Click at one end of the line segment. Drag the mouse cursor to the other end of the line segment and then click to define the end point. Drag the measurement line to the desired location and then click again to complete.
-
Perimeter: Click each point defining the line segments you are measuring in sequence. For example, click the 4 corners of a rectangle in clockwise or counter-clockwise order. Double-click the last point to complete.
-
Area: Click each sequential point defining a line segment in the boundary of the region you want to measure. For example, click the 3 corners of a triangle in clockwise or counter-clockwise order. Click the first point again to complete.
-
Add a label if needed.
Right click the measurement.
Select Add Label from the command menu.
Enter pertinent data you want to include with your measurement.
Click OK.
To learn more about using the Measuring Tool or modifying the appearance of your measurements, consult the Adobe Acrobat Pro documentation.
About Bates Numbering and Actions
Bates Numbering is a method for numbering pages within one or more documents, such that Acrobat Pro assigns a unique Bates number to each page of each document. The unique Bates number indicates its relationship to other Bates-numbered documents, and can also be the vehicle for adding other information such as time/date stamps. You can set up Bates numbering with the Actions wizard in Adobe Acrobat Pro. When applied to a document or series of documents, the numbering appears as a header or footer on the pages of each PDF in the batch.
Accela provides several Bates Numbering and other actions that you can use as a template or model for creating your own actions. The following procedure describes how to access the Accela-created actions, how to apply them, and how to modify them. If you want to create new Bates Numbering actions, refer to the Adobe Acrobat documentation.
To access and apply existing actions, including the Accela created ones
With a PDF open, select Tools in the toolbar to expose the Tools side panel.
Select Action Wizard.
Several options become available: you can create a new action, edit an existing action, or call an existing action from the list of available actions.

Click an action in the list to apply it to the current document.
To use Accela created actions as templates to create your own actions
With a PDF open, select Tools in the toolbar to expose the Tools side panel.
Select Action Wizard.
Select Edit Actions.
An Edit Actions dialog opens.
Select the action you want to use as a template and click Copy.
Click the Save button to create a new Action that is a duplicate of the original.
Highlight the newly created copy and click Rename.
Give your new action a unique name. Do not use “AEDR” in the title. Click Save.
With the newly renamed action still highlighted, click Edit.
In the Edit Action dialog, click the Configure this task icon for the step you want to modify.

Use the Add Header and Footer form to make changes to the step as needed, then click OK.
Repeat the previous steps to configure additional steps if applicable.
Click OK, then click Save.
Saving Annotations and Comments
You can save any annotations, comments, stamps, and measurements that you add to a document during the Electronic Document Review process, back to the Civic Platform application server for others to view. Accela recommends that you save/publish frequently. When all reviews are complete, you can then merge all the annotations, comments, stamps, and measurements together with the original PDF file and save this new document to the record with a new name. The original PDF remains in its unedited state.
Note:
To publish commentary/annotations or check in revisions to the Civic Platform server, you must launch the document that you are reviewing from Civic Platform. |
To save/publish your annotations
Review a PDF document launched from Civic Platform. You may use any review tools or measurement tools available in Adobe Acrobat Pro to annotate the document.
Click the Publish Comments button
 in the Accela
Add-on Tools to save your work to the Civic Platform application server.
Other colleagues with access to the document can view your annotations.
in the Accela
Add-on Tools to save your work to the Civic Platform application server.
Other colleagues with access to the document can view your annotations.
To check in a document with all revisions
Review a PDF document launched from Civic Platform. You may use any review tools or measurement tools available in Adobe Acrobat Pro to annotate the document.
-
Click the Check In Revision button
 in the Accela
Add-on Tools to merge all saved annotations, comments, stamps, and
measurements with the PDF file you are reviewing.
in the Accela
Add-on Tools to merge all saved annotations, comments, stamps, and
measurements with the PDF file you are reviewing. -
Save the new file to the Documents tab for the record, while preserving the original PDF file in submitted state. Be sure you save your file with a PDF extension (do not assume that it is appended automatically), or the file might not get checked in.
Viewing Other Reviewer Comments within the PDF
You can view the comments, stamps, measurements, and annotations of other reviewers when you are working with Electronic Document Review documents. It can be helpful to know what other reviewers may have said or discovered.
To get review comment updates
Open a PDF document from Civic Platform using the Review link
Click the Get Updates button
 in the Accela Add-on Tools to publish your
comments to the Civic Platform application server, and then download all
comments and annotations published by other Civic Platform users for the
current document.
in the Accela Add-on Tools to publish your
comments to the Civic Platform application server, and then download all
comments and annotations published by other Civic Platform users for the
current document.
Interacting with Document Review Comments from Civic Platform
You can search for, review, edit or delete the comments and annotations made on a PDF attachment via the Doc Review Comments tab on the Document Information window.
Topics
Viewing and Editing the Document Review Comments
All comments and annotations made on a PDF document attachment by a reviewer are viewable from the Document Information window for the document after the reviewer has clicked the Publish Comments button in Adobe Acrobat Pro.
To view and edit a document’s comments
Locate the document you want to edit. You can do this by going to the Documents tab for the selected record or to the Sub Tasks tab on the Workflow page.
You can also use Global Search to locate the document. See Searching for a Document for more information.
Select View Document Info from the Actions menu for the document you want to edit.
The Document Information window launches.
Click the Doc Review Comments tab in the left panel.
The Doc Review Comments page displays.
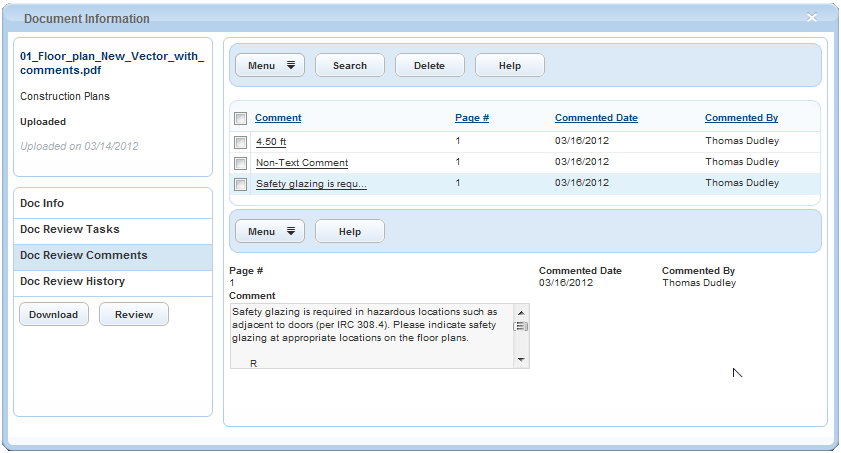
You can use Search to locate a particular comment. Search criteria include a search by document page number, by comment date, by reviewer, and by comment content. See Using the Search Features for more information about searching in Civic Platform.
Edit the Discipline or Status of the comment as needed.
The status of a comment is either Open or Closed. In Adobe Acrobat Pro, if you set a document comment to the Canceled, Completed, or Rejected status and publish the comment, the comment status is Closed in the Doc Review Comments tab. If you change the status of a comment from Open to Closed in the Doc Review Comments tab, the comment no longer displays in Adobe Acrobat Pro in the subsequent document reviews.
If you are working on a document which is a re-submittal of an existing document, the comments list of the document includes all the Open comments of the existing document. If you open the re-submittal document in Adobe Acrobat Pro, the comments display in the document in the same position as in the previous document.
Click the link at the comment to view the comment details. If the comment is added from a checklist item, the checklist item information displays as read-only with the comment details
Deleting Review Comments on a Document from Civic Platform
You can remove review comments from a document via the Doc Review Comments tab on the Document Information window.
Note:
There are 2 reasons to be careful when deleting comments: 1) Removing comments from the Doc Review Comments tab in Civic Platform replicates to the document itself. After you remove the comments in Civic Platform, they disappear in the PDF as well. 2) Civic Platform does not prompt you to confirm the deletion. The second you click Delete, the action is irreversible. |
To remove one or more review comments
Access the Doc Review Comments tab for the desired document as described in Viewing and Editing the Document Review Comments.
The Doc Review Comments page displays.
Select each comment you want to delete.
The Document Information window launches.
Click the Delete button.
Civic Platform removes the comments in both Civic Platform and in the PDF document.
Viewing the Document Review History for a Document
You can use the Doc Review History tab on the Document Information window to view a historical listing of information about interactions with the document, beginning with the initial upload of the document and including any saves, check-in actions, and re-submissions.
To view the document review history
Locate the document you want to work with. You can do this by going to the Documents tab for the selected record or to the Sub Tasks tab on the Workflow page.
You can also use Global Search to locate the document. See Searching for a Document for more information.
Select View Document Info from the Actions menu for the document you want to edit.
The Document Information window launches.
Click the Doc Review History tab in the left panel.
The Doc Review History page displays.

View additional details by clicking the right-arrow carets in the left column.