Microsoft SQL Server 2012 Reporting Services
Topics
- Prerequisites
- Install Microsoft SQL Server 2012 Reporting Services
- Validate the MS SQL Reporting Services Configuration
- Configure Authentication Modes
Prerequisites
| Microsoft Visual Studio 2010 Service Pack 1. |
| Microsoft .NET Framework 3.5 SP1 or higher. |
Install Microsoft SQL Server 2012 Reporting Services
- Double-click setup.exe to launch the installation.
- Click New SQL Server stand-alone installation or add features to an existing installation.
- Click OK to continue after the installer checks your installation setup. Correct any failures to proceed with the installation.
- Enter your product license key and then click Next.
- Click I accept the license terms and then click Next.
- Click Include SQL Server Product Updates and then click Next.
- Click Install to install the setup files.
- Click Next after the installer checks your installation setup. Correct any failures to proceed with the installation.
- Click SQL Server Feature Installation and then click Next.
- On the Feature Selection screen, click Select All. Change the Shared feature directory as needed. Click Next.
- On the Instance Configuration screen, specify a Named instance or use the default instance. Change the Instance root directory as needed. Click Next.
- On the Disk Space Requirements screen, verify that you have enough disk space as per the requirements, and then click Next.
- On the Server Configuration screen, specify the service accounts and the collation configuration, and then click Next.
- On the Database Engine Configuration screen, select Windows authentication mode, select (or add) an Administrator user, and click the Data Directories tab to set specifics. Click Next.
- On the Analysis Services Configuration screen, select Multidimensional and Data Mining Mode, select (or add) an Administrator user, and click the Data Directories tab to set specifics. Click Next.
- On the Reporting Services Configuration screen, select an Administrator user and then click Next.
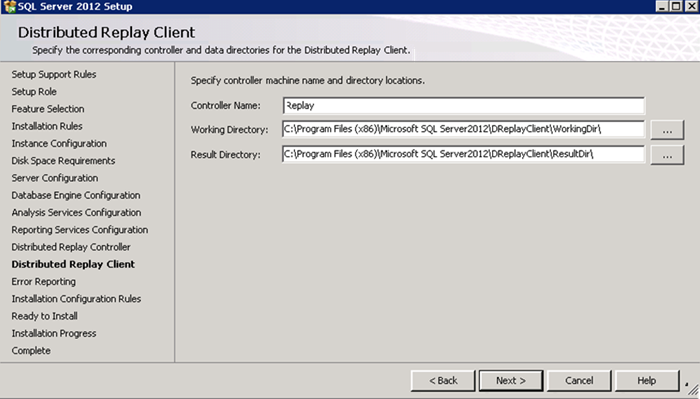
- Configure the information on the
Distributed Replay Client screen (as
shown), and then click
Next.
- On the Error Reporting screen, indicate whether or not to send error reports to Microsoft, and then click Next.
- Click Next to continue after the installer checks the installation setup. Correct any failures to proceed with the installation.
- On the Ready to Install screen, Click Install. The installation progress displays.
- When the Computer restart required notice appears, click OK.
- Click Close.
- Restart your computer.
Validate the MS SQL Reporting Services Configuration
- Go to Windows Start menu > All Programs
> Microsoft SQL Server 2012 > Configuration
Tools > Reporting Services Configuration
Manager.
The following screen displays.
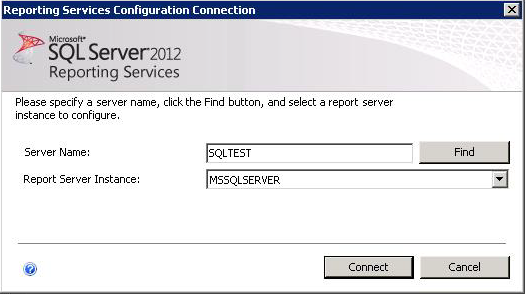
Connect to the server.
The following screen displays.
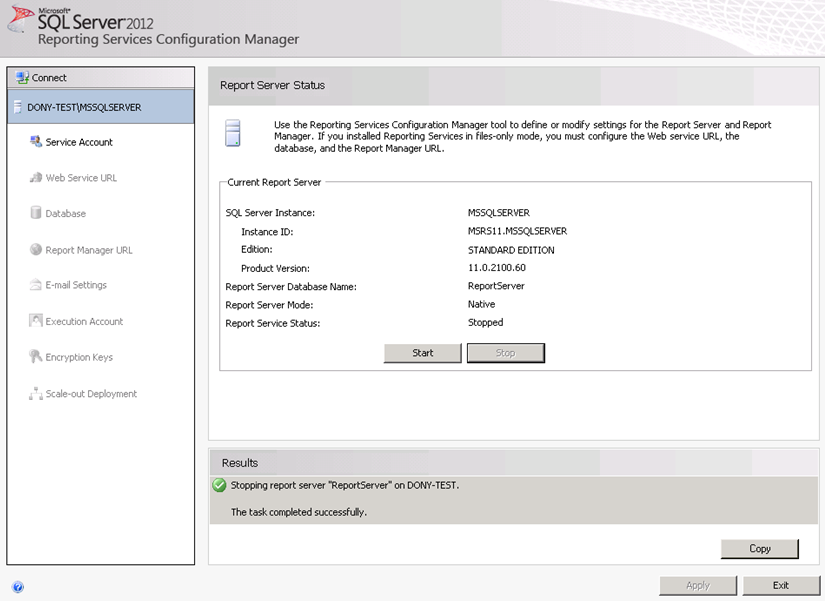
Select the report server in the left pane, and then click Start.
Select the Web Service URL option in the left pane, and then click the link that displays in the right pane. Validate that it opens successfully.

Select the Report Manager URL option in the left pane, and then click the link that displays in the right pane. Validate that it opens successfully.

If the URLs do not open successfully, change the server name to the IP address in the URL, and try again. For example:
Web Service URL: http://10.50.130.93/ReportServer
Report Manager URL: http://10.50.130.93/Reports/Pages/Folder.aspx
Configure Authentication Modes
After you install MS SQL 2012 Report Server, use Reporting Services Configuration Manager to initialize the MS SQL Report. Go to .
MS SQL 2012 Report Server defaults to Specify Negotiate or NTLM authentication. This is the default authentication information in rsreportserver.config:
<Authentication>
<AuthenticationTypes>
<RSWindowsNegotiate/>
<RSWindowsNTLM/>
</AuthenticationTypes>
<EnableAuthPersistence>true</EnableAuthPersistence>
/Authentication>
Topics
Anonymous Access
Because MS SQL 2012 no longer supports anonymous access, manually configure the installation to enable it.
- Copy the AnonymousSecurity.dll file
from the MS SQL 2008 installation directory.
Example:
<Installation Dir>/reports/mssql/2008/ReportServer/bin/Microsoft.Samples.ReportingServices.AnonymousSecurity.dll
Paste it into the MS SQL 2012 installation directory. Example:
C:\Program Files\Microsoft SQL Server2012\MSRS11.MSSQLSERVER\Reporting Services\ReportServer\bin
- Go to: C:\Program Files\Microsoft SQL Server2012\MSRS11.MSSQLSERVER\Reporting Services\ReportServer\rsreportserver.config
- Add this code to the
rsreportserver.config
file:
<Security>
<Extension Name="None" Type="Microsoft.Samples.ReportingServices.AnonymousSecurity.Authorization, Microsoft.Samples.ReportingServices.AnonymousSecurity"/>
</Security>

<Authentication>
<Extension Name="None" Type="Microsoft.Samples.ReportingServices.Anonymous
Security.AuthenticationExtension, Microsoft.Samples.ReportingServices.AnonymousSecurity"/>
</Authentication>
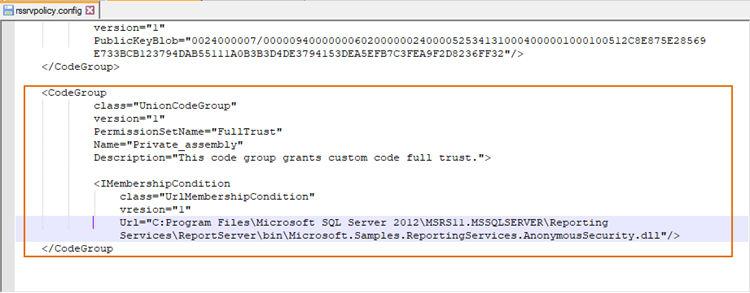
- Configure code access security. Add this code
into the rssrvpolicy.config file in the
ReportServer
folder:
<CodeGroup
class="UnionCodeGroup"
version="1"
PermissionSetName="FullTrust"
Name="Private_assembly"
Description="This code group grants custom code full trust.">
<IMembershipCondition
class="UrlMembershipCondition"
version="1"
Url="C:\Program Files\Microsoft SQL Server2012\MSRS11.MSSQLSERVER\Reporting Services\ReportServer\bin\Microsoft.Samples.ReportingServices.AnonymousSecurity.dll"/>
</CodeGroup>
Because this sample project had no strong name, we are using URL membership in this example. Replace the highlighted text with your URL:
- Go to C:\Program Files\Microsoft SQL
Server2012\MSRS11.MSSQLSERVER\Reporting
Services\ReportServer\rsreportserver.config
and change the AuthenticationTypes in the
rsreportserver.config file to
Custom:
<Authentication> <AuthenticationTypes> <Custom/> </AuthenticationTypes> <EnableAuthPersistence>true</EnableAuthPersistence> </Authentication> - Go to: C:\Program Files\Microsoft SQL
Server2012\MSRS11.MSSQLSERVER\Reporting
Services\ReportManager, then change
authentication mode to None, and set
identity impersonate to false in the
web.config
file:
<authentication mode="None"/> <identity impersonate="false"/> - Go to: C:\Program Files\Microsoft SQL
Server2012\MSRS11.MSSQLSERVER\Reporting
Services\ReportServer, then change
authentication mode to None and set
identity impersonate to false in the
web.config
file:
<authentication mode="None" /> <identity impersonate="false"/> - Restart the report server to finalize the Anonymous Access configuration.
- Go to .
- Open this URL in a browser on a second machine (using your IP in place of the example IP): http://10.50.130.93/Reports
- Copy the ReportFacade.aspx and
ReportFacade.aspx.cs files from the
installation directory to the ReportManager and
ReportServer folders.
Example: Copy the 2 files from this location: <Installation Directory>/reports/mssql/2012/ReportManager/
And paste the files into these 2 locations: C:\Program Files\Microsoft SQL Server2012\MSRS11.MSSQLSERVER\Reporting Services\ReportManager\
C:\Program Files\Microsoft SQL Server2012\MSRS11.MSSQLSERVER\Reporting Services\ReportServer\
- Add this code into the web.config file
in the ReportManager folder (using your IP in
place of the example
IP):
<appSettings>
<add key="URL" value="http://10.50.130.93/ReportServer/ReportService2005.asmx"/>
[Note: In this example, http://10.50.130.93/ReportServer is the report service URL, replace the URL with the one you are using.]
<add key="reportFolders" value="/"/>
</appSettings>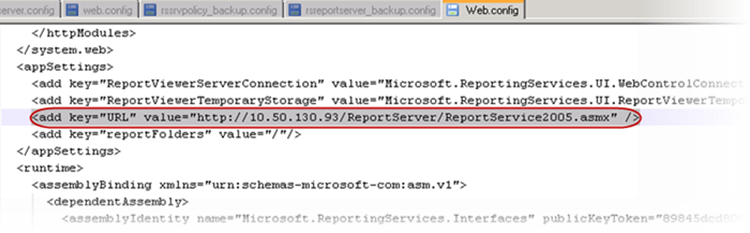
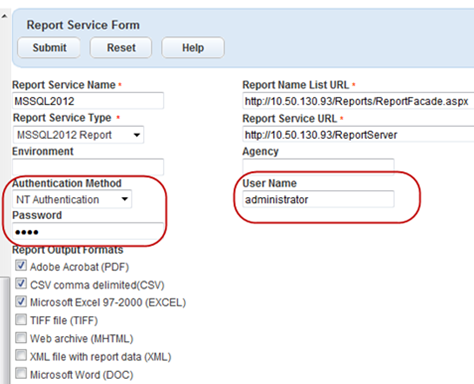
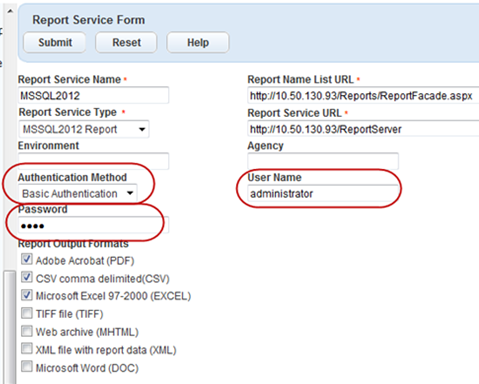
- Go to , and enter these URLs (using your
IP address in place of the example IPs):
- Report Name List URL: http://10.50.130.93/Reports/ReportFacade.aspx
- Report Service URL: http://10.50.130.93/ReportServer
- Report Manager URL: http://10.50.130.93/Reports
Basic Authentication
- Go to the installation directory. Example: C:\Program Files\Microsoft SQL Server2012\MSRS11.MSSQLSERVER\Reporting Services\ReportServer\
- Change the AuthenticationTypes in the
rsreportserver.config file to
RSWindowsBasic:
<Authentication> <AuthenticationTypes> <RSWindowsBasic/> </AuthenticationTypes> <EnableAuthPersistence>true</EnableAuthPersistence> </Authentication> - Go to C:\Program Files\Microsoft SQL
Server2012\MSRS11.MSSQLSERVER\Reporting
Services\ReportManager, then change
authentication mode to Windows, and
set identity impersonate to true in
the web.config file:
<authentication mode="Windows" /> <identity impersonate="true"/> - Go to C:\Program Files\Microsoft SQL
Server2012\MSRS11.MSSQLSERVER\Reporting
Services\ReportServer, then change
authentication mode to Windows, and
set identity impersonate to true in
the web.config
file:
<authentication mode="Windows" /> <identity impersonate="true"/> - Go to , then change these fields:
NT Authentication
- Go to the installation directory. Example: C:\Program Files\Microsoft SQL Server2012\MSRS11.MSSQLSERVER\Reporting Services\ReportServer\
- Change the AuthenticationTypes in the
rsreportserver.config file to
RSWindowsNTLM:
<Authentication> <AuthenticationTypes> <RSWindowsNTLM/> </AuthenticationTypes> <EnableAuthPersistence>true</EnableAuthPersistence> </Authentication> - Go to C:\Program Files\Microsoft SQL
Server2012\MSRS11.MSSQLSERVER\Reporting
Services\ReportManager, then change
authentication mode to Windows and
set identity impersonate to true in
the web.config
file:
<authentication mode="Windows"/> <identity impersonate="true"/> - Go to C:\Program Files\Microsoft SQL
Server2012\MSRS11.MSSQLSERVER\Reporting
Services\ReportServer, then change
authentication mode to Windows and
set identity impersonate to true in
the web.config
file:
<authentication mode="Windows" /> <identity impersonate="true"/> - Go to , then change these fields: