Working with Checklists and Route Sheets
Checklists and route sheets are tools designed to help inspectors complete inspections. A checklist may be a checklist, a questionnaire, or an outline of the steps involved in a particular type of inspection. A route sheet is comparable to a day planner, as it lets an inspector organize all of the inspections for which he or she is currently responsible.
Topics
About Checklist Items
A checklist contains a number of checklist items for inspectors to use. When inspectors work with a checklist during an inspection, they set a status for each checklist item on the list. The scores of all the checklist items automatically populate, and some checklist items may be automatically checked as “major violation.” The total score and number of major violations determine the inspection result, including inspection status and inspection grade.
Some agencies set certain checklists and checklist items as required. Required checklists with required checklist items must be completed. However, if a required checklist does not have any required checklist items, you can skip the checklist. If a checklist is not required, checklist items may not be required either.
Adding a Checklist to an Inspection
Your agency may configure a checklist for each type of inspection your agency does. If your agency has not defined a checklist for an inspection type you are working on, you can add one from a list of reference checklists. You can also copy checklists from a one inspection type to another.
To add a checklist to an inspection
Locate the inspection you are working on, either via the Inspections main link or via the Inspections tab for the record you are working with.
Click the link for the inspection that you want to update.
Civic Platform displays the inspection details.
Click the Checklists tab.
Click Search.
From the Group drop-down list, choose the group that includes the checklist you want to add to the inspection.
Civic Platform displays a list of Reference Checklists attached to the selected Checklist group.
Select the checklist(s) you want to add. To select all reference checklists, select the box at the top of the list.
You can also enter a Checklist ID. The Checklist ID displays on the checklist detail page when you enter the inspection results.
Click Submit.
Civic Platform updates the checklist list.
Copying a Checklist to an Inspection
You can copy a checklist from one inspection and apply it to another. If an inspection already has a checklist associated with it and you copy the same checklist over to the inspection, Civic Platform will overwrite the original checklist with the copied version.
Note:
Access to a checklist is assigned to an inspection based on the specific inspection security settings by your agency administrator. For example, if an inspection is read-only, you can only view it. You cannot modify, delete, or copy checklists assigned to the inspection. |
To copy a checklist to an inspection
Locate and open the application to which you want to apply the inspection information.
Civic Platform displays the Application Summary page.
Navigate to Inspection tab.
Civic Platform displays the Inspection Type list.
Click the inspection type name you want to view.
Civic Platform displays Inspection details.
Click the Checklist tab.
Civic Platform displays the Inspection Checklist page.
Hover your mouse on Menu to display a command menu, then click Copy.
Civic Platform displays the Look up Checklists.
Search for and select the record with the checklist(s) you want to copy over.
Select the record you want and click Submit.
Civic Platform displays the inspection list and checklists from the record.
Select the checklists you want to copy.
Click Submit.
Civic Platform returns to the original inspection type and then displays all checklists.
Adding Checklist Items to a Checklist
When a checklist does not contain a checklist item that you want, you can add a checklist item from any existing reference checklist.
To add a checklist item to a checklist
Locate the inspection you are working on, either via the Inspections main link or via the Inspections tab for the record you are working with.
Click the link for the inspection that you want to update.
Civic Platform displays the inspection details.
Click the Checklist tab.
Civic Platform displays the checklist currently associated with the inspection.
Click the link for the checklist you want to work with.
Civic Platform displays a list of checklist items.
Click the Add link next to the Checklist Items heading in the list.
The checklist item selection window displays.

Locate the desired checklist item.
If known, choose the Checklist Group and Checklist that contains the checklist item from the drop-down lists, or enter the checklist item key word and click the search icon.
Select the desired checklist item, and click Select.
Civic Platform adds the checklist item into the checklist.
If necessary, you can click the Delete link next to the checklist item that you newly added to remove the item from the checklist. Note that you cannot remove a checklist item that your agency administrator configured in the checklist.
Completing a Checklist
Completion of a checklist enables inspectors to keep a record of detailed inspection results, and may also serve as a checklist during an inspection.
Unless you have supervisor permission, you must complete all the required checklists in an inspection before you set an inspection status to Approved. However, if you set the inspection status to Pending or Denied, there is no validation that required checklists have been completed.
To complete a checklist
Locate the inspection you are working on, either via the Inspections main link or via the Inspections tab for the record you are working with.
Click the link for the inspection that you want to update.
Civic Platform displays the inspection details.
Click the Checklists tab.
Civic Platform displays the checklists currently associated with the inspection.
Click the link for the checklist you want to complete.
Civic Platform displays a list of checklist items.
For each checklist item, select a status. All required items must be completed.
When you select an item status, the item score auto-populates with a pre-defined value for the status. You can also enter the item score manually.
The total score and the number of major violations for the checklist automatically updates when you change the status and score of a checklist item.
Note:(1) If you have no supervisory privileges, your agency administrator may only allow you to modify the checklist item statuses, and forbid you from editing inspection result, inspection grade, checklist total score, and checklist major violation.
(2) You can click the History link in the History column of a checklist or checklist item, to view the history results of the checklist or the checklist item.
Click Submit.
Managing Attachments Associated with a Checklist Item
You can associate attachments to checklist items and manage those attachments as needed.
To manage attachments associated with a checklist item
Locate the inspection you are working on, either via the Inspections main link or via the Inspections tab for the record you are working with.
Click the link for the inspection that you want to update.
Civic Platform displays the inspection details.
Click the Checklist tab.
Civic Platform displays the checklists for the inspection.
Click the link for the checklist you want to complete.
Civic Platform displays a list of checklist items.

Expand the desired checklist item, then do one of the following.
To associate documents or image files with the checklist item, click the Upload File icon.
For instructions, see Attachments.
Civic Platform lists attachments under the checklist item. Checklist item attachments are also accessible via the Attachments tab for the inspection that the checklist item belongs to.
To open or download an existing attachment, click the link to the attachment name.
To remove an attachment, click the Delete icon next to the desired attachment.
Removing a Checklist from an Inspection
If you add the wrong type of checklist to an inspection, you can remove it. Be careful not to delete completed checklists as you may lose inspection details recorded on the checklist.
To remove a checklist
Locate the inspection you are working on, either via the Inspections main link or via the Inspections tab for the record you are working with.
Click the link for the inspection that you want to remove.
Civic Platform displays the inspection details.
Click the Checklists tab.
Select the checklist that you want to remove.
Click Delete.
Civic Platform updates the checklist list.
Organizing a Route Sheet
A route sheet helps inspectors organize inspections by minimizing the time and distance that they travel. Contact your agency administrator to enable this feature.
To organize a route sheet
Navigate to the Inspections portlet.
Civic Platform displays a list of inspections.
Click Route Sheet.
Civic Platform displays the Inspection Route Sheet page.

Select the relevant department from the Department drop-down list.
Civic Platform populates the Inspector drop-down list based on the department selection.
Select an inspector from the Inspector drop-down list. Click Current User to populate the field with your user name.
Define the date range for the scheduled inspections in the From and To fields.
Click Filter.
Civic Platform filters the inspection list.
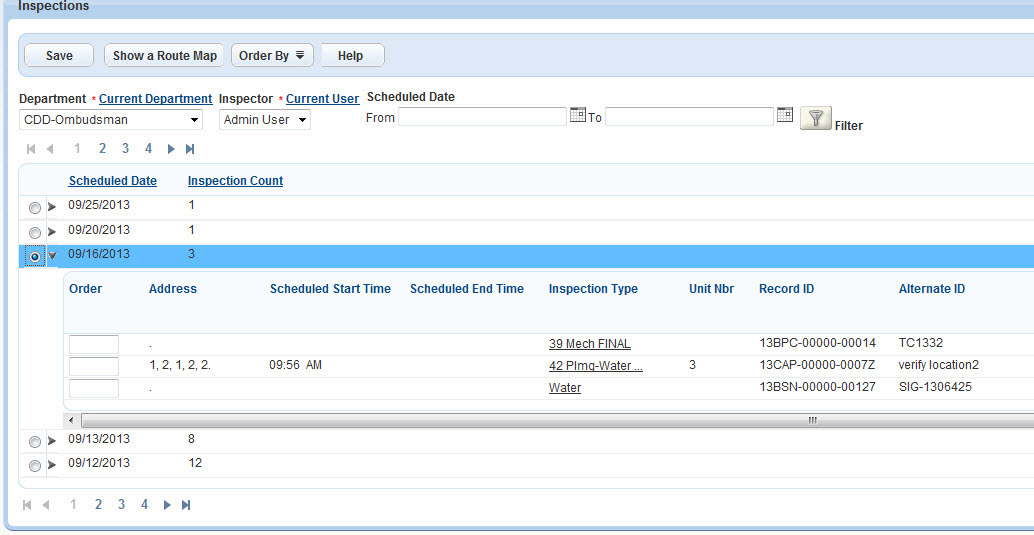
Select the date for which you want to route inspections.
Civic Platform displays the inspection list.
Optimize your inspection route. You can use GIS, or you can use a third party optimizer, provided your agency has configured the integration for it.
To use Accela Silverlight GIS:
Review the inspection list and update inspection details. For field definitions, see Inspection Route Sheet Fields.
Enter a value in the Order field to determine the inspection order, if needed.
Click Show Route Map. Re-route the inspection list using Accela Silverlight GIS functions.
Accela Silverlight GIS displays the inspection route based on the order of the inspections:
If inspections are in numerical order, Accela Silverlight GIS displays the inspection route in assigned order. If some but not all inspections are in numerical order, Accela Silverlight GIS displays the inspection route in the assigned order. Inspections without an assigned numerical order display as individual markers. If none of the inspections are in numerical order, Accela Silverlight GIS optimizes the inspection route by distance and displays the route.
Use the Accela Silverlight GIS Actions menu to route the inspection.
For example, use the Optimized by Distance map command to route inspections for minimal travel distance. Use the Optimized by Time map command to route inspections for minimal travel time.
Use the Send Items Order map command to send the route list to Civic Platform.
Civic Platform updates the route list.
To use a third-party optimizer:
Note:To use this feature, your agency must integrate a third-party route optimizer with Civic Platform. Contact your agency administrator for help.
Click Order By, then select an option from the drop-down menu. Options include Public Transit, Walking, Driving, and Show Locations on Map.
If you select Show Locations on Map, Civic Platform launches the map viewer and plots the inspections on the map.
Click Save.
Civic Platform saves the route list.
Accessing a Checklist from a Route Sheet
While you are viewing the individual inspections for a particular application, you may want to view the checklist associated with a particular inspection on the route sheet.
To access a checklist from a route sheet
Access the Classic Administration Portlet. See "Accessing the Classic Administration Portlet" in Accela Civic Platform Administrator Guide.
Click Daily tab.
Go to the Inspection portlet. If you are using default settings, this appears on the Inspections main link.
Civic Platform displays a list of inspections.
Click the Route Sheet link.
Civic Platform displays the Inspection Route Sheet page.

Click the red dot for the inspection you want.
Civic Platform displays the Inspection Checklist Summary screen.
Accessing a Checklist Item from the Inspection Documents Portlet
You can access a checklist item from the Documents tab on an inspection record.
To access a checklist item from the Inspection Documents portlet
Find the inspection you are working on with one of the following approaches:
Go to the record open the application. In the Inspections tab, click the link to the inspection you want.
Go to the Inspection portlet. In theInspection Type column, click the link to the inspection you want.
Click the Documents tab.
Civic Platform displays the attachments associated with the inspection and the attachments associated with the checklist items of the inspection.
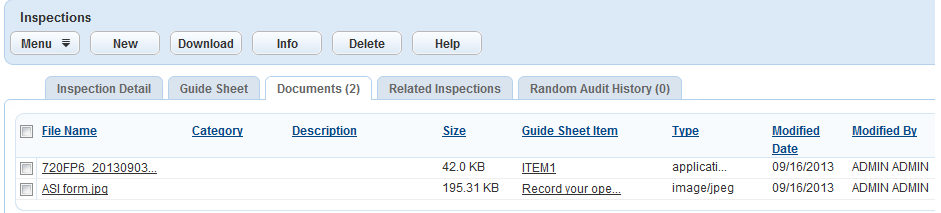
Click the link to the desired checklist item.
Civic Platform displays the details about the checklist item.

Update fields as needed.
Click History to view a history actions for the checklist item.