Managing Inspection Flows and Milestones
Topics
Managing Inspection Flow Processes
Topics
Adding an Inspection Flow Process
Each Inspection Group Code defines its own inspection flow process, which lists a series of tasks you must complete before issuing a certain type of permit or license. As necessary, you can set up additional inspection flow processes at any time. You can also add or delete tasks from a process at any time. However, as the inspection administrator, you must be certain to consider the effects when changing the inspection flow process after a specific inspection flow task has started.
To add an inspection flow process
Access the Classic Administration page (Accessing Classic Administration).
Choose Inspection > Inspection.
Civic Platform displays the Inspection - Search screen.
Complete one of these options:
Search for an inspection group code and then click Submit.
Civic Platform displays the Inspection - Browse screen.
Click Search or scroll through the list.
Click the red dot of the inspection group code you want.
Civic Platform displays the Inspection - Edit screen.
Create a new inspection group code and then click Add. For further details on this task, refer to Adding an Inspection Type.
Civic Platform displays the Inspection Group-Add window.
Enter a name for the Inspection Group Code. The maximum number of characters for a group code name is twelve. This code is not case sensitive. You can use any combination of upper and lowercase characters.
Click Submit.
Refer to Table 1 for complete field descriptions.
Civic Platform displays the Inspection - Edit screen.

Update any of the Inspection - Edit fields, specifying Yes in the Flow Enable drop-down list if the Inspection Type belongs in the inspection flow process.
Refer to Table 1 for complete field descriptions.
To add inspection types, see Establishing Inspection Types.
Click Update.
Click Inspection Flow.
Civic Platform displays the Inspection Flow Process - Edit screen.
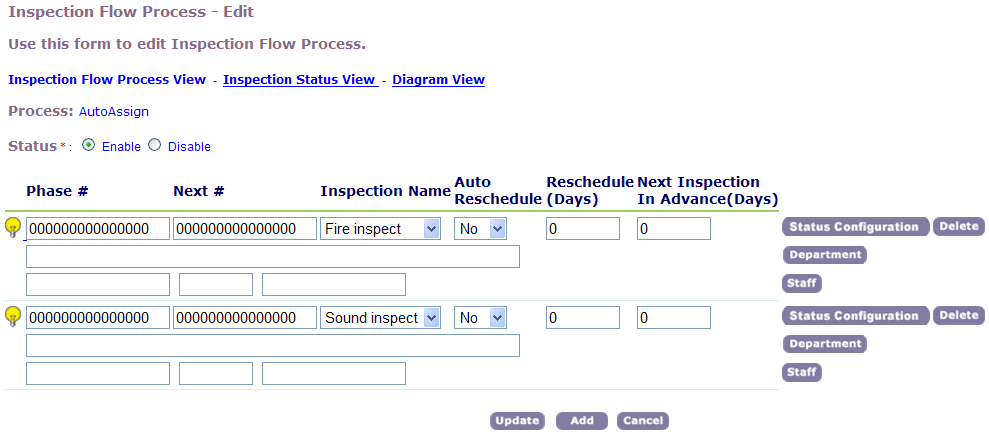
Complete the fields.
Civic Platform supplies the default inspection flow process. Update the fields for each task in the inspection flow process. For a description of fields, see Table 1.
Note:Click the yellow light bulb left of the task. Use the Task Flow Assistant to help you set up phase and next numbers.
Click Add to add other inspection types to the inspection flow.
Click Update.
Table 1. Inspection Flow Process Fields Auto Reschedule Choose “Yes” if you want to automatically reschedule the inspection when the previous inspection status attains Approved status. Diagram View To obtain a visual reference of the inspection flow process, the diagram view link displays a flow diagram of the inspection flow process. See Viewing a Process Diagram Delete To remove the Inspection Name from the inspection flow process. Note: If there is only one Inspection Name in the flow process and you delete it, you also delete the entire flow process from Civic Platform. Department/Staff Use the Department button to search for the department that is responsible for the task. To search for a specific staff member, complete only the Staff field. Civic Platform automatically populates the Department field with the corresponding department and Staff information.
Inspection Name Enter the name of the inspection task you want to display for users. Inspection Status View Review the hierarchy of the inspection flow process set up for the inspection group code. See Viewing Process Status. Next # Enter the 15-digit number that identifies one or more tasks in the workflow process that you want to activate after this task is complete. For more information about each component of a Next number, see Designing Workflows. Next Inspection In Advance (Days) The number of days before you can schedule the next inspection in the flow. For example, if you set this field to “8” and you schedule “Initial Building Inspection” for 8 days, meaning its status does not change for 8 days, then you can schedule the next inspection type in the flow.
Phase # Enter the 15-digit number that identifies the position of this task in the workflow process and its relationship to other tasks. For more information about each component of a Phase number, see Designing Workflows. Reschedule (Days) The number of days before you can schedule the inspection after it enters a pending status. For example, if you set this field to 5, and the “Sewer Inspection” status changes to Pending, you cannot reschedule this inspection until 5 days pass. Staff Use the Staff button to search for a department and a staff member that is responsible for the task. Status Configuration Specify the status that the inspection type must obtain in the flow process. You can also choose to define the next step or the resulting action for the inspection after attains this status.
Reviewing an Inspection Flow Process and Status
Topics
Viewing a Process Diagram
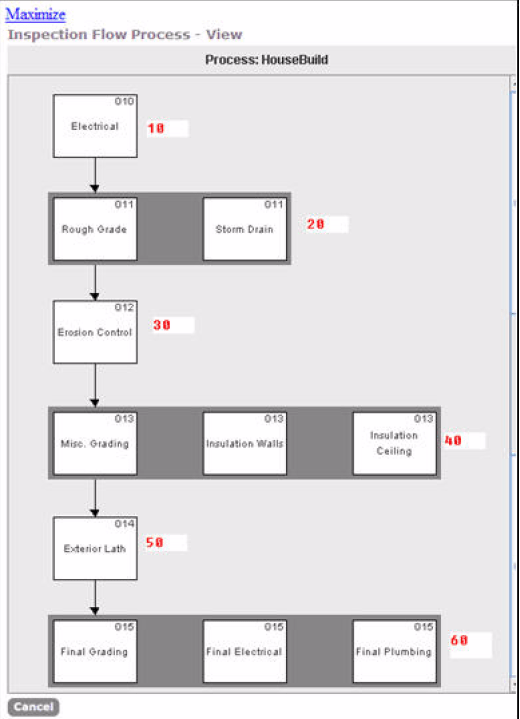
Viewing an inspection flow process lets you see a visual representation of the process using a flowchart. Seeing a picture of a process can help to better understand how each task relates to other tasks, and can help you catch any errors.
To view a process diagram
Access the Classic Administration page (Accessing Classic Administration).
Choose Inspection > Inspection.
Civic Platform displays the Inspection - Search screen.
Search for the inspection group code that you want.
Click Submit to locate all inspection group codes.
Enter part of the inspection code and then click Submit.
Click the red dot that next to the inspection code you want.
Click the Inspection Flow button.
Click the Diagram View link.
Civic Platform displays the flow chart.
To restore the size of the window, click Restore.
When you finish viewing the process, click Cancel or close the view window.
Viewing Process Status
You can view the status of every task in a workflow process. The Process Statuses view, lets you see the relationship between tasks and task statuses, and link to the Inspection Flow Process Status in Figure 1.
Figure: Inspection Flow Process Status
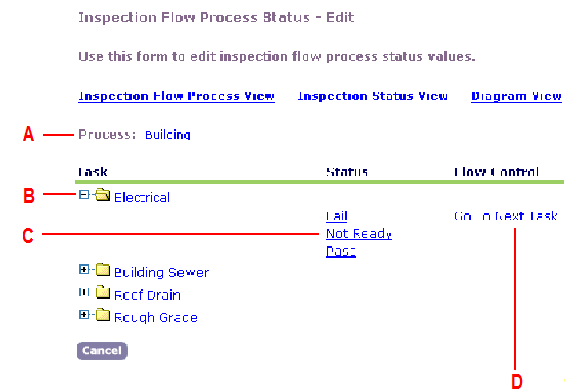
| A | Process. Current inspection group code of this hierarchy. |
| B | Task. Inspection type in order of first to last task. |
| C | Status. Statuses set for the task. Click a status item to change it. |
| D | Flow Control. The resulting action of the status item. Click a status item to change the flow control. |
To view an inspection flow process
Access the Classic Administration page (Accessing Classic Administration).
Choose Inspection > Inspection.
Civic Platform displays the Inspection - Search screen.
Search for the inspection group code that you want.
Click Submit to locate all inspection group codes.
Enter part of the inspection code and then click Submit.
Click the red dot that next to the inspection code you want.
Click the Inspection Flow button.
Civic Platform displays the Inspection Flow Process - Edit screen.
Click the Inspection Status View link.
Civic Platform displays the Inspection Flow Process Status - Edit screen.

Click the plus sign (+) to expand the task.
Click a Status item to modify its status.
Civic Platform displays the Inspection Flow Status - Edit screen.
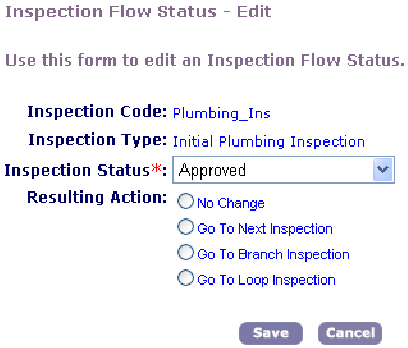
Set the Inspection Status for the task, and modify the Resulting Action (in the flow control column) as needed.
Click Save.
Managing Inspection Milestones
After the supervisor updates the inspection milestone values in the application, Civic Platform re-generates the inspection flow data based on the new inspection milestone values. For more information about editing the inspection milestones for an application, see “Editing Inspection Milestones” in the Accela Civic Platform User Guide.
To configure Inspection Milestones
Note:
You receive a warning message when you update the process configuration type. For example, if you change the existing Inspection Flow to an Inspection Milestone flow, a confirmation displays, “Do you really want to change the selection of “Configure By”? Civic Platform deletes the configured inspection flow and related result status configuration information.” |
Create or edit the inspection milestone flow.
Locate the Inspection Group Code for the inspection group to which you want to add milestones, or add a new Inspection Group.
For information about searching for, editing, or adding an inspection group, see Managing Inspection Groups.
Civic Platform displays the Inspection - Edit page.
Select the Inspection Milestone option and click Update.
Click the Inspection Flow button.
Civic Platform displays the Inspection Flow Process - Edit page.

Enter a Milestone value for each inspection type.
Click Update.
Note:Each Milestone listed on this page must have a value. To remove an inspection type, click Delete. To add an inspection type, click Add.
Click Diagram View to view the flow order.
Civic Platform displays the inspection milestone flow.
Associate the inspection group code with the desired record type.
For information about adding the inspection group code to the application type, see Creating and Configuring Records.