Managing Work Orders
Once work order records are created, they can be edited and updated individually or in batches. You can also print work orders to provide hard copies for field workers, copy information from an existing work order to another work order or Set, and attach different file types as needed.
Topics
Creating a Work Order
You can either create work orders individually for an existing asset, or you can batch create them by setting up Preventive Maintenance (PM) schedules.
There are two options for creating individual work orders:
The application intake form allows you to view many fields when creating, editing, or reviewing an application or service request. It combines the information from many of the tabs associated with a record.
The single portlet entry and review form is organized into sections that correspond with record detail tabs.
If your agency has Accela GIS, you can also use it to create work orders. An advantage to this is the ability to create multiple work orders for multiple assets at one time. It also provides a visual of the assets and their location.
For information about creating preventive maintenance (PM) schedules which enable your agency to schedule specific preventative maintenance tasks for an asset, see Preventative Maintenance Schedules.
If the type of work order has a primary work order template associated, the basic work order information defined in the primary template is automatically populated into the Assigned to Department, Assigned to Staff, Description, Work Order Type and Priority fields on the work order form during work order creation. After the work order is submitted, the cost items, parts, and work order tasks within the primary template are automatically associated with the work order and are shown under the corresponding tab.
Topics
Creating a Work Order via the Application Intake Form
Creating a work order via an intake form can be convenient because all of the fields needed to create a work order are located on one form instead being distributed across multiple tabs. Fields may be sorted into sections.
To create a work order via an intake form
Navigate to the Work Orders portlet.
Civic Platform displays a list of work orders.
Click New.
Civic Platform displays the work order details in a new window.
Define the type of work order that you want to create by completing the Group, Type, Subtype, and Category fields.
Click Submit.
Civic Platform displays a work order form.
Complete the fields with available data. See Work Order Fields for field definitions.
Do one of the following.
Use Search to find and associate an asset.
Click Search.
Civic Platform displays an Asset Search page in a pop-up window.
Enter search criteria as appropriate.
Click Submit.
Civic Platform displays the search results.
Select the asset(s) you want to attach to the work order and click Select.
Civic Platform attaches the asset(s) to the work order.
Use the GISmap system to locate and associate an asset.
Click GIS.
Civic Platform generates the GIS map view.
Use the GIS toolbar and map to select a group of assets
Civic Platform displays results in the Selected Objects list.
Select the item(s) to add to the work order.
Choose Link Objects to Work Order from the drop-down list
Click Submit.
Civic Platform attaches the asset(s) to the work order.
Use Delete to remove an asset from a work order
Select the asset(s) to be removed from the work order.
Click Delete.
Click Validate to validate the fields in the work order. You may skip this step and click Submit directly. Civic Platform still performs validation before submitting the work order.
Note:If a work order is associated with an asset that has active conditions, a Condition Notice window displays, listing all the active conditions for the asset. If the severity of an active condition = Lock, validation fails. See Conditions for more information.
Click Submit.
Civic Platform returns to the work order list portlet, and updates the work order record detail tabs.
Creating a Single Work Order
You can create single work orders using the New Work Order (Record) by Single form. This is a template that often minimizes the data required for the work order, bypassing the extensive data entry process of the permit intake form. The New Work Order (Record) by Single form can be used from the work order list portlet or from Accela GIS. For more information on how to create a work order using GIS, see Creating Work Orders via Accela GIS.
To create a single work order
Go to the Work Orders portlet.
Civic Platform displays a list of work orders.
Click Create by Form.
Civic Platform displays the work order template selection portlet in a new window.

Choose the type of work order you want to create by selecting an option from the Work Order Template or Work Order Type drop-down list.
Civic Platform displays the New Work Order (Record) by Single Form.
Complete the fields with available data. See Work Order Fields for field definitions.
Click Submit.
Creating Work Orders via Accela GIS
Accela GIS can be an efficient vehicle for creating work orders. Instead of searching and selecting each individual asset and linking them to each individual work order, Accela Silverlight GIS allows you to select an area within the map viewer and display all assets in that location, providing not only a visual of the assets, but enabling you to automatically link a group of assets to a work order.
To create a work order using GIS
Navigate to the Work Orders portlet.
Civic Platform displays a list of work orders.
Click GIS.
Accela GIS map viewer displays.
Using the Selection tool, select the objects you want to include in the work order.
From the GIS Data tab within the Select List tab, mark the check box for each item you want to link to a work order.
Select either Create Single Work Order or Create Multiple Work Orders from the drop-down list.
Click Submit.
Civic Platform displays the work order template selection portlet in a new window.
Choose the type of work order you want to create by selecting an option from the Work Order Template or Work Order Type drop-down list.
Civic Platform displays the New Work Order (Record) by Single Form.
Complete the fields with available data. See Work Order Fields for field definitions.
Click Submit.
Civic Platform creates the work order (provided all the work order fields pass validation)
Note:If a work order is associated with an asset that has active conditions, a Condition Notice window displays, listing all the active conditions for the asset. If the severity of an active condition = Lock, validation fails. See Applying Asset Conditions on Work Orders for more information.
Creating a Work Order from an Asset List
You can generate a work order from an asset list, enabling you to create a group work order for all chosen assets or create individual work orders for each item.
To create a work order from an Asset List
Navigate to the Assets portlet.
Civic Platform displays the Assets portlet.
Select the asset(s) you want to generate a work order for.
Click New WO.
Civic Platform displays a message informing you that separate work orders will be created for each asset.
- Optionally, click GIS (or Map) to plot the assets on a map.
The map displays the selected assets, and lists them on the Records panel. To create work orders from the Records panel, select the assets you want to generate a work order, and choose Create a Work Order or Create Multiple Work Orders from the Actions menu. For example:

Do one of the following:
If you selected only one asset, click OK.
If you selected more than one asset and you want to generate individual work orders for each asset, click OK.
If you selected more than one asset and you want to generate one work order for all assets, click Cancel.
Note: If you click the wrong button by mistake, click Cancel on the next page to begin again.
Choose the Work Order Template and Record Type from the drop-down lists.
Civic Platform displays the New Record by Single window.
Complete the fields with available data. See Work Order Fields for field definitions.
Verify that all assets are attached to the work order in the Assets section at the bottom of the page.
Click Submit.
Civic Platform validates the work order fields and creates the work order, provided the validation is successful.
Note:If a work order is associated with an asset that has active conditions, a Condition Notice window displays, listing all the active conditions for the asset. If the severity of an active condition = Lock, validation fails. See Applying Asset Conditions on Work Orders for more information.
Click one of the asset IDs from the asset list associated with the new work order.
The Work Order tab displays the updated work order information.
Viewing and Updating Work Orders
Users can view a list of work orders as well as a summary of individual work orders. Work Order List and Detail Portlets, illustrates the work order list as well as the work order detail portlet that displays when a work order is selected from the list.
Figure: Work Order List and Detail Portlets
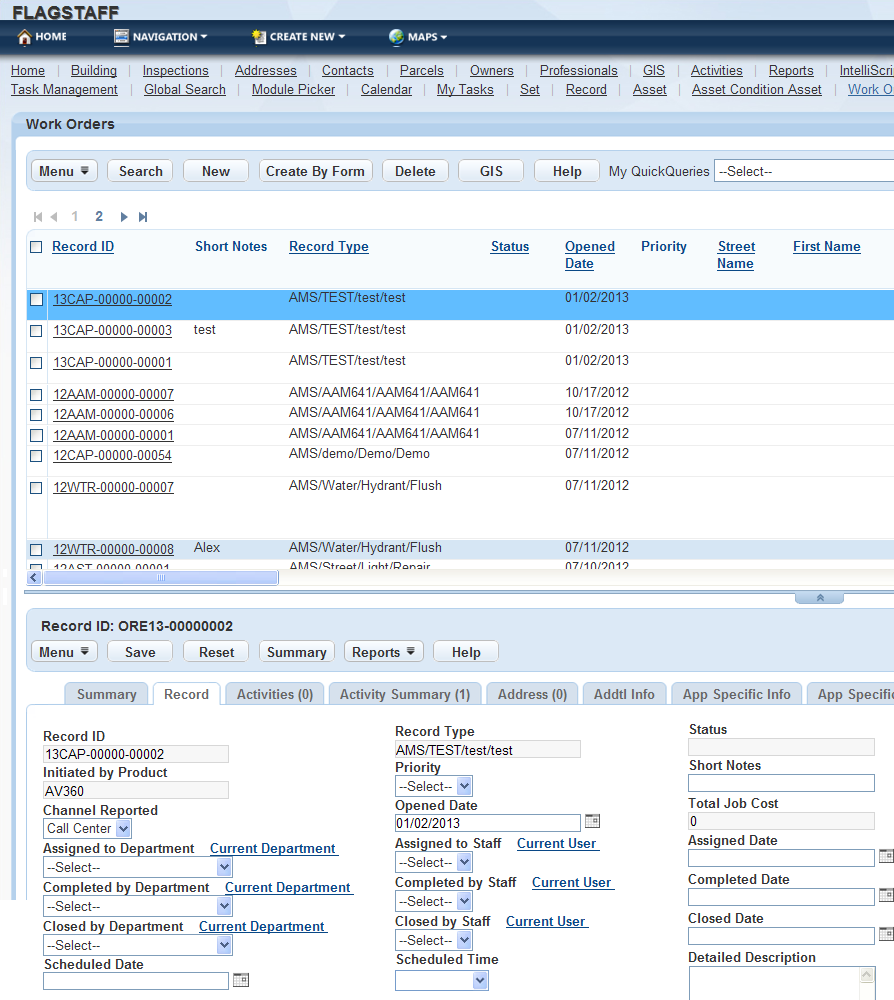
| A | Record ID Link. Click the Record ID link associated with the work order that you want to view. |
| B | Record ID. When you click the Work Order ID in the Work Orders list portlet, Civic Platform displays the work order details on the tabs below. |
| C | Record Detail tabs. Each of the tabs displays related or associated Work Order detail information. |
Topics
Viewing and/or Updating a Work Order
You can quickly access a list of work orders that you are responsible for and make changes as needed.
To view and/or update work orders
Navigate to the Work Orders portlet.
Civic Platform displays a list of all of the work orders currently assigned to you.
Apply a QuickQuery if needed. See 1-understandingQuickqueries.html#id7b225ea6-c25f-4411-a278-59eabca45a46 for more information
Click an ID link to view work order details.
Civic Platform displays the details on the Record tab. You can select different tabs to view various details.
If you want to update the work order, edit the data as needed. See Work Order Fields for field definitions.
Click Submit.
Civic Platform saves your information and refreshes the work order list so that it reflects the changes.
Viewing a Work Order Summary
After you create a work order, you can view a summary of major work order details.
To view a work order summary
Navigate to the Work Orders portlet and use Search to locate and select the work order you want to view.
Civic Platform displays the details on the Record tab.
Click Summary.
Civic Platform displays the work order summary.
If you want to update the work order, click the Work Order Detail tab and edit the data as needed. See Work Order Fields for field definitions.
Click Submit.
Civic Platform saves your information and refreshes the work order list so that it reflects the changes.
Viewing Work Order-Associated Data in GIS
Civic Platform allows you to view the related asset, address, and parcel information of some work orders in the GIS viewer, giving you the ability to create a useful map of relevant data. It also allows you to map work order histories to get a visual representation of asset, address, and parcel conditions.
For example, a user searches for all work orders for instances where high‑pressure cleaning was performed over the past six months. The GIS system displays all the pipes that were associated to these work orders, giving you a broad idea of areas where pipe systems are performing poorly.
To view work order-associated data in GIS
Navigate to the Work Orders portlet and use Search to identify the work orders you want to work with.
Civic Platform displays a list of all of the work orders currently assigned to you.
Select the work order(s) you want to map in Accela GIS.
Click GIS.
Civic Platform displays a map of the relevant area, and displays all assets, addresses, and parcels related to the selected work orders.
Using Group Update for Multiple Work Orders
You can edit or update several work orders at the same time if they all require the same change. For example, if you complete many work orders in one day, you can add the same “completed” date to all the records using the Group Update function.
To perform a group update
Navigate to the Work Order portlet and use Search to locate and select the work orders you want to update.
Hover over Menu to display a drop-down menu and then select Group Update.
Civic Platform displays the work order detail fields available for group update.
Update data as necessary. See Group Update Fields for field definitions.
Click Save.
Civic Platform saves your information and updates the work orders you selected with the information you entered.
Printing a Work Order
You may print work order details or a work order list. For example, you may want a list of the work orders that you plan to work with today. You can search for the work orders and then print the list. Or you might print the work order details for a single work order if you are going off site to take care of some aspect of that work order.
Note:
You must have installed Adobe Acrobat or Acrobat Reader in order to view and print. Civic Platform generates printable permits, licenses, applications, and service requests in PDF. |
To print a work order
Go to the Work Order portlet and use Search to locate the work order(s) that you want to print
Civic Platform displays the work order details on the Record tabs.
To print the list of work orders, click Reports above the list.
To print work order details, click Reports above the record detail tabs.
Civic Platform generates a PDF version of either the asset list or the asset details in a new browser window.
Use your browser’s print command to print the permit.
Depending on what browser you use to view PDF files, you may have the option to save the permit PDF to your hard drive or send it as an email attachment.
To look up a work order ID, click Search and enter the desired fields.
Managing Related Work Orders
There are three possible relationships between work orders: parent, child, or sibling. The parent work order is the primary work order, and other work orders are identified in relation to the parent. The parent is easily identified as it has a global icon next to it in the work order list. A child work order is a step down from the parent and is identified by a check box next to it. When there are many child work orders attached to a parent, the relationship of one child work order to another is known as a sibling relationship.
The relationship of a work order is determined when a work order or many work orders are copied. The source or initial work order is the parent and the target work order is the child. When more than one work order is copied from a source parent, this creates the sibling relationship. To view the work orders, select the parent work order, then select the related work orders record tab. From the list all child work orders can be viewed along with the parent. To activate a child work order, select the desired work order from the list. In order to create a parent/child/sibling relationship between work orders, you need to copy data from at least one existing (parent) work order to another (child/sibling) work order.
Topics
Copying Work Order Data to Existing Work Orders
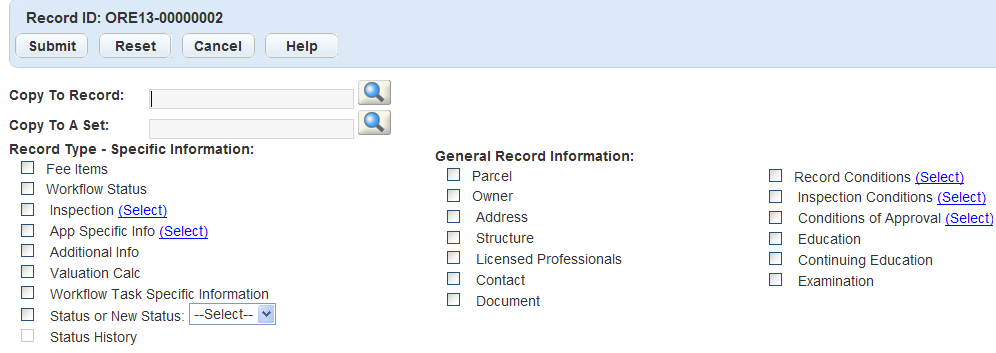
You can copy any data collected on an existing work order to one or move existing work orders, including Fee items, Workflow status, Inspections, Application-specific information, Workflow-task-specific information, Parcel information, People information, and Conditions.
For example, a work order may list the same owner, contact, and licensed professional information as another work order entered into Civic Platform. To save data entry time, you can use this copy function to copy data from one existing work order to another. Once copied, you can modify and update the data in the new work order.
To copy data from one work order to another
Find the existing work order(s) you want to copy.
To look up the work order ID(s), click Search.
Navigate to the Record tab.
Civic Platform displays the work order details.
Hover on the Menu button to display a command menu, then select Copy.
Civic Platform displays the Copy to Application and Copy to a Set page.
Enter the new work order application number or set you want to copy the existing work order information to.
To look up the work order ID, click Search.
Select the work order data elements you want to copy to the existing work orders or set.
Click Submit.
Civic Platform displays a pop-up window indicating the work order or set copied successfully.
Viewing and Activating Related Work Orders
Once you have copied work order information from an existing work order to another work order or Set, you can view and activate the new work order. A work order that is associated with another work order is called a parent, child or sibling work order. For more information on work order relationships, see Managing Related Work Orders.
To view and activate a related work order
Find the work orders you want to view and activate.
To look up the work order ID, click Search.
Click the Related Records tab.
Civic Platform displays a work orders genealogy page.

Click the work orders that you want to view and activate.
Civic Platform displays the child work order record tabs.
Removing Related Work Order Relationships
Civic Platform allows users to remove or delete the parent or child relationship between two work orders. This feature does not delete either of the work orders. It simply removes the relationship between them.
To delete related work order relationships
Find the child work order(s) you want to remove from the parent work order.
To look up the work order ID, click Search.
Click the Related WO & SR tab.
Civic Platform displays a work orders genealogy page.
Select of the child work order(s) you want to delete from the parent work order.
Click Delete.
Civic Platform deletes the child work order(s).
Note:Before removing a work order relationship, make sure you want to remove the relationship. No warning or confirmation message appears when removing related work orders.