Configuring the Cashier Station
There are six general tasks to configure a cashier station. The following is an outline, with references to the corresponding sections of this document:
Set the FIDs for the feature. See Cashier Station FIDs and Standard Choices.
If you are connecting the printer to the workstation through the LPT port, you must configure the workstation’s parallel port which can enable plug-and-play detection. See Configuring Parallel Ports.
Download and install the necessary printer drivers associated with this feature. For Windows XP workstations, these drivers are available for download on the Accela FTP site. For Windows 7 workstations, you must download the drivers from a trusted internet site. See:
Set the web browser security policy. See Setting Up Web Browser Security Policy.
Validate the installation. See Validating the Installation.
Customize the content of the endorsements that print on the backs of checks, according to the agency’s business objectives. See Customizing Endorsement Content.
Note:Do not connect the printer to the workstation until . If you do, the drivers automatically selected when attaching the printer to the workstation install automatically and cause numerous problems. If the incorrect drivers install on the workstation, you must remove them.
Topics
Cashier Station FIDs and Standard Choices
See the Accela Civic Platform Configuration Reference for details setting FIDs and standard choices.
FIDs
8107-Cashier Supervisor
8108-Cashier Payment
8296-Cash Drawer
8261-Open Cash Drawer
8251-Cashier Session
8259-Cashier Session Supervisor
8286-Fees Print Receipt Summary
If the agency chooses not to implement a cash drawer, set FID 8296-Cash Drawer and 8261-Open Cash Drawer to None to eliminate pop-up windows.
Standard Choices
ENABLE_PAYMENT_ENDORSEMENT
Set this standard choice value to Yes to display the Print Application Endorsement button on the receipt summary of a record (Record > Payment tab > Check receipt number > receipt summary).
PAYMENT_REMITTER_CONTACT_TYPE
This standard choice defines a “remitter” contact type, which displays on the check endorsement page. Set the value of this standard choice to a valid contact type, for example, Applicant. You must map this standard choice value to an existing contact type, which you define in the standard choice CONTACT_TYPE.
Configuring Parallel Ports
If you are connecting the printer to the workstation through the LPT port on the workstation, you must configure the workstation’s parallel port. Parallel port configuration enables plug-and-play detection.
To configure to use parallel ports:
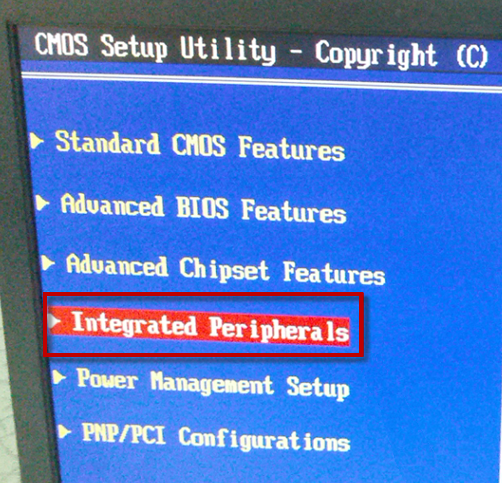
Restart the computer; during reboot, press the appropriate key to enter Setup mode, which is often the Delete key.
The workstation displays the CMOS Setup Utility page.
Select Integrated Peripherals, as shown in this sample screen.
Select I/O Devices, as shown in this sample screen.

Set the parallel port to 378 and set the parallel port mode to Bi-Directional, as shown in this sample screen.

Restart the computer again, this time without pressing any keys.
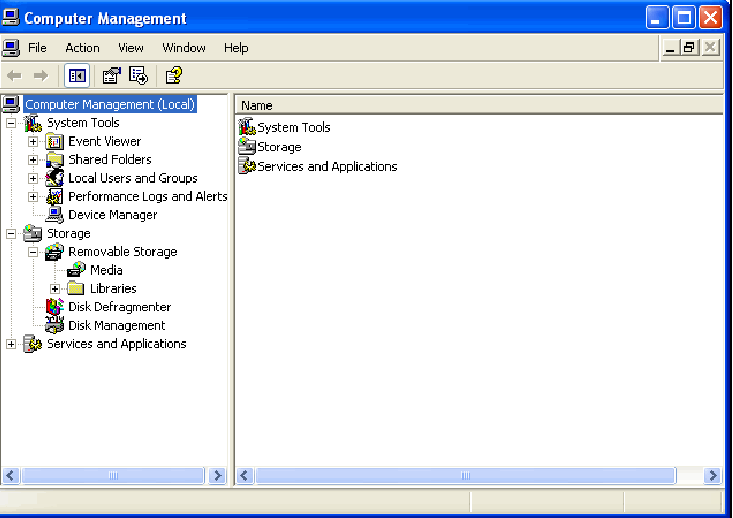
Navigate to
The workstation displays the Computer Management window.
Navigate to
The ECP Printer Port (LPT1) window displays.
Select the Port Settings tab.
Mark the Enable legacy Plug and Play detectioncheck box and select LPT1 from the drop-down list.

Click OK and close all windows.
Installing the Epson Advanced Driver
For the workstation to communicate correctly with the Epson printer, you must install the appropriate printer drivers. The first driver that you must install is the Epson Advanced Driver.
Do not attach the printer to the workstation until instructed to do so. If you do, the workstation automatically selects drivers to run the printer which are incorrect and you must remove them.
Note:
Do not connect the printer to the workstation until . If you do, the drivers automatically selected when attaching the printer to the workstation install automatically and cause numerous problems. If the incorrect drivers install on the workstation, you must remove them. |
To install the Epson advanced driver:
Download the appropriate driver:
Windows XP: ATM_301cE.exe. This driver is available on the Accela FTP site.
Windows 7: APD_453E.exe. You must perform an internet search for this driver and download it from a trusted site.
Extract the contents of the zip file and double-click the executable file to run it.
Choose the operating system (Windows XP or Windows 7) and language.
Note:The remaining screens and steps are for a Windows XP Professional SP3 workstation. If you are configuring a Windows 7 workstation, the screens differ from these examples.
When prompted, specify one of the following check boxes:
USB Driver
Parallel Driver (only if you are Configuring Parallel Ports).
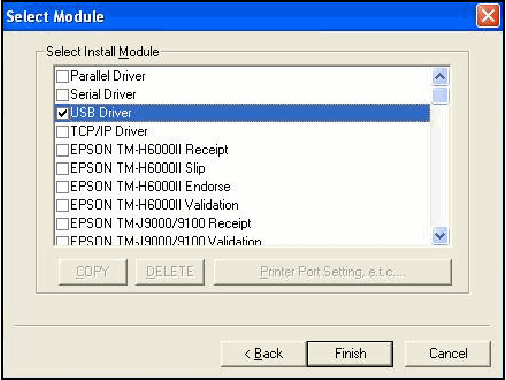
Scroll down this same list in the Select Module window and mark these check boxes for (Ver. 2.XX compatible APD) EPSON TM-U675P.
Mark the Receipt check box for (Ver. 2.XX compatible APD) EPSON TM-U675.
Mark the Slip check box for (Ver. 2.XX compatible APD) EPSON TM-U675.
Mark the Validation check box for (Ver. 2.XX compatible APD) EPSON TM-U675.
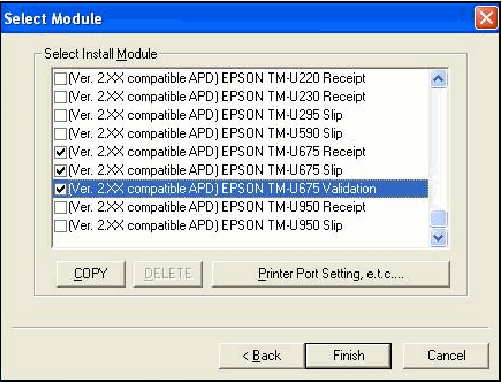
For each of the (Ver. 2.XX compatible APD) EPSON TM-U675 modules (Receipt, Slip, and Validation), set up the Printer Port Settings.
Highlight the (Ver. 2.XX compatible APD) EPSON TM-U675 module and click the Printer Port Setting, etc.button.
Mark the option for the applicable Port Type. USBfor USB port andParallel LPT1 for Parallel mode.
Perform the printer port settings for each of the Slip, Receipt, and Validation (Ver. 2.XX compatible APD) EPSON TM-U675 list items.
Click Finish.
Set the default printer to the Receipt printer.
Navigate to Control Panel > Printer & Faxes.
Click the Receipt printer, then right-click and choose Set as Default Printer from the drop-down list.
Exit the Control Panel.
Shut down the computer.
Connect the Epson Printer to the Workstation with the USB cord or parallel connection cord.
Start the computer. Verify that the printer can successfully print a test document.
Installing the OPOS Driver
After you install and test the Epson Advanced Driver, install the OPOS drivers.
For Windows XP workstations, you must install the OPOS driver and its associated service pack. For Windows 7 workstations, you only need to install one OPOS driver, as described below. Follow the instructions below for a successful OPOS base driver installation.
To install the OPOS driver:
Download the appropriate driver:
Windows XP: OPOSADK250E.exe. This driver is available on the Accela FTP site.
Windows 7: ADK270ER3.exe. You must perform an internet search for this driver and download it from a trusted site.
Note:The remaining screens and steps for a Windows XP Professional SP3 workstation. If you are configuring a Windows 7 workstation, the screens differ from these examples.
- Unzip the
file.OPOSADK250E.zip Go to
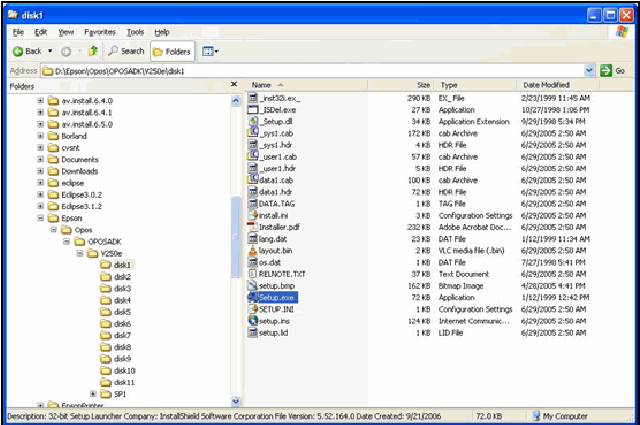
- From the disk1 folder, run
.setup.exe Choose the following settings:
When the release note displays, close the note.
The workstation displays a window with a question about the parallel I/F.
When prompted for parallel I/F (interface), answerNo for USB connection or Yes for Parallel mode, depending on your configuration.
When prompted, restart the computer.
Installing the OPOS Driver Service Pack (Windows XP Only)
This procedure is not applicable to Windows 7. If you are configuring a Windows 7 workstation, skip this step.
After you install the OPOS base driver, as described in the previous section, install the OPOS driver service pack. Follow the instructions below for a successful OPOS driver service pack installation.
To install the OPOS driver service pack:
Download the OPOSADK250ESP1.exe driver from the Accela FTP site.
- Unzip the
file.OPOSADK250ESP1.zip Browse to .
- From disk1, run the
file.setup.exe Restart the computer.
Navigate to .
Run the OPOS setup utility.
The workstation displays the EPSON OPOS ADK Version 2.5E SP1 UPOS window.
Add a new device to POSPrinter
From the device node, right-click POSPrinter and choose Add New Device from the menu.

The Add New Device [Select DeviceNameKey] page displays.
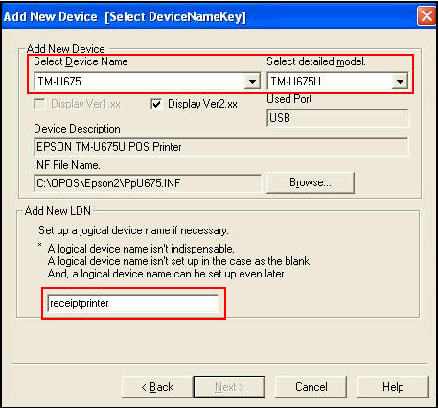
Choose TM_U675 from the Select Device Name drop-down list.
Choose the applicable TM-U675 option from the Select detailed modeldrop-down list. Use TM-U675U for USB port and TM-U675P for parallel port.
Type receiptprinter for the New LDN Name. Do not change this name, you must enter it exactly as shown in the sample screen.
Click Finish.
Add a new device to the cash drawer.
From the device node, right-click Cash Drawer and choose Add New Device from the menu.
The Add New Device [Select DeviceNameKey] page displays.

Choose Standard from the Select Device Name drop-down list.
Choose the applicable Standard option from the Select detailed modeldrop-down list. Use StandardU for USB port and StandardP for parallel port.
Type cashdrawer for the New LDN Name. Do not change this name, you must enter it exactly as shown in the sample screen.
Click Finalize.
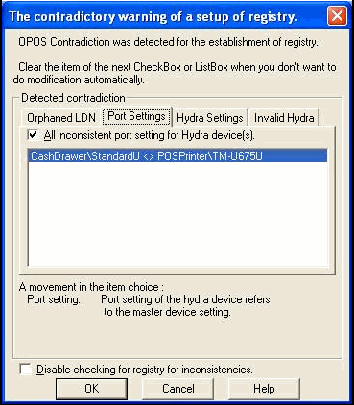
Note:If you get an error message indicating that you assigned another device (POS Printer) to the port, click OK. It is okay for the POS Printer and the Cash Drawer to share the same port because the POS Printer passes through the cash drawer commands.
Figure: Contradictory Warning of a Setup of Registry: