Notification Templates
Topics
Working with Notification Templates
Notification templates are emails, text messages, meeting requests, and Citizen Access announcements, that Civic Platform sends to public users upon a triggering event or action.
Accela provides stock, pre-defined system-level templates, available out of the box with Civic Platform. Administrators can create new notification templates, and can customize:
The content of the message
Which notification type (email or text message) Civic Platform sends when an action occurs that triggers communication
Delayed sending options
You can add parameters to the subject and body of the message. You must declare and assign parameter values in the EMSE scripts. When the specified event or a batch job occurs, the email notification generates and the parameters populate with the matching value passed from the scripts. Parameters are not case-sensitive, but you must enclose them in a pair of double-dollar signs “$$” for example, $$ExaminationID$$. Refer to Embedding Links to Record Detail Page for more details.
Viewing the Notification Template List
The notification template list includes custom notification templates, created by administrators for Civic Platform and Citizen Access. The notification template list also includes pre-defined system-level templates, available out of the box, which administrators can customize to suit the agency’s business objectives.
To view the notification template list
- Go to .
Civic Platform displays the Notification Templates window.

System-level Notification Templates
The following is a complete list of system-level Notification Templates available in communication manager. This includes both Civic Platform Notification Templates and Citizen Access Email Notifications, formerly accessible in Citizen Access Admin > Email Settings.
| AA_MESSAGE_INSPECTION_STATUS_CHANGE |
| AA_MESSAGE_THRESHOLD_NOTIFICATION |
| ACA_ACTIVATION_MESSAGE |
| ACA_AGENCY_ACTIVATION_MESSAGE |
| ACA_MESSAGE_ACCOUNT_VERIFICATION_BY_HYPERLINK |
| ACA_MESSAGE_ADD_NEW_LICENSE_NOTICE_AGENCY |
| ACA_MESSAGE_ADD_NEW_LICENSE_NOTICE_CITIZEN |
| ACA_MESSAGE_ASSOCIATING_LICENSE_TO_MULTIPLE_ACCOUNTS |
| ACA_MESSAGE_ETISALAT_PAYMENT_COMPLETION_FAILED |
| ACA_MESSAGE_ETISALAT_PAYMENT_COMPLETION_SUCCEEDED |
| ACA_MESSAGE_ETISALAT_PAYMENT_RECONCILIATION_RESULT |
| ACA_MESSAGE_ETISALAT_PAYMENT_RECONCILIATION_UPLOAD |
| ACA_MESSAGE_ETISALAT_PAYMENT_REGISTRATION_SUCCEEDED |
| ACA_MESSAGE_INSPECTION_STATUS_CHANGE |
| ACA_MESSAGE_RENEW_LICENSE_AUTO_ISSUANCE |
| ACA_MESSAGE_RENEW_LICENSE_NEW_APPLICATION_NOTICE_AGENCY |
| ACA_MESSAGE_RENEW_LICENSE_NO_AUTO_ISSUANCE_APPROVED |
| ACA_MESSAGE_RENEW_LICENSE_NO_AUTO_ISSUANCE_DENIED |
| ACA_MESSAGE_RENEW_LICENSE_NO_AUTO_ISSUANCE_PENDING |
| ACA_MESSAGE_SCORES_UPDATE_NOTICE_AGENCY |
| ACA_MESSAGE_SCORES_UPDATE_NOTICE_PROVIDER |
| ACA_MESSAGE_SENDPASSWORD |
| ACA_INACTIVATION_MESSAGE |
| ACTIVATION_MESSAGE |
| MESSAGE_ACA_CONNECT_LICENSE_APPROVE_OWNER |
| MESSAGE_ACA_CONNECT_LICENSE_APPROVE_USER |
| MESSAGE_ACA_CONNECT_LICENSE_CONNECT_OWNER |
| MESSAGE_ACA_CONNECT_LICENSE_CONNECT_USER |
| MESSAGE_ACA_CONNECT_LICENSE_DISCONNECT_OWNER |
| MESSAGE_ACA_CONNECT_LICENSE_DISCONNECT_USER |
| MESSAGE_ACA_CONNECT_LICENSE_REJECT_OWNER |
| MESSAGE_ACA_CONNECT_LICENSE_REJECT_USER |
| MESSAGE_ACA_TRADE_NAME_APPROVED |
| MESSAGE_AUTOMATED_PLANREVIEW |
| MESSAGE_NOTICE_BUILDING |
| MESSAGE_NOTICE_ENFORCEMENT |
| MESSAGE_NOTICE_FIRE |
| MESSAGE_NOTICE_PLANNING |
| MESSAGE_NOTICE_PUBLIC WORKS |
| MESSAGE_NOTICE_LICENSE_EXPIRED |
| MESSAGE_NOTICE_RESULT_INSPECTION |
| MESSAGE_PAYMENT_NOTICE_BUILDING |
| MESSAGE_PAYMENT_NOTICE_LICENSES |
| MESSAGE_PAYMENT_NOTICE_PERMITS |
| MESSAGE_PAYMENT_RECEIPT_BUILDING |
| MESSAGE_PAYMENT_RECEIPT_LICENSES |
| MESSAGE_PAYMENT_RECEIPT_PERMITS |
| MESSAGE_RECEIPT_BUILDING |
| MESSAGE_RECEIPT_ENFORCEMENT |
| MESSAGE_RECEIPT_FIRE |
| MESSAGE_RECEIPT_PLANNING |
| MESSAGE_RECEIPT_PUBLIC WORKS |
| MESSAGE_REPORT |
| MESSAGE_SEND_PASSWORD |
| ACA_MESSAGE_ACCOUNT_LOCKED_NOTICE_CITIZEN |
| ACA_MESSAGE_ACA_PROXYUSER_ADD |
| MESSAGE_NOTICE_MEETING_REMINDER |
Creating Notification Templates
Use the procedure below to create templates for outgoing emails, meeting requests, SMS text messages, and Citizen Access notification emails.
To create notification templates
- Go to .
Civic Platform displays the Notification Templates window.
- Click New.
-
Click the General Details tab.
Civic Platform displays the General Details window.

-
Complete these fields:
Table 2. Communication Manager, Notification Template, General Details Tab Template Name Enter a name for the template. Description Enter a description of the template’s purpose. Delay Time and Delay Unit Enter the number of minutes, hours, or days you want to delay sending the message and choose a time interval (minutes, hours, or days) in the Delay Unit field. For example, if you want to send inspection results after 14 days, enter a delay time of 14, and then specify “days” as the delay unit in the next field.
-
If the notification is for email distribution, click the Email Content tab. If the notification is for text message distribution, proceed to .
Civic Platform displays the Email Content window.
-
Complete these fields:
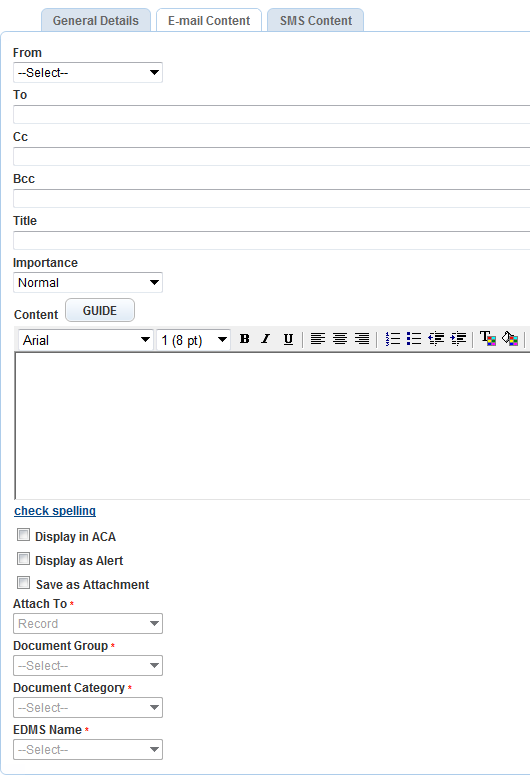
Table 3. Communication Manager, Notification Template, Email Content Tab From Choose a “from” value indicating who the email is from. This name displays to the message recipient. Administrators configure the values that display here when setting up the email account; see Configuring Account Settings. To, Cc, and Bcc Enter specific email addresses or enter EMSE parameters such as $$contacts$$ or $$recordcontactemail$$. You must define these values in the EMSE scripts that initiate the communication. In the Cc and Bcc fields, you can enter an agency email address, which is useful for saving all communications sent to or from a particular department-wide email alias that you set up to retrieve all emails from the server.
Another use case is to configure a script that attaches all emails sent to a Cc or Bcc to records in Civic Platform.Title Enter an email subject or enter an EMSE parameter. To use parameters you must define the values in the EMSE scripts that initiate the communication. For complete details about working with EMSE, refer to the Accela Civic Platform Scripting Guide. Importance Select an importance: low, normal, or high. Normal is the default. Content Enter the content of the message. In addition to standard message text, you can: -- Include variables in the message body. Refer toVariables for a full list.
-- Use HTML code to format the content.-- Add parameters and embed a hyperlink to the Record Detail page in the message body. You must define the parameters and URL in EMSE scripts.
For information on how to define parameter and embed a hyperlink, see Embedding Links to Record Detail Page.Display in ACA Only templates related to examinations and EDR (Electronic Document Recognition) have the Display in ACA field. Select this option to display the notification as an announcement in Citizen Access. For complete details on how to set up Announcements, refer to the Citizen Access Administrator Guide, “Global Settings Configuration” section. Display as Alert Select this option to display an alert informing agency users that they successfully configured the communication. Save as Attachment Select this option to enable the attachments settings that define whether and how Civic Platform attaches notifications to records or email recipients. Attach To This setting is only available for system-level templates, and becomes available when you select the Save as Attachment option. Select Record in the drop-down list to save the email notification as an attachment to associated records.
Select Recipient in the drop-down list, Civic Platform saves a notification as an attachment to the recipients of the notification under the following conditions:(1) The event that triggers when Civic Platform sends the notification contains script that calls the EMSE method attachEmailToEntity to attach the email to specific recipient(s);
(2) The recipient email address specified in the email content is identical with one of the record-associated contacts or licensed professionals.Document Group/Category This setting is only available for system-level templates, and becomes available when you select the Save as Attachment option. Categorize the attachment by first selecting a value from the Document Group drop-down list, then a value from the Document Category drop-down list. It is important to select the Document Group first, because the Document Category drop-down list can be different based on which document group you choose. EDMS Name This setting is only available for system-level templates, and becomes available when you select the Save as Attachment option. Select the Electronic Document Management System (EDMS) you want to save the notification to. -
Click Save.
-
If the message is for text message distribution, click the SMS Content tab.
Civic Platform displays the SMS Content window.
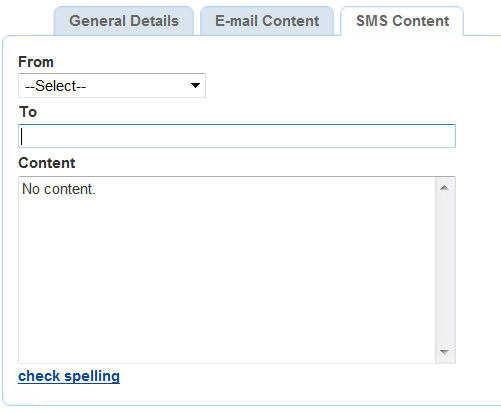
-
Complete these fields:
Table 4. Communication Manager, Notification Template, SMS Content Tab From Choose a “from” value indicating who the text message is from. This name displays to the message recipient. Administrators configure the values that display here when setting up the email account; see Configuring Account Settings. To Enter cellular phone number(s). You can also enter parameters such as $$contacts$$. You must define these values in the EMSE scripts that initiate the communication. Content Enter the content of the text message. This should be a very brief message and can include agency-defined variables, such as record ID, workflow task name and due date, and scheduled inspection time, for example. -
Click Save.
Embedding Links to Record Detail Page
You can embed a hyperlink to the Record Detail page in notification templates. Embedding links enables public users to instantly access the Record Detail page by clicking the hyperlink from the notification. If you restrict record detail page access to registered users, the Login screen displays before the record detail page.
To embed a hyperlink in a notification template to link to the Record Detail page there are four steps:
For complete details about working with scripts, refer to the Accela Civic Platform Scripting Guide.
Creating an EMSE script
Step 1: Create an EMSE script, in which you create a function to get the Record Detail page URLThe URL returned by the function must be in the pattern as shown below:
http://$$ACAWebSite$$/urlrouting.ashx?type=1000&Module=$$Module$$&capID1=$$CapID1$$&capID2=$$CapID2$$&capID3=$$CapID3$$&agencyCode=$$AgencyCode$$
| $$ACAWebSite$$ | Citizen Access website domain. |
| $$Module$$ | Module to which you associated the records. |
| $$CapID1$$, $$CapID2$$, $$CapID3$$ | Record ID fields together with the $$Module$$ and $$AgencyCode$$ to identify a unique record in your agency. |
| $$AgencyCode$$ | Agency code. |
The following code snippet is an example of a function returning the URL of the Record Detail page.
function getACAUrl(){ var acaUrl = “”; var id1 = Accela Automation.env.getValue(“PermitId1”); var id2 = Accela Automation.env.getValue(“PermitId2”); var id3 = Accela Automation.env.getValue(“PermitId3”); var capResult = Accela Automation.cap.getCap(id1, id2, id3); if(!capResult.getSuccess()) { return acaUrl; } var cap = capResult.getOutput().getCapModel(); acaUrl = acaWebServiceSite + “/urlrouting.ashx?type=1000”; acaUrl += “&Module=” + cap.getModuleName(); acaUrl += “&capID1=” + id1 + “&capID2=” + id2 + “&capID3=” + id3; acaUrl += “&agencyCode=” + Accela Automation.getServiceProviderCode(); return acaUrl;}Defining a parameter to assign to returned URL
Step 2: In the EMSE script, define a parameter to assign to the returned URL.The sample code below defines a parameter called $$Url$$. Civic Platform assigns the returned URL by function getACAUrl().
function getParamsForSchedule()
{ … //Define the parameter to assign to the Record Detail page URL.addParameter(params, “$$Url$$”, getACAUrl());
… return params;}Entering parameter to the template body
Step 3: Enter text or parameter to the template body that you want to map to the Record Detail page URL.You can map the URL either to the text or to the parameter in the template body. For each parameter that you add to the template body or its subject, you must assign and define its value in the EMSE scripts. For the sample code of defining parameters, see Defining a parameter to assign to returned URL
Access the Notification Template portlet (Navigating to the Setup).
Open an existing notification template, or create a new one.
To learn how to create a notification template, see Creating Notification Templates.
In the Message Body field, do one of the following:
Enter the text you want to map to the URL of the Record Detail page. For example, Click Here.
Enter a parameter you want to map to the URL. For example, $$AlternateID$$.
Mapping the parameter to Record Detail page
Step 4: Map the text or parameter to the Record Detail page URL.Access the template body.
To learn how to access a notification template, see Entering parameter to the template body
Highlight the text or the parameter in the Message Body field.
Click the hyperlink icon.
Civic Platform displays the Hyperlink window.

In the Hyperlink window, select “https” from the Type drop-down list.
In the URL field enter the parameter you want to assign to the returned URL in the EMSE scripts ($$Url$$, from the sample code snippet in Defining a parameter to assign to returned URL).
Click Save if you are editing an existing template; click Submit if you are creating a new template.
Searching for Notification Template
To search for a notification template
- Go to .
Civic Platform displays the Notification Templates window.
- Click Search.
Civic Platform displays the Notification Template Search form.
-
Complete any fields that display.
-
Click Submit.
Civic Platform returns a list of notification templates that match your search criteria.
Editing a Notification Template
To edit a notification template
- Go to .
Civic Platform displays the Notification Templates window.
-
Click the template name that you want to edit.
If you need to search for the message, Click Search on the top of the list.
Civic Platform displays the template detail portlet.
-
Update any of the fields that display as necessary.
For descriptions of the fields, see Creating Notification Templates.
-
Click Submit.
Deleting a Notification Template
When a notification template becomes outdated, you can delete it from your system. If a batch job uses the deleted notification template, you cannot delete the template. You also cannot delete system templates that come standard with the Accela solutions.
To delete a notification template
- Go to .
Civic Platform displays the Notification Templates window.
- Select the unwanted templates.
-
Click Delete.
Civic Platform warns you that the template might be in use.
-
Click OK if you are sure you want to delete the template.