Additional Report Options
Topics
Using Variables in Reports
Overview
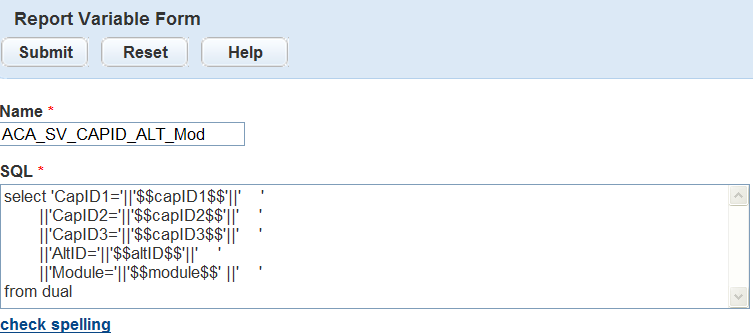
Variables are raw database scripts that you execute directly against the Civic Platform Oracle or MS SQL Server database, outside of a report writer or a development tool. You can incorporate these scripts into a report or report template as parameters and populate them with data from Civic Platform. For example, to extract the full name of the primary owner, use the database script displayed in Figure 1 in the report variable form.
Figure: Report Variable Script for Primary Owner Full Name Query

This tool provides a wide variety of reporting possibilities and is only available to super administrative users with a working knowledge of database scripts. Complicated queries that return large amounts of data effect the performance of the database and slow the responsiveness of the application. For information on how to become a super administrator, contact your Accela implementation specialist.
Report Manager includes a set of standard out-of-the-box session variables. This set of variables include frequently used parameters from Civic Platform such as Department, Module, or Service Provider Code, Today. For more information and a list of these session variables, see Table 1.
Topics
Adding a Variable
You must be a super administrator user to add variables to Report Manager. If you do not have access, contact your Accela Implementation Specialist to change your permissions.
Variables are raw database scripts that you execute directly against an Oracle or MS SQL Server database outside of a report writer or a development tool. You use variables as report parameters to populate specific data in RTF template type reports developed using Microsoft Word. You can also use variables as parameters in a URL string for a URL report. For example, to extract the primary owner full name, use the database script in the report variable form. For instructions on adding this variable to an RTF template, see Using RTF Templates or Setting Up URL Reports Containing Variables.
Civic Platform includes a set of frequently used runtime variables as a standard, out-of-the-box configuration. You can use runtime variables in the WHERE clause of an SQL statement. You must surround runtime variables by “$$” signs and must enclose them in single quotes for Civic Platform to return the values as a string. For example, to retrieve the agency code for the logged in user, use ‘$$ServiceProviderCode$$’. See the image below for an example of how to use the session variable within an SQL script. For a list of the standard runtime variables, see Adding a Report Parameter Variable.
Figure: Example of Runtime Variables in SQL Statement
BEST PRACTICE RECOMMENDATION
It is best practice to test your variables and your scripts in a test environment before running them against a production database or making them available to reports.
This feature provides a way to run queries and simple scripts to return small amounts of data. Do not use this tool to run complicated queries or scripts that return large amounts of data. Running these types of queries against a production database can negatively affect the database and degrade application performance, which causes portlets and lists to load slowly or become unresponsive. It is also possible to lock the database, which prevents you from saving records and causes applications to stop responding.
A best practice recommendation is to add security parameters to these variables. You might have users that do not have permission to view sensitive information, so it is important to write scripts that filter sensitive data according to your agency’s best practices. For example, agencies that share a database must add the $$ServiceProviderCode$$ parameter to display only records created by their agency.
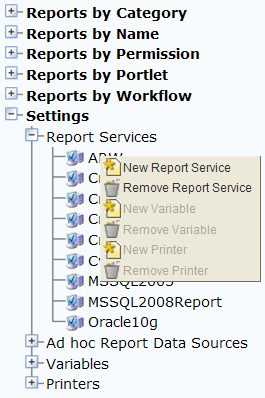
To add a variable
- Access the Report Manager portlet (Accessing the Report Manager Portlet).
- Expand Settings in the navigation tree.
Civic Platform displays the Report Manager setting options.
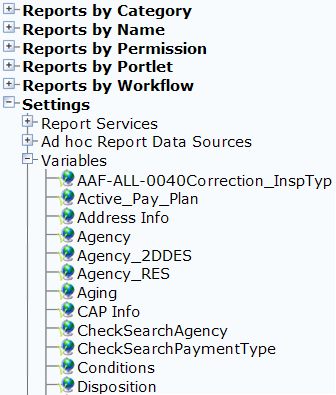
- Expand Variables in the navigation tree.
Civic Platform displays the variables available within Report Manager.

- Right-click Variables and select the New Variable option.
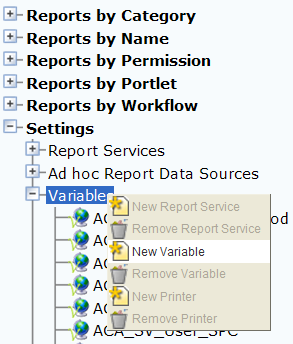
Civic Platform displays the Report Variable form in the right window.

- Complete the following fields:
Name Enter the name to describe the variable. For example, you might name a script that returns the primary owner first and last name, “Primary Owner Full Name.” SQL Enter the database script into the SQL window. Make sure to test the script against the database first. When filter data, you can use standard session variables as described in Figure 2 or hard code the value. You can specify multiple columns in the Select statement as the value of the variable. Note:If the variable populates a drop-down list parameter and its Select statement contains multiple columns, the drop-down list parameter only read the first column value from the Select statement.
- Click Submit..
Civic Platform saves the variable.

Editing a Variable
Editing a variable might be necessary if a query fails against the database or you need to update it for any reason. Any changes to variables results reflect in the reports using the variable. It is important to keep a list of all variables used in each report and review them before making any changes.
To edit a variable
- Access the Report Manager portlet (Accessing the Report Manager Portlet).
- Expand Settings in the navigation tree.
Civic Platform displays the Report Manager setting options.
- Expand Variables in the navigation tree.
Civic Platform displays the variables available within Report Manager.
- Double-click the variable you want to edit.
Civic Platform displays the Report Variable details in the right window.
- Edit the applicable fields below:
Name Update the name of the variable. For example, Primary Owner Full Name. SQL Update the database script in the SQL window. Make sure you test the script against the database first. - Click Submit..
Civic Platform updates the variable.
Removing a Variable
To remove a variable, you must first remove the variable from any reports that use it, specifically RTF template and URL reports. After you remove variable it is no longer available to any reports.
To remove a variable
- Access the Report Manager portlet (Accessing the Report Manager Portlet).
- Expand Settings in the navigation tree.
Civic Platform displays the Report Manager setting options.
- Expand Variables in the navigation tree.
Civic Platform displays the variables available within Report Manager.
- Right-click the variable to remove and select the Remove Variable option.
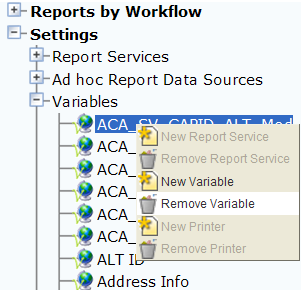
Civic Platform removes the variable.
Adding a Report Parameter Variable
A list of frequently used runtime variables come standard with Civic Platform; you can use them in the WHERE clause of an SQL statement. You must surround the runtime variables by “$$” signs and you must enclose them in single quotes for Civic Platform to return the values in a string. For example, to retrieve the agency code for the logged in user, use ‘$$ServiceProviderCode$$’. Figure 2 displays how to use the session variable within an SQL script.
Table 1 below lists the supported runtime report parameter variables.
| Variable | Name | Description |
|---|---|---|
| $$ID$$ | ID1 | Retrieves the record ID from a specific portlet. This variable works only for portlet-specific reports. |
| $$ID$$ | ID2 | Retrieves a second record ID from a specific portlet. This variable works only for portlet-specific reports. |
| $$capID1$$ | CAPID1 | Retrieves the first 5 characters of the record ID from a specific portlet. Example: CAPID = 01BLD-00000-00018 |
| $$capID2$$ | CAPID2 | Retrieves the second 5 characters of the record ID from a specific portlet. Example: CAPID = 01BLD-00000-00018 |
| $$capID3$$ | CAPID3 | Retrieves the last 5 characters of the record ID from a specific portlet. Example: CAPID = 01BLD-00000-00018 |
| $$department$$ | Department | Retrieves the department of the logged-in user. |
| $$gaUserID$$ | GAUserID | Retrieves the ID of the logged-in user. |
| $$module$$ | Module | Retrieves the module from a specific portlet. For example, if the report is available in the Building list portlet, Civic Platform sends the value “building” to the report. This variable works only for portlet-specific reports. |
| $$serviceProvCode$$ | ServiceProviderCode | Retrieves the ID for the agency. You can use this to filter reports to include records only for the specified agency. It is a required parameter for many reports and agencies that share data. |
| $$FirstName$$ | FirstName | Retrieves the user’s first name. |
| $$MiddleName$$ | MiddleName | Retrieves the user’s middle name. |
| $$LastName$$ | LastName | Retrieves the user’s last name. |
| $$userfullname$$ | UserFullName | Retrieves the user’s full name. |
| $$userGroup$$ | UserGroup | Retrieves the group of the logged-in user. |
| $$userID$$ | UserID | Retrieves the ID of the logged-in user. |
| $$today$$ | Today | Retrieves today’s date. Civic Platform determines this date by the workstation's system date. You can use this variable parameter in calculations to specify a date range. For example, enter $Today$ - 7 to query for all records over the last week. |
| $$portletID$$ | Portlet ID | Retrieves information on a portlet, such as a field name. |
Using RTF Templates
Overview
Agencies can create frequently used letters and forms that use run-time variables to populate data from the Civic Platform database. Variables can be standard session variables such as today’s date and your agency name. Variables can also be custom SQL queries that extract specific data. For example, a warning letter to a citizen about specific code violations can populate with the current date and your agency name using session variables. You can use custom variables for the agency contact information, owner contact information as well as the code violation case # and description. The letter can also include an image, such as the agency’s logo.
You can develop letters and forms using Microsoft Word templates that you save as Rich Text Format (RTF) files. You add these files to Report Manager; they are accessible from the Report Portlet or portlet-specific reports menus. You can also save these files to an Electronic Document Management System (EDMS). You also define the EDMS object to save the report to a record, parcel, workflow, asset condition assessment, inspection, or set. For example, you can save an approval letter to build a new structure to the building permit record. For more information and instructions, see Saving Reports to a Document Management System.
The four major steps to create Rich Text Format (RTF) template based reports include:
Create variables to embed in the report. A variable is an SQL statement that you add directly into Report Manager
Add the variables to Civic Platform using Report Manager so they are available to the RTF report at runtime
Create the report, including variables, using a word processor to create a template that you can save as an RTF file
Adding the RTF report to Civic Platform using Report Manager
For information and instructions on report variables, see Using Variables in Reports.
Topics:
Creating RTF Templates
Rich Text Format (.rtf) template based reports use variables to populate data from the Civic Platform database. Variables can be standard session variables that populate generic data such as today’s date, agency name, user name, and specific module. These types of variables do not require any configuration; you can use them as report parameters. For a list of session variables, see Table 1.
Variables can also be raw Microsoft SQL scripts that run against the database to extract specific information. You can add these scripts to Report Manager and use them in reports, specifically RTF template reports. For information on how to create variables, see Using Variables in Reports.
An RTF report template can have multiple variables. You surround these variables by the “<$” and “$>” signs such as, <$capID$>. When the user runs a report, it replaces the defined variables with the actual value from the SQL statement. You can return variable results in different formats such as a single column and a single row, a single column and multiple rows, or multiple columns and a single row. The examples below display how you can use the different formats within an RTF template report.
Example1. rtf in Figure 3 is an example of an RTF template that uses a variable named <$Fees$>. At runtime, Civic Platform replaces <$Fees$> with the results of an SQL query that returns a single column and multiple records. For an example, see Figure 4.
Figure: Single Column RTF Template Source File

Figure: Single Column RTF Template Output
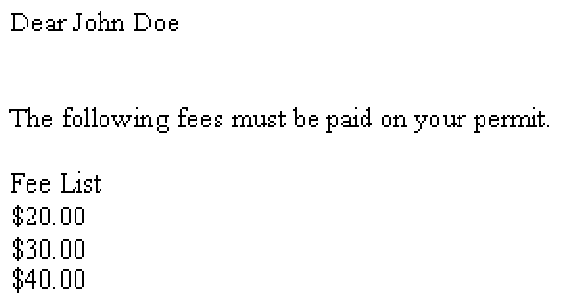
In Figure 4 Civic Platform replaces <$Fees$> with a list of fee values returned from executing the following SQL statement:
Note:
SELECT FEE_VALUE “Fee List” FROM FEES WHERE... |
Civic Platform replaces the heading for the variable <$Fees$> with the name of the column alias “Fee List” from the SQL query. If you do not use an alias, the column name [FEE_VALUE] displays as the column label.
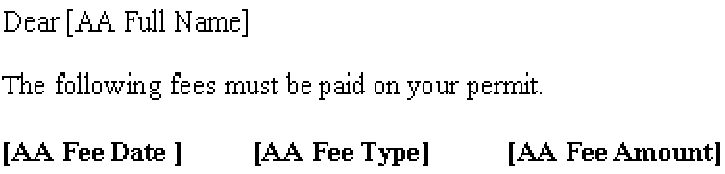
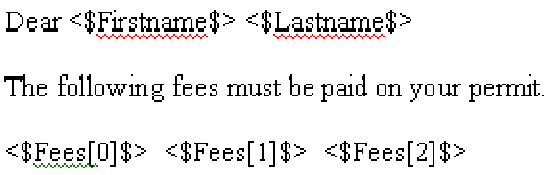
Example2.rtf Figure 5 is an example of an RTF template that uses a variable named <$Fees$> which has multiple columns and multiple rows.
Figure: Multiple Column RTF Template Source File
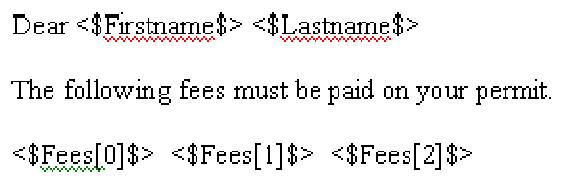
Figure: Multiple Column RTF Template Output
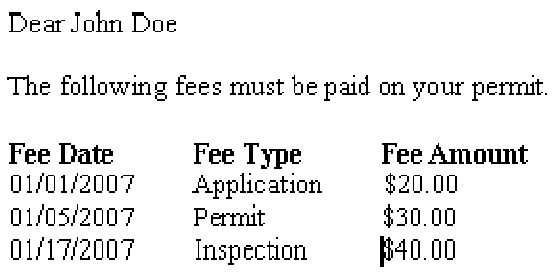
In Figure 5, Civic Platform replaces <$Fees[0]$>, <$Fees[1]$>, and <$Fees[2]$> with a list of fee values from executing the following SQL statement:
|
Civic Platform preserves spaces, tabs, text, or punctuation added to the template, as shown in Figure 6, which enables you to embed variables within the text of a report. For example, the property <$address$> in the city of <$city$> has violated Ordinance No. <$ordinanceNo$>. The result of the report at runtime reads, “The property 111 N. 500 W. in Saint Mary’s City has violated Ordinance No. 0098791.”
Create a template based report using a word processor such as Microsoft Word. After you create a template, you must add it to Report Manager with the appropriate variables and report parameters for the report to function correctly.
To create an RTF Template
- Do the following to create an RTF-template-based report skeleton:
- Open a new or existing Rich Text Format (RTF) file or Microsoft Word document.
- Format the template and leave place holders for the fields you want
populated from Civic Platform.
For example, enter brackets around the fields you want to populate. Civic Platform preserves spaces, tabs, text, punctuation, and/or images.
- Save the template on your local drive.
- Create or use existing MS SQL script variables to populate the placeholders in the RTF report.
Your script might require more than one variable depending on the type of data.
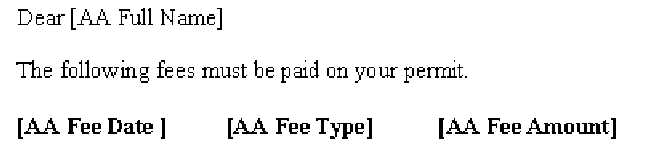
For example, the RTF example requires two variables. The first populates the Owner Name [Full Name], and the second populates the following fee information: [Fee Date], [Fee Type], and [Fee Amount].
The column names in the select statement of the MS SQL script must match the order in which the variables appear in the report. For example, [Fee Date], [Fee Type], and [Fee Amount] populate in this order by entering the associated column names in the order they appear in the select statement of the SQL script as illustrated here:

For more information on creating variables, see Adding a Variable.
- Do the following to set variables in the RTF template:
- Open the template from your local drive.
- Replace the placeholders with the name you want to use to identify the
variable and enclose them in <$ and $>.
For example, if the MS SQL script variable returns fee information, use <$Fees$>. If the variable returns more than one value, add a number to define the order in which it displays in the SELECT statement; start with zero (“0”). The example below uses the SQL statement from Step 2.
- Save the template in Rich Text Format (.rtf) on your local drive.
- Open the template from your local drive.
- Do the following to add the RTF report to Report Manager:
- In the Setup portlet, click the
Report item and choose Report Manager from
the drop-down menu.
Civic Platform displays the Report Manager administration portlets.

- Right-click a Reports by Category option in the
left navigation tree and select New
Report.
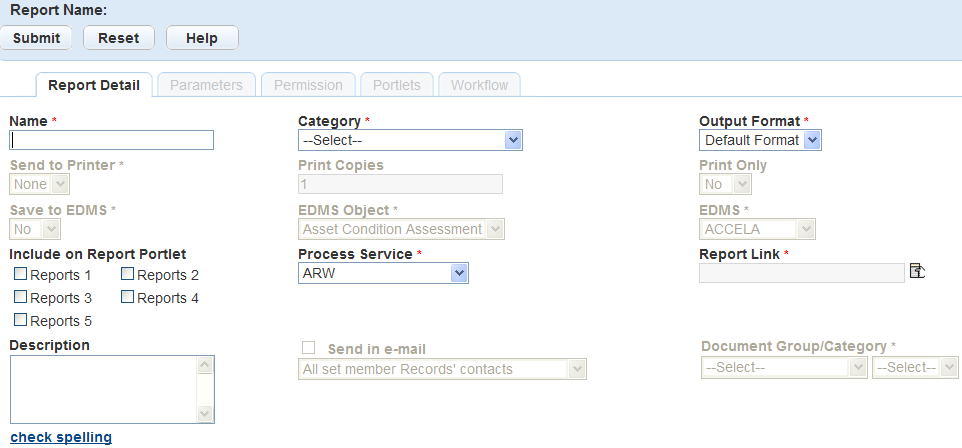
Civic Platform displays a new Report detail form in the right window.
- Complete the following required fields:
Name Enter the name of the report. The Name field is the name that appears in the Reports portlet or portlet-specific report menu. Category Select the category under which you want the report to display. Process Service Select the RTF process service. Civic Platform updates the Report Link to Template and displays a browse button.
- Click Browse to find the report on your local
drive.
Civic Platform displays the Windows Explorer with the folders on your local drive.
- Navigate to and click the report you want to add.
- Click Open.
Civic Platform selects the RTF report and displays the file name for reference.

- Complete the following required fields. For information on additional
optional fields, see Table 1.
Reports Portlet 1 - 5 Select each Reports Portlet on which you want to display the report. For information and instructions on the location of these portlets and how to add them, see Designing Forms for Pages. Save to EDMS Specify whether you want to save the report to EDMS. For more information, see Saving Reports to a Document Management System. - Click Submit..
Civic Platform adds the report to Report Manager and displays it the report under the specified category.
- To preview the report, click Preview. This
preview does not populate the variables but confirms you have the
correct template.
Civic Platform displays a preview of the report.
- In the Setup portlet, click the
Report item and choose Report Manager from
the drop-down menu.
- Do the following to link variable parameters to the RTF report:
- Click the Parameters tab.
Civic Platform displays the Parameters list portlet.
- Click New.
Civic Platform displays the Parameters detail portlet.

- Complete the following required fields. For the additional optional
fields and their descriptions, see Table 2.
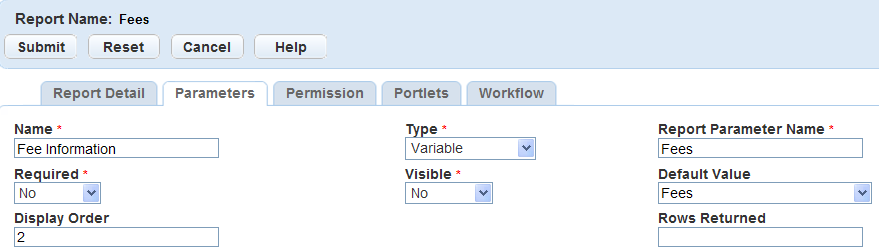
Name Enter the name of the parameter. For example, to add a variable parameter that returns fee information, use “Fees.” Type Select the Variable parameter type. Report Parameter Name Enter the name of the variable. Use this name in the RTF template to specify the location where you want to return and populate the variable values on your report. For example, the template displayed in uses the “Fees” variable. This name must match the exact spelling used in the RTF template.
Visible Select NO to send the parameters directly to the database and automatically populate the RTF report without prompting the user. Default Value Select the SQL script variable, that returns the values for the RTF report. For example, use “Fees” to populate the fee information. Display Order Enter the display order for the variable as it displays in the RTF template. The display order defines the order in which Civic Platform runs the SQL script variables and then returns values. Figure: RTF Report Parameter Detail
- Click Submit..
Civic Platform creates the variable parameter and then displays it in the Parameters list portlet.
- Click the Parameters tab.
Adding RTF Template Reports to Report Manager
After you create your RTF template report and save it to your local drive, you can add it to Report Manager. To add an RTF report you must first define the RTF report service. See Setting Up Report Services for complete instructions on adding an RTF report service.
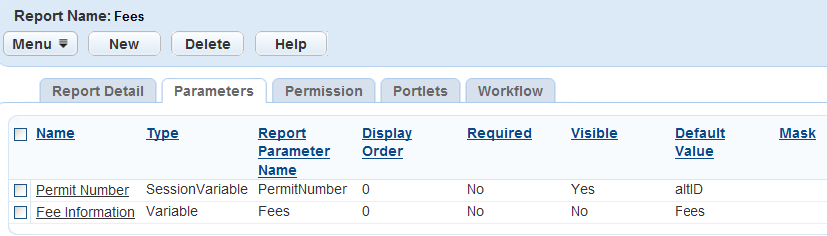
If your RTF template contains variables, you must define those variables as report parameters. For example, if the template contains the variable <$Fees$>, you must identify and define a parameter for Fees. The name of the parameter must match the exact spelling of the variable in the RTF report. If your report contains more than one variable value, you can specify the order in which you want the values to display on the report by defining the display order in the variables; start with 0 (zero). Refer to the following sample screen which illustrates Fee Date, Fee Type, and Fee Value, along with their respective sort order definitions [0], [1], and [2]:
You can save RTF template reports to an Electronic Document Management System (EDMS) allowing the user to save a snapshot of data for historical purposes. You can also save RTF template reports as specific EDMS object types such as records, parcels, workflow, asset condition assessment, inspections and sets. Templates save automatically at runtime. For more information on saving to EDMS, see Saving Reports to a Document Management System.
You can save RTF reports in multiple formats, including Microsoft Word and Adobe Acrobat (PDF). The available output options are native to the report service. After you save an RTF report a Preview button becomes enabled so you can preview the report prior to printing. To update the RTF report, you must make the changes on your local drive and upload the updated template by clicking the Browse button in the Report Detail portlet.
The steps below provide instruction on how to add an existing RTF report for which you previously defined the variables. For instructions on creating a new RTF template report, see Creating RTF Templates.
To add RTF template based reports
- Access the Report Manager portlet (Accessing the Report Manager Portlet).
- Right-click the Reports by Category option in the left navigation tree
and select New Report.
Civic Platform displays a new report detail form in the right window.
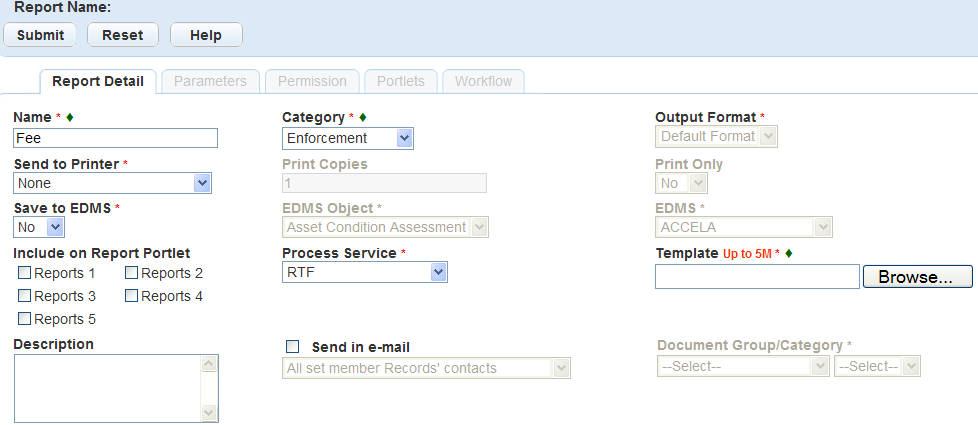
- Complete the following fields. For additional field definitions, see Table 1.
Name Enter the name of the report. The Name field is the name that appears in the report portlet or portlet-specific report menu. Category Select the category under which you want to display the report. Report Service Select the RTF report service. If the RTF report service is not available, you must set it up. For instructions, see Setting Up Report Services. Civic Platform updates the Report Link to Template and displays a browse button.
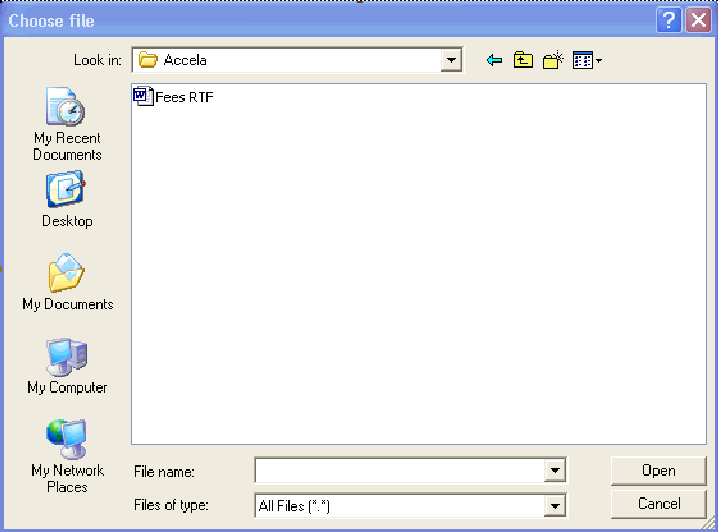
- Click Browse to find the template report.
Civic Platform displays the Windows Explorer with the folders on your local drive.
- Navigate to and click the report you want to add.
- Click Open.
Civic Platform selects the RTF report and displays the file name for reference.
- Complete the following fields. For additional field descriptions, see Table 1.
Reports Portlet 1 - 5 Select each Reports Portlet where you want to display the report. For information and instructions on the location of these portlets and how to add them, see Designing Forms for Pages. Save to EDMS Specify whether you want to save the report to EDMS. For more information, see Saving Reports to a Document Management System. - Click Submit..
Civic Platform adds the report under the specified category.
- To preview the report before saving, click Preview.
Civic Platform displays report preview.
- Do the following to link the variables in the RTF template:
- Click the Parameters tab.
Civic Platform displays the parameters list portlet.
- Click New.
Civic Platform displays the parameter detail portlet.
- Complete the following fields. For field description on additional
fields, see Table 2.
Name Enter the of the parameter. Example, date, status, fees, address info etc. Type Select the Variable parameter type. Report Parameter Name Enter the name of the variable. Use this name in the RTF template to specify the location where you want to return and populate the variable values on your report. For example, the report parameter name for the RTF template in Figure 5 is ‘Fees’. Visible Select NO to send the parameters directly to the database and automatically populate the RTF report without prompting the user. Default Value Select the variable (sql script), that returns the values for the RTF report. Display Order Enter the display order for the variable as it displays in the RTF template. The display order defines the order in which the variable values display on your report. - Click Submit..
Civic Platform creates the variable parameter and then displays in the parameters list portlet.
- Click the Parameters tab.
- To add the RTF template report to run from a specific portlet, such as the Building portlet, click the Portlets tab. For more information on adding reports to portlets, see Attaching Reports to a Portlet with the Report Button.
Saving Reports to a Document Management System
You can automatically save and categorize a report into a document type in an Electronic Document Management System (EDMS). Saving reports to EDMS allows users to save a snapshot of data at any given time. You save the template fields of the reports into the EDMS as part of the document information (metadata) during report generation. Civic Platform synchronizes the template fields with the metadata in the EDMS if you satisfy the following requirements:
You must properly configure the standard choice EDMS; set the EDMS vendor to STANDARD and append the string “VERSION=7.2.0” to the end of the value description.
You must define a set of Custom Fields (document template fields or metadata) for the document type you categorize the report into.
The document template fields are mapped to session variables and SQL variables. For more information about mapping document template fields to variables, see Creating Custom Fields.
You can save reports and templates to any of the following EDMS object: Record, Parcel, Workflow, Asset Condition Assessment, Inspection and Set. For example, to allow a user to save the C-403 report run monthly, you can configure the report to save to EDMS and to the record, while also categorizing it to the PDF category for the RepAttach group.
You can save reports to multiple Electronic Document Management Systems. For example, you might want to save building permit reports to Civic Platform’s EDMS, and save the C-404 Statistical Reports to your agency’s EDMS on your company Intranet. You can add additional Electronic Document Management Systems by setting the appropriate Standard Choices. For instructions on adding new EDMS options, refer to the “Standard Choices Reference” section of the Civic Platform Configuration Reference.
Saving reports to EDMS is available for all report types and all services with the exception of the client-side executables.
To set a report to save to EDMS
- Access the Report Manager portlet (Accessing the Report Manager Portlet).
- Use the navigation tree to find and click the report you want to save to EDMS.
Civic Platform displays the report details in the right window.

- Complete following fields:
Save to EDMS Choose Yes or No so specify whether or not to save to EDMS. If you choose Yes, Civic Platform activates the Document Group/Category drop-down lists. Document Group/Category Use the drop-down lists to select the document group and document category to categorize the report. It is important to select the Document Group first because the Category drop-down list loads based on which document group you choose. EDMS Object Select the EDMS object type. Your options are: Record, Parcel, Workflow, Asset Condition Assessment, Inspection and Set. EDMS Select the Electronic Document Management System to which you wan to save the report. - To test the report, click Preview.
Civic Platform runs the report and displays the report.
- Click OK to save to EDMS.
Civic Platform saves the EDMS
- Click Submit..
Civic Platform saves your EDMS report settings.
Using URL Reports
Overview
You can define a URL as a report source that a Civic Platform user can launch. For example, you can set up a Permit Print report that users can run from an agency, from a government website, or from a report server.
The URL feature can also launch a web page. For example, a clerk from the Health Planning and Development confirms that a licensed professional architect’s license is valid according to the CSLB, Consumer Affairs, Professional Engineers Board, and the Architects Board. A link to these websites and or databases through a URL allows the user to access the information.
In addition, the agency's website or its document management system can also be helpful to the user. These URL links and the URL reports are available from the reports portlet and specific portlet report menu.
Topics
Setting up URL Reports
You can define a URL string as a report source that a Civic Platform user can launch. For example, a user can run a Permit Print report from an agency website, a government website, or a report server. You configure this by appending the report URL with the parameters you want to pass. Civic Platform then passes the parameters from the URL to the report server when a user clicks a link on a website.
The Permit Print report requires specific parameters to differentiate between the URL Permit Print and the Civic Platform Permit Print report.
To set up a URL report
- Access the Report Manager portlet (Accessing the Report Manager Portlet).
- Right-click Reports by Category from the navigation tree and select
New Report from the menu.
Civic Platform displays a new report detail form in the right window.

- Complete the following required fields. For a list of field definitions, see Table 1.
Name Enter the name of the report. The name you enter displays in the Report Portlet or portlet-specific report menu. If this is a Permit Print report, enter Permit Print. Category Select the category the report belongs to. Report Service Use the drop-down to select the URL_Report report service. Report Link Enter the URL to the report source. For example, enter http://permit.accela.com. To pass static parameters, include them in the URL address. For example, enter http://permit.accela.com/PERMITID07BBP-00000-0010. To pass Accela-provided parameters, you must add parameters in the Parameters portlet. You might also need to accommodate the end of the URL to accept the parameter with /index.jsp so that the parameter value matches the following example: http://permit.accela.com/index.jsp/permitID=07BBP-00000-0010. For instructions on adding parameters, see Setting up Report Parameters. Note:You must specify the server name (not IP address or domain) in the report link URL if you want to apply NT authentication for the report. Here is an example of the report link with NT authentication: http://reporting/ReportServer$SQL2K5.
- Click Submit..
Civic Platform saves the URL report.
- To add parameters to the report click the Parameters tab. For instructions, see Setting up Report Parameters or Setting Up URL Reports Containing Variables.
Setting up URL Links
The URL feature can also launch a web page. For example, a clerk from the Health Planning and Development confirms that a licensed professional architect’s license is valid according to the CSLB, Consumer Affairs, Professional Engineers Board, and the Architects Board. A link to these websites and or databases through a URL allows the user to access the information. Linking to your agency website or your document management system can also be helpful to the user. Adding URL links to the support page provides easy access to user forums and technical assistance.
To set up a URL link from the reports portlet
- Access the Report Manager portlet (Accessing the Report Manager Portlet).
- Right-click the Reports by Category from the navigation tree and select
New Report from the menu.
Civic Platform displays a new report detail form in the right window.
- Complete the following required fields. For a list of field definitions, see Table 1.
Name Enter the name of the URL link. The name you enter displays in the Report Portlet or portlet-specific report menu. For example, enter “Support.” Category Select the category the report belongs to. For example, enter “Company Information.” Report Service Use the drop-down to select the URL_Report report service. Report Link Enter the URL to the website or service. For example, enter “http://www.accela.com/support/support_overview.asp” - Click Submit..
Civic Platform saves the URL link.
Setting Up URL Reports Containing Variables
Variables are raw database scripts Civic Platform executes directly against the Civic Platform Oracle or MS SQL Server database outside of a report writer or development tool. You can use these scripts to pass parameters to a URL report, like variables in an RTF report. Before you can run a report, you must set up the variables and a URL report service in Report Manager. For information on how to set up a variable, see Using Variables in Reports. For information on how to set up a report service, see Setting Up Report Services.
A super administrator can add variables to Report Manager and specify them as accessible to users along with Civic Platform session variables. You can then define the number rows you want to return from these variables to your report by adding them to the end of the report URL.
The following example demonstrates how to set-up and run a URL report using a variable and limiting the number of rows returned.
A Civic Platform administrator develops a report to open the EDMS for up to 5 parcel numbers for specific record selected from Civic Platform.
How to set up a URL report containing and limiting the return of variables
- Access the Report Manager portlet (Accessing the Report Manager Portlet).
- In the navigation tree, expand the Settings node and click
Variables to create a variable within Report Manager
using super agency user rights.
For example, the variable in the graphic below specifies the return of all parcel numbers for a record.

- Add a Variable.
- Right-click the Variables option in the
navigation tree and then click New Variable OR
Click Menu and choose New Variable.
- Type in Name of the Variable
- Enter the SQL script with the Standard Session Variables. Example,
‘$$capId1$$'
If you need more information about Variables, see Adding a Variable.
- Right-click the Variables option in the
navigation tree and then click New Variable OR
- Click Menu and choose New Report from the drop-down list.
- Complete the following required fields. For a list of field definitions, see Table 1.
Name Enter the name of the report. The name you enter displays in the Report Portlet or portlet-specific report menu. If this is a Permit Print report, enter Permit Print. Category Select the category the report belongs to. Report Service Use the drop-down to select the URL_Report report service. Report Link Enter the URL to the report source. For example, enter http://permit.accela.com. To pass static parameters, include them in the URL address. For example, enter http://permit.accela.com/PERMITID07BBP-00000-0010. To pass Accela-provided parameters, you must add parameters in the Parameters portlet.
- Click Submit.
- Add variable information:
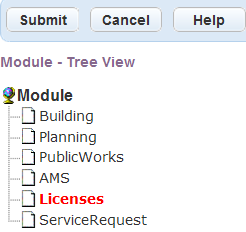
- Assign permissions to the appropriate modules or users to access the URL report. For information
on how to assign permissions, see Assigning Permissions to Reports.
The following example shows the URL report assigned to the Licenses Module.
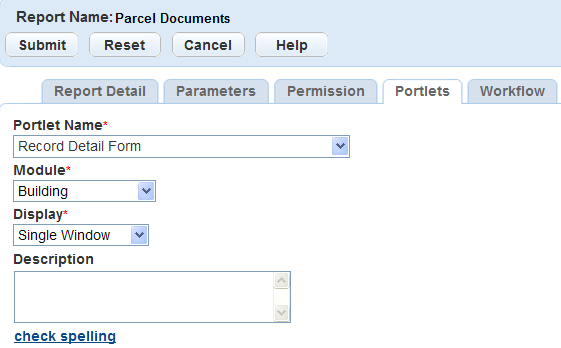
- Add the URL report to the appropriate portlet. For information on how to add a report to a
portlet, see Adding a Report to a Portlet using the V360 Interface.
The following example shows the URL report assigned to the Record Detail Form.
- Run the report
- Navigate to the portlet to which you want to run the report.
For this example, Building> select a permit in the Record portlet.
Open a permit record, click the Reports menu, and choose the report from the drop-down list.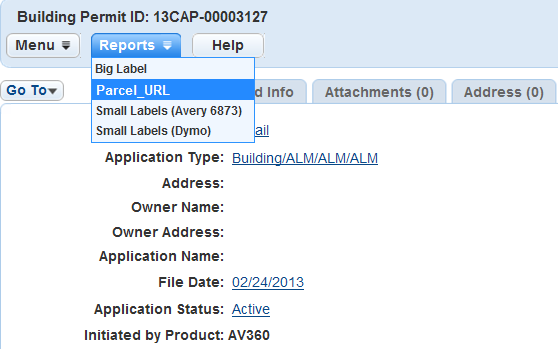
Civic Platform opens a new window to display the URL report.
- Navigate to the portlet to which you want to run the report.

Invoking a Client-Based Application
You can launch client-side executables (Microsoft Word and Microsoft Excel) from a report menu. This enables users to launch reports that reside on their local machine from within Civic Platform, and populate those reports with data from Civic Platform. Use this feature to invoke any type of client-side executable, such as Crystal Reports, a custom application that you use for internal processing, or to print a report on a special printer that requires a client-side application.
To use this feature for reports developed in Microsoft Excel, the user must save the file on their local workstation. The user does not enter the file at runtime nor does the report use an existing report file from the report directory. You define the path to this executable file when creating a Client_EXE report service. For example, enter c:/program files/microsoft office/exel.exe in the Report Service URL field.
Any number of Excel reports on a client’s workstation can use this report service by creating different reports. To define the report file path, you must create a very specific report parameter. You must set the Report Parameter Name “File_Path” and the Default Value defines the path to the spreadsheet. For example, c:/MyDocuments/Spreadsheets.xls. This parameter must be present or it prevents the file from opening and the user receives an error. You must identify any parameter values you want to pass to the report as additional report parameters. For instructions, see Setting up Report Parameters.
Client-side executables, with the exception of Microsoft Excel, do not require the “File_Path” parameter. You can include the file path in the command line for the Report Service URL. Use this option for executables that you do not use for multiple reports, such as a letter template that populates the agency name, and address. The Report Service URL includes the path to the executable and the report’s file.
To pass static parameter values to a report or program, you must add them to the end of the command line. For example, to execute a letter with the agency name and address, use the command line; c:/program files/microsoft word/word.exe C:/MyDocuments/Documents.doc ‘Accela, Inc.’ ‘555 So. Main Street, Sandy, Utah’. To pass parameters from the Civic Platform database, you must define the individual parameters for the report. For instructions, see Setting up Report Parameters.
Client-side executable type reports cannot save to an Electronic Document Management System (EDMS). However, users can save the report to their local machine with the standard save options in programs such as Word and Excel.
To add a client-side executable
- Access the Report Manager portlet (Accessing the Report Manager Portlet).
- Expand the Settings node in the navigation tree.
- Right-click the Report Services option and select New Report
Service from the menu.
Civic Platform displays the Report Service Form.
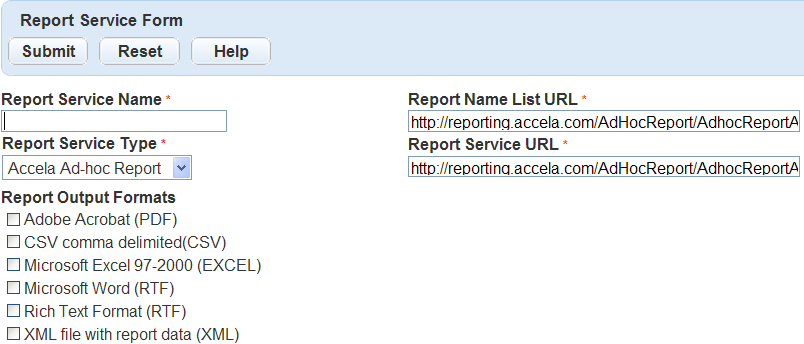
- Complete the following fields:
Report Service Name Enter the name of the report service. Use a name that describes the executable. This name appears in the Report Service drop-down list in the report detail form. For example, enter MS Excel EXE. Report Service Type Select the Client_EXE option. Report Name List URL Enter the file path to the executable. For example, enter “c:/program files/microsoft excel/excel.exe" If you are defining a path for an executable other than Microsoft Excel, you can define the file path and the static parameters at the end of the command line. For example, enter “c:/program files/microsoft word/word.exe C:/MyDocuments/Documents.doc ‘Accela, Inc.’ ‘555 So. Main Street, Sandy, Utah’” Report Service URL Report Service URL is the server address. - Click Submit..
Civic Platform saves the report service.
- Right-click Reports by Category and select the New
Report option.
Civic Platform displays the report detail form.
- Complete the following fields:
Name Enter the name of the report. Category Select the category the report should display under. Report Service Select the client-side executable report service. For example, select MS Excel EXE or MS Word EXE. - Click Submit..
Civic Platform saves the report detail.
- For Microsoft Excel reports, click the Parameters tab.
Civic Platform displays the report parameters list form.
- Click New.
Civic Platform displays the report parameter detail form.

- Complete the following fields:
Name Enter the name “File Path” to identify the special file path parameter. Type Select the String data type. Report Parameter Name Enter “File_Path” as the report parameter name. This parameter name must be present for the excel file to open on the user’s workstation. Default Value Enter the path to the file on the user’s workstation. For example, enter “c:\My Documents\Spreadsheets.xls” as shown in Figure 7. - Click Submit..
Civic Platform saves the report parameter.
- To add parameter values to pass to the report, click New. For information and instructions in Setting up Report Parameters.
Running Reports in EMSE
The Event Management Scripting Engine (EMSE) has full control of launching reports set up in Report Manager. EMSE retrieves the Report Object through the report name and automatically provides parameter values. You can set up reports to save automatically to an Electronic Document Management System (EDMS) in a variety of formats including Adobe Acrobat (.pdf), Microsoft Excel (.xls), and Rich Text Format (.rtf). You can set up an event script to send and save reports to multiple destinations, and then run the reports multiple times. Contact your Accela Services Implementation representative for information on writing and running this kind of event script. For general information on using scripts in Civic Platform, see the Accela Civic Platform Scripting Guide.
Setting a Default Printer
To send a report directly to a printer when a user runs it, you must identify a default printer. The default printers added to Report Manager are available in the Report Detail form portlet shown in Figure 8. You select these printers from the network printer list, ensuring the accessibility to the printer when running the report.
Figure: Default Printer Drop-down List
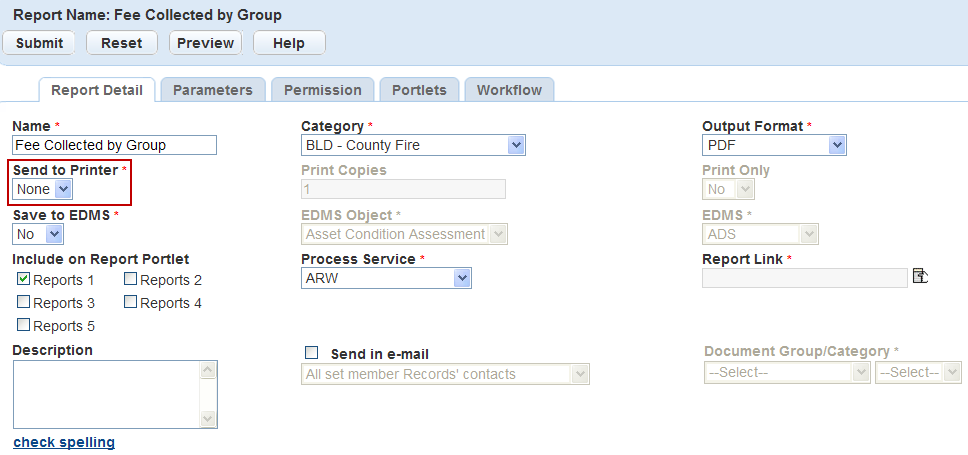
A report that has a default printer assigned prints automatically when a user selects it from the Reports Portlet or from a specific portlet's report menu. You can also set a report with an assigned printer to run based on the status change of a specific workflow task. You can also set a report with an assigned printer to run based on the status change of a specific workflow task. For example, a user prints an application at the time of acceptance. When the user runs the report they receive a message notifying them that the report printing is complete.
To add a default printer to a specific report, select the printer in the Report Detail form portlet. For more information on the Report Detail form portlet, see Adding a Report.
To add a default printer
- Access the Report Manager portlet (Accessing the Report Manager Portlet).
- Expand the Settings option from the navigation tree.
- Right-click the Printers option and select New
Printer from the menu.
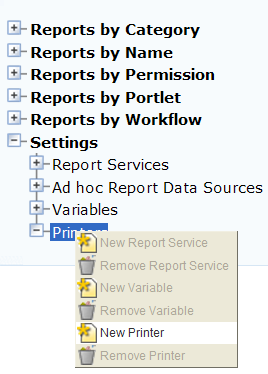
Civic Platform displays the add printer portlet.
- Complete the following fields:
Printer Name Enter the name of the printer. This name displays in the default printer drop-down list in the Report Detail form. Printer Select the network printer you want to use as a default printer when automatically printing reports. - Click Submit..
Civic Platform saves the network printer as the default printer.
Using Barcodes in Payment Reports
Payment reports such as invoices developed in Civic Platform can use barcodes to enhance process efficiency.
Barcodes imprinted in the reports or invoices must follow code 39. Each barcode represents some field value, for example, record ID, receipt number, and invoice number. With the reports in the Payments portlet, you can embed a hot key combination in a barcode. When users scan the barcode, the cursor automatically moves to the field indicated by the hot key setting, and the value in the barcode populates the field.
Table 2 lists the hot keys in the Payment Processing portlet that can be embedded in barcode.
| Hot Key | Barcode for the Hot Key | Task |
|---|---|---|
| Ctrl + Shift + 1 | .W.X1.X.W | To go to the 1st field in the portlet that can get focus. |
| Ctrl + Shift + 2 | .W.X2.X.W | To go to the 2nd field in the portlet that can get focus. |
| Ctrl + Shift + 3 | .W.X3.X.W | To go to the 3rd field in the portlet that can get focus. |
| Ctrl + Shift + 4 | .W.X4.X.W | To go to the 4th field in the portlet that can get focus. |
| Ctrl + Shift + 5 | .W.X5.X.W | To go to the 5th field in the portlet that can get focus. |
| Ctrl + S | (TBD) | To go to the global search field in the portlet. Note:
After you move the cursor to the global search field, you cannot go to the other fields by scanning the other barcode. This behavior is unique to this hot key. |
The Intermec SR30 Handheld scanner is the only scanner that Civic Platform supports for the barcode scanning feature. For information about installation and configuration of the barcode scanner, see “Configuring a Barcode Scanner” in the Accela Civic Platform Installation Guide.