Managing Fee Schedules
Topics
Fee administration updates
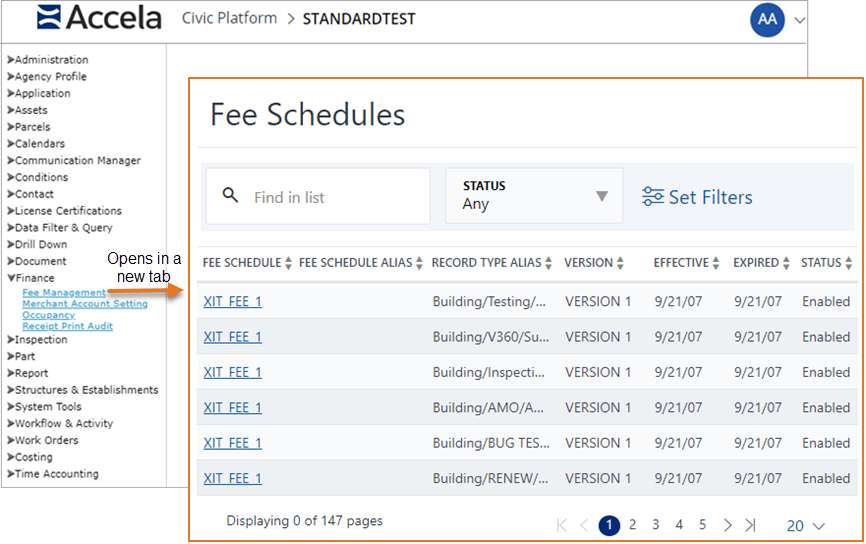
The fee administration (Fee Schedule option) is moving from Classic Admin to the Oxygen UI Administration pages, making fees easier to maintain. Fee Schedules are easier to locate, view, and edit with the new capabilities.
-
To access the new fee administration options, go to Administration > Finance > Fee Management.
-
Use the options available to quickly locate available Fee Schedules.
- Type search terms to find content within the schedules.
- Select a STATUS from the drop-down menu to filter out results by Enabled or Disabled schedules.
-
Note: Set Filters does not yet work.
- To view a FEE SCHEDULE, click one of the linked titles.
-
On the open fee schedule, options appear to edit the fee schedule, create a new version, or add a fee item to the schedule.
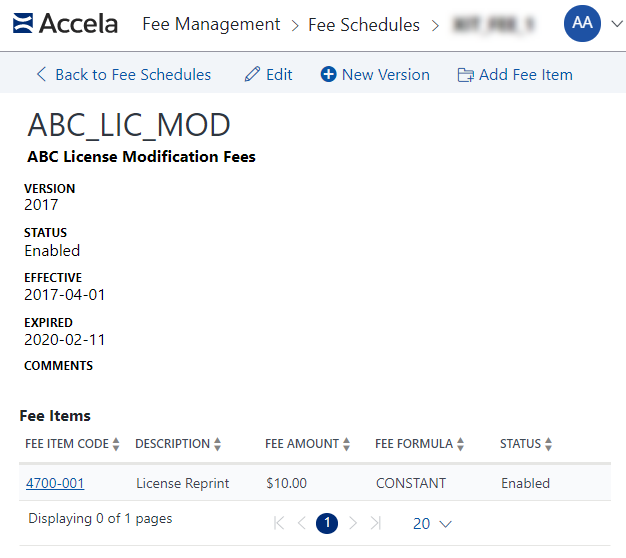
- Edit fee items by clicking on the link for the FEE ITEM CODE.
Searching for a Fee Schedule
If you want to locate a particular fee schedule for editing or informational purposes, you can do a search for it. There are multiple ways to search for a Fee Schedule. You can search for fee schedules by name, date, or status.
To search for a Fee Schedule
Access the Classic Administration page (Accessing Classic Administration).
Navigate to .
Civic Platform displays the Fee Schedule - Search Screen
Enter your search criteria with one of the search options:
Fee Schedule– Enter the name of an existing fee schedule.
-
Version – After entering the name of an existing fee schedule, enter the version.
Effective Date – Click Date to select a date from the calendar or enter a date into the Effective Date.
Status – Select the status of an existing fee schedule.
To return all fee schedules select All.
To return only enabled fee schedules, select Enable.
To return only disabled fee schedules, select Disable.
Click Submit.
Creating a New Fee Schedule
Civic Platform provides a way to easily create a fee schedule that can have multiple version numbers that relate to the effective date. Although you can create multiple versions of a fee schedule, only one can be active and enabled at a time. You can configure different versions of a fee schedule, so that the amount of the fee matches the rate of inflation.
To create a fee schedule
Access the Classic Administration page (Accessing Classic Administration).
Navigate to .
Click Add.
Civic Platform displays the Fee Schedule - Add screen.
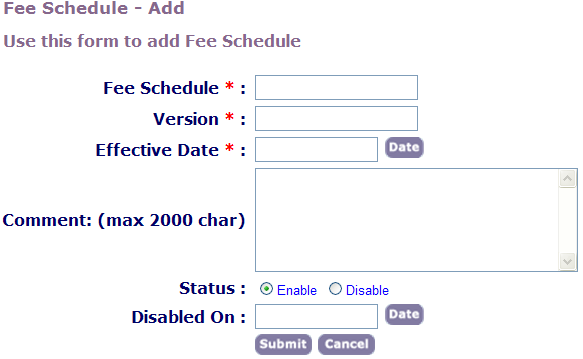
Complete the fields. See Table 1 for a list and description for each fields.
Click Submit.
Table 1. Fee Schedule Fields Comment Provide a comment or a description about the fee schedule. For example, this fee is for a registration or a mobile home application fee. Disabled On The last date you enabled the fee schedule. The effective date for a fee schedule is the enable date from one version to the enable date of the next version. The disable date is for your informational and is optional. Effective Date Enter the start date for the fee schedule. Fee Schedule Provide the name for the fee schedule. Status Select whether the fee schedule is active. Choose between Enable or Disable. Version Enter the version for the fee schedule. The version must be unique for the fee schedule. Version can be alphanumeric with special characters.
Editing a Fee Schedule or Creating a New Version
After you create a fee schedule, you can modify it to create a new version. You can also edit any fee schedule to change effective dates or status.
To edit a fee schedule
Access the Classic Administration page (Accessing Classic Administration).
Navigate to .
Search for an existing fee schedule. For more information on how to search for a fee schedule, see Searching for a Fee Schedule.
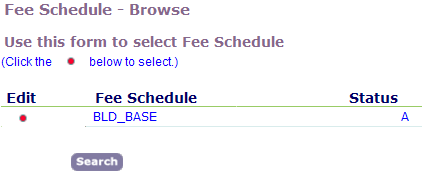
Civic Platform returns a list of fee schedules meeting the search criteria.
Click the red dot next to the fee schedule you want to edit.
Civic Platform displays the Fee Schedule - Edit screen
Edit the Fee Schedule. Refer to the following editing options:
Modify your fee schedule. Edit fields using the list of field descriptions, see Table 1.
Create a new Version for a fee schedule.
Click Create New Version and complete the fee schedule fields to create a new version of the fee schedule. The old version remains unchanged.
Add, Edit, or Disable Fee Items from the fee schedule.
Click Add to add a Fee Item or click the red dot next to the Fee Item you want to edit.
For more information on fee items, see Setting Up a Flat Fee Item.
Click Save.
Managing Fee Groups
In a fee schedule, you can create fee item groups comprised of one or more fee items. When adding fee items to a group, you can add them to an existing group or create a new group for them. When a group is no long used by any fee item, Civic Platform automatically deletes the group.
Topics
Adding Fee Items to a Fee Group
You can set up a group that contains one or more fee items. You can add a fee item to one or more groups. See Figure 1.
Figure: Fee Item List

To add fee items to a fee group
Access the Classic Administration page (Accessing Classic Administration).
Navigate to
Search for an existing fee schedule. For more information on how to search for a fee schedule, see Searching for a Fee Schedule.
Civic Platform returns a list of fee schedules meeting the defined search criteria.
Click the red dot next to the fee schedule you want to edit.
Civic Platform displays the Fee Schedule - Edit screen page.
Select the fee items that you want to add to the one or more groups.
Click the Add to Group button.
Civic Platform displays the Fee Item - Assign to Group window.
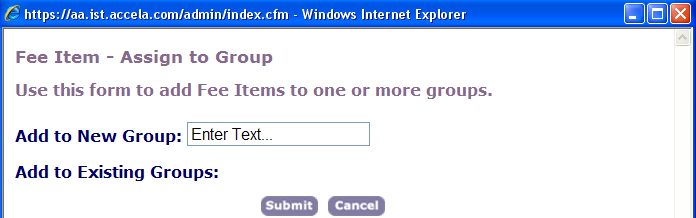
Do one of the following:
To create a new group for the fee items, enter a group name in the Add to New Group field.
To add the fee items to the existing groups, select the groups you want in the Add to Existing Group list.
To add the fee items to a new groups as well as to existing groups, do both of the previous steps.
Click Submit.
Removing Fee Items from a Fee Group
You can remove fee items from assigned groups. Civic Platform automatically deletes groups that do not have any fee items.
To remove fee items from a fee group
Access the Classic Administration page (Accessing Classic Administration).
Navigate to
Search for an existing fee schedule. For more information on how to search for a fee schedule, see Searching for a Fee Schedule.
Civic Platform returns a list of fee schedules meeting the defined search criteria.
Click the red dot next to the fee schedule you want to edit.
Civic Platform displays the Fee Schedule - Edit screen page.
Select the fee items you want to remove from their assigned groups.
Click Remove from Group.
Civic Platform displays the following page.
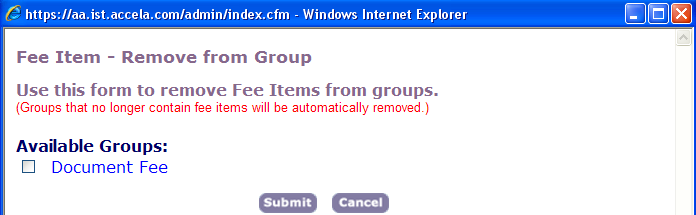
Select each group in the Available Groups list that you want to remove the fee item from.
Click Submit.
Copying a Fee Schedule
You can copy a fee schedule to create a new fee schedule version and also to eliminate the task to recreate fee items. After you copy the fee schedule with a new name, you can edit the schedule name and modify fee items as appropriate to your agency objectives.
To copy a fee schedule
Access the Classic Administration page (Accessing Classic Administration).
Navigate to .
Civic Platform displays the Copy Schedule window.

Complete the fields:
Schedule Name Enter a name for the schedule. Copy Schedule From Choose an existing schedule from the drop-down list. Click Submit.
Edit the fee item as appropriate to your agency's objectives. For instructions, see Editing a Fee Schedule or Creating a New Version.
Assigning a Module to a Fee Schedule
By default, every fee schedule functions in all modules. You can, however, limit a fee schedule to work in specific modules. For example, if your agency has a building module, a code enforcement module, and a service request module, you can have fee schedules, specific to building permits, that you do not want to assign to the other modules.
To assign a module to a fee schedule
Access the Classic Administration page (Accessing Classic Administration).
Navigate to .
Civic Platform displays the Fee Schedule Search window.

Enter any search criteria. You can leave these fields blank to return all the fee schedules.
Click Submit.
Civic Platform displays the following page.
Click the red dot by the fee schedule you want to work with.
Civic Platform displays the Fee Schedule Edit window.

Use the drop-down list to select a module to assign.
Click Save.
Civic Platform returns to the Fee Schedule Browse page.
For each additional module you want to assign, repeat steps 4-6.