Creating Batch Jobs
Creating Batch Jobs
Civic Platform supports a variety of batch jobs including: asset/GIS synchronization, index server/application server synchronization, email notification, PM schedule work order generation, geotagging, inspection routing, and asset calendar index rebuilding. Please review the topics in this section for instructions on how to set up batch job functionality.
Topics
Creating a PM Schedule Batch Job
You can create a batch job that automatically generates work orders in advance of a scheduled preventative maintenance. The batch job generates all work orders associated with the PM schedule in a time frame you determine. Schedule the batch job to correspond with the PM schedule so that Civic Platform generates work orders at the same time interval as the PM schedule.
To create a new preventative maintenance schedule batch job
Access the Batch Jobs portlet (Accessing the Batch Jobs Portlet).
Click New.
Civic Platform displays the New Batch Job portlet.
Complete the following required fields:
Name Enter an intuitive name for the batch job. Description Enter a brief description of the batch job. Email Enter the email address where you want Civic Platform to send emails after job completion, no matter whether the job is successful or not. You can configure the email template named NOTICE_OF_BATCH_JOB_COMPLETED to customize the notification. For information about how to edit an email notification template, see Working with Communication Manager. Job Server Select the server for running the batch job. Job Type Select job type “System” from this drop‑down menu. Service Category After you select job type “System” from the Job Type drop‑down menu, the Service Category drop‑down menu displays. Select the batch job you want to create, in this example, PM Schedule. Click Submit.
Civic Platform creates the batch job and then displays the Batch Job Detail portlet.

Associate PM Schedules to the batch job by completing the following steps:
Select the PM Schedule option from the Service Category drop‑down menu.
Civic Platform displays the New PM Schedule Batch Job portlet.
Click the PM Schedule tab.
Civic Platform displays the PM Schedule List tab.

Click Look Up.
Civic Platform displays the PM Schedule Search portlet.

Complete any fields that display. For a description of the fields, see Table 2.
Click Submit.
Civic Platform displays a list of PM Schedules that match your search criteria.
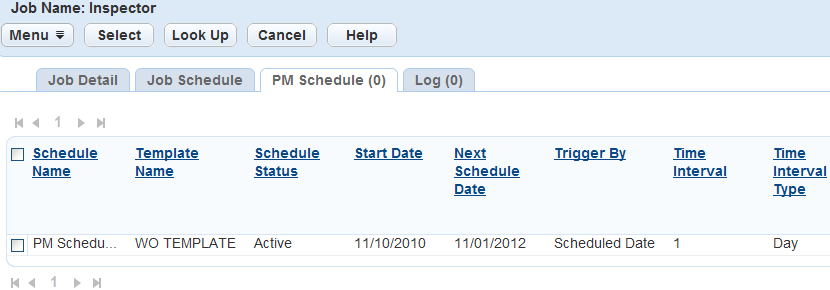
Click the PM Schedules you want to add to the batch job.
Select only active PM Schedules you have not already assigned to the batch job. Otherwise, an error message displays.
Click Select.
Civic Platform associates the PM Schedule(s) to the batch job.

To remove a PM Schedule from a batch job, select it and click Delete.
Define the Job Schedule by completing the following steps:
Click the Job Schedule tab.
Civic Platform displays the Job Schedule portlet.
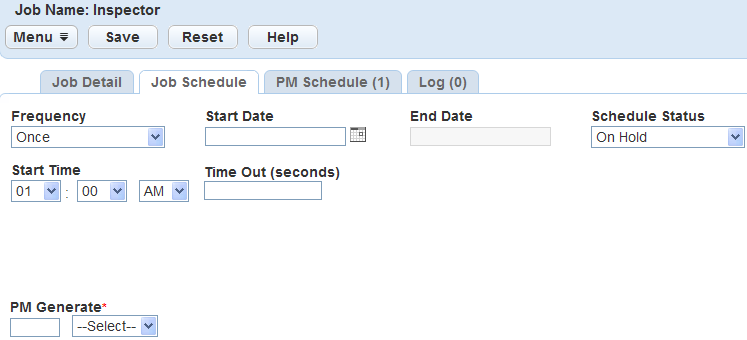
Complete the following fields as described in Table 1.
Click Save.
Civic Platform saves the batch job.
-
Table 1. Job Schedule Field Descriptions End Date If you select a value other than Once in the Frequency field, the End Date field activates. Enter the date on which the batch job stops running or select a date by clicking on the data picker beside the field. Frequency Select the frequency with which the batch job runs from this drop‑down menu. Batch jobs can run once, daily, weekly, monthly, or yearly. PM Generate PM Generate is a required field that enables you to specify how far in advance the batch job generates work orders. Enter a number in the first field, then select Days, Weeks, Months, or Years from the drop‑down menu in the second field. For example, to generate work orders two weeks in advance of the PM Schedule batch job, enter 2 in the numeric field and select Weeks from the drop‑down menu. Or, enter 15 in the numeric field and select Days from the drop‑down menu.
Schedule Status Use this drop‑down menu to turn a batch job on and off. Select Active to activate the batch job. Select On Hold to deactivate the batch job and save its information. Start Date Enter the date on which the batch job starts or select a date by clicking on the data picker beside the field. If you set a batch job Schedule Status to Active but do not specify a Start Date, an error message displays when you try to save the batch job.
Start Time Determine the time of day at which the batch job begins: - You can schedule batch jobs between the hours of 8:00 PM - 12:00 AM and 1:00 AM - 4:00 AM
- You do not need to enter the AM and PM designations; Civic Platform enters those values automatically based your selections.
- Upon scheduling a batch job, the following message displays, "Batch job will run after business hours."
If you set a batch job Schedule Status to Active but do not specify a Start Time, an error message displays when you try to save the batch job.
Time Out (seconds) Enter the number of seconds a batch job attempts to run before timing out. The default is 36,000 seconds (10 hours); you can specify any value less than 36,000 seconds.
Table 2. Batch Job PM Schedule Fields Asset Group Enter the Asset Group Code. Asset ID Enter the Asset ID of an asset that belongs to the asset type you are looking for. Asset Type Enter the name of the asset type you are looking for. Comments Enter any comments associated with the maintenance schedule. Generate Single Work Order for All Addresses Select this option to create a work order for each asset address linked to this PM schedule. Otherwise, the PM schedule creates a single work order for all addresses. This option is not active if you select the Include Addresses in Asset’s Work Order option. Generate Single Work Order for All Assets Select this option to create a work order for each asset linked to this PM schedule. Otherwise, the PM schedule creates a single work order for all linked assets. Generate Work Orders for Child Assets up to n level(s) Select this option to create work orders for linked assets and their child assets up to three levels. Generate Work Order if Previous One Opened Select this option to allow the PM schedule to create a work order for an asset that has a previous work order still open. Include Addresses in Asset’s Work Order Select this option to include the addresses linked to the PM schedule in asset work orders created by the schedule. Include Child Assets in Parent item’s Work Order This option becomes active when you check the Generate Work Orders for Child Assets up to n level(s) box. Select this option to create one work order for a parent asset and its child assets. Otherwise, each child asset receives a work order. Link Asset Addresses to Work Orders Check this box to show an asset’s addresses in work orders created for that asset. Primary Only This option becomes active when you check the Link Asset Addresses to Work Orders box. Check this box to show only an asset’s primary address in work orders generated by this PM schedule. Record Status Select the status of the record. Schedule Name Enter a unique name to identify the schedule. Schedule Status Use this drop-down list to select the status of the scheduled maintenance. Example: Active or Expired. The status controls whether or not the maintenance schedule executes a work order. If the status is active, Civic Platform generates a work order. If the schedule's status is not active, Civic Platform does not execute a work order after the expiration date. Template Select the name of the work order template used for the schedule. Time Interval Enter the number of days/weeks/months/years between work orders generated for scheduled maintenance tasks. Trigger By Enter the date you used as the basis of the next maintenance due date. You can set this field to the Opened Date, Scheduled Date, or Completed Date of the last PM work order. Trigger Date Enter the first date that the scheduled maintenance is due. Usage Interval Enter the usage interval between scheduled maintenance activities. For example, the number of miles or runtime hours. If you specify a usage interval, Civic Platform checks the usage interval prior to the time interval. If you did not enter a usage interval, Civic Platform generates work orders based on the time interval only.
Creating a Global Search Index Batch Job
The underlying engine for Civic Platform global search is the Apache Lucene full-text search engine. You must create and execute a batch job to build the initial index files on the index server with the current database data. It is best practice to execute batch jobs after you finish running all data conversion loading jobs. After you build the initial index, the index server automatically updates the index with the transaction data that users enter into the database through Civic Platform. There is no need to frequently rebuild the index, for example, no need to run the batch job daily or weekly.
You can define the batch job to support the global search for one or more objects including records, addresses, licensed professionals, assets, parcels, documents, and contacts. By default, the batch job supports all the mentioned objects. You can modify the supporting scope by configuring the Standard Choice GLOBAL_SEARCH_BUILD_INDEX_ENTITIES.
To create a global search index batch job
Access the Batch Jobs portlet (Accessing the Batch Jobs Portlet).
Click New and complete the Batch Job fields as described below.
Name Rebuild Index Description Add the description for the batch job. Email Enter the email address where you want Civic Platform to send emails after job completion, no matter whether the job is successful or not. You can configure the email template named NOTICE_OF_BATCH_JOB_COMPLETED to customize the notification. For information about how to edit an email notification template, see Working with Communication Manager. Job Server Select the server for running the batch job. Job Type Select job type “System” from this drop‑down menu. Service Category Global Search Rebuild Index. Click Submit.
Civic Platform saves the batch job details.
Click the Job Schedule tab.
Define the batch job schedule, including the start time, the start date, and the frequency. Refer to Table 1 for a list of field definitions.
Note:There are only two options, “Once” and “Monthly,” of the frequency with which the Global Search Index batch job runs.
Click Save.
If at any time you want to review the batch job history, click the Log tab. See Viewing the Batch Job Log.
Civic Platform displays the list of completed Rebuild Index batch jobs.
Creating a GIS Asset Sync Batch Job
You can create a batch job that automatically updates an asset type with any information entered for asset records of that asset type in Accela GIS. For example, an agency worker in the field is observing multiple hydrants over the course of a week. You can create a batch job that takes all information that users add to records of the type Hydrant and that run each Friday afternoon. All information you enter in the field using Accela GIS also enters in the corresponding asset records. Schedule this batch job to run at regular intervals so that information gathered in Accela GIS is regularly and automatically incorporated into your regular asset records.
Note:
If you want to copy attribute information in the sync batch job, you must link the GIS attribute fields with attribute fields in Accela Civic Platform - Asset before running the synchronization. See Asset Types. |
To create a new GIS asset synch batch job
Access the Batch Jobs portlet (Accessing the Batch Jobs Portlet).
Click New.
Civic Platform displays the New Batch Job portlet.
Complete the following required fields:
Name Enter an intuitive name for the batch job. Description Enter a brief description of the batch job. Email Enter the email address where you want Civic Platform to send emails after job completion, no matter whether the job is successful or not. You can configure the email template named NOTICE_OF_BATCH_JOB_COMPLETED to customize the notification. For information about how to edit an email notification template, see Working with Communication Manager. Job Server Select the server for running the batch job. Job Type Select job type “System” from this drop‑down menu. Service Category After you select the Service job type from the Job Type drop‑down menu, the Service Category drop‑down menu displays. Select Asset Sync. Click Submit.
Civic Platform creates the batch job and then displays the Batch Job Detail portlet.

Associate asset types to the batch job by completing the following steps:
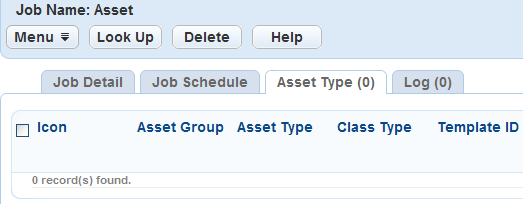
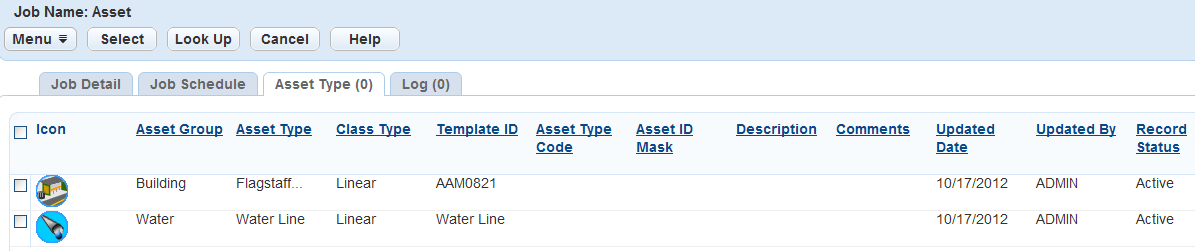
Click the Asset Type tab.
Civic Platform displays the Asset Type portlet.
Click Look Up.
Civic Platform displays the Asset Type Search portlet.
Complete any fields that display. For a description of the fields, see Table 3.
Click Submit.
Civic Platform returns a list of asset types that match your search criteria.
Click the asset type(s) you want to add to the batch job.
Click Select.
Civic Platform adds the asset type(s) to the batch job.

Define the Job Schedule by completing the following steps:
Click the Job Schedule tab.
Civic Platform displays the Job Schedule portlet.
Complete the following fields:
Start Time Determine the time of day at which the batch job begins: - You can schedule batch jobs between the hours of 8:00 PM - 12:00 AM and 1:00 AM - 4:00 AM
- You do not need to enter the AM and PM designations; Civic Platform enters those values automatically based your selections.
- Upon scheduling a batch job, the following message displays, "Batch job will run after business hours."
If you set a batch job Schedule Status to Active but do not specify a Start Time, an error message displays when you try to save the batch job.
Schedule Status Use this drop‑down menu to turn a batch job on and off. Select Active to activate the batch job. Select On Hold to deactivate the batch job and save its information. Start Date Enter the date on which the batch job starts or select a date by clicking on the data picker beside the field. If you set a batch job Schedule Status to Active but do not specify a Start Date, an error message displays when you try to save the batch job.
Time Out (seconds) Enter the number of seconds a batch job attempts to run before timing out. Frequency Select the frequency with which the batch job runs from this drop‑down menu. Batch jobs can run one time, daily, weekly, monthly, or yearly. End Date If you select a value other than Once in the Frequency field, the End Date field becomes active. Enter the date on which the batch job stops running or select a date by clicking on the data picker beside the field. PM Generate PM Generate is a required field that enables you to determine how far in advance the batch job generates work orders. Enter a number in the first field, then select Days, Weeks, Months, or Years from the drop‑down menu in the second field. For example, to generate work orders two weeks in advance of the PM Schedule batch job, enter 2 in the numeric field and select Weeks from the drop‑down menu. Or, enter 15 in the numeric field and select Days from the drop‑down menu.
Click Save.
Civic Platform saves the Job Schedule the batch job.
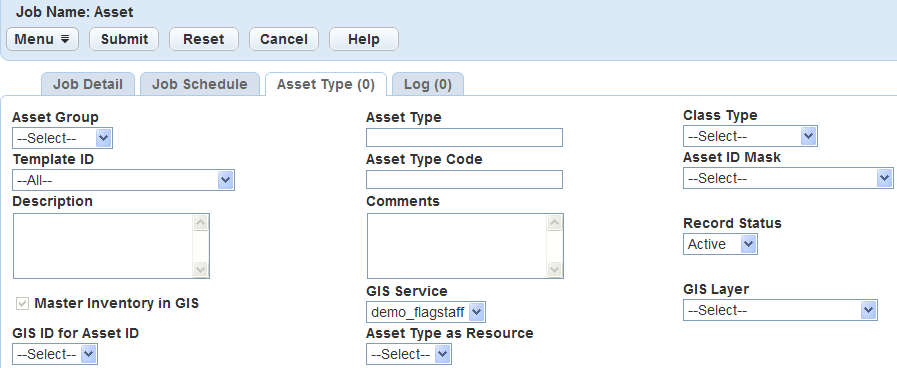
Table 3. Batch Job Asset Type Fields Asset Group Use the drop-down menu to select the asset group. Asset ID Mask Use the drop‑down menu to select the default prefix for the asset type you are looking for. An ID mask can contain strings that show part of the application number that Civic Platform recognizes and acts on before showing the application number. Asset Type Enter an asset type. Asset Type Code Enter an asset type code. Class Type Select an asset class type from this drop‑down menu. Comments Comments in the asset type record. Description The description field of the asset type you are searching for. GIS ID for Asset ID The GIS ID field that you want to map to the asset ID. If you specify a related table, this drop-down list is populated with the fields in the table. Otherwise, this drop-down list is populated with the fields in the GIS layer (feature class). GIS Layer The GIS layer on the selected GIS service that stores the GIS objects. In Esri ArcMap, a feature class is represented visually on the map as a layer. GIS Service The GIS service that stores the information about GIS objects. The GIS services listed on the dropdown list are configured in Accela GIS administration site. Master Inventory in GIS This read-only option indicates whether the asset type is present in the inventory of all mapped objects in Accela GIS. Record Status Select Active, Inactive, or All from this drop‑down menu. Template ID Select a template from this drop‑down menu.
Creating a Batch Job for Expired License Email Notifications
Civic Platform can scan licensed professionals for all expired licenses and insurance coverage lapses, and then send email notifications to all of the appropriate parties. Create a batch job for expired email notifications by configuring the Send License Expired Email batch job category and defining the batch job schedule.
To create a batch job for expired email notifications
Access the Batch Jobs portlet (Accessing the Batch Jobs Portlet).
Click New.
Complete the fields as described below:
Name Enter a Name for the batch job. Description Provide a brief description of the batch job. Email Enter the email address where you want Civic Platform to send emails after job completion, no matter whether the job is successful or not. You can configure the email template NOTICE_OF_BATCH_JOB_COMPLETED to customize the notification. For information about how to edit an email notification template, see Working with Communication Manager. Job Server Select the server for running the batch job. Job Type Select the job type “System” from this drop‑down menu. Service Category Send License Expired Email Click Submit.
Click the Job Schedule tab.
Define the batch job schedule. Complete the fields as described in Table 1
Click Save.
Creating a Proxy User Process Batch Job
You can create a batch job that sets the delegate invitations to expire on the expiration day or to purge the expired or declined invitations after the purge day arrives. The batch job runs at an interval you determine. You configure the expiration day and purge day in Citizen Access administration. For more information see “Delegates Settings” in the Citizen Access Administrator Guide.
To create a proxy user process batch job
Access the Batch Jobs portlet (Accessing the Batch Jobs Portlet).
Click New.
Complete the following fields:
Name Enter a Name for the batch job. Description Provide a brief description of the batch job. Email Enter the email address where you want Civic Platform to send emails after job completion, no matter whether the job is successful or not. You can configure the email template NOTICE_OF_BATCH_JOB_COMPLETED to customize the notification. For information about how to edit an email notification template, see Working with Communication Manager. Job Server Select the server for running the batch job. Job Type Select the job type “System” from this drop‑down menu. Service Category Proxy User Process Click Submit.
Click the Job Schedule tab.
Define the batch job schedule. Complete the fields as described in Table 1. Best practice is to set the Frequency to Daily.
Click Save.
If at any time you want to review the batch job history, click the Log tab. See Viewing the Batch Job Log.
Creating a Script Batch Job
You can create a batch job for running a script on a regular schedule that you define. For example, you create a script that deletes partially completed applications, and then create a batch job to associate with the script. The batch job regularly removes partially completed applications from Civic Platform.
To create a script batch job
Access the Batch Jobs portlet (Accessing the Batch Jobs Portlet).
Click New.
Complete the following fields:
Name Enter a Name for the batch job. Description Provide a brief description of the batch job. Email Enter the email address where you want Civic Platform to send emails after job completion, no matter whether the job is successful or not. You can configure the email template NOTICE_OF_BATCH_JOB_COMPLETED to customize the notification. For information about how to edit an email notification template, see Working with Communication Manager. Job Server Select the server for running the batch job. Job Type Select the Script job type from this drop‑down menu. Script Code From the drop-down list select the script that you want to associate with the batch job. For information on creating a script, see the “Event and Script Setup” chapter in the Accela Civic Platform Scripting Guide. Click Submit.
Specify the job schedule to run the batch job by completing the following steps:
Click the Job Schedule tab.
Define the batch job schedule. Complete the fields as described in Table 1.
Click Save.
Specify the default values of the parameters required to run the script by completing the following steps:
Click the Parameters tab.
Civic Platform displays the Parameters portlet.
Click New.
Civic Platform displays the New Parameter portlet.
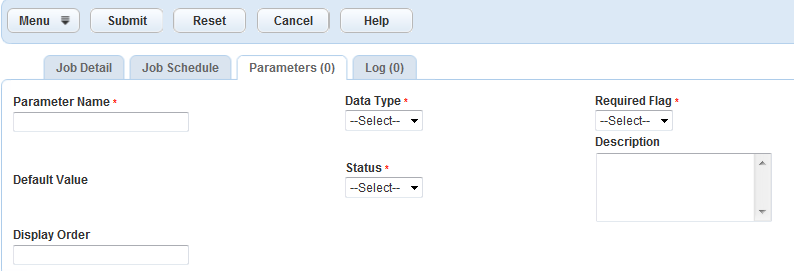
Complete any fields that display. For a description of the fields, see Table 4.
Click Submit.
Table 4. Script Batch Job Parameters Data Type Enter the data type of the parameter. The data type must correspond to the data type defined for the parameter in the script. Default Value Assign a value to the parameter for the script to run. Description Enter a description for the parameter. Display Order Not applicable. Parameter Name Enter the name of the parameter. Required Flag Select the required flag as Yes. Status Use the drop-down to select if the parameter record is active or inactive for the script.
Creating a Geotagging Batch Job
Geotagging is the process of adding geometry information to various objects, to enable users to perform nearby queries or spatial queries.
A nearby query searches for records, inspections, and asset condition assessments within the map extent, within one or more selected GIS features, or near one or more selected GIS features.
A spatial query searches for assets which are near to a selected GIS feature, so that users can link the assets to a PM schedule.
You can create a batch job that automatically geotags all existing data objects in the Civic Platform database, including geocoded addresses and GIS features. Civic Platform also automatically geotags new data objects one by one when users select new geocoded addresses or GIS features from the map and associate them with an asset, a parcel, or a record that exists in Civic Platform.
Associating a record, an inspection, an asset or a condition assessment with geotagged data objects enables users to find the item within the map extent, within one or more selected GIS features, or near one or more selected GIS features.
Note:
To geotag addresses, make sure that Civic Platform can connect to a map integration environment that has a geocoding service and you have set that map integration environment as the default map service for Civic Platform. For information about how to define a geocoding service, see “Retrieving and Selecting a Geocoding Service” in the Accela Civic Platform GIS Administrator Guide. For information about how to set a default map service for Civic Platform, see “Configuring GIS Services in Civic Platform” in the Accela Civic Platform GIS Administrator Guide. |
To create a new geotagging batch job
Access the Batch Jobs portlet (Accessing the Batch Jobs Portlet).
Click New.
Civic Platform displays the New Batch Job portlet.
Complete the following required fields:
Name Enter an intuitive name for the batch job. Description Enter a brief description of the batch job. Email Enter the email address where you want Civic Platform to send emails after job completion, whether the job is successful or not. You can configure the email template named NOTICE_OF_BATCH_JOB_COMPLETED to customize the notification content. For information about how to edit an email notification template, see Working with Communication Manager. Job Server Select the server for running the batch job. Job Type Select System job type from this drop‑down menu. Service Category After you select System job type from the Job Type drop‑down menu, the Service Category drop‑down menu displays. Select the batch job you want to create, in this example, Geotagging Existing Record. Click Submit.
Civic Platform creates the batch job and then displays the Batch Job Detail portlet.
Specify the job schedule to run the batch job by completing the following steps:
Click the Job Schedule tab.
Define the batch job schedule. Complete the fields as described in Table 1.
Best practice is to set the Frequency to Once.
Click Save.
Creating a Batch Job for Rebuilding Asset Calendar Index
The asset calendar becomes available from Civic Platform 7.3 FP1. For the calendar to display asset events that occurred before you upgrades Civic Platform to 7.3 FP1, you must build indexes for asset events on the index server.
Note:
The index server can automatically update the index with all the asset events that occur after Civic Platform upgrades to 7.3 FP1. |
Before you create a batch job for rebuilding asset calendar index, you must configure the Standard Choice ASSET_CALENDAR_BUILD_INDEX_DURATION. This Standard Choice defines the start date and end date of a duration. The batch job only builds indexes for the asset events whose event time (for example, event schedule time) falls in the duration. For more information about the Standard Choice, refer to the Accela Civic Platform Configuration Reference.
To create a batch job for rebuilding asset calendar index
Access the Batch Jobs portlet (Accessing the Batch Jobs Portlet).
Click New.
Civic Platform displays the New Batch Job portlet.
Complete the following required fields:
Name Enter an intuitive name for the batch job. Description Enter a description about the batch job. Email Enter the email address where you want Civic Platform to send emails after job completion, no matter whether the job is successful or not. Job Server Select the server for running the batch job. Job Type Select System from this drop‑down menu. Service Category Select Asset Calendar Rebuild Index from this drop‑down menu. Click Submit.
Civic Platform creates the batch job and then displays the Batch Job Detail portlet.
Specify the job schedule to run the batch job by completing the following steps:
Click the Job Schedule tab.
Define the batch job schedule. Complete the fields as described in Table 1.
Best practice is to set the Frequency to Once.
Click Save.
Creating an Optimized Inspection Route Batch Job
You can create a batch job to generate the sequence of inspection route sheet items for each inspector, based on the start location, the end location, and the default route type in the inspector’s user profile. See Inspections for a description of the three fields.
The inspection route sheet items are the inspections scheduled for the next available day or the day after that, depending on when you run the batch job. For example, if you run the batch job between September 15, 10:00 pm and September 16, 10:00 pm, the batch job generates the sequence of inspections scheduled between September 16,10:00 pm and September 17, 10:00 pm. If you run the batch job between September 16, 10:00 pm and September 17, 10:00 pm, the batch job generates the sequence of the inspections scheduled between September 17, 10:00 pm and September 18, 10:00 pm.
You can run this batch job at the end of the prior day for the next day’s jobs, or at the middle of the night. Supervisors can also manipulate the order of the route sheet items after the automatic generation.
To create an Optimized Inspection Route batch job
Access the Batch Jobs portlet (Accessing the Batch Jobs Portlet).
Click New.
Civic Platform displays the New Batch Job portlet.
Complete the following required fields:
Name Enter an intuitive name for the batch job. Description Enter a brief description of the batch job. Email Enter the email address where you want Civic Platform to send emails after job completion, whether the job is successful or not. You can configure the email template named NOTICE_OF_BATCH_JOB_COMPLETED to customize the notification content. Job Server Select the server for running the batch job. Job Type Select System job type from this drop‑down menu. Service Category After you select System job type from the Job Type drop‑down menu, the Service Category drop‑down menu displays. Select the batch job you want to create, in this example, Optimize Inspection Route. Click Submit.
Civic Platform creates the batch job and then displays the Batch Job Detail portlet.
Specify the job schedule to run the batch job by completing the following steps:
Click the Job Schedule tab.
Define the batch job schedule. Complete the fields as described in Table 1.
Click Save.
Editing a Batch Job
You can edit the job schedule for a batch job at any time. Refresh the page to implement the change. After you have created a batch job you can only edit the Job Description field in the Job Details portlet.
You can add and remove PM schedules and asset types to from PM Schedule and Asset GIS Sync batch jobs, respectively, at any time after you create the batch job.
Topics
Editing the Job Schedule and Description
You can edit the job schedule and its description for any batch job after you have created it.
To edit a batch job
Access the Batch Jobs portlet (Navigating to the Setup).
Click the link of the batch job you want to edit.
Civic Platform displays the Batch Job Details portlet.
If the job is not currently running, you can make the following changes to the batch job:
Modify the Job Description field in the Job Detail tab.
Modify any fields in the Job Schedule tab.
Modify the association of the batch job with PM schedule or the asset type.
Click Save.
Civic Platform saves the changes to the batch job. Refresh the page to implement the changes.
Adding a PM Schedule to an Existing Batch Job
Add additional PM schedules to an existing batch job.
To add a PM schedule to an existing batch job
Access the Batch Jobs portlet (Accessing the Batch Jobs Portlet).
Click the link of the batch job you want to edit.
Civic Platform displays the Batch Job Details portlet.
Click the PM Schedule tab.
Civic Platform displays the PM Schedule list portlet.
Click Look Up.
Civic Platform displays the PM Schedule Search portlet.
Complete any fields that display. For a description of the fields, see Table 2.
Click Submit.
Civic Platform returns a list of PM Schedules that match your search criteria.
Click the PM Schedule(s) you want to add to the batch job.
Click Select.
Civic Platform adds the PM Schedule to the batch job.
Removing a PM Schedule from an Existing Batch Job
To remove a PM Schedule from a PM Schedule batch job
Access the Batch Jobs portlet (Accessing the Batch Jobs Portlet).
Click the link of the batch job you want to edit.
Civic Platform displays the Batch Job Details portlet.
Click the PM Schedule tab.
Civic Platform displays the PM Schedule list portlet.
Select the PM Schedule(s) you want to remove from the batch job.
Click Delete.
Civic Platform removes the PM Schedule from the batch job.
Adding an Asset Type to an Existing Batch Job
Add asset types to an existing batch job to broaden the number of asset records that update with GIS information when the batch job runs.
To add an asset type to an existing asset/GIS sync batch job
Access the Batch Jobs portlet (Accessing the Batch Jobs Portlet).
Click the link of the batch job you want to edit.
Civic Platform displays the Batch Job Details portlet.
Click the Asset Type tab.
Civic Platform displays the Asset Type portlet.
Click Look Up.
Civic Platform displays the Asset Type Search portlet.
Complete any fields that display. For a description of the fields, see Table 3.
Click Submit.
Civic Platform returns a list of asset types that match your search criteria.
Click the asset type(s) you want to add to the batch job.
Click Select.
Civic Platform adds the asset type(s) to the batch job.
Removing an Asset Type from an Existing Batch Job
To remove an asset type from an existing asset/GIS sync batch job
Access the Batch Jobs portlet (Accessing the Batch Jobs Portlet).
Click the link of the batch job you want to edit.
Civic Platform displays the Batch Job Details portlet.
Click the Asset Type tab.
Civic Platform displays the Asset Type portlet.
Select the asset type(s) you want to remove from the batch job.
Click Delete.
Civic Platform removes the asset type(s) from the batch job.
Adding a Parameter to an Existing Batch Job
Add additional parameters to an existing script batch job.
To add a parameter to an existing script batch job
Access the Batch Jobs portlet (Accessing the Batch Jobs Portlet).
Click the link of the script batch job you want to edit.
Civic Platform displays the Batch Job Details portlet.
Click the Parameters tab.
Civic Platform displays the Parameters list portlet.
Click New.
Civic Platform displays the New Parameter portlet.
Complete any fields that display. For a description of the fields, see Table 4.
Click Submit.
Civic Platform adds the parameter to the batch job.
Removing a Parameter from an Existing Batch Job
To remove a parameter from a script batch job
Access the Batch Jobs portlet (Accessing the Batch Jobs Portlet).
Click the link of the batch job you want to edit.
Civic Platform displays the Batch Job Details portlet.
Click the Parameters tab.
Civic Platform displays the Parameters list portlet.
Select the parameter(s) you want to remove from the batch job.
Click Delete.
Civic Platform removes the parameter(s) from the batch job.
Deleting a Batch Job
You can only delete a batch job when it is not running in the process queue. You must also remove any associated PM schedules and asset types from a batch job to delete it. For instructions on removing PM schedules and asset types, see Removing an Asset Type from an Existing Batch Job and Removing an Asset Type from an Existing Batch Job. For instructions on terminating a running batch job, see Terminating a Batch Job.
To delete a batch job
Access the Batch Jobs portlet (Accessing the Batch Jobs Portlet).
Select the batch job(s) you want to delete.
Ensure that the batch job is not running by checking its Job Status column.

If the job is running, follow the steps outlined in Terminating a Batch Job.
Ensure that the batch job has no PM schedules or asset types by checking the PM Schedule or Asset Type tabs.
If there are PM schedules, follow the steps outlined in Removing an Asset Type from an Existing Batch Job.
If there are asset types, follow the steps outlined in Removing an Asset Type from an Existing Batch Job.
Click Delete.
Civic Platform deletes the batch job.
Searching for a Batch Job
You can locate a batch job by any of these criteria, Name, Job Type, Schedule Status, and Job Status.
To find a batch job
Access the Batch Jobs portlet (Accessing the Batch Jobs Portlet).
Click Search.
Civic Platform displays the Batch Job Search portlet.

Complete any of the following fields:
Name Enter the batch job name. Description Enter a brief description of the batch job. Email Enter the email address where you want Civic Platform to send emails after job completion, no matter whether the job is successful or not. You can configure the email template NOTICE_OF_BATCH_JOB_COMPLETED to customize the notification. For information about how to edit an email notification template, see Working with Communication Manager. Job Type Select the job type from this drop‑down menu. Schedule Status Select the Job Schedule Status from this drop‑down menu. Job schedules can be either Active or On Hold. Job Status Select the batch job’s status from this drop‑down menu. Available values are Complete, Running, In Process Queue, and Terminated. Click Submit.
Civic Platform returns a list of batch jobs that match your search criteria.