Crystal Reports Server Embedded 2008 V2 and V3
This section provides you with the information on how to configure the Crystal Reports Server Embedded 2008 V2 (or V3). This section also includes configuration steps for IIS 7 and ODBC, so that you can integrate Crystal Report Server Embedded 2008 V2 (or V3) with Civic Platform.
Topics
Configure Report Adapter
In the Crystal Report Service Adapter, a virtual directory, myreports, and a folder, reports, exist by default in the ASP files. The names are not case sensitive, so MyReports is the same as myreports.
myreports: A default virtual directory in IIS. You can change the name to whatever you prefer. Make sure you also change the name in the FileDirectory.asp and the XReport.aspx.cs.
reports: A default folder under the virtual directory myreports. This folder preserves the source report data. You can change the name to whatever you prefer. Make sure you also replace the existing name with the preferred one in the FileDirectory.asp and the XReport.aspx.cs.
To configure Report Adapter
Get the cr2008_embedded_v2&v3.zip file from Accela Customer Support.
You can call Customer Support at (888) 7-ACCELA, ext. 5 or (888) 722-2352 ext. 5. Customer Support is available Monday though Friday from 6:00 AM to 6:00 PM Pacific Daylight/Standard Time. You can also go to the Success Community website for assistance.
- Unzip the file and copy the contents into the virtual directory where that stores reports. For example,
.D:\MyReports Open the Central Configuration Manager after navigating to and then do the following:
Locate the Report Application Server 12 and then click Stop.
Click Properties to pop up the Report Application Server 12 Properties window.
Click the Parameters tab.
Select Server from the Option Type drop-down list.
- Click Browse in the Report Directory section to select the virtual directory. In this example, it is
.D:\MyReports Click OK to save the changes and close the pop-up window.
Click Start.
IIS7 Configuration
To configure IIS7
Add ASP support, Basic Authentication, and Windows Authentication for IIS 7. To do this, follow the sub-steps below:
Click .
In the Service Manager pop-up window, click Rolesfrom the list in the Connections panel.
Click Add Role Services on the right hand side of the screen to add ASP and, if needed, Basic and Windows Authentications, to the Role Service list.
Change the Advanced Settings for the Application Pool, DefaultAppPool.
Start Internet Information Services (IIS) Manager console.
Click Application Pools from the Connections panel and select DefaultAppPool from the Application Pools list.
Click Advanced Settings link from the right hand side of the console.
Set Enable 32-Bit applications to True.
Set the Managed Pipeline Mode to Classic.
Add Application for myreports.
Start Internet Information Services (IIS) Manager console.
Right-click Default Website and select Add Application from the pop-up menu.
In the Add Application pop-up window, do the following:
- Select DefaultAppPool in the Application pool.
- Fill an application alias in the Alias field. Example: MyReports
- Select the virtual directory that created for storing reports in the Physical path. Example: D:\MyReports
- Click OK.
- Test the report adapter.
- Enter this URL into the address bar of an IE browser:
http://localhost/MyReports/adapter/FileDirectory.asp

- Enter this URL into the address bar of an IE browser:
http://localhost/myreports/adapter/XReport.aspx?reportName=/TEST/ACCELA/test.rpt
Civic Platform displays The report executed successfully in the web browser.
Note: If the test fails, try copying C:\Program Files\BusinessObjects\common\4.0\crystalreportviewers12 to C:\Inetpub\wwwroot\aspnet_client\system_web\2_0_50727\crystalreportviewers12, then run the test again.
- Enter this URL into the address bar of an IE browser:
http://localhost/MyReports/adapter/FileDirectory.asp
ODBC Configuration
If using the 64-bit versions of Windows, as Report Commander runs as a 32-bit application, configure the 32-bit ODBC driver and DSN. To configure the alias as 32-bit DSN, run C:window\sysWOW64\odbcad32.exe to start the 32-bit ODBC Data Source Administrator, and add the DSN there for your Oracle or MSSQL.
Topics
Oracle
- Configure a connection between your machine and Oracle server. Follow the
sub-steps below.
- Run the Oracle Net Configuration.
- Select Local Net Service Name Configuration and click Next.
- Select Add and click Next.
- Enter the Service Name. Service Name is the global database name for your database. Click Next.
- Select TCP as the Communication Protocol and click Next.
- Enter the Host Name. The default port (1521) is generally the correct value. If your DBA has configured Oracle to use a different port, use that instead. Click Next.
-
If you see a message indicating the test was successful, click Next. Otherwise, click Back and consult with your DBA about the port value you should use.
-
Enter the Net Service Name. Net Service Name is the name you give for this connection. Click Next to finish the connection configuration.
Create an ODBC connection to your Oracle server.
Start the ODBC Data Source Administrator.
Click System DSN tab, and then click Add.
On the Driver Select screen, choose the appropriate driver for your database.
When you have chosen your driver, specify the Data Source Name - the name for the ODBC connection. Choose the TNS Service Name from the drop-down list. Specify the default User ID to use for the connection. Click Test Connection.
If the connection is successful, you are ready to use the ODBC name for the connection to the Oracle server.
MS SQL Server
- Start the ODBC Data Source Administrator.
- Click System DSN tab, and then click Add.
- On the Driver Selection screen, select the appropriate driver for your database,
and click Finish.
A message displays asking you to choose which database server to connect to.
- Enter a name for the new connection, enter a short description, and select your SQL server from the drop-down list. Click Next.
- Provide valid user credentials. Click Next.
- Select the database to use for this connection. You can also decide to use the default database for the user account you are using to connect to the database. Click Next.
- Unselect the Change the language of SQL Server system messages to option, then click Finish.
- Click Test Data Source.
Configure the Crystal Reports Database Connection
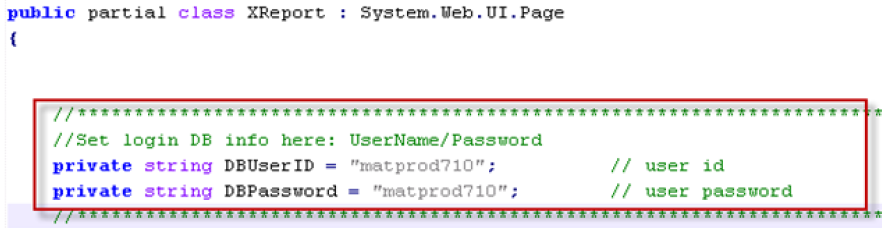
Open the XReport.aspx.cs file in the /adapter folder from the cr2008_embedded_v2&v3.zip package. Enter the username and password that for the Oracle or SQL database connection configuration. The following image shows the code snippet.
Crystal Report Authentication Configuration
You can implement the authentication feature to open the Crystal Report.
Topics
Anonymous Access
To allow anonymous users to access crystal report
Start the Internet Information Services (IIS) Manager, and click the Crystal Report website in the Connections panel.
Click Authentication in the Security section. The Authentication list displays.
Right-click the Anonymous Authentication item and select “Enable” from the pop-up menu.
Access .
Open an existing report service or create a new one. Ensure you carefully enter the following information correctly in the Report Service Form:
Report Name List URL: http://< Crystal Report server IP address>/myreports/adapter/FieldDirectory.asp Report Service URL: http://<Crystal Report server IP address>/myreports/adapter/XReport.aspx Report Service Type: Select Crystal Report. Authentication Method: Select Not Requited. 
Associate a report to the Report Service. Make sure the selected report service from the Process Servicedrop-down list is the one you created or edited in the previous step.
Click the Parameters secondary tab to set up the data filters. When user tries to access the report, the data filters display in the pop-up window for the users to enter values sent to the report.
Click Preview to preview the associated report.
Basic Authentication
You can set up Basic Authentication for your Crystal Report server.
To set up Basic Authentication
Start the Internet Information Services (IIS) Manager, and expand the Crystal Report website and then click the adapter folder in the Connections panel.
Click Authentication in the Security section. The Authentication list displays.
Right-click the Basic Authentication item and select Enable.
Click the Crystal Report website in the Connections panel, and then click IIS Manager Permissions from the Security section.
Click Allow Useron the right hand side and add user that has permission to access the crystal reports.
Access .
Open an existing report service or create a new one. Ensure that you enter the following information correctly in the Report Service Form:
Report Name List URL http://< Crystal Report server IP address>/myreports/adapter/FieldDirectory.asp Report Service URL http://<Crystal Report server IP address>/myreports/adapter/XReport.aspx Report Service Type Select Crystal Report. Authentication Method Select Basic Authentication. User Name and Password the login name and the password of the Crystal Report Server. 
Associate a report to the Report Service. Set the Output Format. Make sure the selected report service from the Process Service drop-down list is the one you created or edited in the previous step.
For non-default format, you must configure parameter if the report has defined parameters. Click the Parameters secondary tab to set up the data filters. When user tries to access the report, the data filters display in the pop-up window for the users to enter values sent to the report.
Click Preview. The Authentication window displays as shown below. Enter your user name and password to display the associated report.
NT Authentication
You can set up NT Authentication for your Crystal Report Server.
To set up NT Authentication
Start the Internet Information Services (IIS) Manager, and click the Crystal Report website in the Connections panel.
Click Authentication in the Security section.
The Authentication list displays.
Right-click the Windows Authentication item and select Enable.
Access .
Open an existing report service or create a new one. Ensure that you enter the following information correctly in the Report Service Form:
Report Name List URL http://< Crystal Report server IP address>/myreports/adapter/FieldDirectory.asp Report Service URL http://<Crystal Report server IP address>/myreports/adapter/XReport.aspx Report Service Type Select Crystal Report. Authentication Method Select NT Authentication. User Name and Password Specify the domain account. 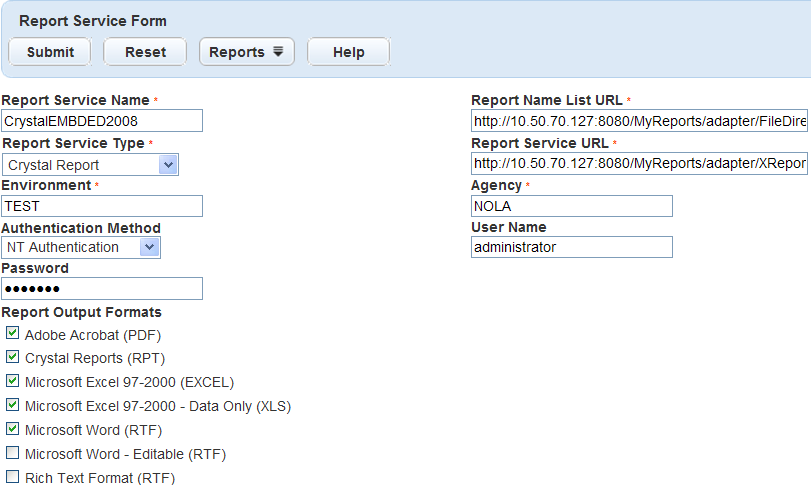
Associate a report to the Report Service. Set the Output Format. Make sure the selected report service from the Process Servicedrop-down list is the one you created or edited in the previous step.
For non-default format, you must configure a parameter if the report has defined parameters. Click the Parameters secondary tab to set up the data filters. When a user tries to access the report, the data filters display in the pop-up window for the users to enter values sent to the report.
Click Preview. If the client user and the crystal report server are in the same domain, the report displays as shown below.

Troubleshooting - Invalid Export DLL or Export Format
If you experiences this error, “Invalid export DLL or export format," when exporting report, you can fix the issue by modifying the PATH environment variable for the computer.
If you are running Crystal Reports Server on a 32-bit computer, add the following to the end of the PATH variable value:
C:\Program Files\Business Objects\BusinessObjects Enterprise 12.0\win32_x86If you are running Crystal Reports Server on a 64-bit computer, add the following instead:
; C:\Program Files (x86)\Business Objects\BusinessObjects Enterprise 12.0\win32_x86Restart your machine after editing the path variable so that the edits can take effect.