Working with Virtual Folder Groups
When you upload an attachment in Civic Platform, the user who uploads the attachment can select from a pre-defined list of folders or create a new virtual folder as appropriate. However, Citizen Access users can only select from the pre-defined virtual folder group to upload attachments. Assignation of attachments to virtual folders serves the same purpose as an actual folder: It allows users to organize uploaded attachments into groups (folders), making it easier to keep track of those attachments.
You can create as many virtual folders and folder groups as you need, by creating standard choices (virtual folder groups) with the desired values (virtual folders) you want to use. You can then associate each virtual folder group with a corresponding record type.
Note:
Existing users with file upload permissions (FID 8212) can edit the virtual folder settings. |
Topics
Accessing the Virtual Folder Group Settings
Access the Record Type Administration portlet (Accessing Record Type Administration).
Expand the module you want to work with by clicking the down arrow on the right side of the module bar.
A list of existing record types displays.
Select the record type for which you want to create a virtual folder group by clicking the record type alias hyperlink. If you have a large number of record types, you can use Search to locate the desired record type by name.
The record type summary displays.
In the left panel, click Other Associations.
From the list of associations at the top of the window, click Virtual Folder Group.
Civic Platform displays the Virtual Folder Group settings.

Creating a New Virtual Folder Group
You can add new virtual folder groups directly from the Record Type Administration portlet.
To create a new virtual folder group
Access the Virtual Folder Group Settings (Accessing the Virtual Folder Group Settings).
Civic Platform displays the Virtual Folder Group settings.
Click Create New Virtual Folder Group.
The New Standard Choice form displays in a new window.
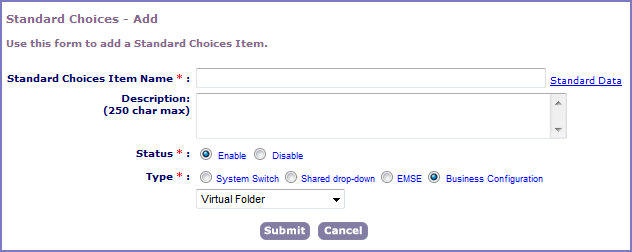
Enter the name of the new virtual folder group you are creating in the Standard Choices Item Name field.
Describe the folder group you are creating; enter usage and relevant information.
In the Status field, select Enable.
In the Type field, select Business Configuration.
Select Virtual Folder from the drop-down list below the Type field.
Click Submit.
Civic Platform creates the new Virtual Folder Group. Now you must add virtual folders to your group.
Click Add at the bottom of the window (below the Standard Choices Value banner).
The Add Standard Choices Value form displays in a new window.
Enter the name of the virtual folder you want to add to the group in the Value field.
In the Value Desc field, describe the folder group you are creating; enter usage and relevant information.
In the Status field, select Enable.
Click Submit.
Civic Platform adds the new folder below the Standard Choices Value banner.
Repeat from for each folder you want to add to the group.
When you finish adding folders, click Update to save your new virtual folder group and folders.
Close the window and return to the Virtual Folder Groups section of the Other Associations tab on the Record Settings portlet.
-
Click Refresh
 .
.The new virtual folder group is now available for assignment to a record type in the drop-down list to the far left.
Viewing or Editing a Virtual Folder Group
You can access virtual folder group details directly from the Record Type Administration portlet.
To view or edit Virtual Folder group details
Access the Virtual Folder Group Settings (Accessing the Virtual Folder Group Settings).
Civic Platform displays the Virtual Folder Group settings.
Select the virtual folder group you want to view/edit.
Click the View/Edit link to the right of the field.
The Standard Choices Item - Edit window displays.
Make modifications to the settings as needed.
click Update if you made changes, then close the window.
Assigning a Virtual Folder Group to a Record Type
To make virtual folders available for use to users, you must assign the appropriate virtual folder group to each record type. You can create a unique virtual folder group for each record type. You can also assign a single virtual folder group to multiple record types. You cannot, however, assign multiple virtual folder groups to a single record type.
To assign a virtual folder group to a Record Type
Access the Virtual Folder Group Settings (Accessing the Virtual Folder Group Settings).
Civic Platform displays the Virtual Folder Group settings.
Select the virtual folder group you want to associate with the current record type.
If you do not see the virtual folder group you need, you might need to add it. See Creating a New Virtual Folder Group for information about adding a new virtual folder group.
Click Save in the left side panel, near the bottom.
Civic Platform assigns the selected virtual folder group to the current record type. Folders contained within are available to users when they upload documents to records of the current type.