Designing a Form Layout
Designing a form layout consists of the following topics.
Topics
Creating a Form Layout
Creating a new screen is the first step in setting up the fields you want to expose in a form to a certain group of users. You can add, customize, and manipulate the size of each field, and use the buttons on the screen to preview, align, add dynamic text, draw lines and insert tables.
To create a new form portlet layout
Access the appropriate Form Layout Editor (Accessing the Form Layout Editors).
Click New.
Civic Platform displays the Screen Name page.
Select the appropriate item from one of these drop-down lists, APO Type, Custom Fields Group Code, Asset Template ID, or TSI Group Code.
Select the APO Type from the drop down list.

Select the APO Type associated with the fields you want applied to the new APO Screen Name. The APO Screen Name might be a name to easily identify the fields or their unique functions for the APO Type.
When a user creates a new application, the fields you add display at the bottom of the APO Type section, for example in the Owner Information section if you added fields to the Owner APO Type.
Select the Custom Fields Group Code from the drop down list.

Select the Custom Fields Group Code applicable to the fields you want to apply to the new Custom Fields Screen Name. The Custom Fields Screen Name should enable you to easily identify the fields or functions of the Custom Fields Group Code.
The Custom Fields Group Code is a unique code name that identifies the custom fields you are working with. A Custom Fields Group is a group of fields that you want to include on an application in addition to the standard application fields such as address, contact, and owner details.
The items in this drop-down list are based on your configurations in Classic Administration > Admin Tools tab > Application > Custom Fields.
For information and details on setting up Custom Fields Groups, see Creating Custom Fields.
Select the Asset Template ID from the drop down list.

Select the Asset Template ID applicable to the fields you want to apply to the new Asset Screen Name. The fields you add display in the Asset Detail form of an asset based on the asset type. When a user creates an asset type, these fields display at the bottom of the Asset Detail form. The Asset Screen Name might be a name to easily identify the fields or functions of the asset template ID or asset type.
To understand how to set up asset templates, see Attributes and Templates
Select the TSI Group Code from the drop down list.

Select the TSI Group Code applicable to the fields you want apply to the new TSI Screen Name. The TSI Screen Name might be a name to easily identify the fields or functions of the TSI Group Code.
You must obtain the task-specific information group name for the workflow task to which you want to add fields. When a user creates an application and Civic Platform assigns a set of workflow tasks, these fields display in the TSI section at the bottom of the Task Details form.
To understand how to set up task-specific information groups, see Designing Workflows. A workflow is a set of tasks an agency proscribes and follows for the purpose of managing an application. Workflow tasks functions as the agency’s to-do list when a user creates an application. A task-specific information group is a group of fields that you want to include on a task in addition to the standard task fields, such as status, status date, and comments. You can locate this feature in Classic Administration under Admin Tools > Workflow > Task Specific Info.
Click Submit.
Civic Platform displays the Screen Name page and the Available Fields page, which contains the fields associated with the APO Type, Custom Fields Group Code, Asset Template ID, or TSI Group Code.
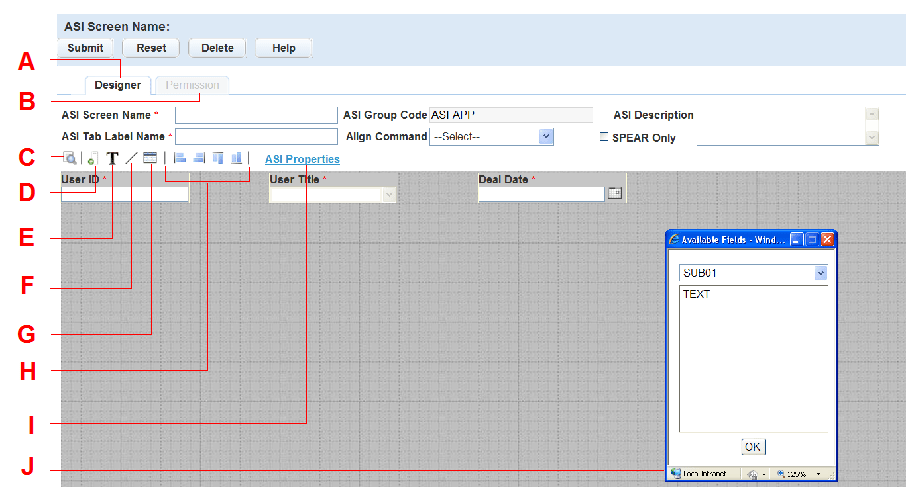
A The Designer tab is where you create and design the form. B The Permission tab is where you assign permissions and make forms available to users. C The Preview button. Click to preview your changes. D The Available Fields button. Click to view the available fields you can add to this page. Double-click the name of the field to add it to the form. E The Add Label button. Click to add text to the page. F The Add Line button. Click to add a line to the page. G The Add Custom Lists or Attributes button. This button is only available in the Custom Fields tool and the Asset Form Layout Editor. Click the button to add the table associated with a Custom Fields Group Code or an Asset Template ID to the form. H The Alignment buttons. Click to align the fields left, right, top, or bottom. I Custom Fields Properties. This link takes you to respective configuration area in Civic Platform. The fields available pertain to the attribute template for the APO Type, the Custom Fields subgroups, or the Workflow subgroups. If you need to add a field to available fields list, you must first add it to the respective area: the attribute template, the Custom Fields subgroups, or the Workflow subgroups. J The Available Fields window. This window displays all available fields for the APO Type, Custom Fields Group Code, Asset Template ID, and TSI Group Code. Double-click the field name to add it to the form. Complete the appropriate fields for the form you are designing. Go to the substep for the screen name you are designing: APO screen name, Custom Fields screen name, Asset screen name, or TSI screen name.
APO Screen Name:
Align Command Use this drop-down list after you have added fields to the screen. Highlight a field and click Align to move the field. To align multiple fields, hold the Ctrl key, click each field you want to move, then click Align. APO Description Enter descriptive text to help identify the form use or its function. APO Screen Name Enter the screen name for the page. APO Type This read-only field is pre-filled with the choice you made in . Custom Fields Screen Name:
Align Command Use this drop-down list after you have added fields to the screen. Highlight a field and click Align to move the field. To align multiple fields, hold the Ctrl key, click each field you want to move, then click Align. Custom Fields Description Enter descriptive text to help identify the purpose of the form. Custom Fields Group Code This read-only field is pre-filled with the choice you made in . Custom Fields Screen Name Enter the screen name for the page. When creating a standard Condition, this name becomes available in the Template drop-down list of the New Condition detail portlet. Custom Fields Tab Label Name Enter the detail portlet tab label associated with this screen. SPEAR Only The SPEAR Only option enables you to define Custom Fields forms for a Custom Fields group used in the application. For example, a Custom Fields group with 400 fields is a large number of fields. Not all of those fields are necessary during record creation. Choose SPEAR only if you want to define a form for the Custom Fields Group Code and display it on the application if you enabled ac Custom Fields Smart Choice group. Asset Screen Name:
Align Command Use this drop-down list after you have added fields to the screen. Highlight a field and click Align to move the field. To align multiple fields, hold the Ctrl key, click each field you want to move, then click Align. Asset Description Enter descriptive text to help identify the form use or its function. Asset Template ID This read-only field is pre-filled with the choice you made in . Asset Screen Name Enter the screen name for the page. TSI (Task Specific Information) Screen Name:
Align Command Use this drop-down list after you have added fields to the screen. Highlight a field and click Align to move the field. To align multiple fields, hold the Ctrl key, click each field you want to move, then click Align. TSI Description Enter descriptive text to help identify the form use or its function. TSI Group Code This read-only field is pre-filled with the choice you made in . TSI Screen Name Enter the screen name for the page. TSI Tab Label Name Enter the detail portlet tab label associated with this screen. Add fields to the screen.
Click available fields to open the available fields page.
If there is more than one APO template, Custom Fields subgroup, Asset template, or TSI subgroup the available fields page has a drop-down list. Choose the template or the subgroup name from the drop-down list. Then hold down the Ctrl key and click each field name you want to add to the page.
Click OK.
Resize and position each field using the mouse.
Customize the fields to add a watermark.
Right-click the field you want to customize and choose Properties.
Civic Platform displays the Properties window.
Customize the fields below.
Label Custom label name for the field. DB Label Database default label name. Watermark Label Enter the text you want to display in the field as a watermark label. The watermark label acts as placeholder or example text to provide a hint to users on what they are expected to enter in the field. Justification Specify justification of label name with drop-down list. Width Enter the width of the attribute field you want to display in the form. Height Enter the height of the attribute field you want to display in the form.
Delete any unnecessary fields.
Right-click on the field you want to delete.
Choose Delete from the drop-down list.
Add lines or additional dynamic text accessed by corresponding buttons.
Click Preview to evaluate whether you want to make adjustments.
When you are happy with the form layout click Submit.
Searching for a Form
To search for a form
Access the appropriate Form Layout Editor (Navigating to the Setup).
Click Search.
Civic Platform displays the form layout editor search screen.
Enter search criteria as necessary.
For a description of the fields that display on the search screen, see Creating a Form Layout.
Click Submit.
Civic Platform displays the screens that match your search criteria.
Editing a Form Layout
Edit Custom Fields screens by adding or removing fields, manipulating the size of the fields, or applying customization.
To edit a form layout
Access the appropriate Form Layout Editor (Accessing the Form Layout Editors).
Select the Screen Name on which you want to act.
Civic Platform displays the Screen Name detail page.
Make the necessary edits to fields. For information on how to make changes to the screen, see Accessing the Form Layout Editors.
Click Submit.
Copying a Form Layout
You can copy an existing form layout screen name from the list and update it as necessary.
To copy a form layout
Access the appropriate Form Layout Editor (v).
Select the screen you want to copy and click Copy.
Make the necessary edits to fields. For information on how to make changes to the screen, see Creating a Form Layout.
Click Submit.
Assigning Permissions
After creating the form, decide which user group or module requires permission to edit or view the fields. For example, you might want to assign permission for a supervisor to enter data in the fields, limit other users to view-only access, and perhaps restrict another group from being able to see the information whatsoever. Make the appropriate permission assignments based on the access-level required by each user type and group.
You can further refine permissions and access-levels by setting Application Type Security, Record Type Security, and Workflow Security. For more information about Security, see Setting Up Security Policies.
To access and assign a view
Access the appropriate Form Layout Editor (Accessing the Form Layout Editors).
Select the Screen Name on which you want to act.
Civic Platform displays the Screen Name detail page.
Go to the Permissions tab.
Civic Platform displays the Permissions detail portlet for the screen name.
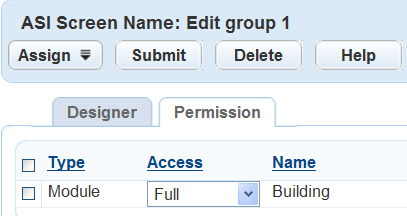
Click Assign.
Select the Module, Group or User from the drop-down list.
Civic Platform displays a navigation tree with associated selection.
Navigate through the tree view to select the associated Module, Group, or User.
Click Submit.
Use the drop-down list to assign Full Access, Read Only, or No Access for the Module, Group, or User.
You can change the access level at any time.
Click Submit.