Working with Calendars
After you configure the calendars, most calendar related operations take place in the calendar administration portlet.
Topics
Finding a Calendar
You can navigate calendars by type, name, permission, or inspection type. You can also search for a calendar by different search criteria.
You can find an existing calendar by expanding and navigating the calendar portlet search for a user calendar to modify calendar details and scheduled user leaves.
To find calendar
Access the Calendar Administration portlet (Accessing the Calendar Administration Portlet).
Civic Platform displays a portlet for navigating or searching calendars.
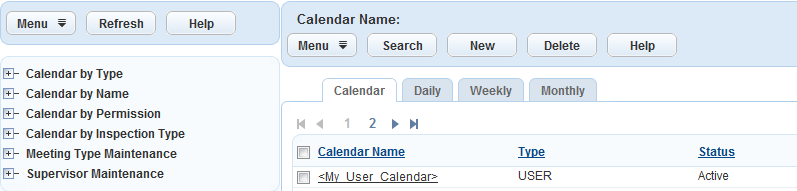
To navigate to a calendar by type, expand the calendar categories on the left side panel until you find the calendar.
Click Search to find a calendar by specifying search criteria.
Civic Platform displays the Calendar search page.

Complete the fields and click Submit. For a complete list of Calendar search fields, see Table 1.
Civic Platform displays the calendars that match your search criteria in the Calendar list portlet.
Note:You can use search to locate inactive holiday calendars.
Viewing Daily, Weekly, and Monthly Calendars
Each calendar provides Daily, Weekly, and Monthly tabs to view different time frames of scheduled calendar items.
To view a calendar
Find the calendar you want to view (Finding a Calendar).
Click the Daily tab.
Civic Platform displays start time, end time, the calendar type, and the name of the calendar items scheduled for the current day.
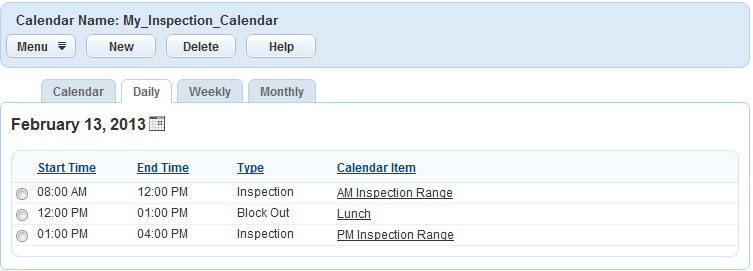
Click the link in the calendar item column to display the schedule details.
Click the New button to schedule a calendar item (Assigning Daily Units).
Click the option to select a calendar item and delete the item or perform one Menu button operations.
Click the Weekly tab.
Civic Platform displays calendar items scheduled for the current week.

Click the link for the calendar item to display the schedule details.
Click the left and right arrows at the top of the calendar to page through the weeks.
Click Show all items for calendars to display all calendar items (Creating Master Calendars).
Click the New button to schedule a calendar item (Assigning Daily Units).
Hover over the Menu button and select one of the operations to perform on the calendar.
Click the Monthly tab.
Civic Platform displays calendar items scheduled for the current month.
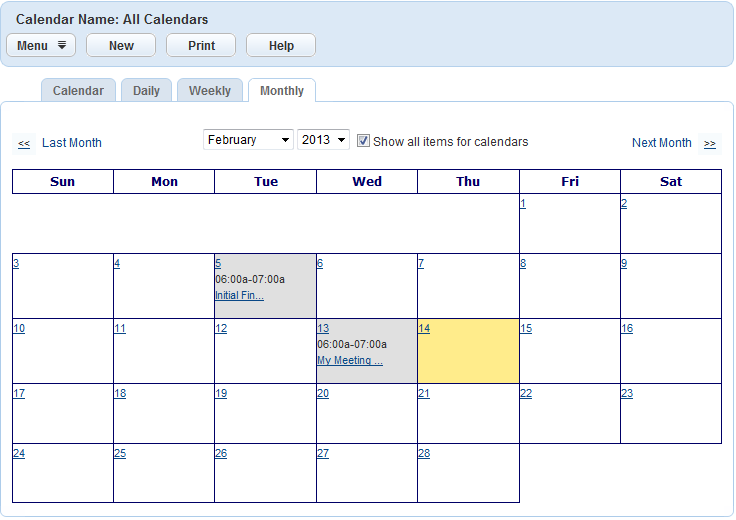
Click the link for the calendar item to display the schedule details.
Click the left and right arrows at the top of the calendar to page through the months.
Click the New button to schedule a calendar item (Assigning Daily Units).
Click Show all items for calendars to display all calendar items (Creating Master Calendars).
Hover over the Menu button and select one of the operations to perform on the calendar.
Printing a Calendar
You can print calendars from the Weekly or Monthly Calendar views. Calendars print exactly as they display. For example, if you print a calendar from the Weekly Calendar view, then the calendar prints the week in view. This same logic applies to monthly calendar views.
To print a calendar
Find the calendar you want to print (Finding a Calendar).
Click the Weekly or Monthly tab.
Based on the tab you click, Civic Platform displays the Weekly or Monthly calendar view.
Click Print.
Accela displays a printable version of the calendar in your browser window.
Choose File and select Print from your browser menu.
Cloning and Copying Calendars
Use the clone feature and the copy feature to apply standard block-out dates, times, and other calendar details to multiple calendars. Clone a calendar to create a new, duplicate calendar. When you clone a calendar, you specify the source calendar content you want to include in the new calendar, including block out days, holidays, weekends, and other shared information. Copy a calendar to duplicate source calendar details, such as block out days, holidays, and meetings, to an existing target calendar.
Use Case Example
You have holidays that apply to all departments in your agency. You can set up holidays in one calendar and copy this information to other calendars.
To clone or copy a calendar
Find the calendar you want to clone or copy (Finding a Calendar).
Clone the calendar by completing one of these actions:
From the navigation tree, right-click on the calendar you want to clone and choose Clone Calendar or Copy Calendar from the drop-down list.
From the Calendar detail portlet, hover over the Menu button and choose Clone Calendar or Copy Calendar from the drop-down list.
Civic Platform displays the clone (shown) or copy calendar portlet.
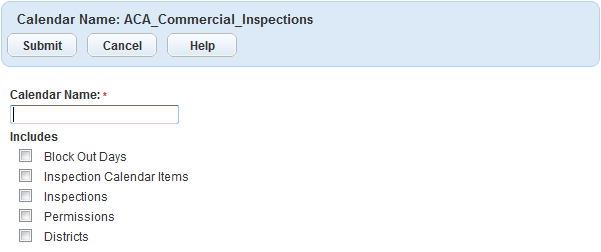
Complete Calendar Name (for clone) or Copy To Calendar (for copy) field:
Calendar Name When cloning a calendar, enter a unique name to identify the new calendar. Copy To Calendar When copying a calendar, enter the name of the calendar to which to copy the select includes. Choose the source items you want to include from the cloned or copied calendar. The type of calendar that you clone or copy, such as an inspection or meeting, determines the type of information you can clone or copy (Table 1).
Table 1. Cloning and Copying Calendar Includes Block Out Days Inspection and User calendars. Districts Inspection calendars. Meetings Meeting calendars. Meeting Agenda Meeting calendars. Meeting Attendees Meeting calendars. Holidays Agency Holiday calendar Inspection Calendar Items Inspection calendars. Inspections Inspection calendars. Copies or clones inspection block out periods. Permissions Inspection and Meeting calendars. Weekend Agency Holiday calendar. Copies or clones weekend block out periods. Click Submit.
Civic Platform creates the cloned calendar or copies the included information to the specified calendar.
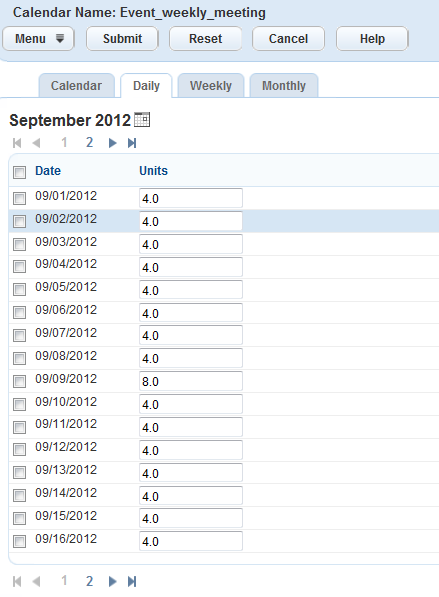
Assigning Daily Units
When you create a calendar, you set the default number of time blocks (units) you can schedule per day in the #Units Allocated per Time Range field (Table 1). This #Units Allocated per Time Range field gets its default value from the daily unit setting you assign in the calendar.
To assign daily units
-
Find the calendar you want to modify (Finding a Calendar).
-
Click the Daily, Weekly, or Monthly tab.
-
Hover over the Menu button and select Assign Daily Units from the drop-down list.
Civic Platform displays the Assign Daily Units portlet.
-
Select the date for which you want to assign a special unit. The value in the # Units Allocated per Day field determines the default number of units in a date.
Note:The portlet lists all the dates in the current month by default. Click the calendar icon above the date list to retrieve the dates of a different month.
-
Modify the unit value in the Units column, as required.
-
Click the Submit.
Civic Platform updates the daily unit settings.
Scheduling Calendar Items
You can schedule calendar items in the Daily, Weekly, or Monthly tab for any of the calendar types:
-
Inspection
-
Event
-
Hearing
-
Agency Holiday
-
User
-
Meeting
To schedule a calendar item
-
Find the calendar you want to modify (Finding a Calendar).
-
Click the Daily, Weekly, or Monthly tab.
-
Click the New button.
Civic Platform displays the Calendar Item portlet.
-
Complete the fields that display. For a complete list of the fields that display, see Table 2.
-
Click the Submit button.
Table 2. Calendar Item Field Descriptions All-Day Event Mark this check box if you want the calendar item you schedule to occupy the entire calendar day on which it is scheduled. When you mark this check box, the Start Time and End Time drop-down lists are greyed out. Calendar Item Enter a distinct name for the calendar item you want to schedule. Comments Enter comments related to the calendar item you schedule. For example, if you are scheduling a hearing, you might want to enter a hearing description, such as, “Plan review for proposed subdivision.” Date Use the Date button to choose a day to schedule the calendar item or type in the calendar item date. End Recurrence If you are scheduling a recurring calendar item, indicate when you want to end the recurring calendar item. To continue a calendar item indefinitely, leave this field empty. End Time Select the calendar item end-time using the drop-down list. Hearing Body This field appears only when you schedule a calendar item on a hearing calendar. Enter the name of the hearing body that will attend the hearing. For example, you might enter Planning Commission or Land Use Appeals Board. A hearing body is an individual or a group of people responsible for reviewing applications in a public setting, such as planning commission or land use appeals board members. Hearing body members mediate hearings and might be required to reject or accept applications based on the hearing results.
Location This field appears only when you schedule a calendar item on a hearing calendar. Select the hearing location from this drop-down list. The values that populate this list are determined by the Standard Choice, HEARING LOCATION (see the Accela Civic Platform Configuration Reference).
Maximum Items This field appears only when you schedule a calendar item on a hearing calendar. Enter the maximum number of applications that can be reviewed at the hearing. Maximum Agenda Items This field appears only when you schedule a calendar item on a meeting calendar. Enter the maximum number of agenda items that can be reviewed at the meeting. Meeting Body This field appears only when you schedule a calendar item on a meeting calendar. Select the meeting body from the drop-down list. The values that populate this list are determined by the Standard Choice, MEETING BODY (see the Accela Civic Platform Configuration Reference). Meeting Status This field appears only when you schedule a calendar item on a meeting calendar. Select the status of the meeting, such as Approved or Pending. The displayed values depend on the status group for the meeting type determined by the Standard Choice MEETING_TYPE_STATUS_{Group Name} (see the Accela Civic Platform Configuration Reference). Meeting Type This field appears only when you schedule a calendar item on a meeting calendar. Select the type of the meeting from the drop-down list. Civic Platform only displays those meeting types for which you have permission. Organizer This field appears only when you schedule a calendar item on a meeting calendar. This field is read-only, and displays the current user as the organizer of the meeting calendar item. Recurrence - None Mark the radio button if you are scheduling a one-time calendar item. Notice Date This field appears only when you schedule a calendar item on a hearing calendar. Enter the date when you want a hearing notice e-mailed to designated recipients. You determine the hearing notice e-mail recipients in the Send Email Notification To drop-down list.
Recurrence - Repeat every day(s) To repeat a calendar item over a certain number of days, select this option and enter the number of days between each calendar item. Recurrence - Repeat every week(s) on To repeat a calendar item over a certain number of weeks, select this option, enter the number of weeks between each calendar item, and choose the day of the week when you want the calendar item to occur. Recurrence - Repeat every month(s) on To repeat a calendar item over a certain number of months, select this option, enter the number of months between each calendar item, and choose the day of the week when you want the calendar item to occur. Recurrence - Repeat every year(s) To repeat a calendar item over a certain number of years, select this option and enter the number of years between each calendar item. Reminder This field appears only when you schedule a calendar item on a meeting calendar. Specifies the number of days, before the meeting, to send out a reminder notification. Responsible Person This field appears only when you schedule a calendar item on a meeting calendar. Select the responsible person for the meeting. Click Current User to populate this field with the current user’s name. Send E-mail Notification To This field appears only when you schedule a calendar item on a hearing calendar. When a hearing is scheduled, a hearing notice can be e-mailed to designated recipients. Select a value from this drop-down list to determine the hearing notice e-mail recipients. You can choose from these values:
All Licensed Professionals and Contacts
Contacts
Licensed Professionals
Primary Licensed Professional and Contact
Start Time Select the starting time for the calendar item using the drop-down list. Status This field appears only when you schedule a calendar item on a hearing calendar. Select a value from this drop-down list to determine the status of the hearing calendar item, such as Approved or Pending. The values that displays in this drop-down list are determined by the status group you set for the hearing calendar item type. You associate a status group with a hearing calendar item type in the Event Type Maintenance portlet.
Subject This field appears only when you schedule a calendar item on a meeting calendar. Enter the subject of the meeting. Type Select a value from this drop-down list to classify the type of calendar item you schedule. For example, you might set Inspection, Hearing, Holiday, Block-out, and Weekend as values in this drop-down list. You configure the values for this drop-down list in the Event Type Maintenance portlet. When you set up an event type, you designate the calendar the event type applies to in the Calendar Type drop-down list.
# Units Allocated Per Time Range This field appears only when you schedule a calendar item on an inspection calendar. Enter a number to define the maximum number of inspections that users can schedule within the time range defined in the calendar item.
Note:The field gets its default value from the daily unit setting (Assigning Daily Units). If you change the value, the setting in the # Units Allocated Per Time Range field overrides the daily unit setting.
Regardless of whether FID 8400 is enabled or disabled, when users schedule an inspection (using or not using the auto-assign functionality), Civic Platform calculates the available units before scheduling, specifically:
-
Calculating the available inspection units against the # Units Allocated Per Time Range setting;
-
Calculating the available inspector units against the Daily Inspection Units setting in the inspector user profile.
Units Displayed in ACA This field appears only when you schedule an inspection type calendar item. It identifies the number of time blocks (units) displayed for a daily calendar item in Citizen Access. The default value of the field depends on the setting of the ACA Schedule Time Block of the calendar in which the calendar item is created:
If the ACA Schedule Time Block field is not configured, you can enter the number of block units to be included in the calendar item in the Units Displayed in ACA field.If the ACA Schedule Time Block field is configured, the default value of Units Displayed in ACA = Available time in the calendar item / ACA Schedule Time Block.
For description of the ACA Schedule Time Block field, see Table 1.
Votes By Body Members This field appears only when you schedule a calendar item on a hearing calendar. Mark an option to indicate whether or not the hearing body members who attend the hearing will vote on the applications they review.
-