Global Search and APO Indexes Enhancement
In previous releases, Civic Platform's Global Search and APO search features only supported two index modes:
- Individual agencies (one-to-one relationship)
- All agencies (all-in-one relationship)
With the 8.0.3.0.2 service pack, Civic Platform supports a 3rd mode: Mixed-mode indexing. This enables standalone agencies to be indexed individually, while multi-tenant (super agency) environments can be indexed in a group to support cross-agency searches.
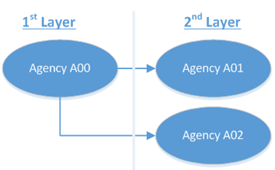
This illustrates a mixed-mode setup with 8 agencies (2 groups and 1 standalone agency) hosted in the same database:

Topics:
- Agency Configuration Requirements
- Agency Relationships Supported
- Changes to the Index Folder Structure
- Configure AGENCY_GROUP Standard Choice
- Rebuild Global Search and APO Indexes
Agency Configuration Requirements
Refer to this table to determine the procedures necessary for specific agencies:
| Agency Configuration | Configure AGENCY_GROUP | Rebuild indexes: |
|---|---|---|
| Standalone agency with shared APO index (Colorado only) | Yes | Global Search and APO |
| Standalone agencies with separate APO indexes | No | APO only |
| All-in-one agencies | Yes | Global Search and APO |
| Super agencies | Yes | Global Search and APO |
Agency Relationships Supported
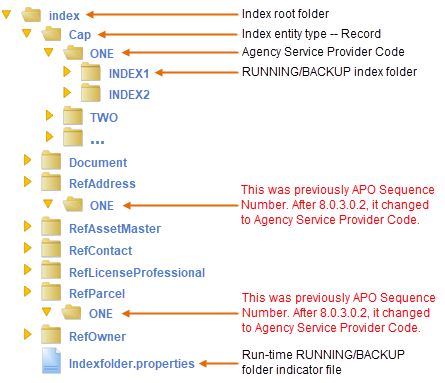
Changes to the Index Folder Structure
Effective in 8.0.3.0.2, the sub-folders in RefAddress and RefParcel (previously named according to the APO source sequence numbers) are renamed to match the agency SERV_PROV_CODE.
Configure AGENCY_GROUP Standard Choice
Use the Standard Choice AGENCY_GROUP to define multi-agency and all-in-one agency environments and redefine the standalone agency that uses shared APO indexes (Colorado).
- Log into Civic Platform as a super agency administrator, and go to Classic Admin.
- Create a new Standard Choice: AGENCY_GROUP.
- Add the agencies comprising the multi-agency environment as Standard Choice
items.
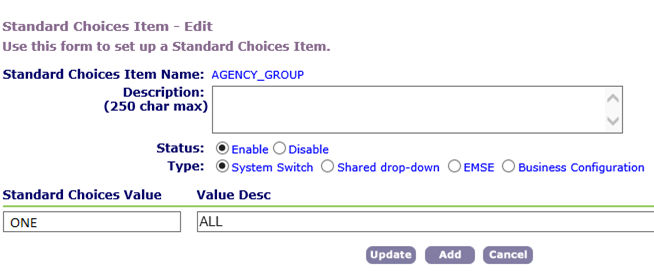
- In the Standard Choices Value field, enter the SERV_PROV_CODE of the parent agency.
- In the Value Desc field, enter the child agency service
provider codes. Separate each with a comma.
Figure: Example 1

If the super agency has a large number of child agencies, use the reserved keyword ALL. The index server translates ALL into a list of all agencies under the SERV_PROV_CODE.
Figure: Example 2
- Click Update.
 IMPORTANT: Restart the av.indexer server after updating the agency group
configuration defined in this Standard Choice to refresh the cached version.
IMPORTANT: Restart the av.indexer server after updating the agency group
configuration defined in this Standard Choice to refresh the cached version.
Rebuild Global Search and APO Indexes
Depending on the agency configuration, the global search and/or APO indexes must be rebuilt by creating a batch job. Rebuilding the index takes hours for small agencies and days for large agencies. Agencies should create a plan for minimizing the impact of the index rebuild down-time.
To create a global search index batch job:
- In Civic Platform Administration, go to .
- Click New.
- Complete the Batch Job fields:
Name Rebuild Index Description Add the description for the batch job. Email Enter the email address to send emails to after job completion (successful or not). Job Server Select the server for running the batch job. Job Type Select System from the menu. Service Category Select Global Search Rebuild Index from the menu. - Click Submit. Civic Platform saves the batch job details.
- Click the Job Schedule tab and define the batch job schedule:
End Date Enter the date to stop running the batch job or select a date by clicking on calendar icon. Note: This field only activates if the selected Frequency is Once.Frequency Select the frequency for running the batch job (Once or Monthly). PM Generate PM Generate is for preventive maintenance batch jobs. It is a required field that can specify how far in advance the batch job generates work orders. Enter a number in the first field, then select Days, Weeks, Months, or Years from the menu. Example: To generate work orders two weeks in advance of the PM Schedule batch job, enter 2 (forWeeks) or enter 14 (for Days).
Schedule Status Select Active from the menu to activate the batch job, or On Hold to deactivate it and save its information. Start Date Enter the date to start the batch job or select a date by clicking on the calendar icon.
Note: Make sure to set the Start Date if the Schedule status is Active. Otherwise an error message displays when saving the batch job.Start Time Determine the time of day when the batch job begins running by selecting Hour, Minute, and a.m./p.m. from the menus.
Note: Make sure to set the Start Time if the Schedule Status is Active. Otherwise an error message displays when saving the batch job.Time Out (seconds) Enter the number of seconds a batch job attempts to run before timing out. - Click Save.
- To review the completed rebuild index batch job history, click the Log tab.