Managing Inspection Scheduling
Topics
Setting Up Automatic Inspection Scheduling
You can configure Civic Platform to automatically assign inspectors. Before automatic inspection scheduling can work properly, you must set up the inspector profile, inspection conditions (including inspection disciplines, districts, and calendar availability), and you must enable the automatic inspection scheduling feature.
When performing automatic inspection scheduling, Civic Platform checks for available inspectors meeting the conditions. The candidate inspectors display in the Inspector Calendar list with an order in which those most largely meet the conditions display on the top of those less able to meet the conditions.
You must configure the following to properly enable and use automatic inspection scheduling:
Inspector districts: This feature enables Civic Platform to check the inspection districts of the applications against the inspectors’ districts.
Civic Platform follows gets inspection district information in this order: (1) The inspection district setting of the parcel; (2) The inspection district setting of the address; (3) The inspection district that the parcel belongs to in the GIS map.
Note:A parcel can overlap multiple GIS inspection districts. If you configure the Standard Choice GIS_BUFFER_DISTANCE, Civic Platform can artificially shrink the parcel to a degree, and get the inspection district that the major portion of the parcel maps to. For instructions on adding the Standard Choice, refer to the “Standard Choices Reference” chapter in the Civic Platform Configuration Reference.
For configuring inspectors district, see Assigning and Unassigning Inspector Districts.
Inspection disciplines: This feature enables Civic Platform to check the discipline of the inspection type against the inspectors’ districts. For configuration details, see Assigning Disciplines to an Inspection Type.
Inspector profiles: Each inspector has an inspector profile that contains their daily inspection units, district location, identified disciplines, and availability. Civic Platform checks this profile and the conditions identified for the inspection to assign the appropriate inspector. For configuration details, see Setting Up an Inspector Profile.
Configure inspection calendars: This feature enable Civic Platform to get the available dates and times from the inspection calendars with matching inspection type and district settings. For configuration details, see Setting Up Automatic Inspection Scheduling.
Enable automatic inspection scheduling, as described in the following procedure.
Enabling automated inspection scheduling:
- Access the Classic Administration page (Accessing Classic Administration).
- Choose .
- Search for the inspection group code you want to activate auto assign.
- Click the Inspection Group Code link corresponding to the inspection for
which you want to activate auto assign.
For field descriptions see see Table 1.
Civic Platform displays the Inspection-Edit page.
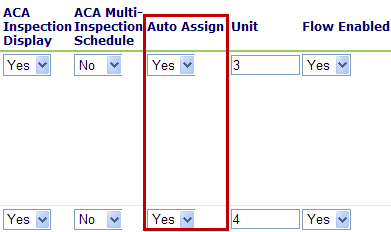
- Use the Auto Assigndrop-down list for the inspection you want and select ‘Yes’ to activate the auto assign inspection feature.
Click Update.
Civic Platform turns on the auto assign feature for the inspection and returns to the Inspection -Edit window.
Defining Re-Schedule and Cancel Inspection Parameters
You can configure reschedule and cancel parameters to determine when inspections are eligible for rescheduling and cancelling from Citizen Access. Inspection type parameters control whether public users can reschedule or cancel inspections. This feature prevents public users from rescheduling or cancelling an inspection right before its scheduled start time and ensures that inspection calendars are stable and consistent.
For example, you might set a reschedule restriction for a Code Enforcement inspection at 5:00 PM one day prior to the inspection date. Meaning that public users can only reschedule a Code Enforcement inspection until 5:00 PM the day before the inspection's scheduled date.
When you set inspection type reschedule and cancel parameters, you must also set the Citizen Access inspection type display. You can configure inspection type display in the Calendar Administration portlets.
In the Calendar Administration portlets, you must first associate inspection types with an inspection calendar. After you associate inspection types, you can determine how each inspection type displays in Citizen Access using the Cancel Inspection in Citizen Access, Reschedule Inspection in Citizen Access, and Schedule Inspection in Citizen Access drop-down lists.
Select a value of Yes for the Reschedule Inspection in Citizen Access and Cancel Inspection in Citizen Access drop-down lists if you want to give public users the option to reschedule or cancel inspections. Select a value of No for the Reschedule Inspection in Citizen Access and Cancel Inspection in Citizen Access drop-down lists if you do not want public users to have the option of rescheduling or cancelling inspections in ACA.
When you enable reschedule and cancel features, public users can only reschedule and cancel inspections based on the parameters you set for each inspection type.
For a complete description of how to configure inspection calendars for Citizen Access, see Setting Up Inspection Calendars for Public Users.
To set inspection type reschedule and cancel parameters
- Access the Classic Administration page (Accessing Classic Administration).
- Choose .
Civic Platform displays the Inspection - Search page.
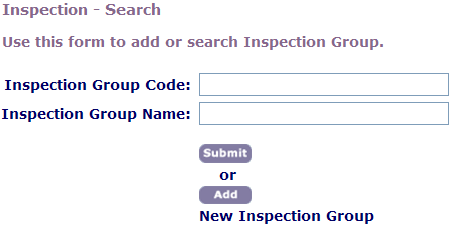
- Complete the fields below or click Submit to search all inspection group
codes:
Inspection Group Code Enter the code of the inspection group that contains the inspection types for which you want to set inspection reschedule and cancel restrictions. Inspection Group Name Enter the name of the inspection group that contains the inspection types for which you want to set inspection reschedule and cancel restrictions. - Click Submit.
Civic Platform displays the search results on the Inspection-Browse page.
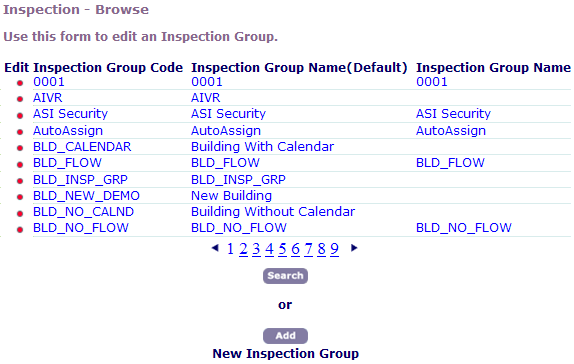
- Click the red dot in the column next to the inspection group code that contains the inspection
types for which you want to set inspection scheduling restrictions.
Civic Platform displays the Inspection - Edit page.

- Select an option and set time values and date values for the Cancel Restriction and Reschedule Restriction fields. For a description of these fields, see Table 1.
- Click Update.
Civic Platform updates the inspection type.
Working with Recurring and Related Inspections
You can configure a relationship between an inspection and one or more follow-up inspections. You can create an inspection as a child inspection of a parent inspection. You can also relate inspections manually.
The recurring and related inspections functionality works together. From the inspection group code you add and configure inspection types, specifying related inspection groups and then setting up your agency’s requirements to automate the scheduling of required inspections.
This section provides instructions for scheduling related inspections, based on the status of a previous inspection. Related inspections can be a follow-up or recurring inspections, based on the status of the original inspection type.
The first set of steps, from through enable you to configure statuses for inspection types so that when an inspection achieves that status, the inspection type automatically reschedules as a recurring annual inspection in one year. You set this type of recurring inspection by using the Next Recurring Inspection option in the Related Type field. For example, each year a restaurant is subject to annual food establishment inspections to ensure continued compliance with city ordinances.
If an inspection attains a negative status (e.g., Denied), you can use this procedure (start with ) to create a related follow-up inspection. You might, for example, apply a follow-up inspection to occur in 15 days after the failure. Doing so gives the restaurant owner time to make any corrections and it can help ensure availability in the inspector’s schedule. You set this type of recurring inspection by using the Status of Denied with the Follow-up Inspection option in the Related Type field.
To allow users to modify relationships, see Relating Inspections.
To schedule a recurring inspection when it attains a certain status
- Access the Classic Administration page (Accessing Classic Administration).
- Choose .
- Search for the inspection group that you want.
- Click the red dot for the Inspection Group Code link corresponding to the
inspection type you want to modify. The Inspection - Edit field descriptions are
in Table 1.
Civic Platform displays the Inspection - Edit screen.
- Locate the Inspection Type. In this example, to automatically schedule the annual food
establishment compliance inspection, click the
Configuration button at the far right side of the
page.
The Configuration drop-down menu displays.
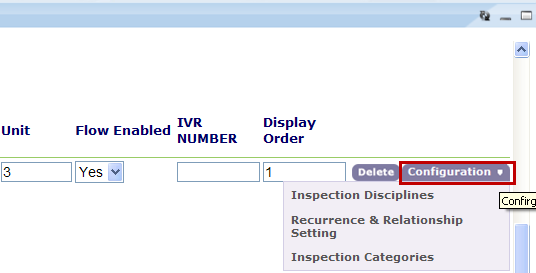
- Select the Recurrence & Relationship Setting option.
You can use disciplines as filtering criteria for automatic inspection scheduling. To use the Inspection Disciplines option, see Assigning Inspection Disciplines. For more information on automatic inspection scheduling, see Setting Up Automatic Inspection Scheduling.
The Inspection Recurrence & Relationship Setting page displays.
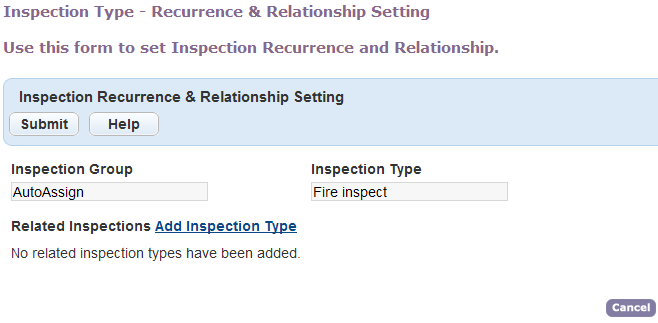
- Click the Add Inspection Type link.
The Add Related Inspection Type window displays.
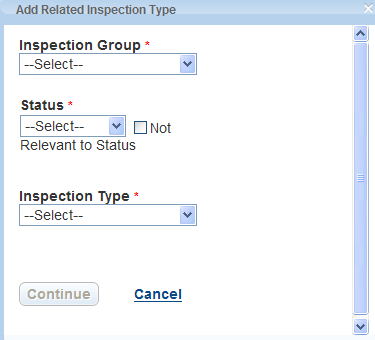
- Specify these required fields for the type of inspection: Status,
Inspection Group, and Inspection
Type. To continue with this example to automatically schedule
the annual food establishment compliance inspection, set the
Status to Approved and specify
an appropriate Inspection Group and Inspection Type.
To bypass any Status on an inspection, select Not Relevant to Status. This means that no matter what the inspection status is, Civic Platform sets the inspection to the Next Recurring Inspection, and it initiates upon the creation of the next application.
- Click Continue.
The Add Related Inspection Type window displays other fields.

- Specify these required fields: Related Type, Interval, and Schedule # of Days Earlier. To continue with this example to automatically schedule the annual food establishment compliance inspection, set the Related Type to the Next Recurring Inspection option. Doing so automatically sets when the inspection type is Initiated From which is the Completion Date of the Previous Inspection. You must enter the Interval using either 365 Days or 1 Year. You also need to enter the number of days prior to the interval that Civic Platform can schedule the inspection. Enter this number in the Schedule # of Days Earlier field.
- Click Finish.
The inspection type displays under the Status - Approved list.

- Next, configure the follow-up inspection if the inspection achieves a status of Fail. Doing so automates the scheduling for the annual building structure inspection.
- Click the Add Inspection Type link.
The Add Related Inspection Type window displays.
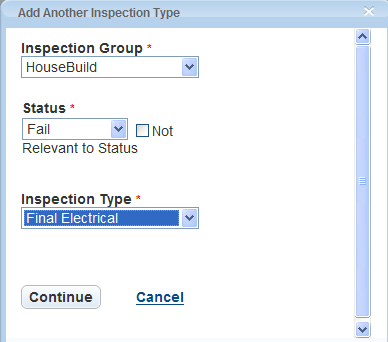
- Specify these required fields for the type of inspection: Status, Inspection Group, and Inspection Type. To continue with this example to automatically schedule the annual food establishment compliance inspection, set the Status to Denied and specify an appropriate Inspection Group and Inspection Type.
- Click Continue.
The Add Related Inspection Type displays.
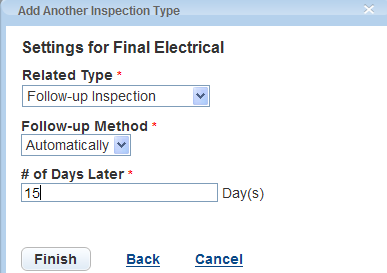
- Specify these required fields: Related Type, Follow Up
Method, and the# of Days Later. To
continue with this example to automatically schedule the annual food
establishment compliance inspection, set the Related Type to the
Follow-up Inspection option. Doing so sets the
Follow-up Method to automatically. Enter 15 days for
the number in the # of Days Later field. Doing so means
Civic Platform automatically schedules the follow-up inspection for 15 days
after the inspection status reaches Denied.
Alternately, you can specify Prompt in the Follow-up Method field to require the user to acknowledge the rescheduling.
- Click Finish.
Civic Platform displays all recurring and related inspection settings.
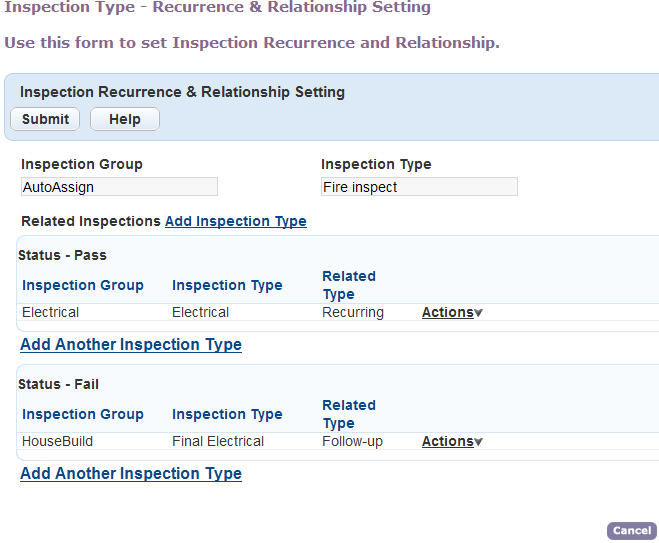
- Click Submit.
Civic Platform saves all related inspection type data.
Relating Inspections
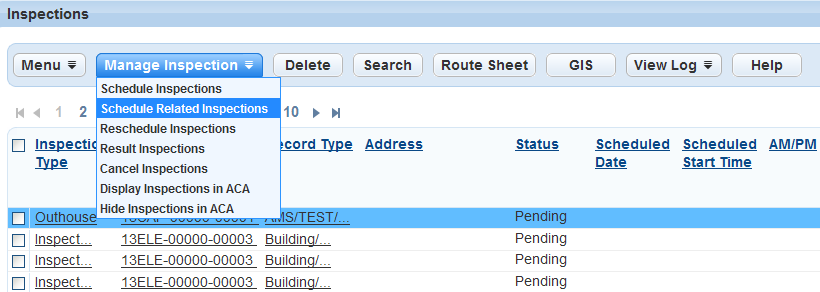
You can relate an inspection manually to another inspection in a relationship. When a daily user accesses the Inspection Detail page the parent with child inspections displays caret signs next to it, like so: >>. In the Related Inspections tab it lists a hierarchy with parent and related child inspections that provide a visual of related inspections and reportable linkage between inspections to allow you to differentiate the parent inspection from its follow-up inspections.
A menu item populates as shown in Figure 1.
Figure: Schedule Related Inspections Menu Option
Configuring Multiple Inspection Scheduling
Civic Platform provides a way for your agency to allow public users to schedule or re-schedule inspections. When your agency implements Citizen Access, you can provide public users with the ability to request/schedule multiple or repeat inspections. For example, a contractor might require multiple concrete pours for a large project and thus require numerous concrete inspections. This feature allows the contractor to schedule multiple concrete inspections for their project based on their pour days.
To implement this feature, you must set the Citizen Access Multi-Inspection Schedule field to Yes for an Inspection type. See Table 1. Then, you must enable multiple inspection scheduling for a module in Citizen Access Configuration on the Module Settings page. If you do not enable multiple inspection scheduling for a module in Citizen Access, public users do not have the ability to schedule multiple inspections for an inspection type, even if the configuration in Civic Platform allows for it. For complete configuration instructions for this feature, see the “Managing Inspections” section in the Citizen Access Administrator Guide.
Understanding Same Day Next Day Inspection Scheduling
You can specify how public users schedule inspections online by configuring inspection calendars. Civic Platform provides different inspection scheduling configuration options, including same day and next business day scheduling. This section describes the steps necessary to configure inspection scheduling for Citizen Access.
The configuration that you complete in Civic Platform affects the inspection scheduling options in Citizen Access. In Civic Platform, you set the scheduling options for each inspection type. For example, if want to give public users the option of choosing the date and time on which they schedule an inspection, then set the calendar display by configuring the dates and times from which public users can choose. You can also configure inspection scheduling so that public users can only choose from three inspection scheduling options: Same Day, Next Business Day, and Next Available Day. When public users choose one of these three scheduling options, Civic Platform schedules the inspection on the date and time that best match the selected option.
Scheduling Requests and Pending Inspections
Civic Platform provides the ability to manage inspection scheduling for public users and user groups. You do this through the request/pending inspection feature for Civic Platform and Citizen Access. This feature allows a public user to request an inspection date. Civic Platform does not set the appointment, but it sets a flag on the inspection and assigns a pending status to it until the agency approves the inspection date and time.
For example, a public user logs into their Citizen Access account and requests a plumbing inspection on September 6th during AM hours. After the public user submits their request through Citizen Access, the inspection maintains a pending status until the agency approves the inspection appointment by using the inspection calendar. Upon approval, Civic Platform uses EMSE to send an email confirmation of the inspection appointment to the public user.
Users can view which inspections are in the pending status at any time by filtering the Inspection Calendar to show Requested Pending Inspections. You can view approved inspections in the inspection list by selecting All Inspections in the Calendar Show drop-down list.
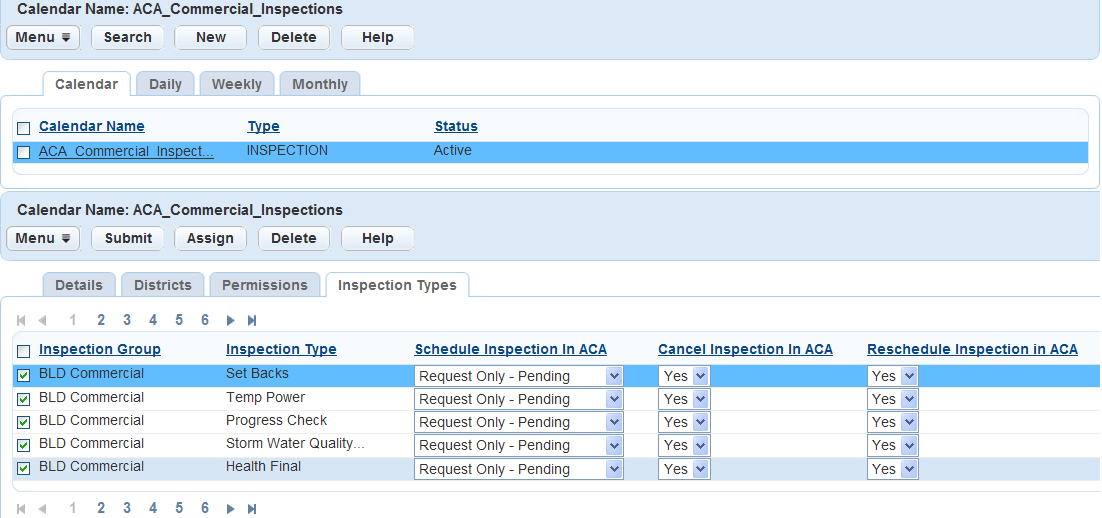
Administrators must do the following configuration tasks in Civic Platform to implement the request and pending feature. First, you must pre-define the inspection types and must set the scheduling parameters. Then, you must navigate to the inspection type tab in the inspection calendar administrator portlet and choose the Request Only - Pending option from the Schedule Inspection in Citizen Access drop-down list for applicable inspection types. This configuration changes the Schedule link to a Request link for the applicable inspection type in the public user’s inspection list in Citizen Access. Then, you must navigate to the Content Customize portlet to define the emails to use for the request and pending feature.
Administrators must also can navigate to a Module in Citizen Access Configuration and customize the content or labels to use with the modular inspection scheduling web page. For additional information on customizing web pages and complete inspection scheduling configuration details for Citizen Access, refer to the Citizen Access Administrator Guide.
To configure request only and pending inspections
- As a prerequisite, verify that you have correctly defined each inspection type and inspection schedule parameter. For information on how to configure inspection types, refer to Establishing Inspection Types.
- Configure Request Only-Pending scheduling option for Inspection Types in the Inspection Calendar.
- Click the Admin primary tab.
- Navigate to the inspection calendar portlet and click the
Inspection Type tab.
Civic Platform displays the inspection calendar details.
- Choose the Request Only - Pending option from the
Schedule Inspection in Accela CitizenAccess
drop-down list for those inspections to which you want to apply the
request only feature.
- Click Submit.
- Customize related emails.
- Click the Admin primary tab.
- Navigate to the Content Customize
portlet.
Civic Platform displays the Content Customize portlet.
- Configure the email sent to the public user after they request an
inspection
online.
ACA_EMAIL_INSPECTION_STATUS_CHANGE_CONTENT
ACA_EMAIL_INSPECTION_STATUS_CHANGE_SUBJECT
- Configure the email sent to the public user after the agency approves
the inspection appointment in Civic Platform.
AA_EMAIL_INSPECTION_STATUS_CHANGE_CONTENT
AA_EMAIL_INSPECTION_STATUS_CHANGE_SUBJECT
- Customize the labels and text on the Schedule an Inspection web page for a module in Citizen Access Configuration. For steps, refer to “Working With Web Pages” in the Citizen Access Administrator Guide.