Managing Contacts
Civic Platform divides contacts into two categories: reference contacts that serve as the reference database, and daily contacts that users add to records. Best practice is to manage contact types by defining only generic reference contact types, such as Individual and Organization. Record each individual or organization as one reference contact. Then link reference contacts to records in various roles, such as Applicant, License Holder, etc. This enables you to easily track all the transactional and reference information about every individual and organization.
Before users add new reference contacts or associate contacts with records, you must set a number of Standard Choices to define the ways of managing contacts in Civic Platform, such as CONTACT TYPE, AUTO_SYNC_PEOPLE, and INDIVIDUAL_CONTACT_MATCH_ CRITERIA. For instructions on configuring the Standard Choices, refer to the Accela Civic Platform Configuration Reference.
Users often look up existing reference contacts to associate the desired one with a record. You can specify contact identity fields to guarantee the uniqueness of each reference contact, and specify contact address identity fields to guarantee the uniqueness of each contact address in each contact.
By default, users have full access to all contact types from within all modules and the reference Contact portlet. If a contact type is available for a few modules, then you can limit the use of the contact type by module through specifying the applicable module in the Contact Type Setting portlet. For more information, see Setting Up Security Policies.
Topics
Managing Contact Identifier Settings
Topics
Managing Contact Address Identifier Fields
You can configure one or more contact address identifier fields. Civic Platform checks whether a contact address is a duplicate of an existing active contact address in the same contact by comparing their identifier field values (joined by AND), and prevents users from saving duplicate contact addresses.
By default, there are no contact address identifier fields in Civic Platform. After you add several contact address identifier fields, Civic Platform executes the duplicate contact address checking in the following ways.
When users add or update a duplicate contact address to a contact, an error message displays indicating the conflict.
When you sync a record contact with a reference contact, if an address in the record contact duplicates with an address in the reference contact, the address in the reference contact replaces the contact address.
When users add new contact addresses to replace old addresses, if the new address duplicates with an active one in the same contact, Civic Platform uses the existing active contact address as a replacement
In previous versions, users were able to create duplicate contact addresses. Civic Platform automatically filters duplicate contact addresses when users look up and select contact addresses to add in records.
To manage the contact address identifier fields
Access the Identity Settings portlet (Accessing the Contact Identity Settings Portlet).
Civic Platform displays the Identity Settings portlet.
Expand the Identity Settings node in the navigation tree, and then click Contact Address.
The Identity Settings portlet displays the list of contact address fields that you previously set as identifier fields.

All the contact address identifier fields, joined by AND, work as one identifier in duplicate contact address checks.
To modify the selection of identifier fields
Click the field selector next to the Address Fields for Duplicate Check label.
Civic Platform displays the list of contact address fields that you can set as identifier fields. The available field options include all the contact address fields, except for Status, Primary, Validate, and Contact Address ID.

Select the fields you want to set as identifiers.
Click the Close button.
Civic Platform updates the contact address identifier fields according to your latest selection.
To clear the selection of identifier fields
Click the recycle bin icon next to the field selector.
Civic Platform clears the current selection of identifier fields.
Click the Save button to save the changes.
Managing Reference Contact Identifier Fields
You can choose to define a number of contact fields as reference contact identifier fields. Table 1 lists your options. Civic Platform checks whether a reference contact is a duplicate of an existing active contact by comparing their identifier field values and thus prevents users from saving duplicate contacts. To set the comparison rule with the identifiers, Civic Platform joins by OR the contact fields that you add separately as identifiers, and joins by AND the fields that you combine and add as one identifier.
By default, there are no contact identifier fields in Civic Platform. After you add several contact identifier fields, Civic Platform executes the duplicate reference contact checking in the following way.
When users add or update a reference contact that has duplicate identifier field value with an existing reference contact, an error message displays indicating the conflict.
To manage the contact identifier fields
Access the Identity Settings portlet (Accessing the Contact Identity Settings Portlet).
Civic Platform displays the Identity Settings portlet.
Expand the Identity Settings node in the navigation tree, and then click Reference Contact.
The Identity Settings portlet displays the list of identifier fields.

To add an identifier field, click Look Up to add a contact field from Table 1.
Civic Platform displays the list of fields you can add as identifier fields.

Select the field, and then click Select. If you want two or more fields to work as one identifier (joined by AND), select several fields, and then click Select & Combine.
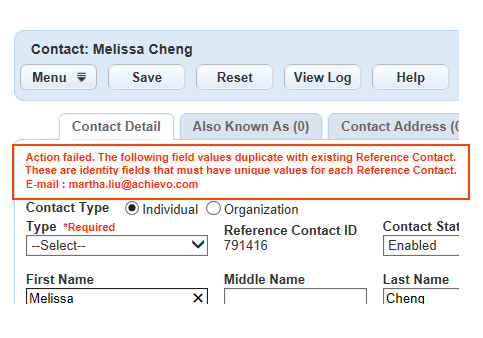
Civic Platform adds the selected fields as identifiers. If a user attempts to add a reference contact that contains an email address that exists in another contact record, Civic Platform prevents the user from saving the duplicate contact and displays the following notification.
To remove an identifier field, select the identifier field and click Delete.
Civic Platform no longer regards the field as an identifier field.
Table 1. Possible Reference Contact Identifier Fields Identifier Field Description Email The email address of the contact. FEIN This acronym stands for Federal Employer Identification Number and identifies a business for tax purposes. This field is only active when the Contact Type selected is Organization. Driver’s License Number The driver’s license number of the contact. Driver’s License State The driver’s license state of the contact. Passport Number The contact’s passport number. SSN The contact’s Social Security Number. This field is only active when the Contact Type selected is Individual.
State ID Number The contact’s state ID number.
Adding a Contact
To enable users to search for a contact, you must add the contact to your reference database. Your reference database acts like a library that lets users search for certain types of stored information. For example, users might need to search for an existing contact when creating a new application.
Note:
Depending on how you set up this contact type, you might see additional attributes and fields. You can add or edit attributes using the people template. |
To add a contact
Access the Classic Administration page (Accessing Classic Administration).
Choose People > Contact.
Click Add.
Use the Contact Type drop-down list to choose the appropriate contact type.
Civic Platform displays fields specific to the contact type you chose.
Complete the fields as described in Table 2.
Click Save.
Table 2. Contact Fields Address Enter up to three lines of the contact’s address information. City Enter the city name or click the Get City button to choose from a standard list of cities. Comment Enter any comments regarding the contact. Contact Relationship Choose the appropriate relationship between the contact and the application. Contact Type Choose the appropriate contact type. Country Enter the country. Email Enter the contact’s email address. Fax Enter the contact’s fax number. FEIN Federal Employer Identification Number (FEIN) associated with the contact. You can leverage this field when performing searches for a record or eliminating duplicate contact entries in your database. Flag Enter the status of the hold. For example, if the hold is still active, enter “Y” for Yes.
Hold Code If your agency places holds on certain contacts, enter the code that identifies the hold here. For example, if a contact has bad credit, enter “Bad Credit.” Hold Description If you enter a hold code, enter a description to help identify the code. For example, enter “Contact has repeatedly failed to pay bills.” ID Enter any other form of ID to help you identify the contact. For example, enter a driver license number of a social security number. Name Enter the First, Middle, or Last name of the contact. Organization Name Enter the name of the organization to which the contact belongs. Phone Enter one or two phone numbers of the contact. SSN Contact Social Security Number. After saving, the number only displays the last 4 digits. For example ***-**-1234. You can leverage this field when performing searches for a record or eliminating duplicate contact entries in your database. State Choose the state. Status If you want to let users search for this contact, select Enable; otherwise, select Disable. Title Enter the contact’s title. A title indicates an official position or professional/academic qualification. For example: Mr., Mrs., Ms., Officer, RN, PhD, DDS, Professor, Judge, or Notary. The Title field is a text field. Zip Enter the contact’s ZIP code.
Searching for a Contact
You can search for any contact on your system, including contacts that you previously disabled. For example, you might need to search for a contact to update information or to change the status of the contact.
Note:
To see a list of all the contacts on your system, click Submit without entering details about an individual contact. |
To search for a contact
Access the Classic Administration page (Accessing Classic Administration).
Choose People > Contact.
Complete the fields as described in Table 2.
Do one of the following:
If you do not want to search using the contact type specific fields, click Submit under the City field.
If you want to search by contact-type information, enter the information in the fields at the bottom of the window and Click Submit.
Civic Platform displays the results of your search.
Editing a Contact
After you add a contact to your reference database, you might need to change certain information about the contact.
Note:
Depending on how you set up this contact type, you might see additional attributes or fields in addition to the standard attributes listed here. |
To edit a contact
Access the Classic Administration page (Accessing Classic Administration).
Choose People > Contact.
Search for the contact that you want.
Complete the fields as described in Table 2.
Click Save.
Enabling Close-Match Searches
Configure contact match criteria to enable close-match searching in Civic Platform, Citizen Access, and Mobile Office.
Close-match searching enables users to locate reference contacts that do not exactly match their search criteria, but come close. The standard search function returns reference contacts that exactly match user’s search criteria. In some cases, users might find that the search results do not include the contacts they intend to find, for example, if the user mistypes the criteria. In that case, users can click the Close Matches button to locate reference contacts that do not exactly match their search criteria, but come close.
To enable close-match searching, configure the following standard choices in the Standard Choices portlet in the Setup Admin:
ENABLE_CONTACT_ADDRESS
INDIVIDUAL_CONTACT_MATCH_CRITERIA
ORGANIZATION_CONTACT_MATCH_CRITERIA
See the Civic Platform Configuration Reference for more information about Standard Choices.