Workflow Designer
Topics
Open Workflow Designer
- Go to the Administration page (see Navigating to the Setup).
- From the Setup portlet, go to Administration > Workflow Designer.
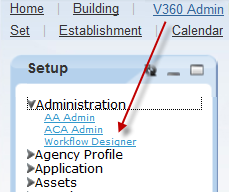
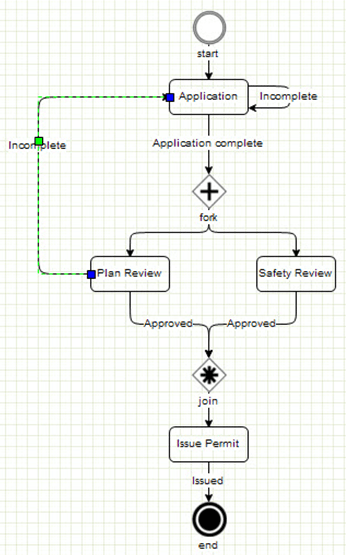
Figure: Sample Workflow

| Legend | Name | Description |
|---|---|---|
| A | Workflow Designer Menu | Contains the New, Open, Save, Save Draft, Clone, Print, Exit, and Help buttons. |
| B | Widgets Panel | Provides all the available widgets to add to a workflow process. |
| C | Workspace | Provides the canvas to design workflow processes and sub-processes. Only one workflow process can be open at one time. If the workflow process has several sub-processes, the sub-processes display in individual tabs. |
| D | Navigator Panel | Displays a thumbnail view of the design panel. Drag the border of the outline in the panel to quickly change the view of the design panel. |
| E | Property Sheet | Provides a list of properties directly related to the workflow process or sub-process displayed in the workspace and the property settings of the widget (if any) that currently has focus. |
Create Workflow
A best practice recommendation is to first plan out the design of the workflow on paper before creating it in Workflow Designer.
- Open Workflow Designer.
- Click New.
- Enter a Workflow Name.

Workflow Designer validates the name and displays a check mark by the field to indicate successful validation.

Note: Do not use special characters (@ ! # $ % *) in a workflow name. However, the underscore symbol ( _ ) is available for use. - Either create a new master process for the workflow or specify an existing
process as the master process:
-
To create a new process, click Create a New Process, then enter a process name.
-
To specify an existing process, click Use Existing Process, then select a process. After editing and saving the process in the new workflow, Civic Platform updates the process in the other workflows associated with it.
-
- Click Submit.
- Design Workflow Process.
- Click Save. Or, if not finished designing the workflow, click Save Draft before exiting Workflow Designer.
Design Workflow Process
A best practice is to understand all of the tasks to include, what status a task must reach before its subsequent task can start, and how tasks relate to each other.
The Save option does not allow partially complete workflows. Make sure a workflow meets this criteria before saving it:
The workflow must have start nodes and end nodes.
All of the nodes must connect with a flow widget.
All of the connections (flows) must have a status.
Otherwise, use the Save Draft option.
Troubleshooting Tip: A flow widget must start from a start, fork, join or a task widget, and it must end at a fork, join, task or an end widget. If a flow widget starts from a task widget, assign one or more task statuses to the flow widget. This way, the workflow process knows what status(es) a task must reach before its subsequent task(s) start.
- Create Workflow.
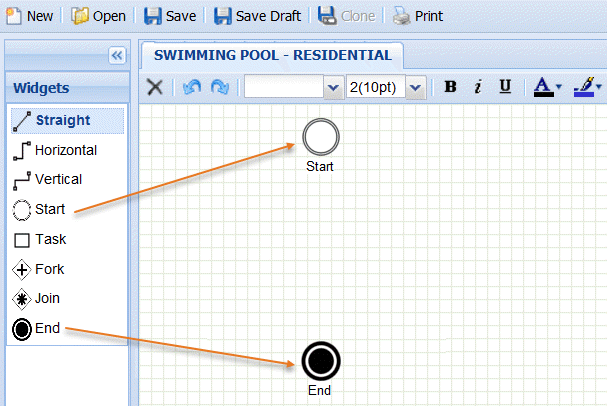
- From the Widgets panel, drag and drop a Start node and an End node onto the
blank workspace. Leave space between the nodes to enter details later. For
descriptions of the widgets, see Widgets Panel.
- From the Widgets panel, drag the workflow tasks onto the workspace.
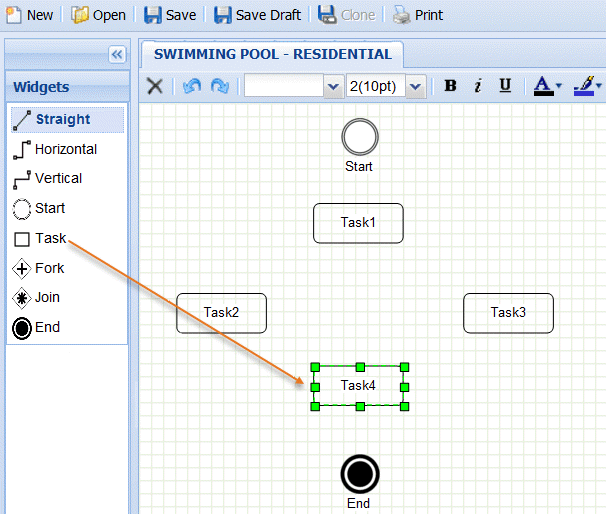
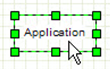
- To specify the task names, double-click the default task name (Task1, for
example) and enter a name.
- To connect two tasks, add a flow widget (Straight, Horizontal, or Vertical):
- From the Widgets panel, click the appropriate flow widget.
- Go to the workspace.
- Hover the mouse over the center of a task.
- Wait for the mouse cursor to change from an arrow to a hand:

- Drag the cursor to the next task and then release the mouse button.
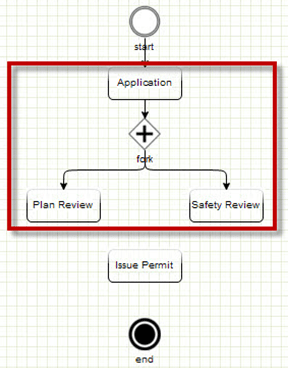
- From the Widgets panel, connect one task to two or more parallel tasks:
- Drag a Fork widget between the task and the parallel tasks.
- Drag a Straight widget to connect the task to the fork node.
- Drag a Vertical widget to connect the fork node to each parallel task.
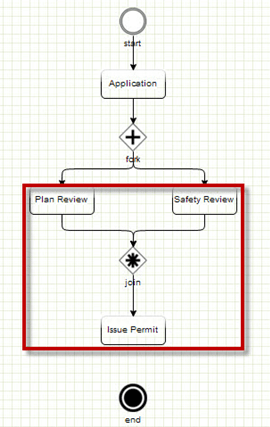
- From the Widgets panel, connect two or more parallel tasks to one task:
- Drag a Join widget between the parallel tasks and the individual task.
- Drag a Vertical widget to connect the parallel tasks to the join.
- Drag a Straight widget to connect the join node to the next task.
- Connect the last workflow task to the end node with the Straight flow widget.

- To create a workflow status that keeps the workflow on the same task:
- From the Widgets panel, select Vertical.
- Hover over the task. Start and end the connection on the same task.
- To create a workflow status that loops back to a previous task:
- From the Widgets panel, select Vertical.
- Hover over the task.
- Drag the connection back to a previous task.
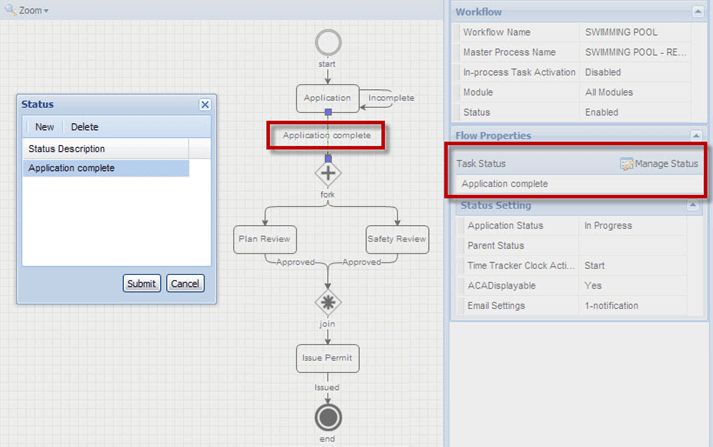
- To add a task status:
- From the workspace panel, select a task connection.
- From the Flow Properties panel, click Manage Status.
- Click New.
- Enter the name of the status.
- Click Submit.
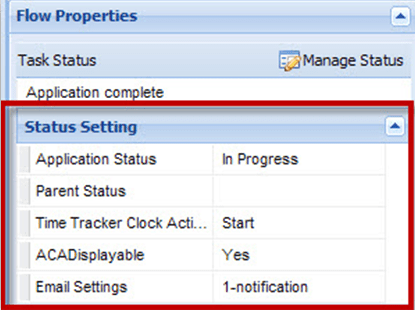
- To define the status settings:
- Select a task connection.
- From the Flow Properties panel, click Manage Status.
- From the Status Setting panel, define the appropriate settings.
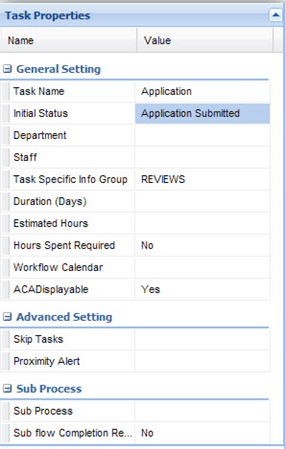
- To set the Workflow Properties for a workflow task:
- From the workspace panel, select a task.
- From the Task Properties panel, set the properties for the task.
- Click Save. Or, click Save Draft to save an incomplete workflow.
Edit a Workflow
Regardless of if a workflow was made in the Classic Workflow tool or Workflow Designer, edit it in Workflow Designer.
- Open Workflow Designer.
- Click Open.
Workflow Designer displays completed workflows in the General tab and incomplete workflows in the Draft tab.
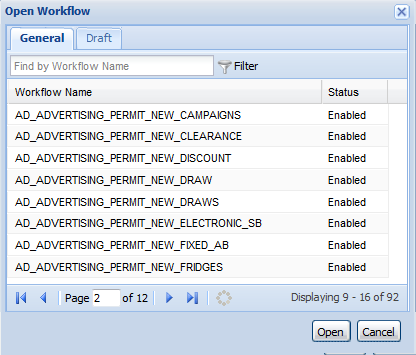
- Locate the workflow. In the General or Draft tab, navigate the workflows with
one of these options:
-
Enter text in the Find by field, then press Enter or click the Filter button.
-
Click the page selection buttons to switch between pages.
-
- Select the workflow.
- Click Open.
Workflow Designer displays the message Opening workflow, please wait...
Troubleshooting Tip: If the selected workflow fails to load in Workflow Designer, it might be a partially completed workflow created with the Classic Workflow tool. Return to the Classic Workflow tool, open the workflow there, and finish configuring the workflow before it can open in Workflow Designer.
- Edit the workflow tasks as necessary.
- Save the workflow.
Clone a Workflow
Copy a workflow currently open in the workspace.
- Open Workflow Designer.
- Open a workflow.
- Click Clone.

- Enter the new workflow name.
A warning sign
 displays if the new name is in use by an
existing workflow or if the new name contains forbidden characters (@ ! # $
% *). Change the name to dismiss the warning.
displays if the new name is in use by an
existing workflow or if the new name contains forbidden characters (@ ! # $
% *). Change the name to dismiss the warning. - (Optional) Enter the new process name. If left blank, the cloned workflow
inherits the process of the workflow being cloned.
Workflow Designer opens the newly-cloned workflow process. The old workflow process automatically exits in its last-saved state.
- Modify the workflow according to the objectives to achieve.
- Click Save.
Note: When cloning a workflow without saving it first, the newly-cloned workflow contains the changes since the last save while the old workflow loses the changes.
Workflow Designer Menu
| Button Name | Description |
|---|---|
| New | Start the creation of a workflow. |
| Open | Display all the existing workflows (in the General tab) and draft workflows (in the Draft tab). |
| Save | Save the current workflow, its process and
sub-processes, and all its properties. Note: The workflow must pass
validation in order to save.
|
| Save Draft | Save a new workflow as a draft before completing the
design of the workflow process. Note: The Save Draft function does
not work for general workflows already saved successfully with
the complete process.
|
| Clone | Create a copy of the current workflow. Note: The Clone
function does not work for draft workflows.
|
| Open the current workflow process or sub-process in print layout. | |
| Exit | Exit Workflow Designer. Remember to click Save first to avoid losing any changes. |
| Help | View instructions for using Workflow Designer. |
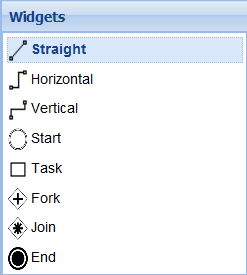
Widgets Panel
| Widget Name | Type | Description |
|---|---|---|
| Straight | Flow | The connecting line is straight. |
| Horizontal | Flow | The connecting line starts horizontally from a node and ends horizontally at another node. |
| Vertical | Flow | The connecting line starts vertically from a node and ends vertically at another node. |
| Start | Node | Indicates the start of a workflow process. |
| Task | Node | Indicates a task in a workflow process. |
| Fork | Node | Indicates multiple tasks are simultaneously active. |
| Join | Node | Indicates all the previous tasks must be complete before the next task starts or the workflow ends. If opening a workflow configured in the Classic Workflow tool, the join widget indicates several parallel tasks. |
| End | Node | Indicates the end of a workflow process. |
Workflow Properties
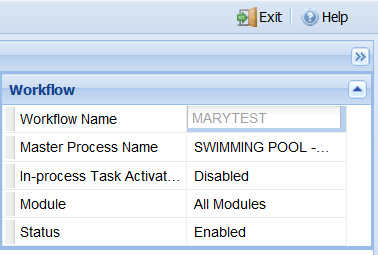
The property sheet shows the properties related with the current workflow. If a widget in the workspace has focus, the property settings of the widget, if any, also display in the property sheet.
Workflow properties always display regardless of whether a widget in the workspace has focus.
Property Description Workflow Name This read-only field displays the name of the current workflow. Master Process Name This read-only field displays the name of the master process for the current workflow. In-process Task Activation Select whether to allow users to activate or deactivate tasks in the workflow process for a record. Module Select the module to assign the workflow to. Status Select the status of the workflow. Disabled does not associate the workflow with record types. Task properties display when a task widget in the workspace has focus.
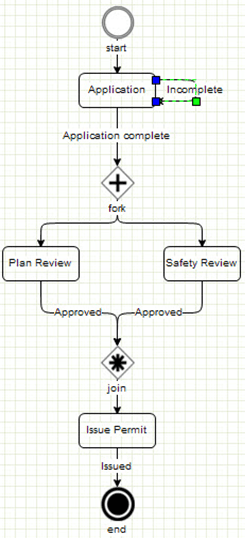
Property Description Task Name Enter the name of the task to display to users. Initial Status Select the task status to display when the task first becomes active. When first configuring a workflow task, the drop-down list is empty. After adding a flow widget that suspends the task, the drop-down list displays the task statuses configured for the flow widget. Here is an example of a flow widget that suspends a task:

Department Use the Department drop-down list to select the department that is responsible for the task. Staff Use the Staff button to select a staff member that belongs to the selected department and is responsible for the task. Task Specific Info Group Select the specific task information group to associate with the current task in the workflow process. Set up these groups in the Classic Workflow tool. Duration (Days) Enter the number of days required to complete this task after it is active. Estimated Hours Enter the number of estimated hours required to complete this task. Hours Spent Required Select Yes to require that anyone who works on the task records the number of hours spent. Otherwise, select No. Workflow Calendar Use the drop-down list to assign a workflow calendar to the task. Citizen Access Displayable For Citizen Access to display the task, select Yes. Otherwise, select No. Skip Tasks Clicking the field entry area brings up a Skip Other Tasks window. Select the tasks that users can skip when the current task completes. Note: One task cannot be configured as the skipped task in multiple tasks. If Task A is configured as the skipped task in task B, and then the user opens the Skip Other Tasks option for task C, the window does not show Task A as an option.Proximity Alert Clicking the field entry area brings up a Proximity Alerts window. Select the GIS proximity alerts to apply during the execution of the task. Sub Process Select an existing sub-process to add to the current task. Also click the icon next to the field to create a new sub-process in the current task. Sub Process Completion Required For the sub-process in the current task to complete before moving to the next task, select Yes. Otherwise, select No. Flow properties display when a flow widget (straight, horizontal, or vertical) that starts from a task widget has focus.
Property Description Task Status Displays the status that a task must reach before the activation of its next task. With multiple statuses, a task only needs to reach one of the statuses before the activation of the next task. Application Status Enter a status. If the task that the flow widget starts from reaches the Task Status, the Application Status entered in this field displays as the Application Status. Parent Status This field works with the flow widget that starts from a sub-process task. Enter a status in this field. If the sub-process task reaches the Task Status, the parent task that contain the sub-process changes to the status in this field. Time Tracker Clock Action Select the time tracker clock action that triggers when the task reaches the selected status. The time tracker clock controls how the Time Tracker records In Possession time for workflow tasks and for applications. Citizen Access Displayable To display the task in Citizen Access, select Yes. Otherwise, select No. Email Settings Displays the number of notifications to send when the task reaches the selected status. 0-notification means there is no notification, 1-notification means Civic Platform sends one notification, and so forth. Clicking the field entry area pops up an Email Settings window. Create, edit, or remove the notifications.