Managing Parcels
When you search for a parcel when creating a new application, you are searching a database of stored parcels that you can associate with applications. Depending on your privileges, you may be able to create new reference parcels as well as modify existing parcel records in the reference database.
Topics
Adding a Reference Parcel
You can add new parcels to your reference database. After you add a reference parcel, you can look up the parcel when associating parcels with a specific application.
To add a reference parcel
Click the Parcels main link.
Civic Platform displays the Reference Parcel Search page.
Click Cancel.
Civic Platform displays the Reference Parcel list portlet.
Click New.
Civic Platform displays the Create New Parcel page.
Complete any of the fields that display. See Parcel List Portlet Fields.
Click Submit.
Civic Platform adds the parcel to the reference database.
Searching for a Reference Parcel
After you add a parcel to your reference database, you can search for the parcel and view the parcel details as well as any applications that the parcel has an association with. The parcel number is the only required field when searching for a parcel.
The parcel number, owner name, and street name fields support wildcard searches. See Performing a Wildcard Search for information.
To search for a reference parcel
Navigate to the Parcels portlet and click Search.
Complete any fields that display. For a description of the fields, see Parcel List Portlet Fields.
Note:According to your agency’s settings and the form layout, there may be template fields in addition to the standard fields listed in Parcel List Portlet Fields. The additional fields are active attributes defined in the parcel template in Civic Platform.
Locate the parcel you want to work with in the Parcel # column.
Civic Platform displays the parcel details.
To add a parcel to a record, click Add reference parcel to record.
To view a list of applications associated with the parcel, click the Record Detail tab.
Associating a Parcel to an Application
You can associate one or more parcels to an application.
Agencies can configure Civic Platform such that any address, owner, structure, or establishment record associated to a parcel populates to a record when you associate the parcel to the record. Contact your agency administrator for information about your agency’s configured functionality for synchronizing reference data.
Topics
Adding a New Parcel to an Application
Civic Platform does not store any new parcels that you add to an application in your reference database. To add a new parcel to your reference database, see Adding a Reference Parcel.
To add a new parcel to a building application
Navigate to the portlet you are working in, and use Search to locate the record you want to work with. See Using the Search Features for information about searching.
Click the link in the Record ID column for the record you want.
Civic Platform displays the application details.
Click the Parcels tab.
Click New.
Complete any of the fields that display.
For descriptions of common fields, see Parcel List Portlet Fields.
Click Submit.
Adding a Parcel from a Reference Database
You can add a parcel to an application by searching for an existing parcel in your reference database.
To add a parcel from a reference database
-
Navigate to the portlet you are working in, and use Search to locate the record you want to work with. See Using the Search Features for information about searching.
-
Click the link in the Record ID column for the record you want.
Civic Platform displays the application details.
-
Click the Parcel tab.
-
Click Look Up to locate a reference parcel.
-
Enter search criteria as needed to locate the parcel you want and click Submit.
Civic Platform displays your search results.
-
Select the parcels you want to add.
-
Click Select to add the reference parcel to a record.
-
If the parcel has any associated addresses, owners, structures, or establishments, one of the following occurs, depending on your agency’s settings:
-
The associated reference data automatically populates the application. If this is the case, you do not receive notification that the data uploaded until you click Submit in step 11.
-
A pop-up window displays the associated reference data. Select which data you want to add to the record and then click Select.

The parcel and any associated reference data that you selected upload to the application.
-
If associated reference data does not upload automatically or following a prompt, you must manually add the data to the record.
-
-
Click Submit.
The Parcel tab displays a message that Civic Platform added the parcels.
Viewing Records Associated with a Parcel
After you look up a reference parcel, you can view a list of record associations for the parcel .
To view records associated with a reference parcel
Navigate to the Parcels portlet and use Search to locate the parcel you want to work with.
Click the link in the Parcel # column for the parcel that you want to work with.
Civic Platform displays the parcel details.
Click the Associated Record List tab.
Civic Platform displays a list of records associated with the parcel.
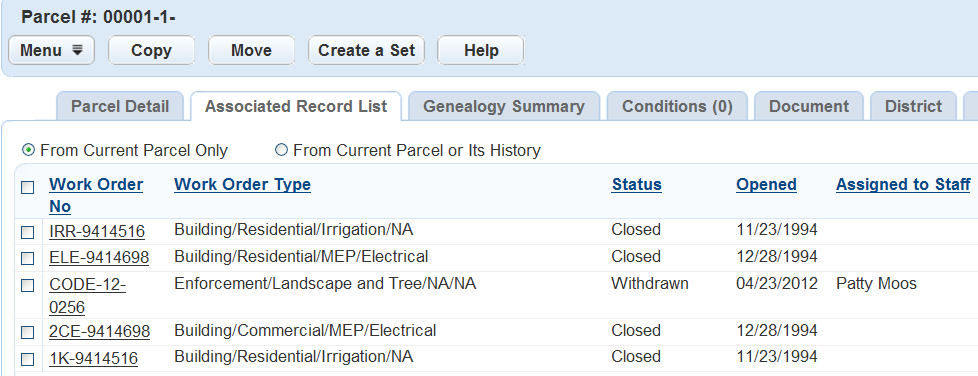
Complete one of these options:
Select the From Current Parcel Only option.
Civic Platform displays the records associated with the selected parcel on the Associated Record List tab.
Select the From Current Parcel or Its History option.
Civic Platform displays the records associated with the selected parcel and its parents, grandparents, or ancestors on the Associated Record List tab.
To view or update record details, click the link to the record that you want to view.
Adding Records into a New Set
You can add records associated with a reference parcel or its genealogically related parcels into a new set.
To create a set of parcel records
Navigate to the Parcels portlet and use Search to locate the parcel you want to work with.
Click the link in the Parcel # column for the parcel that you want to work with.
Civic Platform displays the parcel details.
Click the Associated Record List tab.
Civic Platform displays a list of records associated with the parcel.
Select the records that you want to add into a new set.
Click Create a Set.
Civic Platform displays the SET ID form in the portlet.

Complete the fields with available data.
Set ID This is an alphanumeric abbreviation that identifies the new set. For example, enter “EDP.” The value may be auto-generated. Set Name This is a name that identifies the new set. Click Submit.
Civic Platform creates the set and adds all the selected records into the set.
Copying or Moving Applications Between Parcels
When you split or merge a parcel, you may need to adjust the parcel-application associations. To help accomplish this task, Civic Platform enables you to copy or to move applications between genealogically related parcels.
To copy or move an application
Navigate to the Parcels portlet and use Search to locate the parcel you want to work with.
Click the link in the Parcel # column for the parcel that you want to work with.
Civic Platform displays the parcel details.
Click the Associated Record List tab.
Civic Platform displays the Associated Record List tab for the parcel.
Select the application that you want to copy or move.
Click Copy to copy the application to a genealogically related parcel.
Click Move to move the application to a genealogically related parcel.
Civic Platform displays a list of parcels, including the current parcel and its immediate parents, siblings, and children.
Select the parcel(s) that you want to copy or move the application to.
Click Submit.
If you are copying, Civic Platform attaches the selected application to the newly selected parcel(s) while retaining the association between the application and the original parcel.
If you are moving, Civic Platform attaches the selected application to the newly selected parcel(s) and removes the application from the original parcel.
Editing a Parcel Associated with an Application
After you add a parcel to an application, you can edit the parcel details as needed to correct mistakes or complete partial information.
Note:
When you edit a parcel for an application, you are not changing the details about the parcel in your reference database, nor do your changes affect any other applications with the same parcel. Your changes affect only the current application. |
To edit an parcel associated to an application
Navigate to the portlet you are working in, and use search to locate the record you want to work with. See Using the Search Features for information about searching.
Click the link in the Record ID column for the record you want.
Civic Platform displays the record detail portlet.
Click the Parcels tab.
Civic Platform displays a list of parcels associated with the application.
Click the Parcel # link for the parcel that you want to edit.
Civic Platform displays the parcel details.
Update parcel data as needed. See Parcel List Portlet Fields for field definitions.
Click Submit.
Removing a Parcel from an Application
You can remove a parcel from an application as needed. Removal of a parcel from an application does not delete the parcel from your reference database, nor does it affect other applications associated with the same parcel.
To delete a parcel from an application
Navigate to the portlet you are working in, and use Search to locate the record you want to work with. See Using the Search Features for information about searching.
Click the link in the Record ID column for the record you want.
Civic Platform displays the application details.
Click the Parcels tab that displays on the tabs.
Civic Platform displays a list of parcels associated with the application.
Select the parcel(s) you want to delete.
Click Delete.
If the parcel has any associated addresses, owners, structures, or establishments, one of the following occurs, depending on your agency’s settings
Civic Platform automatically removes the associated reference data from the record and notifies you of the action.
A pop-up window displays the associated reference data. Select which data you want to remove from the application and then click Select.
Civic Platform removes the parcel and any associated reference data that you selected from the application.
If Civic Platform does not remove the associated reference data automatically or following a prompt, you must manually remove the data from the record.
Civic Platform updates the parcel list, removing the parcel you selected and other associated reference data, where applicable.
Working with Parcel Conditions
After you create parcel records, you can use the Conditions tab to manage the conditions applied to parcels. Based on your agency’s user group settings, you may or may not have access to the parcel conditions and all the features described in this section. Contact your agency administrator for more information.
Topics
Adding a Condition
You can create a custom condition for the parcel or apply a standard condition associated with the parcel group or parcel type. For detailed information on conditions, see Conditions.
To add a custom condition to a parcel
Navigate to the Parcels portlet.
Locate the parcel you want to work with, and click the link in the Parcel # column.
Civic Platform displays the parcel details.
Click the Conditions tab.
Civic Platform displays the Conditions tab for the parcel.
Click New.
Civic Platform displays the New Condition portlet.
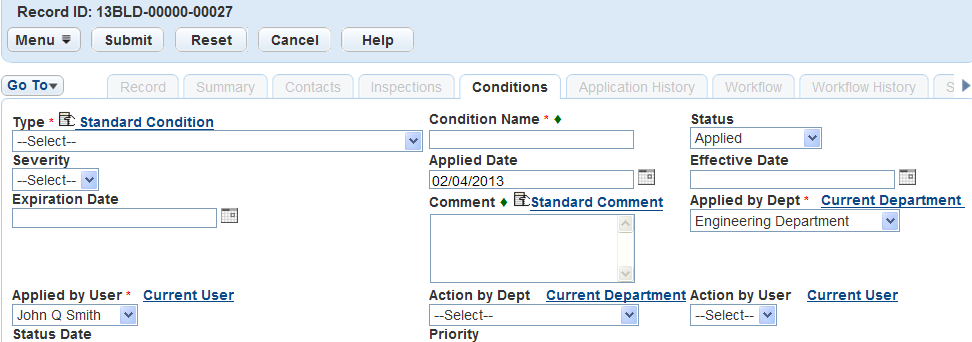
If you are creating a custom condition, complete the fields with available data. For a description of the fields, see Conditions Form Fields.
If you are creating a standard condition:
Click the appropriate Standard Condition hyperlink.
Civic Platform displays the Standard Condition search portlet.
Enter search criteria to locate the standard condition you want, then click Submit.
Civic Platform returns a list of standard conditions that match your search criteria.

Click Edit for the standard condition you want to attach to the parcel.
Civic Platform populates the New Condition form with the values from the standard condition you selected.
Edit the fields as needed.
Click Submit.
Civic Platform adds the condition to the record.
Viewing Associated Conditions
You can view the custom conditions and standard conditions applied to a parcel or the conditions applied to the parcel and its parents, grandparents, or ancestors.
To view associated conditions
Navigate to the Parcels portlet.
Locate the parcel you want to work with, and click the link in the Parcel # column.
Civic Platform displays the parcel details.
Click the Conditions tab.
Civic Platform displays the Conditions tab for the selected parcel.
Select whether to display conditions for the current parcel (From Current Parcel Only), or for the current parcel and its parents, grandparents, or other ancestors (From Current Parcel or Its History).
Click the link to any condition to view details.
Copying or Moving a Condition
When you split or merge a parcel, you may need to adjust the conditions applied to the parcel. To help accomplish this task, Civic Platform enables you to copy or to move conditions between genealogically related parcels.
To copy or move a condition
Navigate to the Parcels portlet.
Locate the parcel you want to work with, and click the link in the Parcel # column.
Civic Platform displays the parcel details.
Click the Conditions tab.
Civic Platform displays the Conditions tab for the parcel.
Select the condition that you want to copy or move.
Click Copy to copy the associated condition to a genealogically related parcel.
Click Move to move the associated condition to a genealogically related parcel
Civic Platform displays a list of parcels, including the current parcel and its immediate parents, siblings, and children.
Select the parcel that you want to copy or move the condition to.
Click Submit.
If you are copying, Civic Platform associates the selected condition with the newly selected parcel while retaining the association between the condition and the original parcel.
If you are moving, Civic Platform associates the selected condition to the newly selected parcel and dissociates the condition with the original parcel.
Deleting a Condition
You can delete any associated condition for a parcel. After you remove the condition, it is no longer applied to the parcel, but it is still available for review only on the Conditions tab.
To delete a condition
Navigate to the Parcels portlet.
Locate the parcel you want to work with, and click the link in the Parcel # column.
Civic Platform displays the parcel details.
Click the Conditions tab.
Civic Platform displays the Conditions tab for the parcel.
Select the From Current Parcel Only option.
Civic Platform displays the conditions associated with the selected parcel on the Conditions tab.
Select the condition you want to delete.
Click Delete.
Civic Platform disables the condition.
Working with Parcel Documents
After you have created parcel records, you can use the Document tab for the parcel to manage associated documents. For detailed information about uploading, downloading, and removing documents, as well as viewing document information, see Attachments. Based on your agency’s user group settings, you may or may not have access to all the features described in this section. Contact your agency administrator for more information.
Topics
Viewing Associated Documents
You can view the documents associated with a parcel or the documents associated with the parcel and its parents, grandparents, or ancestors.
To view attached documents
Navigate to the Parcels portlet.
Locate the parcel you want to work with, and click the link in the Parcel # column.
Civic Platform displays the parcel details.
Click the Document tab.
Civic Platform displays the Document tab for the selected parcel.
Select whether to display documents for the current parcel (From Current Parcel Only), or for the current parcel and its parents, grandparents, or other ancestors (From Current Parcel or Its History).
Click the link to any document to view details.
Copying or Moving a Document
When you split or merge a parcel, you may need to adjust the parcel-attachment relationship. To help you accomplish this task, Civic Platform enables you to copy or to move attachments between genealogically related parcels.
To copy or move a document
Navigate to the Parcels portlet.
Locate the parcel you want to work with, and click the link in the Parcel # column.
Civic Platform displays the parcel details.
Click the Document tab.
Civic Platform displays the Document tab for the parcel.
Select the documents that you want to copy or move.
Click Copy to copy the documents to a genealogically related parcel.
Click Move to move the documents to a genealogically related parcel.
Civic Platform displays a list of parcels, including the current parcel and its immediate parents, siblings, and children.
Select the parcel that you want to copy or move the documents to.
Click Submit.
If you are copying, Civic Platform attaches the selected document to the newly selected parcel while retaining the association between the document and the original parcel.
If you are moving, Civic Platform attaches the selected documents to the newly selected parcel and removes the documents from the original parcel.
Downloading and Printing Multiple Documents
To download multiple documents, choose the documents and click Manage Documents > Download. Note that the Civic Platform administrator must grant Upload and Download permission on the Administration > Agency Profile > Security Policy > EDMS Access Security > {EDMS-Name} to enable multiple document downloads.
To print multiple documents, choose the documents and click Manage Documents > Print. Note that the Print option only shows if the Civic Platform administrator has configured FID 8508 Print Multiple Documents with Full Access.
Working with Associated Inspection Districts
After you have created parcel records, you can use the District tab for the parcel to manage the associated inspection districts. Based on your agency’s user group settings, you may or may not have access to all the features described in this section. Contact your agency administrator for more information.
Topics
Associating an Inspection District with a Parcel
Users can associate the parcels with inspection districts, which enables inspectors, for example, to organize inspections within a designated area.
To associate a district with a parcel
Navigate to the Parcels portlet.
Locate the parcel you want to work with, and click the link in the Parcel # column.
Civic Platform displays the parcel details.
Click the District tab.
Civic Platform displays the District tab for the selected parcel.
Locate the inspection district you want to associate. You can either search for the district using the standard search functionality, or you can use GIS to locate the district.
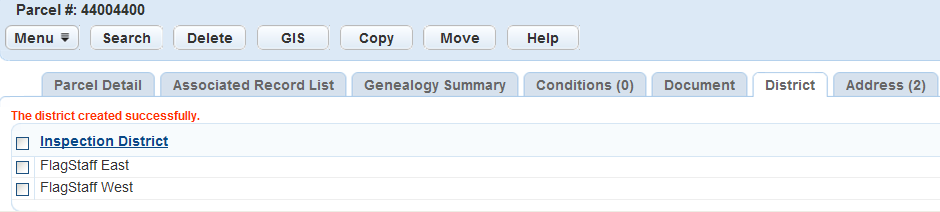
If you are using standard search, click Search, select the district you want to associate, and then click Submit.
Civic Platform adds the selected district to the District tab for the parcel.
If you are using GIS to locate districts, click GIS.
Accela GIS opens.
Select the district layer in the Layers panel to activate it.
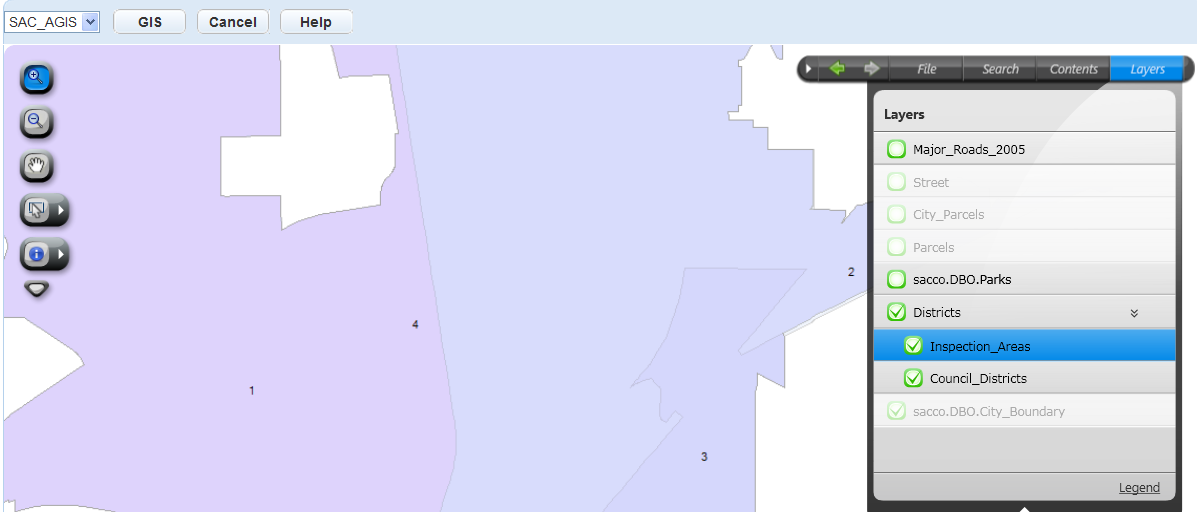
Use the map search panel to locate the inspection district you want, then select that district. You can also use the map selection tools to select an inspection district on the map.
From the Actions or Context menu, select Send GIS Features.
Civic Platform adds the selected district to the District tab for the parcel.
Copying or Moving an Inspection District
When you split or merge a parcel, you may need to adjust the parcel area of inspection districts. To help you do this, Civic Platform enables you to copy or to move inspection districts between two genealogically related parcels.
To copy or move an inspection district
Navigate to the Parcels portlet.
Locate the parcel you want to work with, and click the link in the Parcel # column.
Civic Platform displays the parcel details.
Click the District tab.
Civic Platform displays the District tab for the parcel.
Select the inspection district that you want to copy or move.
Click Copy to copy the inspection district to a genealogically related parcel.
Click Move to move the inspection district to a genealogically related parcel.
Civic Platform displays a list of parcels, including the current parcel and its immediate parents, siblings, and children.
Select the parcel that you want to move the inspection district to.
Click Submit.
If you are copying, Civic Platform attaches the selected inspection district to the newly selected parcel while retaining the association between the inspection district and the original parcel.
If you are moving, Civic Platform attaches the selected inspection district to the newly selected parcel and removes the inspection district from the original parcel.
Working with Reference Data
After you create parcel records, you can associate reference data to them, view reference data, copy/move reference data between two genealogically related parcels, and remove associated reference data from parcels as needed. Reference data includes addresses, owners, structures and establishments.
Based on your agency’s user group settings, you may or may not have access to all the features described in this section. Contact your agency administrator for more information.
Topics
Associating a Reference Address to a Parcel
You can track relationships between reference parcels and reference records of other types by associating the reference records to parcels.
To associate an address with a parcel
Navigate to the Parcels portlet and use Search to locate the parcel you want to work with.
Click the link in the Parcel # column for the target parcel.
Civic Platform displays the parcel details.
Click the Address tab.
Civic Platform displays the Address tab for the selected parcel.
Locate the address you want to associate. You can enter an address manually, you can search for an address using the standard search functionality, or you can use GIS to locate an address.
If you are entering an address manually:
Click New.
Civic Platform displays the Address detail portlet.
Complete fields with available data. For a description of the fields, see Address Fields.
Click Submit.
Civic Platform adds the address to the parcel.
If you are searching for an existing address:
Click Look Up.
Civic Platform displays the Address search portlet.
Enter search criteria as needed to locate the address you want.
Click Submit.
Civic Platform returns a list of addresses that match your search criteria.
Select the address that you want to associate to the parcel.
Click Select.
Civic Platform adds the address to the parcel.
If you are using GIS to search for an address:
Click GIS.
Accela GIS opens.
Select a layer in the Layers panel to activate it.
Use the map search panel to locate the address you want, then select that address. You can also use the map selection tools or the Geocoding Address Locator to locate an address on the map.
From the Actions or Context menu, select Send Address.
Civic Platform adds the address to the parcel.
Associating a Reference Owner to a Parcel
You can track relationships between reference parcels and reference records of other types by associating the reference records to parcels.
To associate an owner with a parcel
Navigate to the Parcels portlet and use Search to locate the parcel you want to work with.
Click the link in the Parcel # column for the target parcel.
Civic Platform displays the parcel details.
Click the Owner tab.
Civic Platform displays the Owner tab for the selected parcel.
Click Look Up.
Civic Platform displays the Owner search portlet.
Enter search criteria as needed to locate the owner you want to associate.
Click Submit.
Civic Platform displays a list of owners that match your search criteria.
Select the owner you want to add to the parcel.
Click Select.
Civic Platform adds the owner to the parcel.
Associating a Reference Structure or Establishment to a Parcel
You can track relationships between reference parcels and reference records of other types by associating the reference records to parcels.
To associate a structure or establishment with a parcel
Navigate to the Parcels portlet and use Search to locate the parcel you want to work with.
Click the link in the Parcel # column for the target parcel.
Civic Platform displays the parcel details.
Click the Structures & Establishments tab.
Civic Platform displays the Structures & Establishments tab for the selected parcel.
Click Look Up.
Civic Platform displays the Structure or Establishment search portlet.
Enter search criteria as needed to locate the structure or establishment you want to associate.
Click Submit.
Civic Platform returns a list of structures or establishments that match your search criteria.
Select the structure or establishment you want to associate to the parcel.
Click Select.
Civic Platform adds the structure or establishment to the parcel.
Copying or Moving Reference Data
When you split or merge a parcel, you may need to maintain associated reference data. To help you do this, Civic Platform enables you to copy or move associated reference data between genealogically related parcels.
To copy or move an associated reference object
Navigate to the Parcels portlet and use search to locate the parcel you want to work with.
Click the link in the Parcel # column for the target parcel.
Civic Platform displays the parcel details.
Click the tab containing the reference data you want to work with.
Civic Platform displays the corresponding reference record tab for the selected parcel.
Select the reference object (such as an address or structure) that you want to copy or move.
Click Copy to copy the reference object to a genealogically related parcel.
Click Move to move the reference object to a genealogically related parcel.
Civic Platform displays a list of parcels, including the current parcel and its immediate parents, siblings, and children.
Select the parcel that you want to copy or move the reference object to.
Click Submit.
If you are copying, Civic Platform associates the selected reference object to the newly selected parcel while retaining the association between the reference object and the original parcel.
If you are moving, Civic Platform associates the selected reference object to the newly selected parcel and removes the reference object from the original parcel.
Working with Parcel Activities
After you have created parcel records, you can use the Activity tab to manage the activities associated with the parcel. From the Activity tab, you can create activities for parcels, view or update associated activities, copy or to move activities between two genealogically related parcels, and disassociate activities from parcels. For detailed instructions about how to work with activities for parcels, see Activities.
Associating a Public User with a Parcel
After you have created parcel records, you can use the Associated Public User tab to associate one or more public users to a parcel. This linked relationship is particularly useful when the public user initiates an application in Citizen Access. He or she can use the auto-fill feature to populate parcel details on the application intake form with one click. For more information about public users, contact your agency administrator.
To associate a public user with a parcel
Navigate to the Parcels portlet and use Search to locate the parcel you want to work with.
Click the link in the Parcel # column for the target parcel.
Civic Platform displays the parcel details.
Click the Associated Public User tab.
Civic Platform displays the Associated Public User list portlet.
Click Look Up.
Civic Platform displays the Associated Public User search portlet.
Enter search criteria as needed and click Submit.
Civic Platform returns a list of public users that meet the search criteria.
Choose the public user whom you want to associate with the parcel.
Click Connect.
Civic Platform creates a link between the parcel and the public user.
Working with Associated Trust Accounts
If there is an association between a parcel and one or more trust accounts, you can use the Associated Trust Accounts tab for the parcel to manage the associated trust accounts. Based on your agency’s user group settings, you may or may not have access to all the features described in this section. Contact your agency administrator for more information.
Topics
Viewing Associated Trust Accounts
You can view the trust accounts associated with a parcel.
To view an associated trust account
Navigate to the Parcels portlet and use Search to locate the parcel you want to work with.
Click the link in the Parcel # column for the target parcel.
Civic Platform displays the parcel details.
Click the Associated Trust Accounts tab.
Civic Platform displays the Associated Trust Accounts tab for the selected parcel.
Click the Account ID link of the trust account you want to view.
Civic Platform displays the Trust Account detail portlet.
Copying or Moving Associated Trust Accounts
When you split or merge a parcel, you may need to maintain parcel-trust account associations. To help you do this, Civic Platform enables you to copy or to move trust accounts between genealogically related parcels.
To copy or move an associated trust account
Navigate to the Parcels portlet and use Search to locate the parcel you want to work with.
Click the link in the Parcel # column for the target parcel.
Civic Platform displays the parcel details.
Click the Associated Trust Accounts tab.
Civic Platform displays the Associated Trust Accounts tab for the selected parcel.
Select the trust account that you want to copy or move.
Click Copy to copy the trust account to a genealogically related parcel.
Click Move to move the trust account to a genealogically related parcel.
Civic Platform displays a list of parcels, including the current parcel and its immediate parents, siblings, and children.
Select the parcel that you want to copy or move the trust account to.
Click Submit.
If you are copying, Civic Platform associates the selected trust account to the newly selected parcel while retaining the association between the trust account and the original parcel.
If you are moving, Civic Platform associates the selected trust account to the newly selected parcel and removes the trust account from the original parcel.
Establishing a Parcel Genealogy
A parcel genealogy is a record of historical parcels and any applications associated with those parcels. You can use the parcel genealogy to track the evolution of any parcel in the genealogy.
To build a parcel genealogy, you need to establish a relationship between existing parcels. There are several types of relationships that you can establish. For example, you can split a parent parcel into multiple descendants. You can also merge parcels together in a “spousal” relationship, or choose to combine multiple parcels into a single descendant. Each time you establish a relationship between parcels, Civic Platform records your action as a genealogical transaction.
The two main types of genealogical transactions that you can perform are merges and splits. The illustration below shows examples of genealogy transactions. A split transaction allows you to disable a single parent parcel so you can create one or more child parcels. A merge transaction allows you to disable two or more parent parcels so you can create a single descendent, or child parcel.
Figure: Parcel Genealogy Transactions
Note:
Genealogy transactions are not reversible. After a parcel genealogy transaction, parent parcels become disabled. Only the descendants of the transaction remain active. You cannot search for or add disabled parcels to an application or future genealogy transaction. |
Each parcel in a parcel genealogy has a unique parcel number that identifies it. When splitting or merging parcels, you have the option of creating new parcel numbers for child parcels or applying the parcel number of a parent parcel to its child.
As soon as you perform a transaction, all parent parcels involved in the transaction become disabled. The transaction might generate new parcel records or just update the parent parcel to the child parcel. If you choose to update the parent parcel to the child parcel, you have the option of retaining a read-only copy of the parent parcel in the reference database.
Note:
Each parent and descendant parcel has a unique parcel number, and each parcel may have an association with one or more applications. Parcel genealogy transactions do not affect existing applications. When you create new applications, you can search for or add only parcels that a user has not disabled through a genealogy transaction. |
Topics
Splitting a Parcel
Multiple children in a parcel genealogy imply a split. After you split a parcel, Civic Platform disables the original parcel.
When you select an active parcel from the Parcel list portlet or when you navigate to the Genealogy Summary tab for an active parcel, you can click Split to launch the Split Parcel wizard.
To split a parcel
Either navigate to the Genealogy Summary tab for the parcel, or select the parcel that you want to split from the Parcels portlet.
Click Split.
Civic Platform launches the Split Parcel wizard.
Complete one of these options.
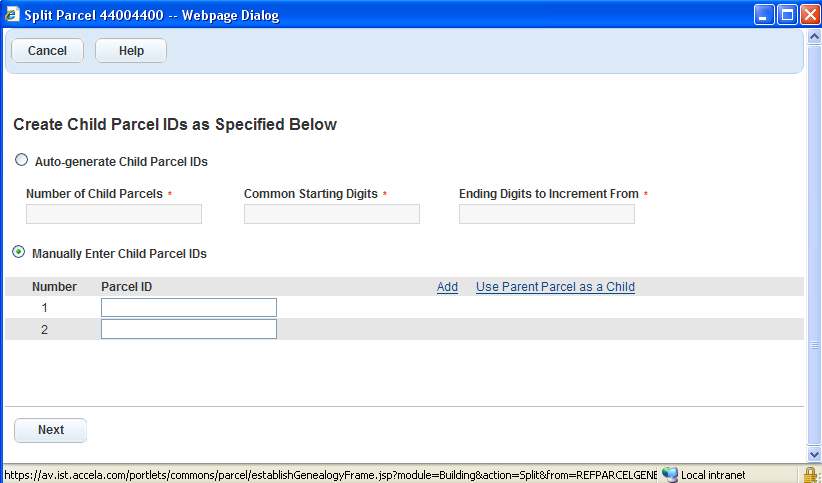
To generate new child parcel numbers automatically:
Select the Auto-generate Child Parcel IDs option.
Complete the following fields.
Number of Child Parcels Enter the number of child parcels that you want to create. Common Starting Digits Enter the common digits that each child parcel number is to begin with. Ending Digits to Increment From Enter the remaining digits for the first child parcel number. The parcel number for the subsequent child parcel increments by 1 based on the parcel number of the previous child record.
To enter child parcel numbers manually:
Select the Manually Enter Child Parcel IDs option.
Enter a parcel number in the Parcel ID field for each child parcels.
By default, Civic Platform lists only two child parcels. Click the Add link to add more child parcels. You can remove the third child parcel or any subsequent ones by clicking the Delete link next to the parcel.
If you want to use the parent parcel as a child parcel of the split, click the Use Parent Parcel as a Child link. Civic Platform populates the parent parcel number into the Parcel ID field of the first child automatically.
Click Next.
You move to the next step of the Split Parcel wizard.
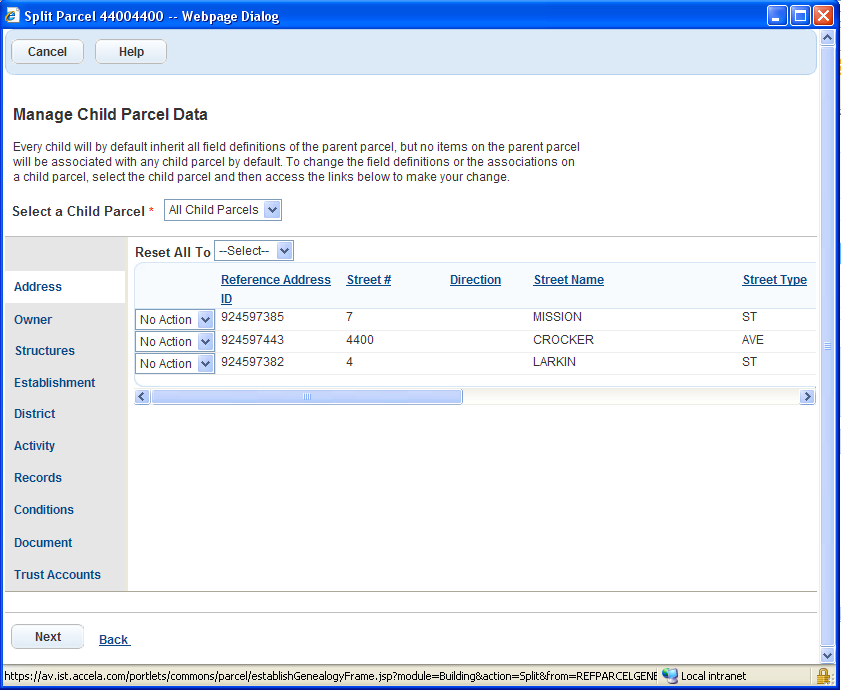
Select which child parcel you want to edit from the Select a Child Parcel drop-down list.
Complete the fields with available data. See Parcel List Portlet Fields for field definitions.
Note:If you select the All Child Parcels option from the Select a Child Parcel drop-down list, the Parcel Details tab is not available. The parcel details copy from the parent parcel to all child parcels automatically.
Click each object tab on the left to manage available objects.
The Split Parcel wizard displays objects associated with the parent parcel.

Use the drop-down list next to each associated object to determine your action for that object - either No Action, Copy, or Move.
To control all the associated objects on a single tab at a time, use the Reset All Todrop-down list.
Note:By default, all associated objects copy from the parent parcel to the child parcel using the parent parcel number. For any other child parcel, only associated trust accounts copy by default.
To restart the application workflow on child parcels, select the Restart Workflow option in the Records tab.
Click Next.
You move on to the Split Summary page.

Complete these fields on the Split Summary page.
Retain Parent Parcel Data Select this option to retain the parent parcel as a read-only reference record. It is no longer associated with the objects that you just moved to one or more child parcels. When you do not select this option, Civic Platform updates the parent parcel directly as the child parcel using the parent parcel number. This option is available only when a child parcel uses the parent parcel number.
Description A description with details about the split. Date The date when the split occurred. If you want to view a child parcel, click the View details link next to the child parcel from the Child Parcels list.
Civic Platform displays the Parcel Summary window for the selected parcel. The Parcel Summary window contains the parcel details, as well as a list of the objects associated with the parcel.
Click Finish.
Civic Platform splits the parcel as you specified and establishes a parcel genealogy transaction. If you chose to retain parent parcel data, Civic Platform returns to the Genealogy Summary tab for the parent parcel. Otherwise, Civic Platform returns to the Genealogy Summary tab for the child parcel using the parent parcel number.
Merging Parcels
Multiple parents in a parcel genealogy imply a merge. After you merge parcels, Civic Platform disables the original parcels.
To merge parcels
Either navigate to the Genealogy Summary tab for the parcel, or select the parcel that you want to merge from the Parcels portlet.
Click Merge.
Civic Platform launches the Merge Parcel wizard.

You can select parcels to merge in more than one way.
To add parent parcels from a list:
Click Add More Parcels.
Civic Platform displays a search window.
Enter search criteria as needed and click Submit.
A list of parcels matching your search criteria displays.
Select the parcels that you want and click Select.
Civic Platform adds the selected parcel to the Parcels to Merge list.
Repeat steps a through d for each additional parent parcel that you want to include in the merge.
To add parent parcels from the map:
Click Add Parcels from Map.
Accela GIS opens and activates the parcel layer.
Search for a parcel using the map Search panel and select one or more parcels to include in the merge.
From the Actions or Context menu, select Send GIS Features.
Civic Platform adds the selected parcel to the Parcels to Merge list.
Repeat steps a through d for each additional parent parcel that you want to include in the merge.
Enter the child parcel number in the Child Parcel ID field.
If you want to use a parent parcel as the child parcel of the merge, select the parent parcel and then click Use as Child Parcel.
Click Next.
The Manage Child Parcel Data page displays.
Complete the fields with available data. See Parcel List Portlet Fields for field definitions.
Note:If the child parcel uses the parcel number of a parent parcel, then parcel details automatically copy from the parent parcel. Otherwise, you must manually enter parcel details.
Click each object tab on the left to manage available objects.
The Merge Parcel wizard displays objects associated with the parent parcels.
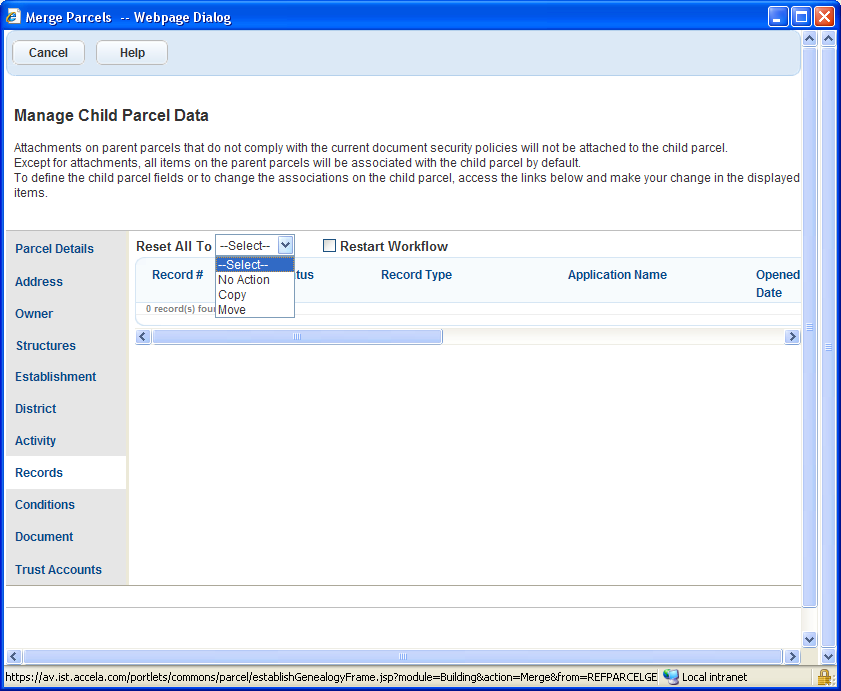 Note:
Note:If an object has an association with multiple parent parcels, the object list only displays a single record for the object.
Use the drop-down list next to each associated object to determine your action for that object. Options include No Action, Copy, or Move.
Note:If a child parcel uses the parcel number of a parent parcel, all objects associated with the parent parcel copy to the child parcel by default. For objects associated with the other parent parcels, you must select an action for each one individually.
If you want to restart the application workflow on child parcels, select the Restart Workflow option in the Records tab.
Click Next.
The Merge Summary page displays.
Complete these fields.
Retain Parent Parcel Data Available when a child parcel uses the parent parcel number, this option defines whether or not to retain the parent parcel as a read-only reference record. If the option is enabled, the parcel no longer has an association with the objects that moved to child parcels. If disabled, the parent parcel is directly updated as the child parcel using the parent parcel number. Description A description with details about the merge. Date The date when the merge occurred. To view a child parcel, click View details.
Civic Platform displays the Parcel Summary window for the child parcel.
Click Finish.
Civic Platform merges the parcels as specified and establishes a parcel genealogy transaction. If you chose to retain parent parcel data, Civic Platform returns to the Genealogy Summary tab for the parent parcel that Civic Platform uses as the child parcel in the merge. Otherwise, Civic Platform returns to the Genealogy Summary tab for the child parcel.
Viewing a Parcel Genealogy
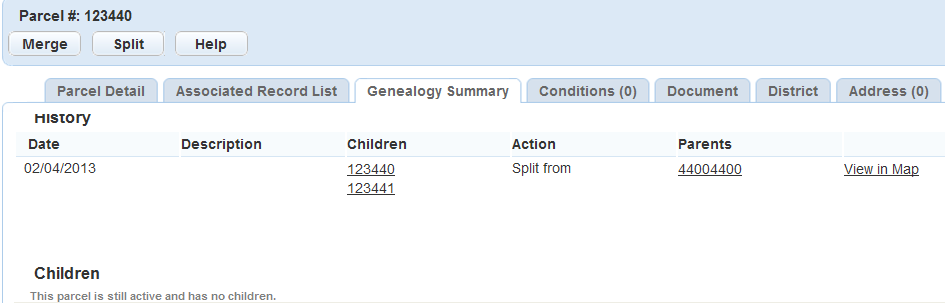
After you establish a parcel genealogy, you can review it from the perspective of any parcel involved in the genealogy. From the perspective of this reference parcel, each genealogy shows two sections of transactions: History and Children.
The History section shows you any transactions from which the selected parcel descends, including the parents, grandparents, and even ancestors of the parcel. The transactions display in descending chronological order, which means the latest transaction always displays at the top of the History section.
The Children section only shows you any transactions for which the selected parcel is the parent. This section only includes one generation of descendants. In addition to parents, grandparents, ancestors, and children, you can interact with siblings and spouses of a selected parcel. Siblings are co-descendants of the same parents. Spouses are co-partners in a merger. Siblings and/or spouses are visible in both the History and Children sections.
If the selected parcel is active, then you may be able to split the parcel or merge it with other parcels through the Genealogy Summary page. Based on your agency’s user group settings, you may or may not have access to the Merge and Split buttons on the Genealogy Summary page. Contact your agency administrator for more information.
To view a parcel genealogy
Navigate to the Parcels portlet and use search to locate the parcel you want to work with.
Click the link in the Parcel # column for the target parcel.
Civic Platform displays the parcel details.
Click the Genealogy Summary tab.
Civic Platform displays the Genealogy Summary page.
Click the link to any parcel in the genealogy.
Civic Platform displays the genealogy summary for the selected parcel.
To view the parcels involved on the map, click the View in Map link.
Civic Platform displays the GIS map viewer.
Working with External APO Data
External address, parcel and owner (APO) data refer to the APO data from external data source. Your system administrator can configure Civic Platform in a way that allows you to view records associated with external parcels data. You can also run reports for associated records. For information on running reports, see Accessing and Running a Report via a List Portlet.
If your agency administrator configure a GIS map layer as external parcel source, you can retrieve GIS objects from the map layer as external parcels, and attach the external parcels to records.
To work with external APO data
Navigate to the Parcels portlet and click GIS.
Complete any fields that display. For a description of the fields, see Parcel List Portlet Fields.
Click the Parcel # column for the parcel you want to work with.
Civic Platform displays the parcel details.
(For external parcels from GIS source) Hover your mouse cursor on GIS, and then select Show/Select GIS Objects.
Civic Platform launches the GIS map viewer.
Different from other external parcels, external parcels from the GIS source can support the same commands as those available for internal parcels in the GIS map viewer, including Show Accela Record, Send Features, and Create New Record. For information on working with parcels in the GIS map viewer, see Accela GIS User Guide.
Click the Associated Record List tab.
Civic Platform displays the records associated with the selected external parcel information.
Click the Document tab. You can attach documents to the external parcel as needed.
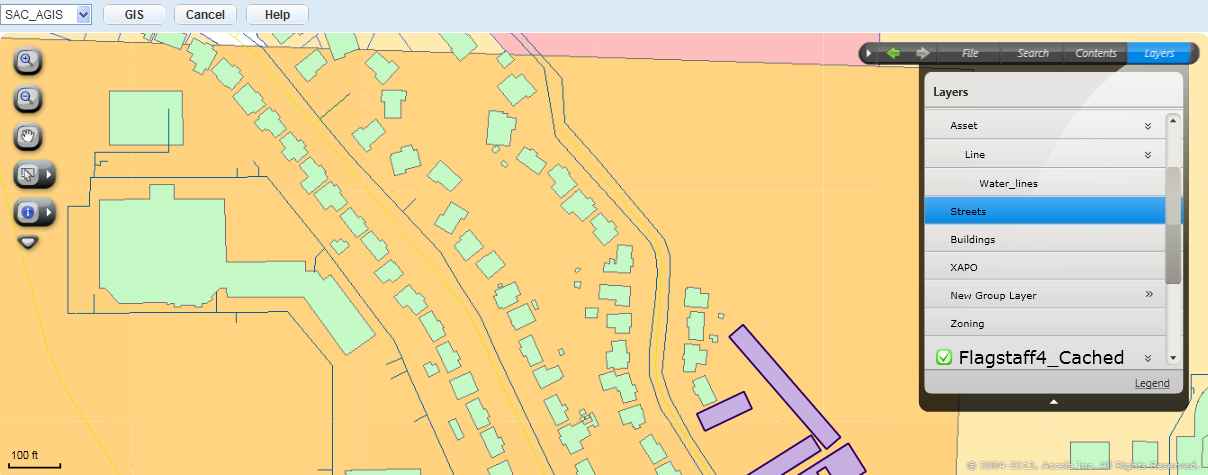
Viewing Parcels in GIS
Use GIS functionality to locate parcels. GIS provides automated maps from a central database and gives staff direct access to view geographic representations of a parcel.
To view a parcel in GIS
Navigate to the Parcels portlet and use Search to identify a parcel you want to work with.
Civic Platform displays a list of parcels.
Select the parcel you want to view in GIS.
Click GIS.