Understanding Application Form Details
Application intake forms group data fields by section. Which sections are available on an application varies by application type and by agency. For information about many of the available sections, choose a topic below.
Topics
Working in the Applicant and Contact Sections
A contact can be any person who has some involvement in the application process, including the applicant, billing contacts, and legal contacts. The Applicant and Contact sections of an application allow you to include contact information in new applications.
Topics
About the Contact Section
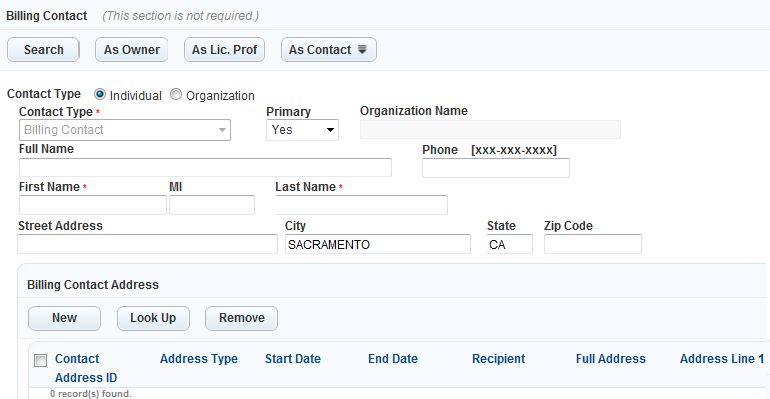
The application intake form can have up to three individual contact sections for entering single contact data, or it can have a contact list section for entering an unlimited number of contacts.
The image below shows an example of a contact section for entering single contact data.
Before you add any contact, the Contact list section looks the same as the single Contact section except that it does not display the Contact Address sub section. After you add contact(s) to the section, the Contact list section displays the contact(s) in a list.

If you click a contact in the list, a new window displays with the single contact entry form which looks the same as the single Contact section and includes the Contact Address sub section.
Adding a Contact
Depending on the type of record you are creating, there are various ways to add contact information to an application intake form. You can enter new contact information, use existing owner or licensed professional information, copy existing contact information, search for contacts, and add reference contact information. The validation setting of the Contact section determines which methods are available to you.
If the Validate button displays in the Contact section, you must validate the section against reference contacts after adding a contact. For more information, see Validating a Contact.
If the Contact Address sub section displays in the Contact section, you can add, look up, or remove contact addresses of the contact. You must enter required contact addresses. For more information, see Adding Contact Addresses for a Contact.
To search for and add reference contacts
Do any of the following:
Navigate to the Applicant or Contact section for entering single contact data.
Navigate to the Contact section that is for entering multiple contact data but you have not added any contact to and click the Search button to go to the Contact List pop-up window.
Navigate to the Contact list section.
Click Search.
Complete any fields that display and click Submit.
You can either search by contact standard fields, activities, or contact addresses. For a description of the fields, see Contact and Applicant Detail and Contact Address Fields.
Civic Platform returns a list of contacts that match your search criteria.
Note:Civic Platform ignores the contact type when performing the search, and returns all the reference contacts that meet the other criteria settings.
If you are adding a contact in a single contact section, there is an “Add Contact” icon next to each contact.
If you are adding contacts in a multiple contacts configuration, each contact has a check box, enabling you to select one or more contacts to interact with.

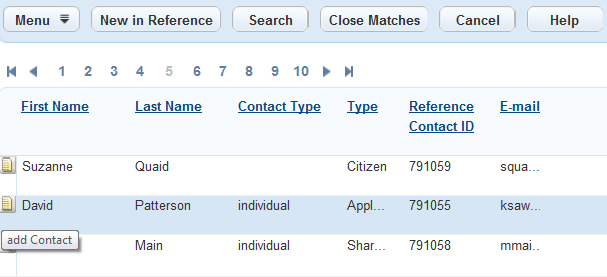
If the search results contain the contact(s) you want to add:
In the single contact section, click the icon next to the contact you want to add.
If available, you can click the Associated Contact link next to the contact to view the contacts associated with the selected contact, and click the icon beside the contact you want to add.
Civic Platform adds the contact information to your application intake form.
In the multiple contact section and in the contact list section, choose the contacts you want to add and click Select.
To view records that are associated with the selected contacts, select the desired contacts, then click Search Associated. Select the contacts that you want to add and click Select.
Civic Platform adds the contact information to your application intake form.
If the search results do not contain the contact(s) you want to add:
Click Close Matches to retrieve close match contacts. For more information on close match search, see Looking for Close Matches.
Click New in Reference to create a new reference contact. After you complete the fields in the popup Contact New Form (see Contact Detail Fields), click Submit.
When you see the contact(s) you want to add in the search results list, perform If the search results contain the contact(s) you want to add:.
If the selected contact(s) has multiple contact addresses, you can select the contact addresses to add from the contact address look up form by selecting the desired contact addresses, then clicking Select.
If the selected contact has only one contact address, Civic Platform adds the selected contact to the record with that contact address.
You can also add contact address(es) for the contact in the contact address sub section. See Adding Contact Addresses for a Contact.
Confirm that the contact type for the newly-added contact is correct. If not, select the type you want from the drop-down list.
To populate the contact section with existing owner, licensed professional, or contact data
Assuming that you already added an owner, a licensed professional, or a contact to the corresponding section of the application intake form, do one of the following:
Click the As Lic. Prof button if the contact you want to add is a licensed professional you added in the licensed professional section.
Click the As Owner button if the contact you want to add is the same as the owner you added in the owner section.
Click the As Contact button and select an existing contact.
Note:If your contact section supports multiple contacts, the As Contact button is available only on the contact entry form.
Civic Platform populates the contact section with information from the existing owner, licensed professional, or contact.
Add contact address(es) for the contact in the contact address sub section. See Adding Contact Addresses for a Contact.
To add a new contact manually
Do one of the following:
Navigate to the applicant or contact section for entering a single contact.
Navigate to the contact section for entering multiple contacts, click Search, then click New.
Navigate to the contact list and click New.
Note:If a Validate button displays in the application or contact section, you must search for an existing reference contact to add it to the section and then validate your choice. You cannot add a contact to the application by entering contact information manually.
Civic Platform displays the contact entry form.
Complete any fields that display (see Applicant and Contact Fields).
Note:If you are working with the multiple contact section or the Contact list section, Civic Platform saves any new information you enter as a new reference contact in the database.
If you are working with the single contact section, Civic Platform does not save the data as a reference contact. Instead, Civic Platform links the new contact to the application.
Add contact address(es) for the contact in the contact address sub section. See Adding Contact Addresses for a Contact.
Adding Contact Addresses for a Contact
After you specify the contact type for a contact, you can add contact addresses for the contact in the Contact Address sub section. The heading of the Contact Address sub section might display a warning message telling you that Civic Platform requires certain contact address types for a contact. You must enter contact addresses for the required contact address types before you can save the record successfully.
Before you add contact addresses to a contact that you added to the record by looking up reference contacts, be aware that your change might affect the contact addresses in the associated reference contact or another related record contact. Specially:
If you create a new contact address or edit a contact address in the record contact, Civic Platform adds or updates the contact address in the reference contact as well;
If you remove a contact address from the record contact, the contact address still exists in the reference contact.
If you deactivate a contact address in the record contact, the contact address changes to inactive in the reference contact and also the record contacts which link to the same reference source.
If you deactivate a contact address in the reference contact, the contact address changes to inactive in all the record contacts which link to the reference contact.
The primary contact address in one record contact can be non-primary in another one, although the two contact addresses share the same reference source.
To add a new contact address manually
In the contact entry form of the contact you want to work with, click New in the contact address sub section.
Civic Platform displays the contact address form.
The address you are adding might require validation:
Note:Even if the Validation button displays, you might only need to validate addresses of certain type and in certain countries. You can first select the address type and country/Region, and try the Validate button to know where you are from the response message. For example,
The “Address validation is required” message means that the address requires validation.
“No validation data source is defined” message means that you are creating an address that requires no validation;
“Failed to connect to the validation data source” message means that the address requires validation but Civic Platform cannot connect to the validation source defined by your administrator.
If the address you are adding requires no validation, complete the fields as described in Contact Address Fields.
Civic Platform leaves the Validated field empty.
If the address you are adding requires validation, complete the following steps:
Specify the Address Type and Country/Region fields, and complete a few more fields as described in Contact Address Fields.
Click the Validate button.
Civic Platform displays the Contact Address Validation List, with the matching addresses from the external validation source.
To add an address from the list, choose the desired address, then click Select.
Civic Platform populates the contact address fields with the information from the selected address, and sets the Validated field to Yes.
If you do not want to accept any of the validated addresses, click Cancel.
Civic Platform sets the Validated field of the address to No.
Click Submit to save the contact address to the current contact.
To look up and add a contact address from the reference contact
Open the contact form for the contact you want to work with.
Click the Look Up button in the Contact Address sub section.
Civic Platform displays the Contact Address Look Up Form. The contact address list contains the contact addresses with address type that is both active and associated with the contact type.

Select the contact addresses you want to add for the contact. If the address type of a listed contact address is a required field for the contact, Civic Platform selects the address by default.
Click Select.
Civic Platform adds the selected contact addresses to the current record contact.
Note:
When you make changes to a contact address that a user added by using the look-up function, Civic Platform updates to the reference contact accordingly. |
Note:
If you remove a contact address from the current record contact, Civic Platform does not remove the contact address from the source reference contact in the reference contact portlet. |
To edit a contact address
Click the Contact Address ID link of the contact address that you want to edit.
Modify the fields as desired. For a description of the contact address fields, see Contact Address Fields.
Click Save.
Note:When you make changes to a contact address that a user added by using the look up function, Civic Platform updates to the reference contact accordingly.
To remove or deactivate a contact address
Select the contact address that you want to remove or deactivate. Note that you cannot remove or deactivate the primary contact address.
Click Remove to remove the contact address from the current record contact, or click Deactivate to deactivate it first.
If you remove a contact address from the current record contact, Civic Platform does not remove the contact address from the source reference contact in the reference contact portlet.
If you deactivate a contact address, you can enter an end date for the contact address, which defaults to the current date, and the contact address status becomes Inactive.
If the contact address you are deactivating is the primary contact address in one or more records, it requires you to define a new contact address besides specifying the end date for the selected address.
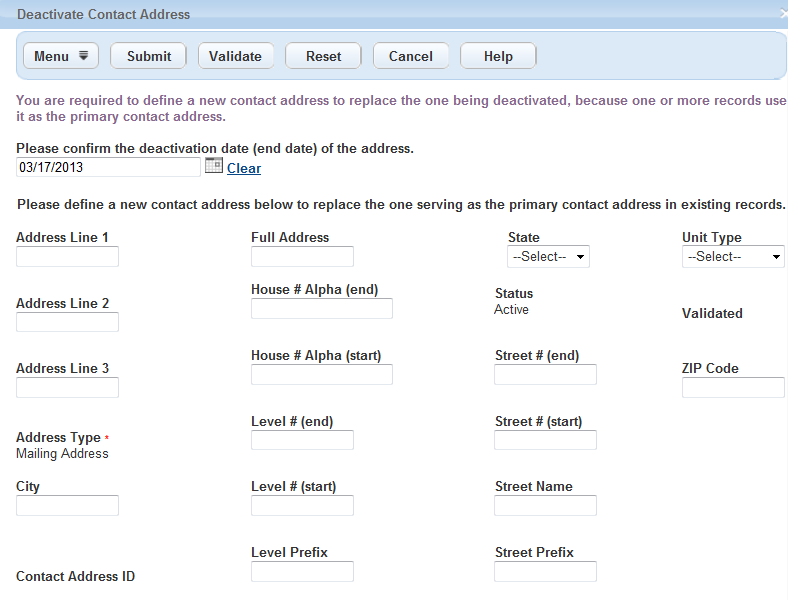
For information on defining a new contact address, see Creating a New Reference Address for a Contact.
Setting a Primary Contact
When you have multiple contacts on a record, you can set a primary contact to indicate whom to contact regarding the record.
To set a primary contact
In the Contact list section, identify the contact you want to set as primary, and mark that contact in the Primary column as shown below.
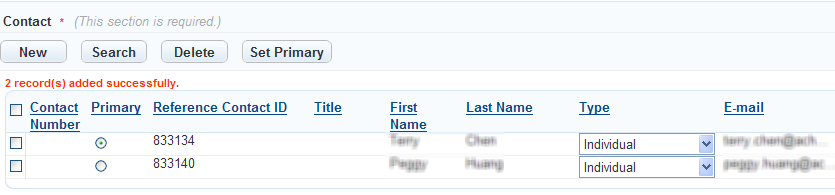
Click Set Primary.
Civic Platform sets the contact as the primary contact for the record.
Validating a Contact
Depending on your agency administrator’s settings for the Contact section, you might need to validate contacts. If the Contact section displays the Validate button and the section is not complete, then the validation is a required action before you submit the record.
For the Single Contact or Applicant section, Civic Platform checks if the contact is valid against the reference database. For the Multiple Contact section, Civic Platform not only checks if the contact is valid against the reference database, but also checks if you have added contacts of the required types to the application.
If the contact information entered is not valid against the reference database, you can create a reference contact and add it to the record.
The image below shows an intake form with two Contact sections, the first with a Validate button and the second without a Validate button.
Figure: Contact Section Validate Button

To validate a contact
Do any of the following:
Navigate to the Contact section for entering a single contact and add a contact.
Navigate to the Contact section for entering multiple contacts and add a contact.
Navigate to the Contact list section and select the contact you want to validate.
For more information about adding a contact, see Adding a Contact.
Click Validate.
Civic Platform validates the contact information against the reference database.
If you looked up the record contact from reference, the validation is always successful. You can jump to step 5.
If you manually entered the contact information, the validation checks whether there exists close-match reference contact(s) by checking all the common fields, except Contact Type, between the information you entered and the matching reference contact(s).
If there is only one matching reference contact, Civic Platform directly adds the reference contact information to the record. You can jump to step 4.
If there is none or multiple close match reference contacts, Civic Platform lists all the close match reference contacts for you to select and add as the record contact. You also have the option to create a new reference contact.
Civic Platform displays the Contact List pop-up window, with close match contacts, if any.

In the Contact List pop-up window, do one of the following:
Select the reference contact that you want to add from the contact list.
Click New to create a new reference contact. After you complete the fields in the popup Contact New Form, click Submit. After you see the contact in the contact list, select it to add the contact.
If the selected contact(s) has multiple contact addresses, you can pick the contact addresses to add in the pop-up Contact Address Look Up Form by marking the check boxes besides the contact addresses, and clicking Select. If you select a contact address and click Deactivate, the contact address no longer displays in the Contact Address Look Up Form.
If the selected contact has only one contact address, by default, Civic Platform adds the selected contact to the record with its contact address.
Confirm that the contact type of the newly-added contact is correct. If not, select a type in the Type drop-down list.
Make necessary changes to the newly-added contact if you want. Depending on your agency’s configuration, your changes might also write to the reference source when you submit the record.
Deleting a Contact
If your agency configures the Contact section as a contact list, you can delete individual contacts from the list before submitting the application.
To delete a contact
Navigate to the Contact list section of the application intake form.
Select for each contact you want to delete.
Click Delete.
Civic Platform deletes the contact from the Contact list.
Editing a Contact
If your agency configures the Contact section as a contact list, you can view and edit the details for each contact. You can also change the contact type from the Contact list section directly.
To edit a contact
Navigate to the Contact list section of the application intake form.
To change the contact type only, select the desired option from the Contact Type drop-down list.
To edit contact details, click the contact that you want to edit.
Civic Platform displays the contact details in the Contact Form pop-up window.
Update the fields as needed.
For a description of the fields, see Applicant and Contact Fields.
Add or edit the contact address in the Contact Address section.
For more information on contact addresses, see Adding Contact Addresses for a Contact.
Click Save.
Civic Platform saves the changes to the contact.
Working in the Address Section
Use the Address section of the application intake form to add an address for the primary application contact. There are several methods for adding an address. In most cases, you start with a database search.
Search the database for an existing address.
Enter one or more search criteria in the available address fields, then click Search.
A list of addresses that meet your search criteria displays.
Method 1: Select Address(es) and other items
Select each address you want to add and click Select.
If your agency administrator sets the parcel, owner, structure, and/or establishment sections to Auto, then data from those associated reference records populates automatically to the application intake form.
Otherwise, a list of the items associated to the address you are adding displays. Select the items you want to add to the record and click Select. Do not select any items if you plan to complete needed fields manually.
Civic Platform adds the information to the record.
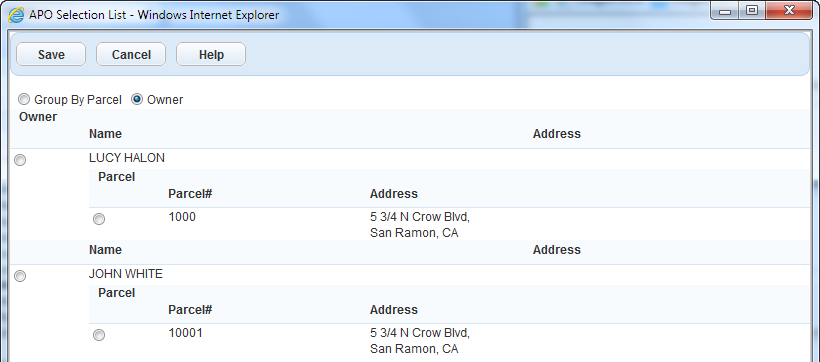
Note:If both parcels and owners populate within the record, you can view them grouped by parcel or by owner by selecting the Group By Parcel or Group By Owner option. See Related Reference Grouped by Parcel and Related Reference Grouped by Owner for examples.
Figure: Related Reference Grouped by Parcel

Figure: Related Reference Grouped by Owner
Method 2: Get Parcel & Owner button.
Click Get Parcel & Owner.
If Civic Platform does not add parcel records or owner records associated to the address record, this button locates and adds associated parcel or owner information.
Method 3: Add the address manually.
If you cannot find an address using search, or if you want to enter an address on the application but not in the database, you can add the address manually.
Click New on the Address Search Results page.
Civic Platform displays the New Address pop-up window.
Manually enter a new address.
Click Submit.
Note:Civic Platform does not store the address information that you enter as a reference address,. The data exists only in the application that you create.
Setting a Primary Address
When you have multiple reference addresses on one record, you can set only one primary address on a record.
To set a primary address
In the Address list section, identify the address you want to set as primary, and mark that address in the Primary column as shown below.

Click Set Primary.
Civic Platform sets the address as the primary address for the record.
Note:If you do not manually set a primary address on a record, Civic Platform system selects the primary based on the following:
When you add multiple reference addresses and more than one reference addresses are flagged as primary in the database, Civic Platform selects the last reference address flagged as Primary on Application Intake Form.
When you add multiple reference addresses and no reference address is primary, Civic Platform selects the first reference address listed on Application Intake Form as the primary address by default on a record.
Method 4: Use the GIS Address Locator.
You can retrieve only one address at a time using this method.
If your agency uses Accela GIS, click the Address Locator button.
The Address Locator pop-up window displays.
Click Locate Address and click an area on the map with the cursor.
Civic Platform displays a red marker for the address location you selected.

Click Save Location to save the address to the application intake form.
Note:For more information about using Accela GIS to add an address to an application, see the Accela Accela GIS documentation
Method 5: Use Accela GIS to add multiple addresses.
Open Accela GIS, then click the GIS button.
Civic Platform displays a pop-up GIS viewer.
Select the desired parcels in the GIS viewer and click Create Record.
Select one or more addresses from the address list and click Select.
Select one or more parcels or owners from the Parcel Owner Selection List and click Select.
Choose a primary parcel/owner and click Submit.
Civic Platform adds the selected address, parcel, and owner information to the application intake form.
Working in the Documents Section
Use the Documents section to attach (upload) documents to an application intake form. For example, an agency administrator might require documents such as building plans and an insurance bond before building a large commercial structure. Such documents can be submitted in electronic format, and attached to the application from the Documents section.
Working in the Parcel Section
Use the Parcel section to associate a parcel to an application intake form. There are several ways to associate a parcel. All of the methods start with a database search.
Search the database for an existing parcel.
Enter one or more search criteria in the available parcel fields, then click Search.
A list of parcels that meet your search criteria displays.
Method 1: Select Parcel(s) and other items
Select the parcels you want to add and click Select.
Note:Your agency might configure your system to add an associated address, owner, structure, establishment, and/or GIS information in addition to parcel information to the application, either automatically or at your direction.
If your agency administrator sets the address, owner, structure, and/or establishment sections to Auto, then information from any of those reference records associated to the parcel populates automatically to the application.
If your system prompts you to choose an address, owner, structure, and/or establishment to add, a list of the items associated to the parcel you are adding displays in a pop‑up window. Select the items you want to add to the record and click Select. Leave all items unselected if you plan to complete needed fields manually.
Civic Platform adds the information to the record.
Method 2: Get Address & Owner button.
Click Get Address & Owner.
If your system does not add address and owner records associated to the parcel record either automatically or in response to a system prompt, this button locates and adds associated address and owner information.
Method 3: Add the address manually.
If you cannot find an address using search, or if you want to enter an address on the application but not in the database, you can add the address manually.
Click New on the Parcel Search Results page.
Civic Platform displays the New Parcel window, where you can manually enter a new parcel, or you can also try a different search.
Click Submit to add the parcel to the application intake form.
Note:Civic Platform stores the parcel information that you enter in the individual application, and not in the database.
Method 4: Use Accela GIS.
This feature is useful if you want to add more than one parcel to the application intake form.
Click the GIS button.
For more information on how to add a parcel to an application intake form using Accela GIS, refer to the respective Accela GIS documentation set.
Civic Platform displays a pop-up GIS viewer.
Select the desired parcels in the GIS viewer and click Create Record.
Civic Platform displays a Parcel List window.
Select the parcels you want to add to the record and click Select.
Choose a primary parcel and then click Submit.
The selected address, parcel, and owner information all display on the application intake form.
Working in the People Section
Use the People section to add licensed professionals or owners to an application intake form. Your agency administrator can configure this section to give you the ability to associate multiple business professionals with an application.
You can add a professional or owner to an application intake form in one of three ways:
Using the Search button
Enter search criteria, then click Search to find an existing business professional (architect, building contractor) or owner, or complete the fields to add a new owner. For a list of field descriptions, see Adding an Owner to a Parcel.
Civic Platform displays the People Search form.
If your agency administrator sets the address, owner, structure, and/or establishment sections to Auto, information from any of those reference records associated to the owner populates automatically to the application intake form.
If you see a message that asks you to choose an address, owner, structure, and/or establishment to add, a list of the items associated to the owner you are adding displays in a pop‑up window. Mark the check box of each item you want to add to the record and click Select. Leave the check boxes blank if you do not want to add associated items, then complete needed fields manually.
Using the Search P+ button
Click the Search P+ button to add ‘PERMITS’ Plus owner records to the application intake form.
Using the GIS button
Click the GIS button.
For more information on how to use Accela GIS to add a professional or owner to an application, refer to the respective Accela GIS documentation set.
Civic Platform displays a pop-up GIS viewer.
Select the desired parcels in the GIS viewer and click Create Record.
Civic Platform displays a Parcel List window.
Select the parcels you want to add to the record and click Select.
Choose a primary parcel and then click Submit.
The selected address, parcel, and owner information display on the application intake form.
Working in the Structures or Establishments Section
Use the structures or establishments section to add one or more structures or establishments to the application intake form.
Note:
You can only add existing structures or establishments to an application. |
To add a structure or establishment to an application
In the structures or establishments section, use search to locate the desired structure or establishment.
Click Submit.
Civic Platform returns a list of structures or establishments that match your search criteria.
Select each structure or establishment you want to add to the application intake form.
Click Select.
If there are address, parcel, owner, structure, or establishment records associated to the structure or establishment you selected, one of the following might occur, depending on your agency’s settings. Follow the instructions for the outcome you see:
The associated reference data automatically populates the permit. Proceed to the next step.
A pop‑up window displays the associated reference data. Select which data you want to add to the permit, then click Select.
Civic Platform adds the address and associated reference data to the permit.
Civic Platform does not add the associated reference data. You must add data manually to the permit.
Click Select.
The selected structure/establishment information displays in the application form.
Working in the Application-Specific Information Section
Use the Application-Specific Information (ASI) section to add a set of fields specific to a single application.
Some administrators create drill-down ASI fields in the ASI section. Drill-down ASI fields guide users through a series of drop-down lists that present the filtered data choices based on the selections that you made in the previous field. For example, your agency can create a drill-down field for business license applications. The first drill-down lists the nature of the license, such as Agriculture, Bakeries and Confectionery, or Building Materials. If the user selects Building Materials, the next drill-down lists materials such as Paints and Bonding Materials, Tiles and Ceramics, and Wood and Wooden Products. If the user selects Wood and Wooden Products, the third drill-down field might contain options such as Import of Wood, Furniture Repair and Refurbishing, Plywood Manufacture, and Sawdust Collection and Recycling.
Some administrators create attribute mappings between Accela GIS objects and ASI fields. The ASI fields automatically populate with GIS object attribute values according to the attribute mappings, when you attach an asset, parcel, or associated GIS feature to an application as follows:
Launch the map viewer from the main console or the Record list portlet, select a GIS object that represents an existing asset in the Civic Platform database, and perform the Create New Record, Create Single Work Order, or Create Multiple Work Orders command.
Look up an existing parcel that you can plot on the map and add it to the Parcel section.
Launch the map viewer from the Parcel section, select a GIS object that represents an existing parcel in the Civic Platform database, and perform the Send GIS Features command.
Look up an existing asset that you can plot on the map and add it to the Asset section.
Launch the map viewer from the Asset section, select a GIS object that represents an existing asset in the Civic Platform database, and perform the Link Object to Work Order command.
Launch the map viewer from the Associated GIS Features section, select a GIS object that either represents an existing parcel or asset, and perform the Send GIS Features command.
Note:
If you attach multiple parcels, assets, or associated GIS features to an application at a time, a dialog box prompts you to set one item as primary. The ASI fields get the corresponding values from the attributes of the primary GIS object. |
Working in the Application-Specific Information Tables Section
Use the Application-Specific Information Tables section to add application-specific information in table format. To make data retrieval easier, Civic Platform provides a table drill down feature as well as a table search feature.
Topics
Application-Specific Information Table Drill-down
In the Application‑Specific Info Tables section of the application intake form, you can use the drill-down feature to define the values for the table. Civic Platform guides you through a series of windows that present filtered data choices based on the selections that you make. Civic Platform then populates the data selected in multiple rows on the table.
To create an ASI Table Drill-down
Go to the Application Specific Information Tables section on the application intake form and then click Add.
Civic Platform displays the ASI Table Drilldown selection pop-up window.
Select a value and click Next.
Note:If your administrator has enabled multiple selection, hold down the Ctrl button on your keyboard and select the desired values, then click Next.
Repeat the previous steps for each selection screen. The last screen has a Finish button instead of a Next button. Click Finish to complete the process.
Civic Platform displays the application-specific information table on the application intake form.
Note:If the agency administrator configures the option, you can sort an ASI table column by ascending or descending order. Civic Platform remembers your sorting preferences for future use.
To add another row to the ASI table, click Add and complete the drill-down steps again to include the new element.
To delete a row from the table, select the row and click Delete.
Searching Application-Specific Information Tables
You can search for records using application-specific information table data values as search criteria: App Specific Info Table Label and Appl Specific Info Table Value. These fields are available on the ASI table search page even if you do not select a Record Type.
To search by application-specific criteria with no record type selected
Navigate to the Building portlet and click Search.
Civic Platform displays the Record search form.
Enter a valid value in the App Specific Info Table Label field to identify the table label you are searching on.
Enter a valid value in the App Specific Info Table Value field to identify the record.
Civic Platform displays the search results.
Click the Record ID link for the record you want to view.
Civic Platform displays the Record Details Portlet
Select the App Specific Info Tables tab.
Civic Platform displays the list of ASI Tables for the selected record.

Use the search box located to the right of the Table Subgroup drop-down to search the ASI table data. See Searching for Application-Specific Table Data from Results List for more information.
To search application-specific information with a record type selected
Navigate to the portlet you are working with and click Search.
Civic Platform displays the Record Search form
Select a Record type from the drop-down, then select a Type, a Subtype, and a Category from the drop-down lists that appear in sequence.
Civic Platform displays the Searchable ASIT fields.
 Note:
Note:Only the Name and Business fields display, because those are the only two fields with Searchable selected in the configuration.
Enter search criteria as appropriate.
Civic Platform displays the search results.
Click the Record ID link for the record you want to view.
Civic Platform displays the Record Details Portlet
Select the App Specific Info Tables tab.
Civic Platform displays the list of ASI Tables for the specific record
Use the search box located to the right of the Table Subgroup drop-down to search the ASI table data. See Searching for Application-Specific Table Data from Results List for details.
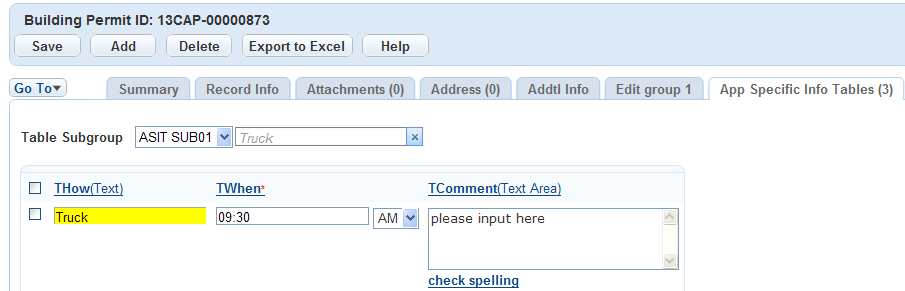
Searching for Application-Specific Table Data from Results List
Use the search box to the right of the Table Subgroup drop-down to search ASI table data. By default, the ASI table data search features searches all columns within the ASI tables.
Figure: ASI Table Data Search Results Indicated with Yellow Highlight
To use the ASI table data search feature
If desired, apply a quick filter:
Click the down-arrow to the right of the search button (magnifying glass).
Civic Platform displays the quick filter list of searchable columns
Select one or more columns to search.
Enter a search string into the Search field to the right of the Table Subgroup box.
Click Search.
Civic Platform displays the search results (filtered by the selected columns, if applicable).
ASI Table Data Search Additional Usability Features
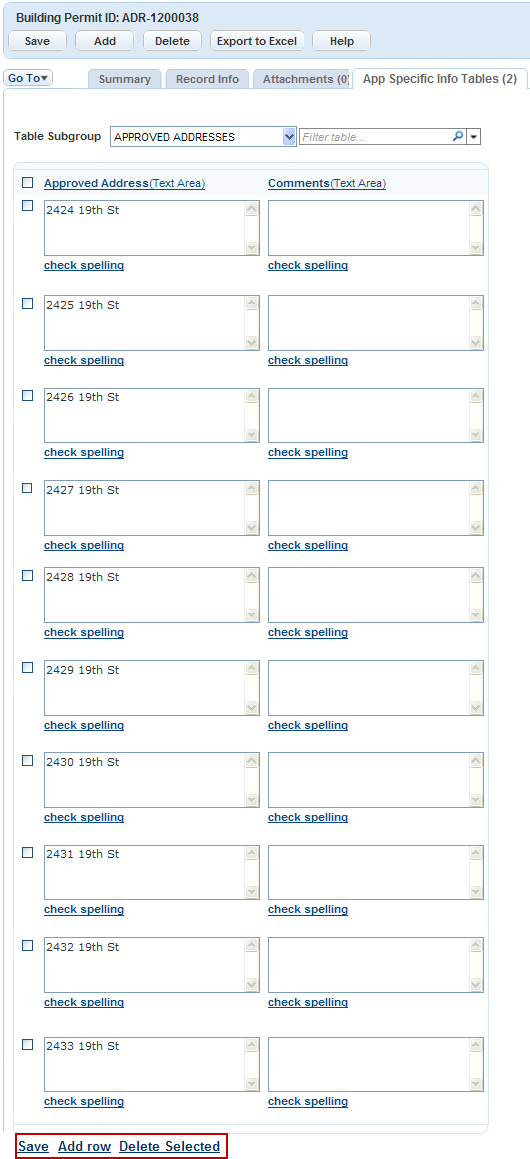
If ten or more ASI tables display within the ASI table section, then Add Row and Delete Selected links display at the bottom of the list. Use the links to add or delete ASI table rows as needed. If you add or delete rows, a Save button appears at the bottom of the window. Use it to save your changes.
Figure: Add Row and Delete Selected links at the Bottom of the ASI Table List
Working in the Education Section
The education section is often available on application intake forms for a professional or occupational license. You can enter an applicant’s educational credentials now, or you can select educational credential from the applicant’s reference contact file.
Note:
For additional information about using education information in connection with professional or occupational licenses, see Education and Examination Providers. |
To add education information to an application
Click Add in the Education section to insert a new data line (if a predefined line exists).
Select the educational institution attended from the Provider Name drop-down list.
Civic Platform automatically populates the Provider Number field.
Click the arrow next to the Provider Name to expand the section. Review, add, or modify provider information as needed.
Complete the rest of the fields with available data. Fields marked with a red asterisk require data entry.
Note:In Years Attended, you can enter a single year (2009), a range of years (2009-2011), or a combination of both (2006, 2009-2011).
When you submit the application, Civic Platform adds the data you just entered to the license record, where you can view or edit it on the Education tab. For more information about working with education data on the License portlet, see Education and Examination Providers.
Working in the Continuing Education Section
The continuing education section is often available on the application intake form for a professional or occupational license. Use it to enter information about an applicant’s ongoing professional development or continuing education credentials earned toward recertification.
You can enter an applicant’s continuing education credentials manually, or you can select continuing education credentials from the applicant’s reference contact file. See Education and Examination Providers for information.
Some applications have a continuing education requirement. Civic Platform lists the required number of educational hours (units) at the top of the section. Expand the total hours to display a table that lists the hours required, hours completed, and the balance due. As you enter hours into the lines below, the figures listed in the table automatically recalculate.
For additional information about using continuing education information in connection with professional or occupational licenses, see Education and Examination Providers.
To add continuing education information to an application
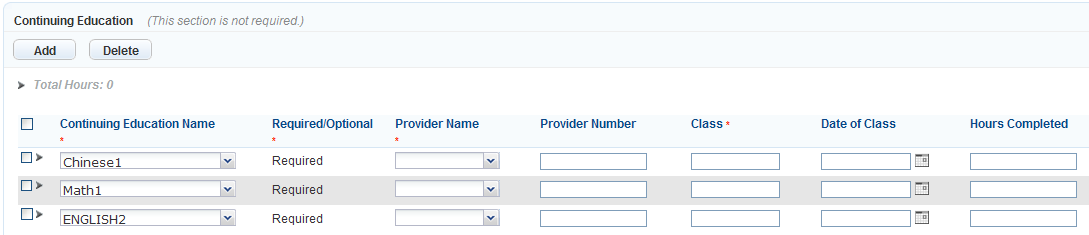
In the Continuing Education section, click Add to insert a new data line.
Make selections from the Continuing Education Name and Provider Name drop-down lists.
Civic Platform automatically populates the Provider Number field.
You can click the arrow next to the provider name to expand the section, where you can review, add, or modify provider information, as needed.
Populate the remaining fields with available data.
When you submit the application, Civic Platform adds the data you enter in this section to the license record, where users can view it on the Continuing Education tab. See for more information.
Working in the Examination Section
The examination section is often available on application intake forms. Use this section to enter details about certification-level examinations that the applicant takes. You can enter an applicant’s examination information now, or you can select examination information from the applicant’s reference contact file. SeeSelecting Examination or Education Records for an Application for information.
Depending on your agency’s agreement with external providers, the provider might maintain the exam data within Civic Platform or on an external system and integrate the data with Civic Platform by means of a URL link. Consult with your agency administrator for the specific information that you need to provide to examination providers who choose to use the second option.
For additional information, see Chapter 18: Certifications and Education, in the Civic Platform Citizen Access Administration Guide and Modifying Educational Credentials
To add examination information to an application
In the Examination section, click Add to insert a new data line.
Select the Examination Name from the drop-down list.
Civic Platform displays a Schedule link next to the Examination Date field, which provides all available schedule options from one or more providers.
You can click the arrow next to the Provider Name to display the Examination Site section. The fields auto-populate after you select a schedule.
Populate the remaining fields using one of the following methods:
Manually enter values.
Civic Platform does not display the application as a registered record in the associated provider (Licensed Professional record). You cannot update manually entered data by uploading a CSV file or by connecting to an external system. You must update this data manually.
Select an examination session to populate the fields.
Civic Platform displays the application as a registered record in the associated provider (Licensed Professional) portlet. You can update the exam data by uploading a CSV file or by connecting to an external system, depending on your agency’s agreements with the provider of certification-level examinations.
Click the Schedule link next to the Examination Datefield.
Civic Platform displays a list of available exam sessions for the selected provider.
Select an option from the list.
To narrow down the options and better locate the option you want, you can apply a filter.
Click Next.
Civic Platform displays the scheduling details for your confirmation.
Specify a registered Citizen Access user account if you are scheduling an online examination.
Note:You can use the same registered Citizen Access user account to schedule online examinations from different examination providers.
Click Finish.
Civic Platform populates the values of the selected exam session to the schedule line.
Click Submit.
Civic Platform saves the newly added examination schedules.
Estimating Fees
You can calculate an estimate of costs payable to the agency by partially completing an application. If you save your settings, you can search for the partial application later so that you can work with it again. To help identify partial application records with estimated fees, Civic Platform includes the designation “EST” in the application name.
To estimate fees
Follow steps 1-6 to submit a new application (see Creating a Record).
Click Estimate Fee.
Note:If you selected the “Create one Record for each Parcel” option, Civic Platform disables the Estimate Fee and Manual Input ALT IDbuttons.
Civic Platform displays the fee calculator pop-up portlet.

Do one of the following:
To add a fee item:
Click Add.
Enter the quantity of each fee item that you want to add.
To restore the default quantities and clear the note boxes, click Reset.
Click Submit.
To edit a fee item:
Click the Fee Item link for the item that you want to change.
Make changes as needed.
Click Submit.
To delete a fee item:
Select the item that you want to delete.
Click Delete.
To edit a related condition:
Click the name of the condition that you want to edit.
Make changes as needed.
Click Submit.
When you finish viewing the estimated fees, click Cancel.
Because the fees are only an estimate, you do not need to save them.
Civic Platform returns to the partial application in progress.
Click Save without Submit.
Civic Platform saves the partially completed application for submittal at a later time.
Transferring Accela GIS Data to an Application
Civic Platform can auto-populate application-specific information into an application form using Accela GIS (Geographic Information System).
Note:
Your agency administrator identifies application-specific information about each GIS object and layer. For more information on how to transfer Accela GIS data to an application, refer to the Accela GIS documentation set. |
To auto-populate permit-specific information by using Accela GIS
Follow steps 1-4 to submit a new record (see Creating a Record).
Complete the form fields with available data. When you come to the Address, Parcel, or Owner section, click the GIS button or the Address Locator button.
Civic Platform displays the Accela GIS map viewer.
Select each GIS object you want to reference. Mark Select All Objects if you plan to associate all the objects.
From the drop-down list, select Send Features to AA.
Click Submit.
Accela GIS sends data for the selected objects to Civic Platform. If you select more than one GIS object, Civic Platform displays a ‘Choose Primary Object’ dialog box.
If prompted, choose the object you want to select as the primary object.
Information from the primary object auto-populates to the appropriate fields on the application intake form. The object becomes the primary parcel for the application, while all other selected GIS objects become associated with the application.
Click Submit.
Civic Platform displays the Default Inspection Type pop-up window.
Select the inspections you want to schedule (see Select the inspection(s) you want to schedule. of the Creating a Record section).
Click Submit.
Civic Platform generates the Record ID, updates the list of applications, and schedules the selected inspection types.