Managing Import Jobs
This section describes how to configure an import job and import exported data, and gives you instructions on how to handle conflicts in the configuration data between the source agency and target agency.
You can schedule an import job to run at a specific date and time. You can also manually run the job.
Topics:
Prerequisites to Import Jobs
Before you create import jobs, make sure you complete the following tasks:
Configure, run, and download an export job from the source agency.
Set up the target agency, and import the product license for the target agency.
For module-specific data elements (record types and permission settings, for example), prepare target modules to which you can map the data elements. Include module-specific user groups.
Set appropriate Function Identifications (FIDs) to the target module user groups.
Planning Import Jobs
You may need to import the data elements in multiple phases. The following guidelines apply to a multi-phase import:
If an export job file contains user group configuration information, create an import job that only imports the user group information, and run the import job before importing other types of data elements.
Import the data elements of basic configuration (such as User, Standard Choices) before the others (such as Console Configuration, Form Portlet Designer).
Import the record types before the data elements (such as Time Accounting, Work Order Template, Condition) that reference the record types.
Import the record types, public users, and reference license professionals, before the ACA configuration data.
Import the application specific info (ASI) groups, ASI tables, condition types, asset types, workflow, and record types before the expressions in the Expression Builder page.
When importing document groups, also import the application specific info groups the document groups use as templates.
Always export data elements and import data elements across the same types of databases. For example, avoid exporting and importing between Oracle and Microsoft SQL databases, or between I18N database and non-I18N database.
Creating an Import Job
Create an import job for importing the data elements from the source agency to the target agency.
To create an import job
Open the Data Manager panel. For instructions, see Navigating the Data Manager Panel.
Click the New Import Job button in the Export Jobs panel.
Civic Platform displays the Create New Export Jobs page.

Complete the fields that display.
Conflict Action Choose from two options, Override and Reject. These options refer to conflict data between the target agency and source agency. If you want the data elements in the import file to overwrite existing duplicate data at the target agency, select the Override option. If you do not want the data elements in the import file to overwrite existing duplicate data at the target agency, select the Reject option. Note:The value you select for this field determines the default conflict action for all the conflict data elements. You can open the import job configuration page and select different conflict action for specific data elements.
Description A description of the import file. E-mail Your email address. Name A name that identifies the import job. Source Click the Browse button that appears next to this field to select the export job source file. Target Agency Choose the import file target agency from the drop-down list. If you use multiple agency administration, child agencies configured in the Delegate User Administrator display in this drop-down list are the . The default value for this drop-down list is the current user’s agency. Click the Save button.
Civic Platform displays the Import Job Summary page. See Figure 1.
Figure: Import Job Summary Page

Security Setting and Module Mapping
Your configuration can associate security and permission settings with data elements at the module level or user group level. The import job summary page displays the security and permission setting and their module mapping (Figure 2). You can choose whether to import security and permission from the source agency, and specify how to map the modules and user groups in the source file to the modules and user groups in the target agency.
Figure: Security Setting and Module Mapping Section
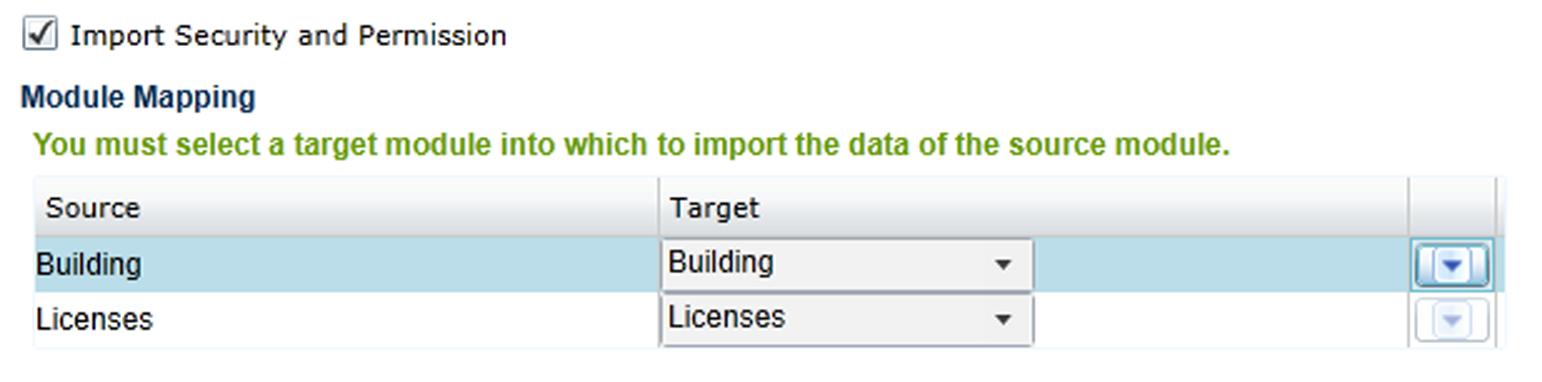
The security and permission settings refer to the permissions configured in certain data elements, for example, the record type security and permissions in condition type. Note the following points with the Import Security and Permission option:
The Import Security and Permission option does not display if your import job does not contain data elements with module access permissions or user group access permissions.
If you select the Import Security and Permission, you can migrate security and permissions at the agency, module, and user group levels.
If you clear Import Security and Permission, Data Manager does not migrate security and permissions.
The Module Mapping section displays source modules associated with data elements in the import job. You specify the module in your target agency into which you want to the import data elements from the module in the source agency of the import job. Note the following points with the Module Mapping section:
The Module Mapping section does not display if your import job does not contain data elements at the module level.
When you clear the Import Security and Permission option, the list of source modules may change, or not display.
Make sure to specify a target module for every source module. Otherwise, the import job ignores the data elements that relate with the source module.
You cannot map a target module to multiple sources.
Every time you change a module mapping, remember to reconfigure the user group mappings in the module mapping if there is any. User group mapping only applies to the import of security and permission.
You can import a disabled module or disabled user group to a disabled or enabled target module or user group.
To configure the module mapping and user group mapping for an import job
Go to the Import Job Summary page. For instructions, see Creating an Import Job.
Civic Platform shows the Module Mapping section in the Import Job Summary page.
Select a target module from the Target drop-down list for a source module.
If a module in the target agency has the same name as the source module, the module is mapped to the source module by default. You can change the module if necessary.
All the modules in the target agency are the options in the drop-down list.
Click the down arrow in the last column of the module mapping section to configure user group mapping.
Note:Data Manager disables the down arrow if a source module contains no user groups.
The User Group Mapping section displays with the list of user groups in the source module.

Select a user group from the drop-down list beside the source user group to set the mapping.
You can click the arrow button beside the User Group Mapping label to automatically populate the target user group field with the source user group name, on the precondition that the same user group exists in the target module.
Repeat steps 2-4 until you finish the mapping for all the modules, and (optionally) user groups.
Click the Save button in the navigation panel to save the settings.
Selecting Data Elements for Import Job
The major task to do when configuring an import job is to select the data elements from the export job that you want to migrate to the target agency.
The target agency may already contain the data elements that you plan to import. For such duplicate data elements, you must determine how to resolve any conflicts. In addition to the default conflict action configured in the import job summary page, you can set the conflict action for individual data element, or associated element, after checking the conflict details.
Topics:
Selecting Data Elements for Importing
To select data elements for an import job
Go to the Import Job Summary page. For more information, see Creating an Import Job.
Civic Platform displays the importable data element types in the left navigation panel.
For details on the configuration data that you can export and import with each data element type, see Exportable and Importable Data Element Information.
Click the type of data elements you want to include in the import job in the left navigation panel. For example, Record Types.
If you click the AA Configuration, Reference Data, or AAM Configuration link in the navigation panel, their sub types display under the link. You can then click a sub type and you can load the data elements in it.
Note:If the selected type contains many data elements, Data Manager can take some time to load all the data.
Civic Platform loads the list of data elements from the specified export job source file.

Do one of the following to filter long data elements list:
Enter text in the Find by field to display only the items that contain the text.
Select the check box beside the All Selected option to display only the items that you have selected in the list.
For the Record Types data element page only, click the Set Filters button, and set filter criteria in the popup Record Type Filter page to filter the record types that display.
Note:By default, Data Manager sorts record types alphanumerically. Typically, agencies do not customize the sort order. However, if an agency needs to customize the sort order for the Record Type Select (picker) page and they use the server constant CUSTOMIZED_APPTYPE_DISPLAYORDER, then if an agency imports record types that have a customized sort order, the sort order might conflict with the sort order at the target agency. To fix this issue, agencies can choose from two options noted below. Update the column value for TYPE_DISPORDER in the R3APPTYP or set the server constant CUSTOMIZED_APPTYPE_DISPLAYORDER to N.
Click the column headings to activate the column filters. Use column filters to sort columns alphabetically, show and hide specific columns, and group the display based on column names.
Select or clear the elements you want to import while determining how to resolve the conflict data.
You can select an data element entry but clear the associated elements in it to exclude the import of the associated elements.
You can either click the check boxes individually to select/clear the data element one by one, or click the column name to select/clear all (except any disabled items) at one time.
Note:If your extract relates some data elements with modules and/or user groups, but you do not configure the relevant module mapping (Security Setting and Module Mapping), you cannot import the data elements even though you can select the data elements.
For information on how to resolve data element conflicts, see Resolving Data Element Conflicts.
Click the Save button in the navigation panel to save your selection in the current data element type.
Repeat the previous steps for all the data element types you want to add to the export job.
Resolving Data Element Conflicts
Each element entry and its associated element (for example, record type and its associated fee schedule) from the export job source file display in the list with check boxes.
Some element entries from the extract may already exist in the target agency. Data Manager compares these element entries and their values in the source agency and target agency, and provides indications of conflict status upon loading of the elements. You can resolve the data element conflicts with the help of the indications:
If an element entry or the associated element already exists in the target agency with the same value as in the source agency, Data Manager disables its check box, which means it is unnecessary to import it. Otherwise, Data Manager selects the check boxes by default.
Note:
There is an exception: The element entries in the My Navigation page are always selectable for importing even though they already exists in the target agency with the same values as in the source agency. |
When the data elements first load, each column heading displays the default conflict action selected in the import summary page. “O” stands for override to override the value in the target agency with the one from the source agency. “R” stands for reject to reject the value from the source agency.
If you select “R” for the first column, which is usually the data element name, Data Manager rejects the data elements and their associated elements in the target agency, regardless of whether you select “O” or “R” for the subsequent columns that represent the associated elements.
If you select “O” for the first column, the data elements in the source agency override the corresponding data element values in the target agency. At the same time, you can select “R” for the subsequent columns that represent the associated elements, so that the associated elements can still reject the values from the source agency.
A red “!” sign displays beside a data element (or associated element) indicating the conflict status that the data element (or associated element) in the export job source file conflicts with the existing ones in the target agency. You can click the red “!” sign and view the conflict details in the popup Conflict Detail window (see Figure 3) before deciding whether to override or reject the conflict.
If you import an inspection group or workflow, associated with a record type in the record type page, Data Manager disables the inspection group or workflow in the inspection type or workflow page, and displays with a red “!” sign to indicate that you selected the data element elsewhere.
If you import an attribute template, associated with an asset type in the asset types page, Data Manager disables the attribute template in the attribute templates page, and displays with a red “!” sign to indicate that selected the data element elsewhere.
Figure: Conflict Detail Window
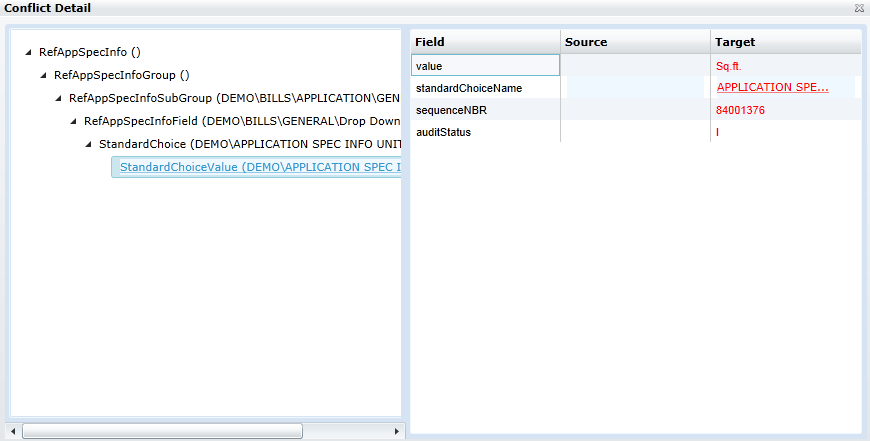
| A | Conflict Tree. A tree that directs you to the source of conflict in the database. The node names are the primary key + value of the database tables from the ancestor to the actual one that contains the conflict field. |
| B | Conflict Field. View the database field that contains different values in the target agency and source agency. |
| C | Source. The value of the conflict item in the source agency. The value can be empty if undefined. The value shown in red is the one causing the conflict. |
| D | Target. The value of the conflict item in the target agency. The value can be empty if undefined.The value shown in red is the one causing the conflict. |
Scheduling an Import Job
You can schedule an import job before, during or after you configure the export job. The schedule sets the date and time to run the import job. If necessary, you can hold the schedule to prevent the import job from running.
To schedule an import job
There are two ways to schedule an import job.
Open the Data Manager panel, and select Schedule from the Actions list for the desired import job.

Go to the Import Job Summary page which contains the schedule section. For instructions, see Creating an Import Job.
Civic Platform shows the schedule section.
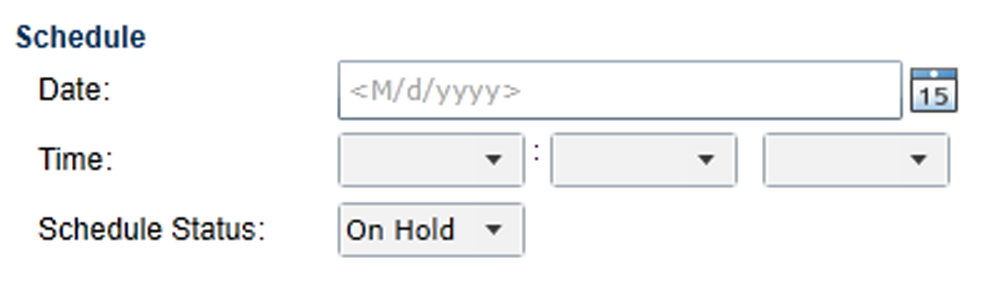
Complete the fields in the schedule section.
Date Enter the date or use the calendar icon to select the date to automatically run the import job. The default date that displays is the current date.This field only works when the Scheduled Status is Active. Time Select the time when you want to run the import job. The default time that displays is the current time.This field only works when the Scheduled Status is Active. Schedule Status Select the status as On Hold or Active. If the status is On Hold, you can only save the import job, but cannot run it either on the scheduled time or manually. If the status is Active, the import job runs on the scheduled time. You can also run the job manually. Click the Save button in the navigation panel to save the schedule settings.
Working with the Import Job Actions Menu
Use the import jobs Actions menu (see Figure 1) to manage and run import jobs. You can use the Actions menu to start and stop an import job, schedule an import job, view a log of all the changes made to an import job, and delete an import job.
The status fields at each import job, including Schedule Status, Job Status, Start Date and End Time, show the job statuses from your previous actions.
You can set the schedule status of an import job to be either Active or On Hold.
If the schedule status is Active, the job can run on the scheduled date and time. If the schedule status is On Hold, the job cannot automatically run.
The following job statuses are possible for an import job.
Completed. The job completed successfully as configured.
In Process Queue. You scheduled the job to execute at a later time.
Terminated. The job terminated without completing.
Running. The job is currently running.
Stopping. The job stopped and you can resume the job if you click Start.
The start date and time are the schedule that you created for the job.
The commands available in the Actions menu for a job vary depending on the current statuses of the job.Table 1 describes the Actions menu commands of import jobs and explains how the schedule status and job status of each export job affect the availability of menu commands.
Note:
After running an import job, in particular, after importing Standard Choices, ACA Configuration, and/or text settings, clear the cache for Civic Platform or even restart the Civic Platform server, to make sure the newly-imported data elements appear. |
Note:
After running an import job, open the target agency and check that Data Manager imported the data elements successfully. Data Manager may fail to export and import some default settings in ACA configuration. |
| Command | Schedule Status | Job Status | Command Effect |
|---|---|---|---|
| Delete | Active | Complete In Process Queue Terminated |
The Delete button is active and you can delete the import job from the database. |
| Delete | Active | Running Stopping |
The Delete button is inactive. |
| Delete | On Hold | Any | The Delete button is active and you can delete the import job from the database. |
| Schedule | Active | Complete Terminated |
The Schedule button is active and you can schedule the date and time when you want the import job to run. |
| Schedule | Active | In Process Queue Running Stopping |
The Schedule button is inactive. |
| Schedule | On Hold | Any | The Schedule button is active and you can schedule the date and time when you want the import job to run. |
| Start | Active | Complete Terminated In Process Queue |
The Start button is active and you can manually run the import job (see Note below). |
| Start | Active | Running Stopping |
The Start button is inactive. |
| Start | On Hold | Any | The Start button is active and you can manually run the import job (see Note below). |
| Stop | Active | Complete In Process Queue StoppingTerminated |
The Stop button is inactive. |
| Stop | Active | Running | The Stop button is active. If you click the Stop button while the job is running, the job terminate and the job status is updates to Terminated. |
| Stop | On Hold | Any | The Stop button is inactive. |
| View Import Log | Active | CompleteIn Process Queue | The View Import Log button is active and you can view a log of all the changes made to an import job. |
| View Import Log | Active | Running Stopping Terminated |
The View Import Log button is inactive. |
| View Import Log | On Hold | Complete Terminated |
The View Import Log button is active and you can view a log of all the changes made to an import job. |
| View Import Log | On Hold | In Process Queue Running Stopping |
The View Import Log button is inactive. |
Note:
Data Manager allows you to manually start a job even if the job schedule is undefined or the schedule status is On Hold. If you schedule a job to execute at a later time and then select the Start command to start it immediately, Data Manager cancels the scheduled job. |