Managing Documents for Attachments
Enabling Users to Upload and Download Documents
To enable users to upload and download documents, configure your agency Security Policy as shown below.
Users can download and print multiple documents at one time. See the Civic Platform User Guide for details on downloading and printing documents.
To enable users to upload and download documents
- Go to Classic Administration and select Agency Profile > Security
Policy > EDMS Access Security > <EDMS NAME>

- Select the download and upload options for the agency, module, or group where you want to enable downloading multiple documents.
- Click Save.
- Repeat steps 1-3 for each EDMS that is configured in your Civic Platform environment.
Creating a Document Group
A document group lets you organize the different types of documents that users might need to add to certain applications. When you create a new document group, you determine the group name and add an initial document type to the group. You can add more document types to the group when you edit it.
To create a document group
Access the Classic Administration page (Accessing Classic Administration).
Choose .
Click Add.
Civic Platform displays the Document Type Add page.
Create a new document group by providing a name in the New Group field.
Add Document Types to the Document Group. For specific instructions on how to add document types, see Adding a Document Type.
Searching for a Document Group
You can search for any document group currently defined on your system. For example, you can search for a document group if you want to add or update document types, or if you want to view the details for a certain group. To see a list of all document groups in alphabetical order, click Submit without entering any information in the search field. You can also enter partial information to perform a partial search.
To search for a document group
Access the Classic Administration page (Accessing Classic Administration).
Choose .
Enter the group name in the Select Group field.
Click Submit.
Civic Platform displays the Document Group—Browse page.
Click the red dot that appears next to the group that you want.
Editing a Document Group
After you create a document group, you might need to change it. When you edit a document group, you can change any of the document types that make up the group. After you create a document group, you cannot delete the group without first deleting all document types that make up the group. When you delete the last document type, Civic Platform automatically deletes the group.
To edit a document group
Access the Classic Administration page (Accessing Classic Administration).
Choose s.
Search and select the document group you want to modify.
To add, edit, or delete an additional document type, see Adding a Document Type.
ClickSubmit.
Working with Document Types
This section provides instructions on how to work with document types associated with a document group and, if your agency uses Citizen Access, define how to apply permissions to public users for the document type.
Topics
Adding a Document Type
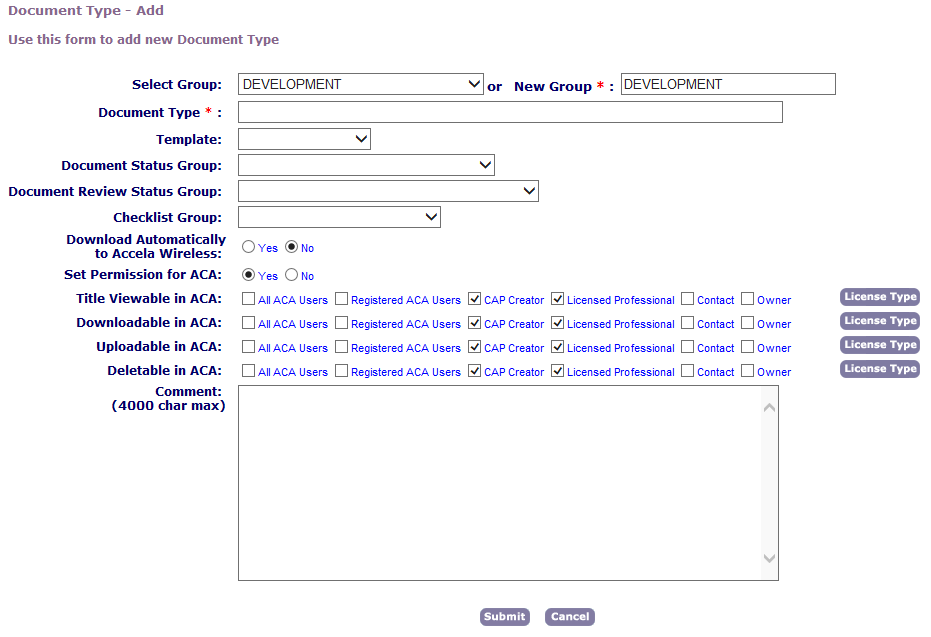
After you create a document group, you can add document types to the group. The document types that you set up apply to both the electronic and non-electronic documents, and determine how users categorize the documents associated with an application. If your agency uses Citizen Access, you must indicate which public users have permissions to view, upload, and delete the document type attachment online. The public user types include: All Citizen Access users (including anonymous users), registered users, Licensed Professionals, Record Creator, Contact, and Owner. Administrators can specify which licensed professionals can upload, delete, or view the document type by clicking the License Type button and selecting the appropriate options. If you want to restrict access to a specific document, navigate to the document tab for the record and assign additional permission settings. For instructions on how to restrict access to a specific document, see “Defining Citizen Access Permissions for a Document” in the Accela Civic Platform User Guide.
To add a document type
Access the Classic Administration page (Accessing Classic Administration).
Choose .
Search for the document group that you want.
Click Add.
Civic Platform displays the Document Type-Add page.
Complete one of these fields to define the document group code:
Select Group Choose an existing document group. New Group Type in what you want to name the new group. Note:You should not enter a new group name here unless you want to create a new group as well as a new document type. When you choose an existing group, Civic Platform automatically populates this field with your choice, because this field is a required field.
Complete the document type fields as described in Document Type Fields.
If you want to specify the licensed professional types allowed to upload, delete, or view the document type in Citizen Access, click Licensed Professional, indicate the specific licensed professional types, then click Select.
Click Submit.
Table 1. Document Type Fields Checklist Group Select a checklist group for the document type. Upon a successful upload of a document, if a checklist group is associated with the document type of the document, Civic Platform automatically adds the Auto Create checklists in the checklist group as the document review checklist for the document. Users can add more checklists or checklist items for the document review if they want. The steps to configure checklists and checklist groups for document reviews are the same as configuring checklists and checklist groups for inspections. For more information, see Managing Checklist Groups. Comment Enter any comments or notes about the document type. Deletable in Citizen Access Select which public users have permission to delete the document in ACA. Document Group Document Group is a read-only field that displays the name of the Document Group for the Document Type. Document Type Enter the document type that you want to include in the group. Download Automatically to Accela Wireless? Select Yes if you want to download files of this document group automatically to Accela Wireless; otherwise, select No. Downloadable in Citizen Access Select the users for which you want to grant permission to download the documents of this document type. When you select Licensed Professional, click the License Type button to select the desired licensed professionals. Set Permissions for Citizen Access Select Yes to grant permission on documents of this document type to Citizen Access users; otherwise, select No. Uploadable in Citizen Access Select those individuals for which you want to grant permission to upload documents of this document type. When you select Licensed Professional, click the License Type button to select the desired licensed professionals. For users without Title Viewable in Citizen Access permission, if you grant this permission to them, they can upload documents of this document type, but they cannot view them in the document list. Title Viewable in Citizen Access Select those individuals for which you want to grant access to view the document titles of this document type. When you select Licensed Professional, click the License Type button to select the desired licensed professionals. Note: Those users without this permission consequently cannot download or delete documents of this document type, even though they have the downloadable and deletable permissions.
Editing a Document Type
After you add a document type to a document group, you might need to change it. You can update type name as well as any comments about it. If you no longer want to include the document type in the group, you can delete it.
To edit a document type
Access the Classic Administration page (Accessing Classic Administration).
Choose .
Search for the document group that you want.
Click the red dot that appears next to the document type that you want.
Civic Platform displays the Document Type-Edit page.
Complete the necessary fields as described in Document Type Fields.
Click Submit.
Deleting a Document Type
You can delete any document type in a document group. After you delete the last document type in a group, Civic Platform automatically deletes the group. Civic Platform prompts you when this happens and gives you the option to cancel the deletion of the document group.
To delete a document type
Access the Classic Administration page (Accessing Classic Administration).
Choose .
Search for the document group that you want.
Click Delete to the right of the document type that you want.
Click OK.
Setting Required Document Types
Agencies can configure Civic Platform to require certain documents when an agency user submits a new application of a given type. Agencies can also configure document requirements when a public user submits a new application of a given record type via Citizen Access or Mobile Office. Agencies can also configure Civic Platform to require certain documents before a workflow task status change occurs.
You can access the Required Document Setting form both from the Administration tool in Civic Platform and from the Citizen Access Setup form. The following procedure describes how to access the Required Document Setting from the Administration tool.
The Role of Scripting in Required Document Functionality
Agencies can use existing EMSE scripting functionality to require documents dynamically as part of new or existing record processing. For example, agencies can create a script that auto-applies a notice condition that prompts for the required documents after a new application submission (ApplicationSubmitAfter) or after a workflow status update (WorkflowTaskUpdateAfter). Agencies can also create a script (DocumentUploadAfter) that clears required document conditions once required documents get uploaded. Agencies may have more complex document submission requirements. For example, agencies may configure a page flow in Citizen Access Administration to prompt for or validate required documents by associating scripts to the OnLoad or OnSubmit event in the relevant step. Agencies can write the script to block or not to block the page flow if a validation fails. For existing records, agencies can use scripting to enforce or prompt for required document submissions against various business rules for events like workflow status update (WorkflowTaskUpdateAfter) or application specific info update (ApplicationSpecificInfoUpdateAfter).
Setting Required Document Types by Record Type
When you set required documents, the list of required documents displays on the application intake form when a user adds a new record from Civic Platform, Citizen Access, or Accela Mobile Online. This informs the user which documents he must prepare and submit. If the user does not attach the required documents, he cannot submit the application.
Note:
If EDMS is not accessible from Citizen Access, the public user may be able to submit his application without the required documents. |
Before you can set required documents, you must have the following in place:
The desired document group code and assigned documents types for that group code must exist and have an association with the record type you are working with. See Managing Documents for Attachments.
The document group code to which you apply required document settings must be consistent for both Civic Platform and Citizen Access, if the record type you are working with is available to both Civic Platform and Citizen Access.
To set required document types by record type
Access the Record Type Administration portlet (Accessing Record Type Administration).
Expand the module you want to work with by clicking the down arrow on the right side of the module bar.
A list of existing record types displays.
Select the record type for which you want to set required document types by clicking the record type alias hyperlink. If you have a large number of record types, you can use Search to locate the desired record type by name.
The record type summary displays.
In the left panel, click Other Associations.
From the list of associations at the top of the window, click Document Code.
Civic Platform displays the Document Code settings. A document group code must be assigned to the record type you are working with. If not, you must assign a document group code. See “Managing Documents for Attachments” for more information about assigning or changing a document group code.
Click the View Edit link for Required Document Types.
The Required Document Setting form displays.
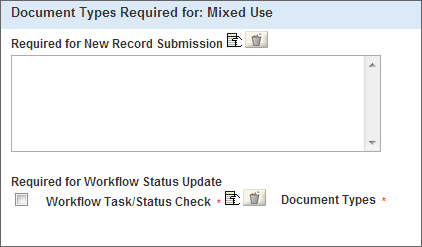
To set required documents for new record submission:
Click the picker to the right of Required for New Record Submission. A widget displays a list of documents included in the selected document group.
- Select the document type(s) that your agency wants to require as part of a new record submission. If needed, you can mark Select All to require all the listed documents. The selected document types display in the Required for New Record Submission box.
To set required documents for a workflow task status update:
Click the picker to the right of Workflow Task/Status Check.
Select each task status for which you want to require a document submittal.
Each time you select a task status, Civic Platform adds a new row to the Required for Workflow Status Update list. In the example below, we selected three workflow status options. Civic Platform added three rows - one for each status option - for you to configure individually.
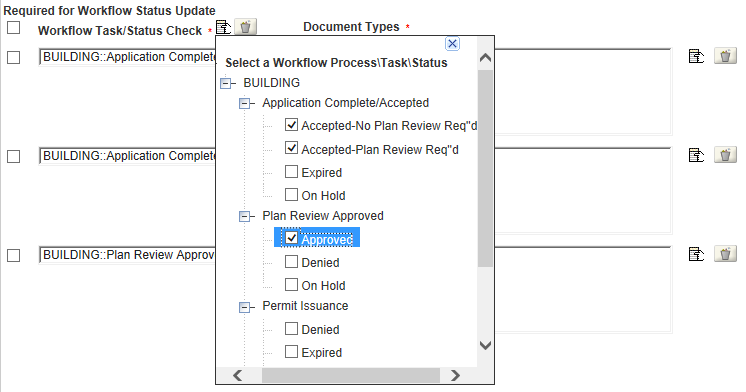
Click outside the widget to exit the widget and interact with the new rows.
Click the picker to the right of the Document Types box for one of the workflow task/status check rows.
A widget displays the list of document types for the selected document group.

Select the document type(s) that your agency wants to require before the workflow can advance with the selected status. If needed, you can mark Select All to require all the listed document types.
The selected document types display in the Document Types box.
Repeat the previous two steps for each workflow task you have listed.
Click Save.