Managing Work Order Assets
Work orders usually are tasks performed on assets, thereby most work orders associate with assets. For example, you could create a work order for a fire hydrant to be serviced next month. Since the fire hydrant is an asset, you must search for the fire hydrant and associate the fire hydrant information, including the address, to your new work order.
There are multiple access points for you to associate assets with work orders, including the Assets, Work Orders, and PM Schedule portlets. In the Assets and PM Schedule portlets, if you select some assets and create a work order, the work order automatically associate with the assets. In the Work Order portlet, you may go to the Assets tab of an existing work order and link assets to the work order. You can also select assets from the map to link with work orders via Accela Silverlight GIS.
Topics
Associating an Asset to a Work Order
A work order may already have assets associated with it at its creation. When you edit the details of a work order, you may want to associate more assets to the work order. You can look up in existing assets list and select ones to create the association. Or, you can open the Accela Silverlight GIS map viewer, view the assets that are already linked to the work order, and select new assets that need to be linked.
To associate an asset to a work order
Go to the Work Orders portlet and locate the work order you want to work with (see Using the Search Features).
Civic Platform displays work order details on the Record tab.
Click the work order ID link to open the work order.
Civic Platform displays the work order details.
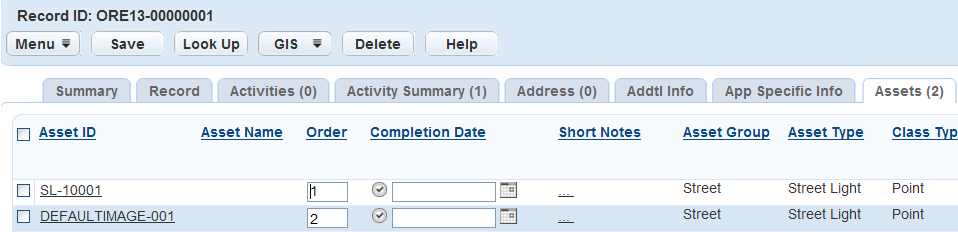
Click the Assets tab.
Civic Platform displays a list of assets associated with the work order.
To look up an asset and associate it to the work order, do the following:
Click Look Up.
Civic Platform displays the Associated Assets search form.
Enter search criteria.
Click Submit.
Civic Platform returns a list of assets that match your search criteria.
Select the asset you want to associate to the work order.
Click Select.
Civic Platform adds the asset into the associated assets list of the work order.
To select an asset from the Accela Silverlight GIS map viewer and associate it to the work order, do the following:
Click GIS and select Show/Select Assets.
Civic Platform displays the Accela Silverlight GIS map viewer.
Select an asset on the map.
Accela Silverlight GIS displays a map overlay or icon on the selected asset. The asset also displays in the Contents panel.
Open either the Context or Actions menu.
Accela Silverlight GIS displays the available map commands.
Click Link Object to Work Order.
Civic Platform returns to the associated assets list, with the selected asset in the list.
Viewing and Editing Associated Assets
You can view detailed information about an associated asset in the Assets tab. Furthermore, you can edit the details of each asset, and configure the asset fields that are specific to the work order. If you configure the start and end locations of linear assets in a work order, you can open the Accela Silverlight GIS map viewer to view the assets with their start and end locations.
To view and edit an associated asset
Go to the Work Orders portlet and search the work order to which you want to associate assets.
Civic Platform displays work order details on the Record tab.
Click the work order ID link to open the work order.
Civic Platform displays the work order details.
Click the Assets tab.
Civic Platform displays a list of assets associated with the work order.
To edit the details of an associated asset:
Clicking the asset ID link of the asset.
Civic Platform displays the asset details.
Edit field values as needed.
Click Save.
To edit the asset fields specific to the work order:
Find the asset in the assets list.
Complete the editable fields next to the Asset ID of the asset.
Click Save.
To view associated assets in the Accela Silverlight GIS map viewer:
Select the assets in the assets list.
Click GIS and select Show/Select Assets.
Accela Silverlight GIS opens the map viewer and displays the selected assets with map overlay or icon in the map.
To view the work location of associated linear assets in the Accela Silverlight GIS map viewer:
Select the linear assets in the assets list.
Click GIS and select Show Work Location.
Accela Silverlight GIS opens the map viewer and displays the selected linear assets with the start point, end point, and an arrow indicating the start location and end location.

For a description of the linear asset work location, see Work Order-Related Asset Fields.
If you want to reverse the start and end locations of a linear asset, open the Context menu of the asset in the map viewer, and select Flip Direction.
The arrow that indicates the start location and end location reverses its direction.
Deleting Associated Assets
You may want to remove some assets that are associated to a work order. Deleting an asset record from a work order does not delete the asset from the database; rather, it deletes the relationship between the asset and the work order.
To delete associated assets
Go to the Work Orders portlet and search the work order to which you want to associate assets.
Civic Platform displays work order details on the Record tab.
Click the work order ID link to open the work order.
Civic Platform displays the work order details.
Click the Assets tab.
Civic Platform displays a list of assets associated with the work order.
Select the asset you want to delete from the work order.
Click Delete.
Civic Platform deletes the relationship between the asset and the work order.
Updating Details for Multiple Work Order Assets
Occasionally, you may find that you need to update several assets associated with a particular work order with the same information. For example, several streetlights may all be put into service on the same day. Civic Platform allows you to save time and improve data accuracy by updating a group of assets with one action.
To update group asset details
Navigate to the Work Order portlet. Use Search to locate and select the work order associated with the assets you need to update.
From the work order detail area, select the Asset tab.
Select the asset(s) you want to update. You may select assets of the same type, or of different types.
Hover over the Menu button to display a drop-down menu and then select Group Update.
Civic Platform displays the Asset Details page. A notice displays if you attempt to update assets for which you do not have permission.
The fields displayed are those that are common to all of the selected asset types. Notice that when assets of the same type are selected, such as a group of street lights, additional fields specific to the asset type are displayed.
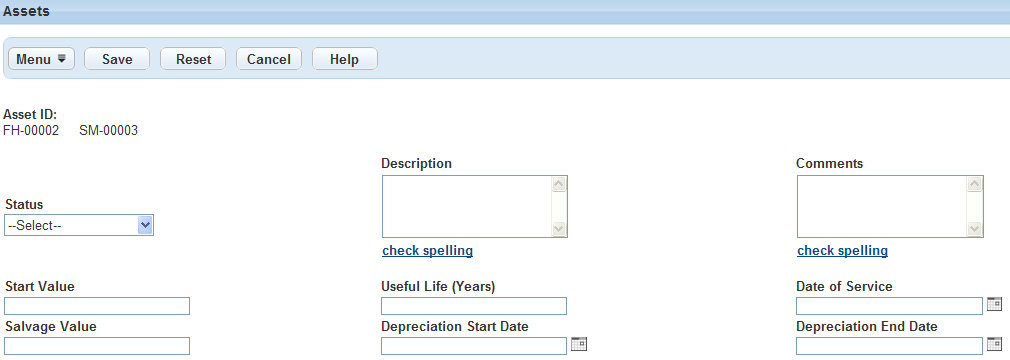
Update the fields as needed with available data.
Click Save.
Civic Platform saves your information and refreshes the asset list so that it reflects the changes.