Working with the Form Layout Tool
You can use the form layout tool in ad hoc reports to design and create forms that you can populate with Civic Platform data, resulting in customized document output.
For example, you can create an invoice form that populates with data from the database. When you run the report, Civic Platform creates a separate, customized invoice for each record included in the report.
Note:
Agencies must obtain a license key to access the form layout tool. |
Topics
Related Information
Creating a New Form
Novice and expert users alike can use the form layout tool to create letters and forms. You can create letters and forms from scratch as described below, or you can copy the html code from an existing letter or form and paste it into the form layout tool, where you can add fields (see Creating a New Form Using Existing HTML Code).
BEST PRACTICES TIP: If your letter or form does not already exist, take a few minutes to plan the letter/form contents before you begin working in the form layout tool. Identify the graphics you need, any hyperlinks you want to create, and what database fields you want to use in the form. Write a list of the database fields you want to use, so you can be confident that you are spelling the field names correctly when you insert them into your form.
Note:
Work with the Display Document Structure button |
To create a form or letter
Open the ad hoc report writer portlet (see Launching the Ad Hoc Report Writer).
Select the database source for your report
Go to the Fields tab.
Select the fields you want to use in your form.
Write down the field names exactly as they appear. You will need this information later.
Click the Design Form button.
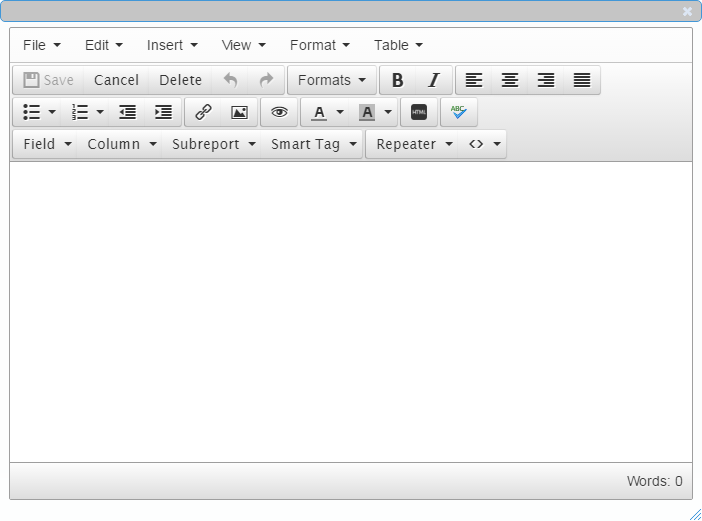
The form layout tool displays.
Enter all text content that you intend to be common to each form that runs. For example, you can enter a title to a form, or the body of a form letter. Do not format the text yet.
If you want any information or data in your form/letter to appear in columns, create a table and use the columns in the table to organize your data (see Adding a Table to a Form).
Note:You can use tables to control your form layout as well. For example, your form might be on letterhead, with a header title and your agency’s logo in the same horizontal space on your form. You can create a 2-column table without lines and put the logo in one table cell, and the header content in the other cell.
Using the list of fields you wrote down in step 4, enter each field you want to include in your form in the location where you want it to appear. Enclose each field name in square brackets. Example: [record_id]. (see Adding Fields to a Form).
Insert horizontal lines, graphics, and page breaks as needed (see Adding Graphical Elements to a Form).
Format the text as you want it to appear. For example, apply a new font style and size to your header.
Click OK when you are done.
Civic Platform closes the form layout tool and then returns you to the Fields tab.
You can proceed with report setup as described in Designing a New Report.
Creating a New Form Using Existing HTML Code
You have the ability to create new forms by copying the HTML code from an existing letter or form and pasting it into the form layout tool, where you modify the contents as needed.
Note:
Work with the Display Document Structure button |
To create a form or letter using existing HTML code
Open the ad hoc report writer portlet (see Launching the Ad Hoc Report Writer).
Select the database source for your report
Go to the Fields tab.
Select the fields you want to use in your form.
Write down the field names exactly as they appear. You will need this information later.
Locate the source document you want to copy, such as a XML or HTM file.
Double-click the file to open it in your browser.
Right-click in the page display.
A command menu displays.
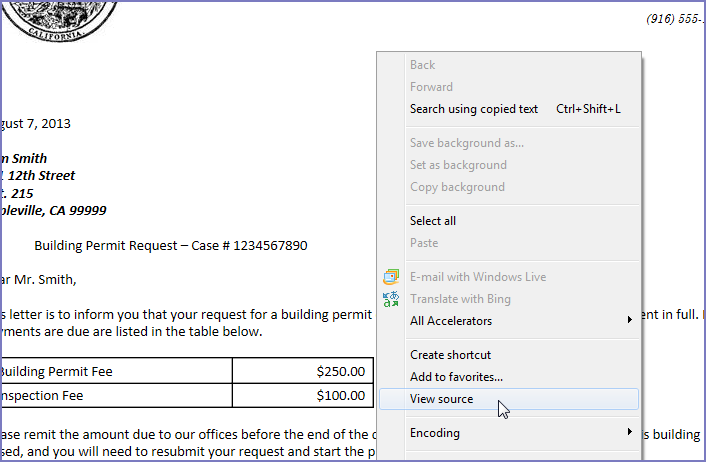
Select View Source.
The source code for the page displays.
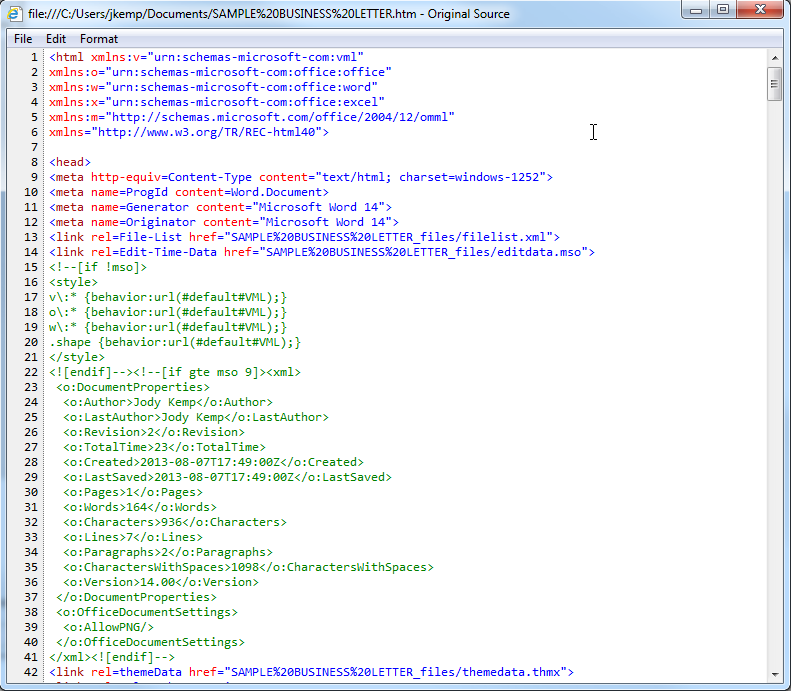
Click within the window, then press Ctrl+A to select all of the contents of the window.
Press Ctrl+C to copy the contents to the clipboard.
Navigate to the ad hoc reports form layout tool, and click Design Form.
Click the HTML Source Code button.
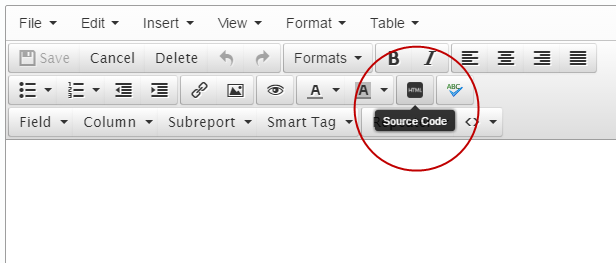
On the Source Code window, press Ctrl+V to paste the contents of your clipboard to the form layout tool.
Click Insert and Close button on the Source Code window to view the content in WYSIWYG format.
Using the list of fields you wrote down in step 4, enter each field you want to include in your form in the location where you want it to appear. Enclose each field name in square brackets. Example: [record_id] (see Adding Fields to a Form).
Insert horizontal lines, graphics, and page breaks as needed. (see Adding Graphical Elements to a Form).
Note:To have each instance of your form appear on a separate page, use the Page Break button to insert a break at the bottom of your form. For example, you have an invoice form, and you want each invoice that Civic Platform creates when you run the report to be on a separate page.
Edit the form content as needed to make it appear the way you want it.
Click OK when you are done.
Civic Platform closes the form layout tool and then returns you to the Fields tab.
For more information about designing report forms, see the Izenda Report Design Guide > Izenda Forms.
You can proceed with report setup as described in Designing a New Report.
Adding a Table to a Form
You can use tables in a form to display data in a columnar format. You can also use tables to regulate where on a page that you want form elements to appear. For example, if you want to create letterhead for a letter that includes your agency logo on the left and your agency name and address on the right, you can use a table to align these elements side by side.
You can add a table to a form in the form layout tool with the click of a button. Use the table editing buttons to modify your table as needed.
Note:
Work with the Display Document Structure button |
To add a table to a form
With the form layout tool open, position your cursor where you want to place the table.
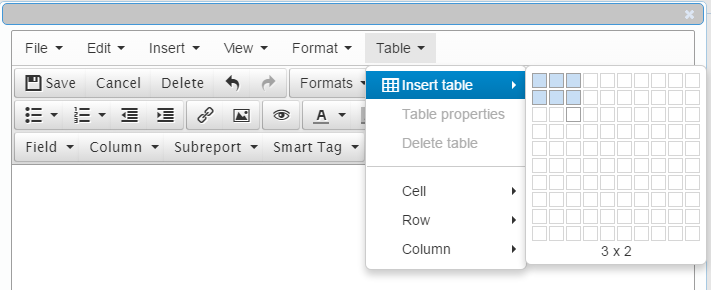
From the Table menu, select Insert table and choose the number of rows and columns.
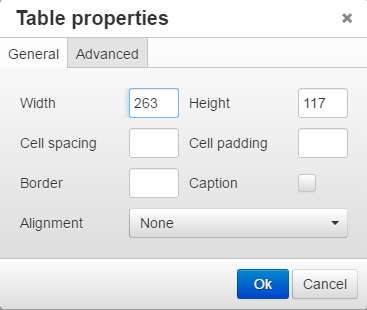
- To see the table properties, select the table on the form designer, and select Table > Table properties.
Adding Fields to a Form
You can add field markers to your form that tell Civic Platform which data elements to use in your form. When you run your report, Civic Platform replaces those field markers with data from the fields you indicated, creating custom letters and completed forms. For example, you can create a form letter and insert field markers for the contact’s name and address. When you run the report, Civic Platform populates those markers with the name and address of each record it uses in the run. Your output is a series of form letters; each letter has the form letter content, but different names and addresses.
Field markers are easy to create. Simply enter the name of the database field you want to use, enclosed in square brackets. For example, to create a marker for the record_ID field, enter [record_ID] in the form layout tool. It is good practice to write down the list of fields you want to use while you are in the Fields tab. Doing so gives you the opportunity to double check the field name spelling and syntax.
You can use tables to regulate where on a page that you want field markers to appear. For example, you can create columns and place field markers in the cells so that the data aligns when you run the report (see Adding a Table to a Form).
To add field markers
On the Fields tab for your report, select the fields you want to use in your form (see Designing a New Report).
As you select fields, write down the names of the fields. You may find that the written list is handy when you are working in the form layout tool.
Click the Design Form button.
The form layout tool displays.
Position your cursor where you want to place the field.
Enter the name of the field you want to place, enclosed in square brackets. For example, to create a marker for the record_ID field, enter [record_ID] in the form layout tool.
Apply font styles and formatting as needed.
Adding Graphical Elements to a Form
You can enhance your form’s appearance by inserting graphics, such as an agency logo, or by inserting horizontal rules (lines) as needed.
Topics
Adding a Horizontal Rule
You can add a horizontal rule (line) to your form when you want to visibly distinguish one section of your form from another.
With the form layout tool open, position your cursor where you want to insert the line.
-
From the Insert menu, select Horizontal line.
Civic Platform places the horizontal rule (line) as defined.
Inserting a Graphic
With the form layout tool open, position your cursor where you want to place the graphic.
From the Insert menu, select Insert image.
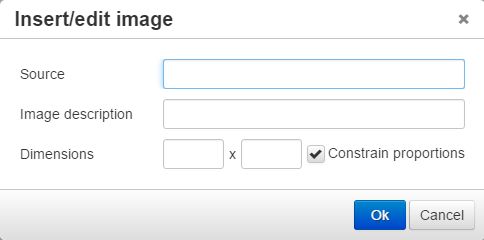
In the Source field, enter the location and name of the graphic you want to insert. You can use a URL address or a file directory address (for example, c:\graphics\agency_seal.jpg).
If you are an experienced HTML coder, you can enter HTML code in the Source code window.
Adding a Hyperlink to a Form
You can create hyperlinks in your forms as needed. When your report runs, the hyperlinks you created provide readers of the electronic report with a link to a URL you specify. For example, you can insert a hyperlink that customers can click to access your agency’s website.
To add a hyperlink to a form
With the form layout tool open, position your cursor where you want to create the hyperlink.
Enter the text that you want to use as the base for your hyperlink. For example, if you want to create a hyperlink to your agency’s website, you can enter your agency’s name.

Highlight the text that you want to use for your hyperlink.
From the Insert menu, select Insert link.
The Insert link dialog box displays.
Enter the URL and other link properties.
Use the Target field to define whether you want the linked site to display in the current window or in a new window.
Click OK.
Civic Platform displays the new link as a colorized, underlined object. When you run the report, or when you use Preview, you can test the link.
Adding an Anchor and Linking to It
You can add an anchor ("bookmark") to an object within a form, and then create a link to that bookmark from another location within your form. For example, you can insert a bookmark where your agency’s address and phone number appear in the form, and then create a hyperlink in the form body that instructs the reader to click the link to see the agency address.
To add an anchor and create a link to that anchor
With the form layout tool open and your form displayed, position your cursor where you want to insert the bookmark. This location is the destination for the link you want to create.
From the Insert menu, select Anchor. On the Anchor window, enter the name of the anchor.
Civic Platform inserts an invisible marker in the form at the location you indicated.
Go to the location in your document where you want to create the hyperlink.
Highlight the text that you want to use for your hyperlink.
From the Insert menu, select Insert link.
The Insert link dialog box displays.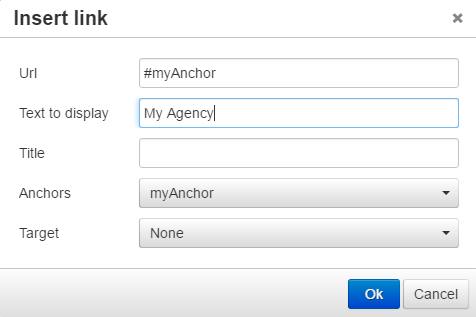
From the Anchors drop-down list, select the name of the anchor you created.
Use the Target field to define whether you want the linked site to display in the current window or in a new window.
Click OK.
Civic Platform displays the new link as a colorized, underlined object. When you run the report, or when you use Preview, you can test the link.