Working with Custom Fields Groups
Topics
Adding a Field to a Custom Fields Group
You can add any number of fields to a Custom Fields Group. The fields you add to a Custom Fields Group become available in the Custom Fields Form Layout Editor. You can also specify whether to display a newly-added field on existing records.
Once you've added the Custom Field to a group, you can add it to a form, using the Custom Fields Form Layout Editor. These are the field types that are supported in the Custom Fields Form Layout Editor:
Number Field: Lets users enter only numeric characters in a number field. A number field displays the word “number” to the right of the field.
Text Field: Lets users enter only text characters in a text field. A text field displays the word “text” to the right of the field.
Text Area: Lets users enter multiple lines of text, such as a three-line address.
Date Button: Lets users search for a date rather than entering a date manually.
Yes/No Option Buttons: Lets users select either a Yes or No value by selecting the option.
Drop-down List: Lets users choose a value from a list of predefined values determined by your agency.
Time: Lets users enter a time value.
Money: Lets users enter a dollar amount.
Check box: Lets users click a check box to select the option.
To add a field to a Custom Fields Group
Locate the Custom Fields Group to which you want to add a subgroup.
Click Add.
Civic Platform displays the Custom Fields Group Code—Add page.
Select the Group Code containing the existing subgroup you want to add.
Civic Platform displays all of the subgroups associated with the group code you selected.
In the Subgroups field, select the subgroup to which you want to add a field.
Civic Platform displays the Custom Fields page.
Click Add.
Civic Platform displays the Custom Fields Field—Add page.
Complete the fields that display. For a description of the fields, see Table 1.
Click Submit.
Editing a Field in a Custom Fields Group
After you create a Custom Fields Group, you might need to change it. You can add or delete fields, or change the field type, its display order, and its default value. However, you cannot change the group code, the group name, or the field labels when you edit the group. Changing a field label requires that you delete the field and add it again with the new label.
To edit a Custom Fields Group
Locate the Custom Fields group to which you want to add a subgroup. For instructions, see Searching for a Custom Fields Group.
Click the red dot next to the subgroup whose field you want to update.
Civic Platform displays the Custom Fields page.
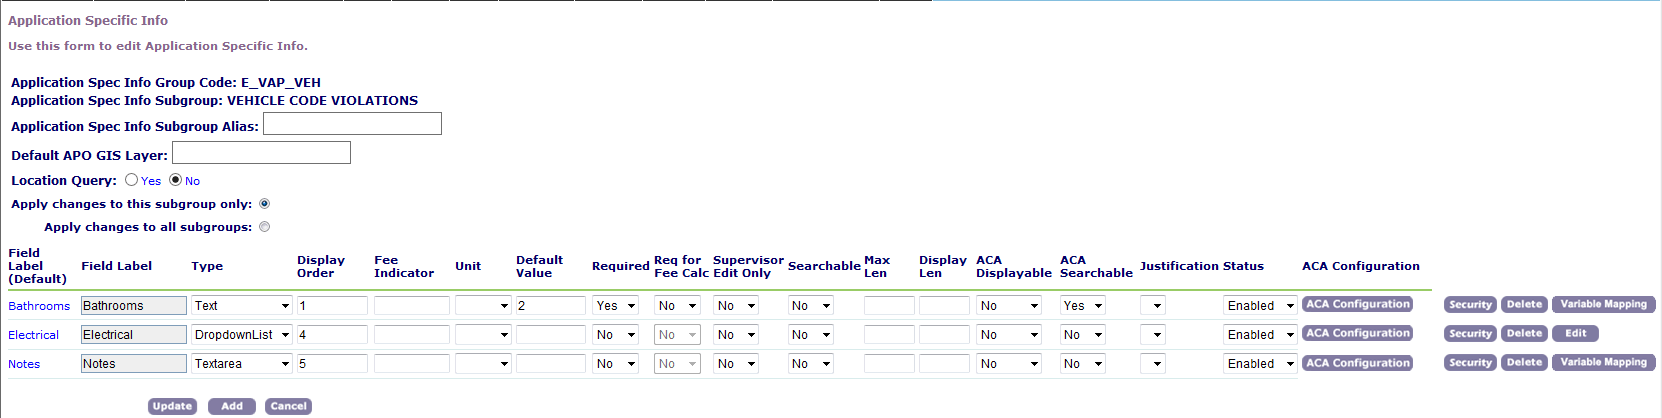
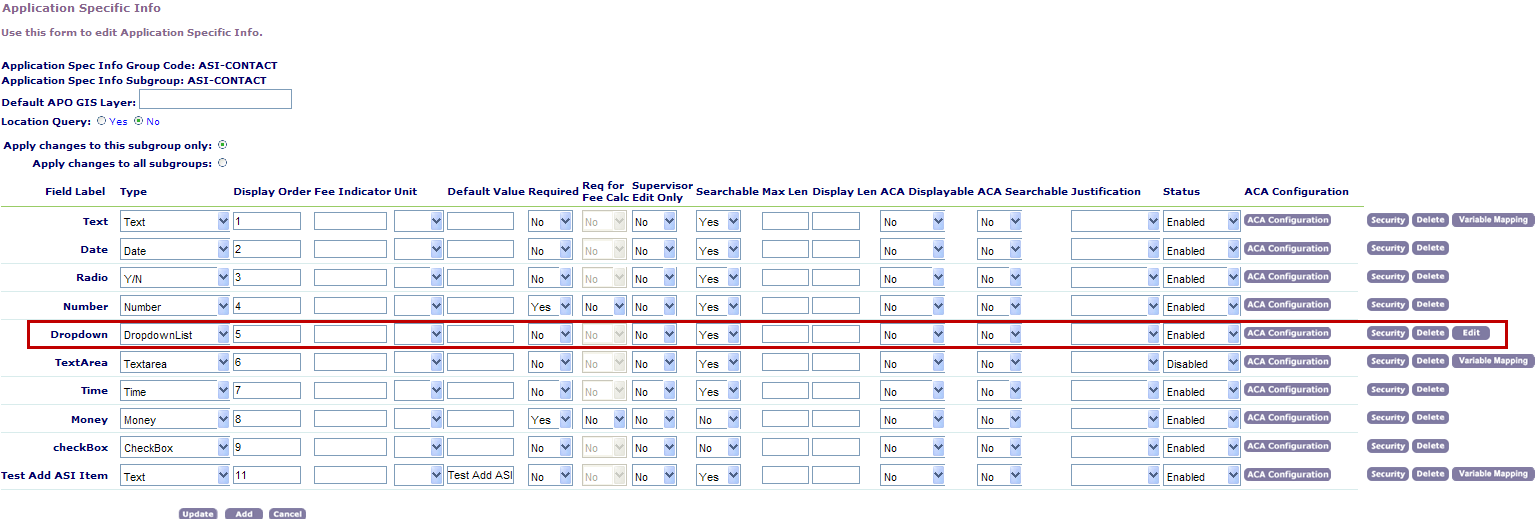
Update the information about the field you want to change. For a description of the fields, see Table 1.
Do any of the following, as appropriate for your agency's objectives:
Click the Security button next to the field to apply or update user access security permissions to it. For instructions, see Setting Permissions for Custom Fields Groups and Custom List Groups.
Click the Edit button next to the field of the Drop-down List type to define the options in the drop-down list. For instructions, see Setting or Editing Drop-Down List Field Values.
Click the Variable Mapping button next to the field of the Text or Text Area type to map the field to a session variable or a SQL-defined variable. For instructions, see Mapping a Field to a Session or SQL-Defined Variable.
Deleting a Field from a Custom Fields Group
If you no longer need a field in a Custom Fields Group, you can delete it.
To delete a field from a Custom Fields Group
Locate the Custom Fields group that you want to add a subgroup to. For instructions, see Searching for a Custom Fields Group.
Click the red dot next to the subgroup from which you want to delete a field.
Civic Platform displays the Custom Fields page.
Click Delete next to the field that you want to delete.
Click OK.
Civic Platform deletes the field.
Setting or Editing Drop-Down List Field Values
After you create a Custom Fields Group, you can add fields to the group. If you add drop-down list fields, you must then set the values that you want to include in the list. You can also specify a shared drop-down list, which already has preconfigured values. For information on how to implement shared drop-down lists, see Applying Shared Drop-down Lists.
Users can choose from field values when completing an application. For example, if you add a field to enter contact information, you can provide a drop-down list of contact types. You can also edit existing drop-down list values or delete drop-down values that you no longer use.
To edit drop-down list values
Locate the Custom Fields Group with the drop-down list whose values you need to set.
Click the red dot next to the subgroup that contains the field for which you want to set drop-down list values.
Civic Platform displays the Custom Fields page.
Click Edit next to the drop-down list you want.
Civic Platform displays the Custom Fields Drop-down List—Add page.
Choose one of the following:
To add a new value, click Add, enter the value in the Item Value field, and then click Submit.
To update an existing value, replace the value text and then click Update.
To delete a value, click Delete.
Applying Shared Drop-down Lists
After you create a Custom Fields Group, you can add a drop-down field to the group. If you add drop-down list fields, you must then set the values that you want to include in the list. You can implement a shared drop-down list, which already has preconfigured values.
For information on how to create a shared drop-down list, see Creating Shared Drop-down Lists.
To apply a shared drop-down list
Locate the Custom Fields Group to which you want to apply the shared drop-down list. For instructions, see Searching for a Custom Fields Group.
Click the red dot next to the subgroup that requires you to configure the drop-down list values.
Civic Platform displays the Custom Fields page.
Click Edit next to this drop-down list you want to modify.
Civic Platform displays the Custom Fields Drop-down List-Add page.

Select the Use Shared Drop-down Lists option.
Do one of the following:
Click Search to return all shared drop-down lists.
Enter the first letter of the drop-down list, or any other search criteria, then click Search.
Civic Platform returns the Shared Drop-down List-Browse page.
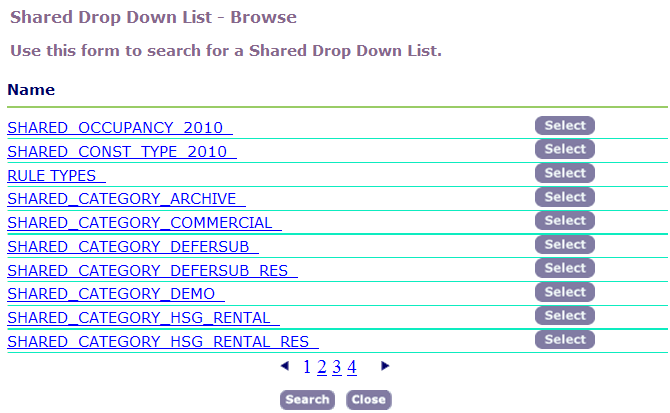
Click Select next to the drop-down list you want to apply.
Note:You can only select one shared drop-down list.
Civic Platform returns to the Custom Fields Drop-down List-Add page, and displays the Field Values from the shared drop-down list in blue.
Click Update.
Mapping a Field to a Session or SQL-Defined Variable
Administrators can map Custom Fields to a session variable or SQL-defined variable. When you use the field as a template field in a report with the Save to EDMS option set to Yes, Civic Platform can retrieve the value of the template field based on the variable mapping for the field. If Civic Platform retrieves a blank field value from session information or SQL query results, or fails to retrieve any value, an alert displays and you must enter the field value manually.
Civic Platform provides you with a set of standard out-of-the-box session variables. This set of variables include frequently used parameters from Civic Platform such as Department, Module, or Service Provider Code. For more information and a list of these session variables, see Table 1.
To map a field to a session or SQL-defined variable
Locate the Custom Fields Group that you want to work with.
Click the red dot next to the desired subgroup.
Civic Platform displays the Custom Fields page.
Click the Variable Mapping button next to the Text or Text Area field you want to modify.
Civic Platform displays the Variable Mapping page.

To map the Custom Field to a session variable, do the following:
From the Type drop-down list, select SessionVariable.
Civic Platform refreshes the Variable Mapping page to display the Value field as a drop-down list.

Select the session variable to which the Custom Field is mapped from the Value drop-down list. For a description of the session variables, see Table 1.
To map the Custom Field to an SQL variable, do the following:
From the Type drop-down list, select Variable.
Enter an SQL statement in the Value field to retrieve the field value at run time.
To remove the relationship between the Custom Field and variable, leave the Type and Value fields blank on the Variable Mapping page.
Table 1. Session Variables in Variable Mapping Variable Description ALTID Retrieves the alt(ernate) ID from a specific portlet. AssetNbr Retrieves the asset sequence number from a specific portlet. CAPID Retrieves the alt(ernate) ID from a specific portlet. CollectionID Retrieves the public user collection ID. Department Retrieves the department of the logged-in user. DocumentID Retrieves the document sequence number from a specific portlet. GAUserID Retrieves the ID of the logged-in user. InvoiceBatchNbr Retrieves the invoice batch number. InvoiceNbr Retrieves the invoice sequence number. Language Retrieves the language that the logged-in user selected. For example, en_AU (for Australian English) or en_US (for US English). Module Retrieves the module name from a specific portlet. ParcelID Retrieves the parcel number from the Parcels portlet. PortletID Retrieves the portlet ID of a specific portlet. ProviderNumber Retrieves the provider number. PublicUserID Retrieves the user login ID that a public user generates when they create an account. ServiceProviderCode Retrieves the agency code for the logged-in user. SetID Retrieves the set ID from a specific portlet. StateLicNum Retrieves the official number that identifies the business license issued by the state. Today Retrieves today’s date. The workstation's system date determines this date. TransactionID Retrieves the transaction ID. TrustAccountReceiptID Retrieves the trust account receipt number. UserFullName Retrieves the logged-in user’s full name. UserGroup Retrieves the group name of the logged-in user. UserID Retrieves the ID of the logged-in user.
Working with Custom Lists
Administrators can set up Custom Lists that enable users to add custom data with zero-to-many relationships. This enables you to store the same data for multiple items. For example, you might want to store the quantity and manufacturer for different types of fixtures, such as bathtubs, sinks, and drains. The Custom List name becomes the label that displays for the user.
A Custom List can have as many data fields with as many individual data types as you require. You can make all of the table data fields available for use during fee calculation and for Event Manager Scripting Engine (EMSE) scripts.
Topics
Creating a Custom List
Administrators can create new tables to let users add custom data to applications. Custom Field tables can have as many data fields with as many individual data types as you need.
To create a Custom List
Access the Classic Administration page (Accessing Classic Administration).
Choose .
Civic Platform displays the Custom Lists – Search window.
Click Add.
Civic Platform displays the Custom Lists Group – Add page.
Complete the fields to define the structure of the Custom List you want to create. For a description of the fields, see Table 2.
Click Submit to save the new table group.
Civic Platform displays the structure of the table you are defining.
Select whether to apply changes to this subgroup only or to all subgroups.
Make any necessary changes in the subgroup. For a description of the fields, see Table 2.
To delete a subgroup, click Delete next to the subgroup you want to delete.
Note: Deleting all subgroups from a Custom List group also deletes the table group.To add an existing subgroup, complete these steps:
Click Add.
Civic Platform displays the Custom List Group Code—Add pop up.
Select whether to apply changes to this subgroup only or to all subgroups.
Complete the necessary fields. For a description of the fields, see Table 2.
Click Submit.
Click Update.
Editing a Custom List
Administrators can edit Custom Lists. You can change the display order, add instructional text, and add or delete subgroups.
To edit a Custom List
Access the Classic Administration page (Accessing Classic Administration).
Choose .
Civic Platform displays the Custom Lists—Search window.
Enter relevant search criteria in the Group Code and Subgroup fields and click Submit. To browse all tables, click Submit without entering any search criteria.
Click the red dot beside the Custom List that you want to edit.
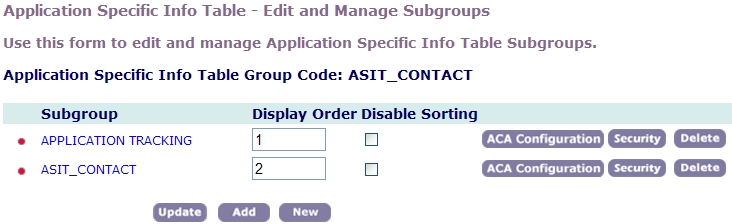
Civic Platform displays the Custom Lists—Edit and Manage Subgroups window.
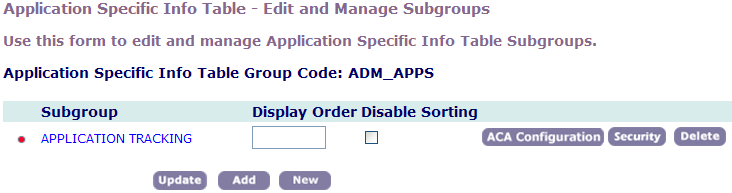
To change an existing subgroup’s display order, enter the number to determine the position in the Display Order field and click Update.
To allow users to sort Custom List fields, clear the Disable Sorting check box. To prevent users from using the column sort, select the Disable Sorting option.
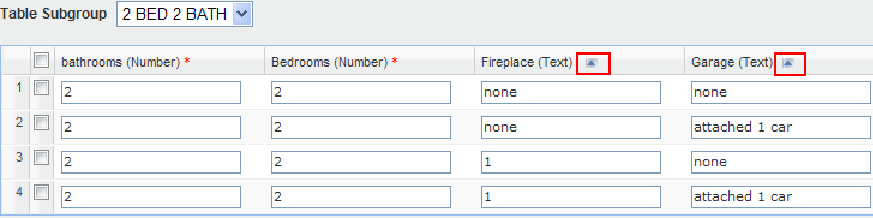
If you clear Disable Sorting, a sort control arrow displays on the heading of each Custom List column in all applicable locations in Civic Platform. Users can sort a column in the Custom List in ascending or descending order.
To add instructional text for a group, click ACA Configuration, enter instructional text into the Instructions text field, and then click Save.
To delete a subgroup, click Delete next to the subgroup you want to delete.
Note:Deleting all subgroups from a Custom List group also deletes the table group.
To add an existing subgroup from another table to the current table:
Click Add.
From the Group Code drop-down list, choose the group code that contains the subgroup you want to add.
In the Subgroups field, click the subgroup you want to add.
Click Add.
To create a new subgroup:
Click New.
Edit the fields as necessary. For a description of the fields, see Table 2.
Click Submit.
To edit an existing subgroup in the table:
Click the red dot beside the table subgroup you want to edit.
Civic Platform displays the subgroup edit page.
Edit the fields as necessary. For a description of the fields, see Table 2.
Click Update.
Table 2. Custom List Group Fields Custom Lists Group Enter a unique code to identify the Custom List group that you are creating. If you are creating a subgroup for an existing group code, Civic Platform automatically populates this field with the group code that you are working with. Custom Lists Group Subgroup Enter the name of the subgroup you are creating. Custom Lists Group Subgroup Alias Enter the Custom List subgroup alias. The alias replaces the Custom List subgroup name in all areas where it displays to users in Civic Platform, Citizen Access, and Mobile Office. Column Name Enter the name of the first column for this table group. Default Value Enter a default value for the first field in your Custom List group. Note:If you are setting up a drop-down list, you can add values to the drop-down list so that a user can choose from multiple values. For instructions, see Setting or Editing Drop-Down List Field Values.
Display Len Specify the maximum number of characters that Civic Platform displays. Display new Custom Fields on existing Records Select Yes to apply the new Custom Field to existing applications. Select No to apply the new Custom Field to new applications only. If you cannot see the option, you must configure the related Standard Choice.
Refer to the Civic Platform Configuration Reference for additional information.Display new Custom List on existing Education/Examination/Continuing Education Choose Yes to make the new user-defined field, list, or sub-group of user-defined fields available to existing education, examination and/or continuing education records in addition to being available for new records. Choose No to apply the new user-defined objects to new records only. Display Order Enter a number to determine the position of the first field in your Custom List group. For example, to display the field before any other fields, enter 1. Group Display Order Enter a number to determine the position of this list on the Custom Lists section of an application in Daily Activities. For example, if you want this information group to display in the second position, enter 2. Req for Fee Calc To require users to complete the Fee Calculation fields, choose Yes. Fields required for Fee Calculation display a visual indicator ($) on the permit application form. You can configure this feature using the Function Identification 0242 Required for Fee Calculation.
Required Flag To require users to enter a value in this field, select the Yes option. Searchable To make this Custom List searchable within Civic Platform, select the Yes option. Status To let users see this field in Civic Platform, click Enabled; otherwise, click Disabled. Supervisor Edit Only Select Yes to make this information read-only to non-supervisor users after a user creates an application. For further information about this field, please see Limiting Custom Field and Custom List Editing Rights to Supervisors Only. Type Choose the type of the first field in your Custom Lists group. For more information on field types, see Table 2.
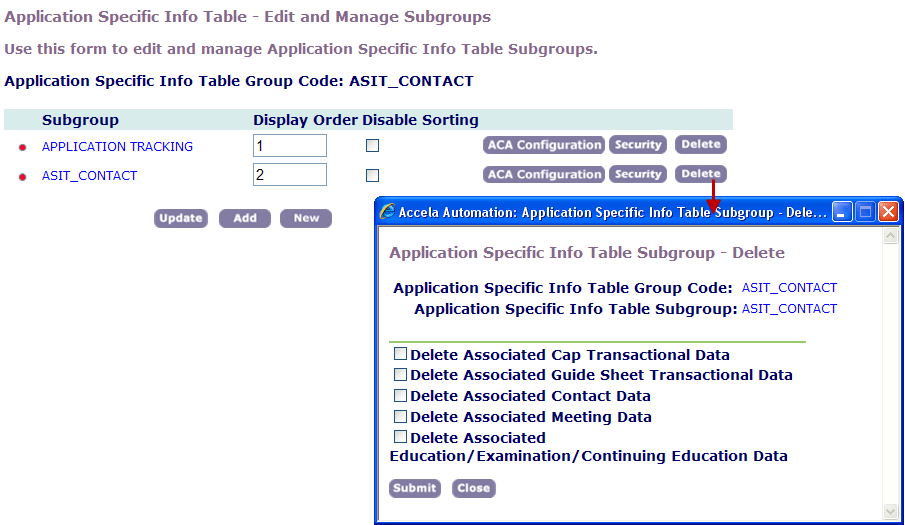
Deleting Custom List Subgroups and Columns
Civic Platform has an option to delete Custom Field data and Custom List columns from all reference and transactional records. You can do this to restrict Custom Fields subgroups to only display in a historical record, new records, or both. You can also completely remove Custom List columns from historical transactional data, instead of just disabling the column.
If you delete the Custom List subgroup, Civic Platform deletes the information from all Custom Lists related to the subgroup. If you delete the column within a Custom List, you remove the column information, but the rest of the information in the Custom List continues to display. When you delete either a column or subgroup, it removes the related data from Custom List reference data, Custom List transactional data, Custom List drill downs, and Custom Fields security data. Expression records related to the deleted Custom List column or subgroup remain intact. The V360 user experience pages affected are the Custom List tab, the Record Summary tab, the new record in the Building portlet, and the Checklist tab in the Inspections portlet.
Note:
The delete function is permanent. You cannot retrieve deleted subgroups. |
You have several options when you delete a Custom List column or subgroup. You can combine any of these options to determine the desired result. The first option is to apply the changes to only the selected subgroup or to all subgroups. The second is to remove the Custom List column or subgroup from the reference and associated Checklist transactional records. The third option enables you to hide the Custom List columns and subgroups for future records, but leave them visible in historical records.
To delete Custom List columns and subgroups
Access the Classic Administration page (Accessing Classic Administration).
Choose .
Civic Platform displays the Custom Lists - Search page.
Enter relevant search criteria in the Group Code and Subgroup fields and click Submit. To browse all tables, Click Submit without entering any search criteria.
Click the red dot beside the Custom List that you want to edit.
Civic Platform displays the Custom Lists — Edit and Manage Subgroups window.
To delete the entire subgroup, click Delete.
Civic Platform displays the Custom Lists Subgroup - Delete page.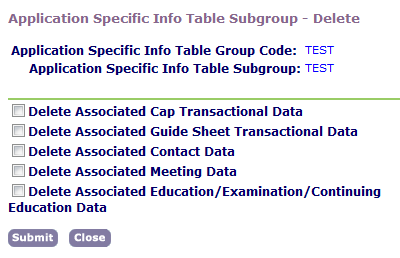
Select the associated data you also want to delete.
Click Submit.
Civic Platform deletes the subgroup, along with any associated data that you selected for deletion.
To delete a column within the Custom List subgroup, click the red dot next to the subgroup, then click Delete next to the column you want to delete.
Civic Platform displays the Custom Lists Column - Delete page.
Do one of the following:
If you are deleting a Custom List column, select either Apply changes to this subgroup only or Apply changes to all subgroups. If you select Apply changes to this subgroup only, Civic Platform only removes the column from the current subgroup. If you select Apply changes to all subgroups, Civic Platform removes the column from all of the subgroups in which the Custom List displays.
To hide the column and subgroup for future records, but leave them visible in historical records, click Submit without selecting any options.
Civic Platform closes the page and hides the column or subgroup from new records.
Configuring Custom Field and List Drill-downs
You must configure Civic Platform to display Custom Field and Custom List drill-downs for Civic Platform users. The configuration steps include:
Setting three FIDs
Defining the Custom Field information in Classic Administration
Creating or editing shared drop-down lists
Creating or editing Custom List drill down records.
You can associate a Custom Fields Group with a Custom Field or Custom List in your application. To specify the application to apply the field or list to, you must associate the Custom Fields group or Custom List group with the record type. The shared drop-down lists contain the values for the Custom Field or Custom List drill-downs.
Note:
As soon as you associate the Custom Fields Group with a Custom List drill-down, the drill-down displays on the application, even if you have not assigned values to the drill down record. You can set the Custom Field or Custom List drill-down record as “inactive” until it is ready for the application. |
Custom List drill-downs allow users to search for the value of a column with a drill-down approach. This drill down displays in the application. The drill-down functionality guides the user through a series of drop-down fields that present unique data choices based on previously-selected data fields. When you complete all the selections, Civic Platform displays a field or list drill-down table with the value results in the application. You can apply drill-down fields to multiple Custom Fields Groups. For example, you can apply a list of business license types to both business and professional licenses.
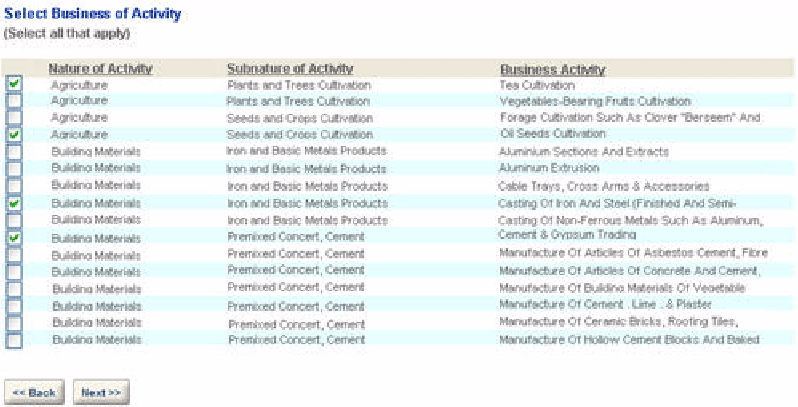
For example, you can prepare a list for multiple business license types. You can specify the first option, such as Agriculture, and then assign subgroups, such as Plants and Trees Cultivation, and Seeds and Crops Cultivation. You can then create additional groups for each of the subgroups which narrows the license options available. After you assign the groups and subgroups, the options display as Custom Lists in the public user view.
Figure 1 shows a sample completed Custom List table drill-down.
Figure: Custom List Table Drill-Down – User View
Custom Fields and Custom Lists drill-downs are available to both Civic Platform and Citizen Access users. For information about the additional steps required to configure Custom Lists drill-downs for Citizen Access applications, see “Configuring ASI Table Drill-Downs” in the Citizen Access Administrator Guide.
To configure Custom Fields and Custom Lists drill-down display
Create or edit the Custom Fields group and subgroup and the Custom Lists group and subgroup.
On the Intake Form Configuration Group (Classic Administration > Application > Intake Form Configuration), select Yes on the Custom Fields and Custom Lists options.
For further details on Intake Form Configuration Groups, see Working with Intake Form Configuration Groups.
Create or edit the shared drop-down lists with the values needed for the drill-down.
For details on completing this task, see Creating Shared Drop-down Lists.
Create or edit the Custom Field or Custom List drill-down record.
For details on completing this task, see Creating Custom Fields Drill-Downs.
Limiting Custom Field and Custom List Editing Rights to Supervisors Only
Administrators can set Custom Fields and Custom Lists to read-only for non-supervisor roles after an application is submitted. This means that any user other than a supervisor can only view, not edit, the information. Non-supervisor users can enter or change the information during application creation, but you can designate individual fields to allow only supervisors to update those data elements after a user saves the application. The supervisor edit only designation can also apply to individual subgroup fields in Custom Lists. For example, an intake clerk user can create and complete all fields for an application, but after the application is submitted, the clerk who is a non-supervisor user can read but not edit those fields.
To limit editing rights to Supervisor Edit Only
Access the Classic Administration page (Accessing Classic Administration).
Go to Application > Custom Fields or Custom Lists.
Civic Platform displays the search page.

Enter relevant search criteria in the Group Code and Subgroup fields and click Submit. To browse, click Submit without entering any search criteria.
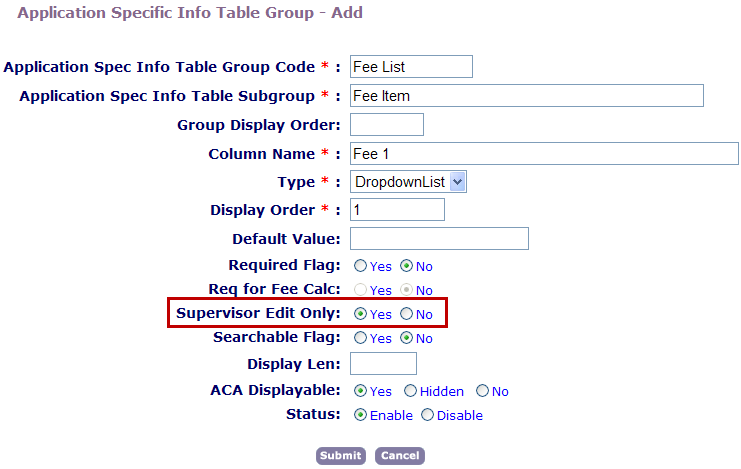
When you create or edit the Custom Fields or Custom Lists group, set the Supervisor Edit Only field to Yes and Click Submit.
Configuring the Record Detail Audit Log
Civic Platform provides an audit log that contains modification details for each record. Audit logs enable you to track all activity that occurs on a record, including changes to Custom Fields and Custom List data. You can define an audit log for these activities within each application record.
When a user creates a record, the log records the first entry of each field. When a user makes a change to any of the record details including Custom Field and Custom List values, the log records the change. The log records the action performed such as added, updated, or deleted. The log also records the Custom Field and Custom List subgroup, the field, the updated value, the date, the current user and the product. For example, if an agency user needs to determine who changed custom data, such as the income value for a specific record, and when they changed it, they can access the record audit log to view the changes.
Note:
The audit log does not record activity on a partial record. A partial record can have many details in the application, but it is never complete until a user submits it. After it is complete and you submit the record, the record detail audit log records the activity. |