Managing Alerts
Topics
Creating an Alert
Privileged users can create alerts to notify groups at your agency of all kinds of events. After you create an alert it displays in the Alerts portlet, where you can edit, delete, and manage its recipients.
To create an alert
- Go to
Civic Platform displays the Alert window.
- Click New.
Civic Platform displays a Message Type drop-down field in the record tab.
Select one of the following options from the Message Type drop-down field:
If you want to send the alert as an email message, choose Email.
If you want to post the alert message to the Alert portlet, choose Alert Message.
Click Submit.
Civic Platform refreshes the form with fields appropriate for the message type.

Complete any of the fields that display.
For a list of field descriptions, see Table 1.
Click Submit.
Civic Platform displays a confirmation message and enables the Recipient and Rules tabs.
Choose the alert recipients.
See Managing Alert Recipients.
If you want to apply an alert rule to govern the time frame for sending an alert, see Applying an Alert Rule to an Alert.
Table 1. Alert Detail Content Enter the text of the alert message. In addition to the standard text, you can also enter parameters for variables. Click the selection icon to select a parameter from a list. See Filtering the Display of Data for a complete list of variable parameters. For additional variables that pertain directly to Accela Civic Platform - Asset, see Table 2.
Duration Enter how long the alert message should remain in the Alert portlet. External Recipients If you are sending the alert to people outside of your agency, select the kind of external recipient from the drop-down. For example, Contacts. Message Type Indicates whether the alert is in the form of an email or as an alert message in the Alert portlet. After you create an alert message, you cannot change the message type. Status Use the drop-down field to enable or disable the alert. The alert duration does not begin, nor does the alert display, until you enable the alert. Unit Select the units for the quantity in the Duration field (Days, Hours, Minutes, or Seconds). Table 2. Asset Management Alert Message Variables Variable Name Description $$altID$$ Alt ID The asset’s alternate ID. $$wotemplate$$ Work Order Template Template used to create the asset’s associated work order. $$scheduledate$$ Schedule Date Scheduled asset condition assessment date. $$estprodunits$$ Est. Prod Units Estimated production units for a work order. $$actualprodunits$$ Actual Production Units Actual production units for a work order. $$estcostperunit$$ Est. Cost Per Unit The estimated cost per production unit for a work order. System administrators define this value at the Application Type level. $$costperunit$$ Cost Per Unit The cost per unit of production for a work order. $$estjobcost$$ Est. Job Cost Estimated total cost for the work order. This value is the product of the Cost Per Unit and the Est. Prod. Unit values. $$totaljobcost$$ Total Job Cost Total cost of the job, defined by a work order. $$assetgroup$$ Asset Group Name of an asset group. $$assettype$$ Asset Type Name of an asset type. $$assetID$$ Asset ID Asset identification name or number. $$assetstatus$$ Asset Status Status of an asset, whether Active or Expired. $$classtype$$ Asset Class Type Name of an asset class type. $$dateofservice$$ Date of Service Date of an asset's activation or when you placed it into service. $$usefullife$$ Useful Life Number of years you expect to use an asset. $$assetrecordstatus$$ Asset Record Status Status of the asset record, whether Active or Inactive. $$assetdesc$$ Asset Description Description of an asset. $$currentvalue$$ Current Value An asset’s current value. $$depreciationvalue$$ Depreciation Value Dollar amount of an asset’s value after depreciation. $$depreciationamount$$ Depreciation Amount Dollar amount of an asset’s depreciation. $$assetstreetnumberstart$$ Street # (start) Initial street number of a street number range. $$assetstreetnumberend$$ Street # (end) Final street number of a street number range. $$assetstreetprefix$$ Prefix Any part of an address that comes before the street name or number, such as North Windsor Dr. $$assetunitnumberstart$$ Unit # (start) Initial unit number, for example apartment number, of a unit number range. $$assetunitnumberend$$ Unit # (end) Final unit number, for example apartment number, of a unit number range. $$assetunittype$$ Unit Type Type of unit, for example, apartment or condominium. $$assetstreetdirection$$ Direction Street direction that precedes the street name, for example West Broadway. $$assetstreetname$$ Street Name Street name of an asset’s address. $$assetstreettype$$ Street Type Suffix used for a street, for example Lane or Boulevard. $$assetstreetsuffix$$ Street Suffix (direction) Street direction that follows the street name, for example 600 Maple South. $$assetcity$$ City City in which an asset resides. $$assetstate$$ State State in which an asset resides. $$assetczip$$ Zip ZIP code for an asset’s mailing address.
Editing an Alert
This section describes how to edit an alert.
To edit an alert
- Go to
Civic Platform displays the Alert window.
Click the link to the alert you want to edit.
Civic Platform displays the alert details.
Edit information in the displayed fields.
For a list of field descriptions, see Table 1.
Click Submit to save your changes.
Civic Platform displays a confirmation message, and updates the alert list.
Make any changes to the alert recipients, as needed. See Managing Alert Recipients.
Make any changes to the alert rule that governs the alert, as needed. See Applying an Alert Rule to an Alert.
Deleting an Alert
Make sure the alert you select is the one you want to delete. If you delete the wrong alert, you must recreate it.
To delete an alert
Access the Setup portlet (Navigating to the Setup).
Choose Communication Manager > Alert.
Select the alert you want to delete.
Click Delete.
Civic Platform displays a confirmation message.
Managing Alert Recipients
After you create an alert message, you can determine who should receive it. You can send an alert to your entire agency or select certain departments, user groups, and even individual users within your agency.
If you no longer need a recipient to receive the alert, you can remove the recipient from the list. Removing a recipient from this list does not delete the recipient from your system.
For more information on managing alert recipients, see Setting Up Security Policies.
Creating a Time Variable Alert
Use time variables in alerts to notify specific users when, for example, a user creates a service order and a specific amount of time elapses before they assign the service order to a user.
You can use the following time variables in alerts:
$$Today$$
$$Today+N$$
$$Today-N$$
To configure an alert with a time variable
Navigate to V360 Administration > Communication Manager > Alert Rule.
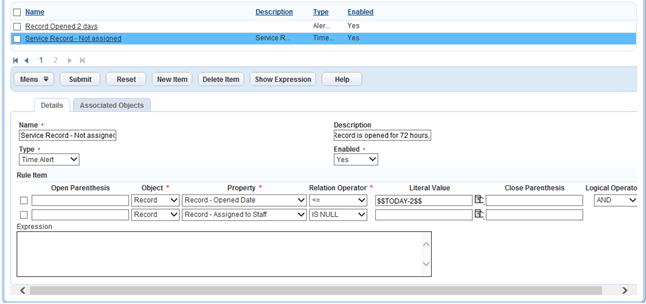
Create a new alert rule with the following parameters:
Type: Alert Message
Rule Items: Record - Open Date <= $$TODAY-2$$ AND Record - Assigned to Staff is null
Enabled: Yes
Click Submit.
Go to Communication Manager > Alert.
Create a new alert with message type AlertMessage.
Specify the content, duration, and status (enabled).

Click Submit.
Open the alert.
On the Recipient tab, click Assign User to specify the user you want to notify.
On the Alert Rule tab, click Look Up to specify the alert rule you created in .
To validate that the alert is working
Create or modify a test record with an opened date more than 2 days in the past (for example, 10/21/2013) and a scheduled date after the opened date (for example, 10/30/2013).
Click the Alerts link at the top of the console in Civic Platform to validate that the alert triggers successfully:
