Working with Intake Form Configuration Groups
This section describes how to create and define an Intake Form Configuration Group, with instructions for each section of the Intake Form Configuration Group, and how to include or exclude the field groups on certain types of applications.
For instructions on applying an Intake Form Configuration Group to an application type, follow the steps in Configuring Other Associations.
Topics
Adding an Intake Form Configuration Group
An Intake Form Configuration Group enables you to specify parameters and settings for the fields on an intake form. For example, you can display or hide fields, choose whether those fields are mandatory or optional, specify where the fields display on the form, and so forth.
Intake Form Configuration Group Settings
You can set the following parameters for fields on intake forms:
Display: Do you want the field to display on the form?
Required: Is the field required or optional?
Validate: Do you want to give users the ability to validate their entry against your database?
Default Values: Do you want to display default values that tell users what information you expect them to enter? (This only applies to Contact sections)
Display Button: Where do you want the field to display on the intake form?
Display Order: Where do you want the field to display on the intake form?
depending on the field type (for example, Default Values are only available for certain fields):
To add an Intake Form Configuration Group
Access the Classic Administration page (Accessing Classic Administration).
In the Application area, click Intake Form Configuration Group.
Click Add.
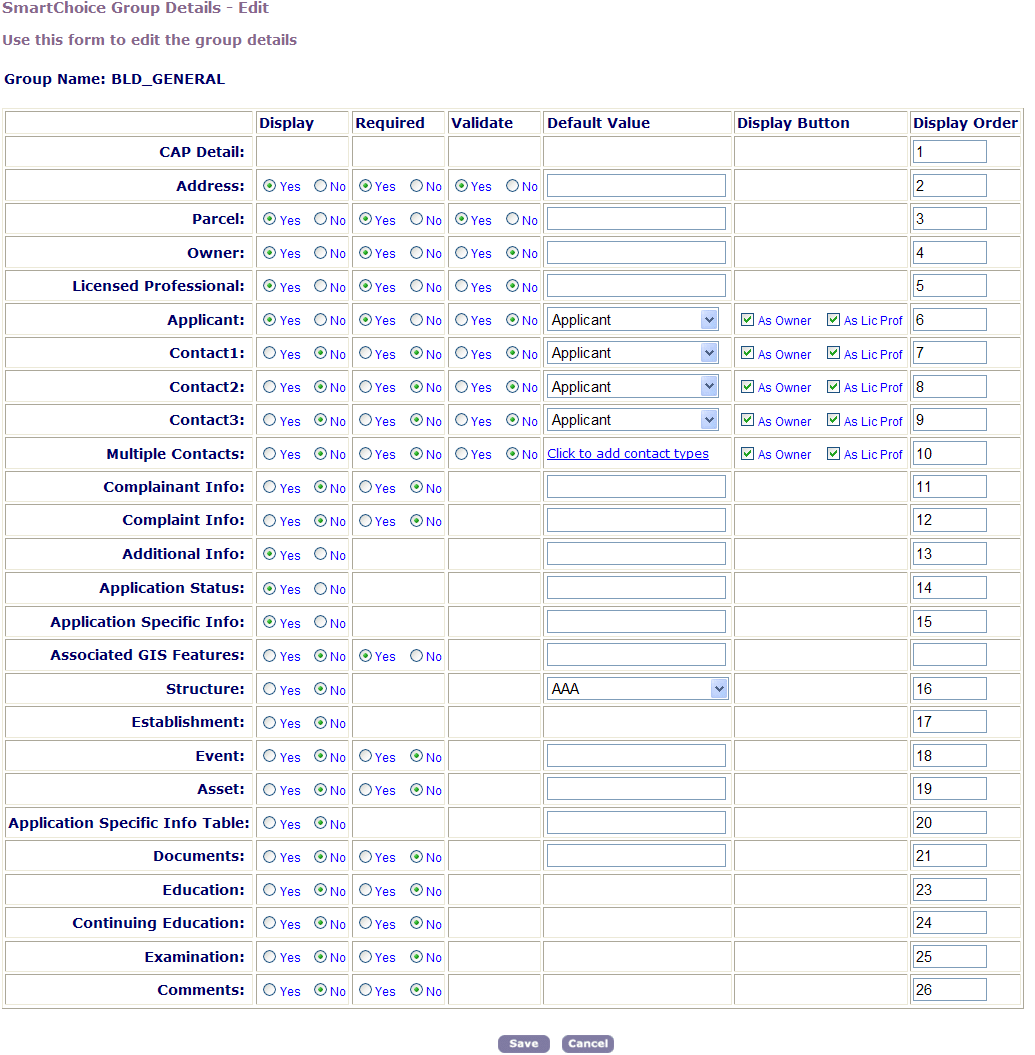
Civic Platform displays the Intake Form Configuration Group - Add page, illustrated in the sample screen below. The first column lists the intake form fields and its sections, starting with Record Detail; see Table 2 for a complete list. The columns that display horizontally across the top of the page contain the parameters you can set for each row listed in the first column.
Enter a name for your new Intake Form Configuration Group.
For each row in the first column, specify the parameter settings for the columns that display horizontally across the top of the page. For complete details of these settings, see Table 1.

| Display | Click Yes to display the field on the intake
form. Click No to hide the field on the intake form. |
| Required | Click Yes to require the user to complete this field. If you click Yes, users cannot submit the form unless the form contains the required information. Click No to make this field optional. If you click No, users can submit the form without entering a value in this field. |
| Validate | Click Yes to enable a Validate button on the
form. If a section requires validation, users can only search and
add information from the reference database into the section. The reference
database can be the local Civic Platform database, an external
data source that holds address, parcel, owner data, or data from
‘PERMITS’ Plus, Kiva, or GIS. If you click Yes at the Validate and Required options of the Applicant or Contact section, all the other sections and the fields in the intake form are inactive until users validate the section. If a contact list requires validation, you only need to validate the primary contact in the list. Click No to disable validation. If a section does not require validation, users can enter new information or modify the information that they select from the reference database. |
| Default Value | Specify a default value from the drop-down list to indicate the information you
expect the user to enter in the field. For example, if users
generally enter billing information in this form, you can set the
default value for a contact field to “billing contact,” so that a
user who is completing the form sees “Billing Contact” in the field.
For the Multiple Contact fields, click the “Click to add contact types” link and add the default contact types and the minimum number of contacts a user must enter. When you set default values to “required,” users must enter the information on the form before Civic Platform allows them to submit the form. |
| Display Button | Check the As Owner option
to display the As Owner button in this section on the form. To hide
this button, clear the check box. Check the As Lic Pro option to display the As Lic. Pro button in this section on the form. To hide this button, clear the check box. Note:
In Civic Platform 7.1.0 or earlier versions, the display of the As Owner and As Lic. Pro buttons on the Applicant and Contact sections was controlled by FID 8235-Search Owner and FID 0008 Reference Licensed Professionals. Upgrading Civic Platform to Version 7.2.0 automatically migrates the display settings of the As Owner and As Lic. Pro buttons to Intake Form Configuration Group configuration. |
| Display Order | Enter a Display Order number that represents the field’s position on the form. For example, to display the Record Detail first on the form, enter 1. |
| Record Detail | The Record Detail section of a form displays the details of the record. The only parameter that you can set for this section is the Display Order. |
| Address | The address section of an intake form lets
users enter the address of the primary parcel, including a range
of street and unit numbers. If you set the Display and Required parameters in this section to Yes, Civic Platform validates whether a user adds information to the Addresses section on the Location tab upon the submittal of a new record. |
| Parcel | The parcel section of an intake form lets users
enter information about the parcel. The County Assessor’s Parcel Number
(APN) determines the parcel information. If you set the Display and Required parameters in this section to Yes, Civic Platform validates whether a user adds parcel information to the Parcels tab upon the submittal of a new record. |
| Owner | The owner section of an intake form lets users
enter information about the individual or institution that owns
the parcel, property, or structure. If you set the Display and Required parameters in this section to Yes, Civic Platform validates whether a user adds owner information to the People tab upon the submittal of a new record. |
| Licensed Professional | The licensed professional section lets users
enter contractor, architect, engineer, or developer (CAED) information.
The state usually provides this information, including the license number
and license type. If you set the Display, Required, and Validate parameters in this section to Yes, Civic Platform validates whether a user adds licensed professional information to the People tab upon the submittal of a new record. |
| Applicant | The applicant section lets users enter information
about the individual or institution who submits the form. If you
set the Validate and Required parameters in this section to Yes,
the Validate button displays in this section. All other sections
of the form are inactive, and the user must complete the Applicant
section and click the Validate button to activate the other sections. You
cannot activate this section if you activated the Multiple Contacts
section. If you set the Display, Required, and Validate parameters in this section to Yes, Civic Platform validates whether a user adds applicant information to the People tab upon the submittal of a new record. If you specify a default value for this section, Civic Platform also validates whether a user adds the required type of applicant. |
| Contact 1 Contact 2 Contact 3 |
Up to three Contact sections on a form let users enter information about billing,
legal, and any additional contacts. If you set the Validate and Required parameters in any Contact section to Yes, the Validate button displays in the section. All other sections of the form are inactive, and the user must complete any Contact sections and click the Validate button to activate the rest of the form. If you set the Display, Required, and Validate parameters in this section to Yes, Civic Platform validates whether a user adds contact information to the People tab upon the submittal of a new record. If you specify a default value for this section, Civic Platform also validates whether a user adds the required type of contact.NOTE: You cannot activate this section if you activate the Multiple Contacts section. |
| Multiple Contacts | Set the Display option to Yes to display multiple contacts as a list and to allow
users to add more than three contacts. From the list of contacts,
users can set a primary contact and can search for, add, and delete
contacts. When you activate the Multiple Contacts section, you cannot activate the Applicant and Contact 1, Contact 2, and Contact 3 sections. If you set the Validate and Required parameters in this section to Yes, the Validate button displays in this section. All other sections of the form are inactive, and the user must complete the section and click the Validate button to activate the other sections. If you set the Required parameter to Yes and Validate to No, Civic Platform only enforces the Required parameter. Note:
If you set the Display, Required, and Validate parameters in
this section to Yes, Civic Platform validates whether a user adds
contact information to the People tab upon the submittal of a new
record. If you specify a default value for this section, Civic Platform also validates whether the user added the required type
of contact.Multiple Contacts require the intake form available in Civic Platform 6.5. To get this form contact Accela Customer Support and request the Civic Platform 6.5.0 Migration Document for application intake form consolidation (07ACC-03396) to migrate to the new intake form. |
| Complainant Information | The complainant section lets users enter information
to identify an individual or institution who registers a complaint.
Only include this section for intake forms that you use in the code
enforcement module. NOTE: The complaint and complainant sections of an Intake Form Configuration Group only work with Classic Administration - Daily User. They do not work in V360. Best practice is to configure Complaint and Complainant fields in Application Specific Information or Application Specific Information Tables for the enforcement record types. |
| Complaint Information | The complaint section lets users enter a description of a complaint, including
the reported address. Only include this section for intake forms
that you use in the code enforcement module. NOTE: The complaint and complainant sections of an Intake Form Configuration Group only work with Classic Administration - Daily User. They do not work in V360. Best practice is to configure Complaint and Complainant fields in Application Specific Information or Application Specific Information Tables for the enforcement record types. |
| Additional Information | The additional information section lets users enter information that the U.S. Census Bureau requires in a C404 report. This report, also known as the “Report of Privately-owned Residential Building or Zoning Permits Issued,” surveys new residential units, additions, and alterations. |
| Application Status | Click Yes to display the Application Status. Civic Platform displays the Application Status based on the Application Status Group assigned to the Application Type. Click No to hide the Application Status. |
| Application‑Specific Information | The application-specific information section enables you to enter custom information specific to your agency. |
| Associated GIS Features | For information about GIS, refer to the Accela Civic Platform GIS Administrator
Guide. If you set the Display and Required parameters in this section to Yes, Civic Platform validates whether a user adds GIS features to the Map Objects section on the Location tab upon the submittal of a new record. |
| Structure | The structure section lets users enter information about any structures under construction. For example, “Twin Pines Mall.” |
| Establishment | An establishment is a business or residence that occupies space in a structure. For example, users can enter information about a store in a mall. |
| Event | The event section lets users access an existing calendar and schedule an event related to the intake form. |
| Asset | Click Yes to display the Asset Section in a
new permit intake form. Click No to hide the Asset Section in a new permit intake form. If you set the Display and Required parameters in this section to Yes, Civic Platform validates whether a user adds asset information to the Assets tab upon the submittal of a new record. |
| Application- Specific Info Table | Click Yes to display the Custom Lists section
in a new permit intake form. Click No to hide the Custom Lists section in a new permit intake form. |
| Documents | The documents section lets users attach documents, such as building plans or an
insurance bond, to a permit application. The value you enter in the
Default Value field indicates the number of documents users can
attach. You can configure the maximum number of documents or set a
fixed number of documents in the Default Value field. If you set the
Default Value to null, there is no limit to the number of documents
you can allow users to add to a permit application. To set a maximum number of documents, enter “<=#” in the Default Value field. For example, if you want to set the maximum number of documents at 10, enter <=10. You can also set a maximum number of documents by entering <# For example, if you want to set the maximum number of documents at 10 or fewer, enter <11. To set a fixed number of documents, enter “=#” in the Default Value field. For example, if the fixed number of documents is 5, enter =5. If you set the Display and Required parameters in this section to Yes, Civic Platform validates whether a user adds a document to the Attachments tab upon the submittal of a new record. |
| Education | This section lets users enter the Education credentials of a licenced professional. |
| Continuing Education | This section lets users enter the Continuing Education credentials for a licenced professional. |
| Examination | This section lets users enter the Examination details of a licenced professional. |
| Comments | This section lets users enter any additional description or details about the application. |
Searching for an Intake Form Configuration Group
To edit an existing Intake Form Configuration Group, you first need to find the group in your system. To see a list of all Intake Form Configuration Groups, click Submit without entering the details about an individual group.
To search for an Intake Form Configuration Group
Access the Classic Administration page (Accessing Classic Administration).
Choose Application > Intake Form Configuration Group.
Enter the name of the group that you want to find in the Group Name field.
Click Submit.
Civic Platform displays the Intake Form Configuration Group browse page.
Click the red dot that appears next to the group that you want.
Editing an Intake Form Configuration Group
After you set up an Intake Form Configuration Group, you might need to change certain details about it. You can change the standard sections that you want to display in a group, as well as change the required and validation status of each section.
You cannot change the group name.
To edit an Intake Form Configuration Group
Access the Classic Administration page (Accessing Classic Administration).
Choose Application > Intake Form Configuration Group.
Civic Platform displays a list of Intake Form Configuration Groups.
Click the red dot by the Intake Form Configuration Group that you want to edit.
Civic Platform displays the Intake Form Configuration Group Details-Edit page.
Update the values for each section of the application as defined in Table 1 and Table 2.
Click Save.