Crystal Reports Server 2013 and 2011
Topics
Prerequisites
Accela's support of Crystal Reports Server 2013 includes Enterprise 4.1. You must have functioning installations of:
Civic Platform 7.1.0 or later
Crystal Reports Server 2013 or 2011
For Crystal Reports Server 2013: SAP BusinessObjects BI Platform 4.1 .Net SDK
For Crystal Reports Server 2011: SAP BusinessObjects BI Platform 4.0 .Net SDK
Internet Information Services (IIS) 7
Accela’s adapter for Crystal Reports Server 2013 or 2011:
Deployed on a Windows machine with .Net Framework 4.0 or later
Deployed the same computer with Crystal Reports Server 2013 or 2011
Configure IIS 7
Configure IIS 7 to add role services for ASP (required), and Basic Authentication and Windows Authentication (optional).
- In Windows, go to .
- Click Roles.
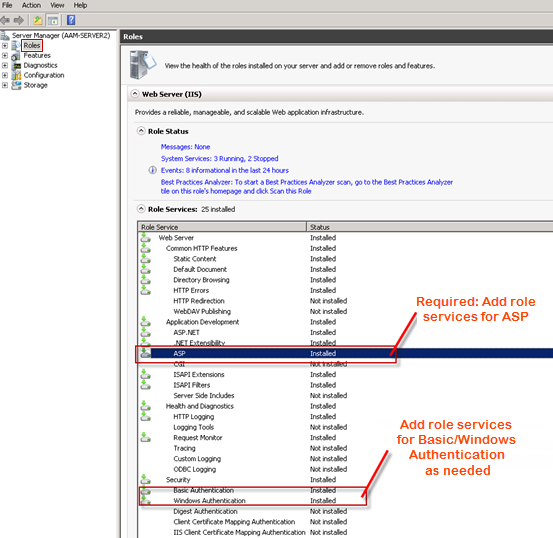
- Click Add Role Services on the right side of the screen to add ASP (required), and Basic Authentication and Windows Authentication (as needed), to the Role Service list.
- For Crystal Reports Server 2013, change the Advanced Settings for the
Application Pool DefaultAppPool.
- Start the Internet Information Services (IIS) Manager console.
- Click Application Pools from the Connections panel and select DefaultAppPool from the Application Pools list.
- On the Edit Application Pool window, select the .NET Framework
version 4.0 or later.

- Click Advanced Settings on the right side of the screen.

- Set Enable 32-Bit applications to False.
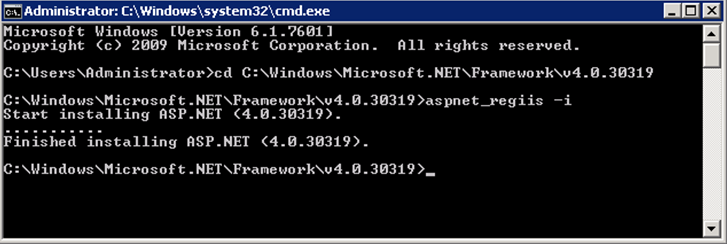
- Open a command window and go to the following directory:
C:\Windows\Microsoft.NET\Framework\v4.0.30319, then run aspnet_regiis
-i
- In IIS, go to the root node and click ISAPI and CGI Restrictions.
- Select the Not Allowed item, right-click it and change it to
Allow

Install the Adapter for Crystal Reports Server 2013 or 2011
- Copy the adapter files to a directory on the Report Server. The adapter files
install as part of Civic Platform.
- Go to: <Your Accela Installation Directory>\av.deploy\dist\reportadaptor\crystal\ <Your Crystal Reports Version>
- Copy the files to your reports directory, for example: D:\MyReports\.
- Add Application for MyReports.
- Start Internet Information Services (IIS) Manager console.
- Right-click the Default Web Site and select
Add Application.

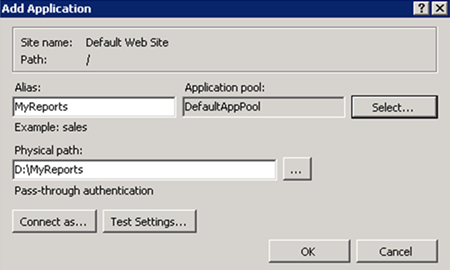
- In the Add Application window, update the fields.
-
In the Application Pool field, select the DefaultAppPool configured in the IIS Configuration procedure.
-
Enter an application alias in the Alias field. In this example: MyReports.
-
Select the virtual directory created for storing reports in the file path. In this example: D:\MyReports.
-
Click OK.
-
Configure the Adapter for Crystal Reports Server 2013 or 2011
Use the following procedure to configure the adapter for Crystal Reports Server, including Enterprise Reports capability.
- Open the web.config file, located in D:\MyReports.
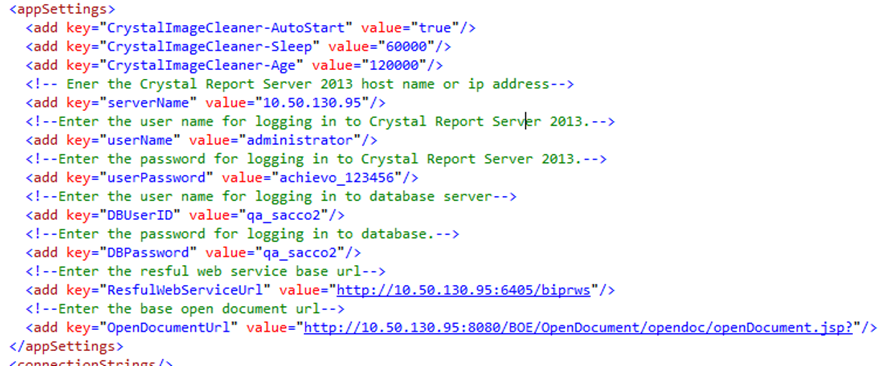
- Set the values of the parameters.
Application Setting Parameter Name Value Crystal Reports Server serverName The Crystal Reports Server 2013 or 2011 host name or IP address. userName The user name for logging into Crystal Reports Server 2013 or 2011. userPassword The password for logging into Crystal Reports Server 2013 or 2011. Database Server DBUserID The user name for logging into the database server. DBPassword The password for logging into the database server. Enterprise Reports(Does not support RPT format) RestfulWebServiceUrl For Crystal Reports 2013 Enterprise 4.1 only. Enter the web service URL you use to send requests to the BI service. Example: http://10.50.130.95:6405/biprws
OpenDocumentUrl For Crystal Reports 2013 Enterprise 4.1 only. Enter the URL to open an enterprise report.
Example: http://10.50.130.95:8080/BOE/OpenDocument/opendoc/openDocument.jsp?
- Derive the syntax for the
RestfulWebServiceURL parameter from the BI service.
- For Crystal Reports 2013 Enterprise 4.1, go to , then right-click Restful Web Service and select Properties.
For Crystal Reports 2011 Enterprise 4.1, go to , then right-click Open Document and select Processing Settings.
- Convert the computer name to its IP address. Example: Change SAP2 to
10.50.130.95
Figure: Crystal Reports 2013 Enterprise example

Figure: Crystal Reports 2011 Enterprise example

- Test that the report adapter is properly working. Open an IE browser and copy
this URL into the address bar:
http://localhost/MyReports/adapter/FileDirectory.aspx . XML code
displays in the web browser:

Configure ODBC Connections
Topics
Crystal Reports Server 2013 or 2011
On 64-bit versions of Windows, Report Commander runs as a 32-bit application, so it requires 32-bit ODBC drivers and DSNs. Enterprise 4.1 requires 64-bit ODBC driver and DSN.
32-bit DSN alias
- Run c:\windows\sysWOW64\odbcad32.exe to start the 32-bit ODBC Data Source Administrator.
- Add the DSN For Oracle/MSSQL.
Oracle
- Configure a connection between your machine and Oracle server.
-
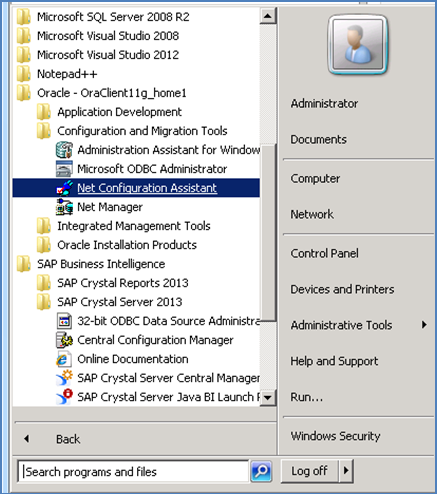
Start the Oracle Net Configuration Assistant.
- Select Local Net Service Name Configuration, and then click Next.
- Click Add, and then click Next.
- Specify the service name, and then click Next. The device name is the global database name for your database.
- Select TCP as the communication protocol, and then click Next.
- Enter the host name, and then click Next.
Port 1521 is the default and is generally the correct value. However, it is possible that your database administrator configured Oracle to use a different port. Check with your Oracle administrator.
- After a successful test, click Next to continue.
- Enter a net service name to identify this connection, and then click Next.
- Click Finish to complete the connection.
-
- Create an ODBC connection to your Oracle server.
- Open the ODBC Data Source Administrator. Depending on your version of Windows, this program is available from the Start menu in Administrative Tools or in Control Panel.
- Click System DSN tab, and then click
Add.
- Choose the appropriate driver for your database. Example: OraDb11g.
- Enter a Data Source Name to identify the ODBC connection. Select
the TNS Service Name from the menu. Specify the default User
ID to use for the connection. Click Test Connection.

MSSQL
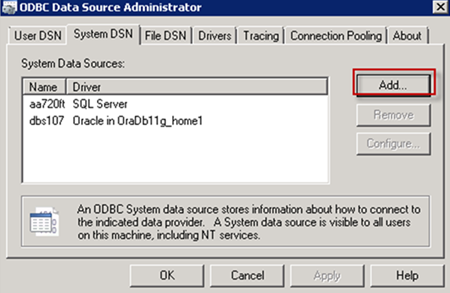
- Start the ODBC Data Source Administrator. Click System
DSN tab, then click Add.
- On the Create New Data Source, select the appropriate driver for your database.
Example: SQL Server.
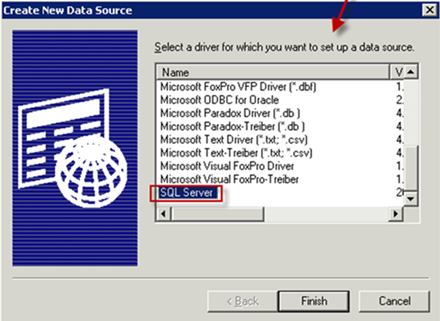
- Click Finish.
- Enter a name to identify the connection, enter a short description (optional),
and select your SQL server's IP address from the menu.
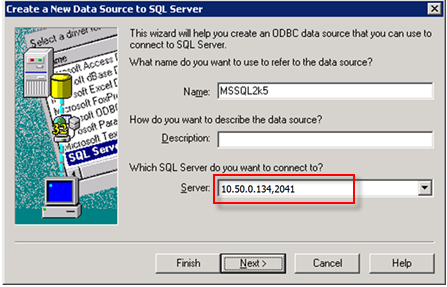
- Click Next.
- Select the SQL Server Authentication radio option, select the Connect to SQL
Server option, and enter the credentials.

- Click Next.
- Select the database to use for this connection. Also optional, select the
default database for the specific user. Configure the other
options as appropriate.

- Click Next.
- Clear the Change the language of SQL Server system messages
to option. Configure the other options as
appropriate.

- Click Finish.
- Click Test Data Source.

Configure Authentication Modes
Topics
Anonymous Access
- Start Internet Information Services (IIS) Manager, and click the Crystal Reports site in the Connections panel.
- Click Authentication in the Security section.
- In the Authentication list, right-click the Anonymous Authentication item then select Enable.
- Navigate to V360 Administration > Report Manager > Settings > Report Services > Crystal2013 or Crystal 2011.
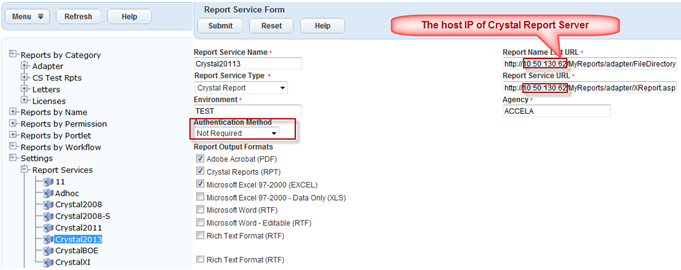
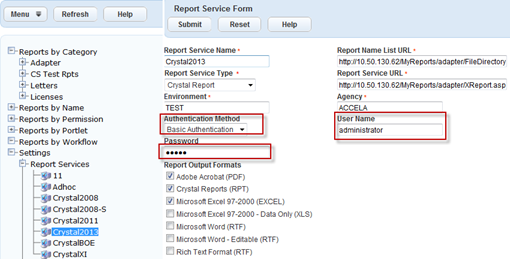
- Open an existing report service or create a new one. Complete the fields in the
Report Service Form:
-
Report Name List URL: http://<Crystal Reports Server IP address>/myreports/adapter/FileDirectory.aspx
-
Report Service URL: http://<Crystal Reports Server IP address>/myreports/adapter/XReport.aspx
-
Report Service Type: Crystal Reports
-
Authentication Method: Not Required
-
Environment:
Fill the first level folder Name of Report Server. For example: TEST.
-
Agency:
Fill the second level folder Name of Report Server. For example: ACCELA. See screenshot as below.

-
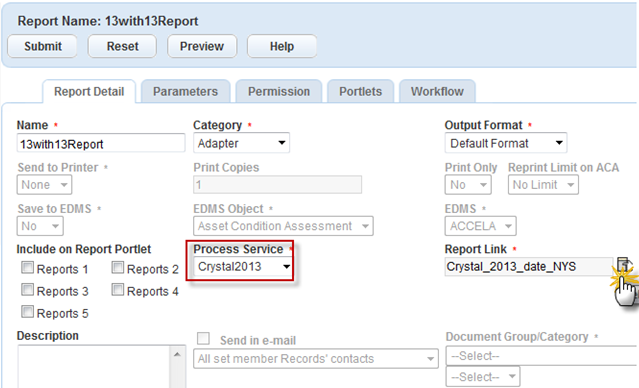
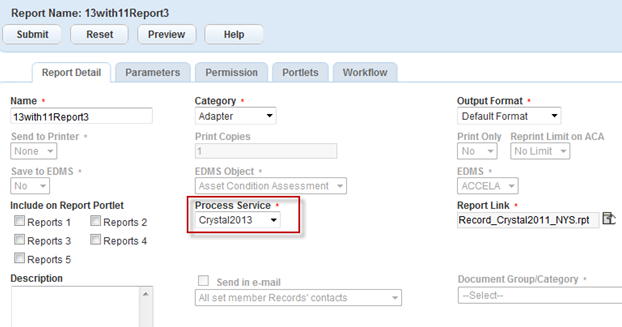
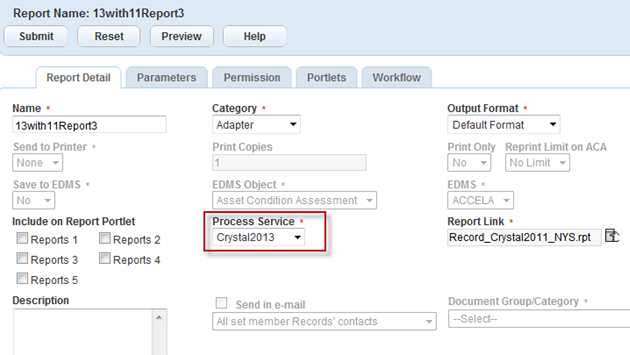
- Associate a report to the Report Service. Make sure the selected report service
from the Process Service menu is the one created or edited in the previous step.
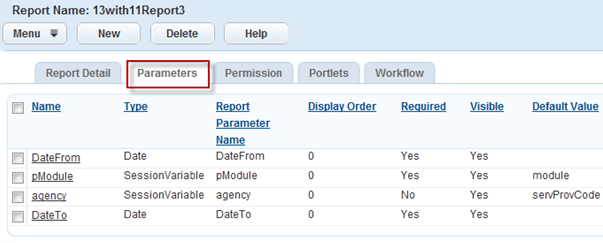
- Click the Parameters tab to set up the data filters.
- Complete the fields on the parameter form, and then click
OK. The preview results display.

Basic Authentication
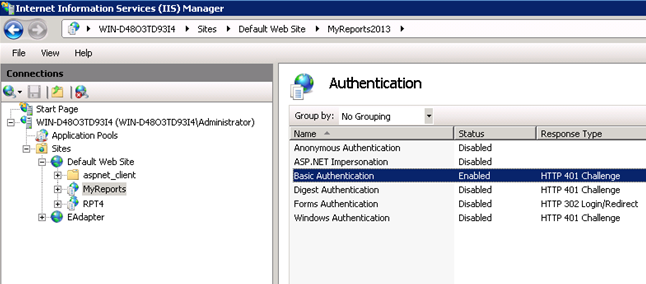
- Start Internet Information Services (IIS) Manager, expand the Crystal Report
site, and then click the adapter folder in the Connections panel.

- Click Authentication in the Security section.
- On the Authentication list, right-click the Basic
Authentication item and select Enable.
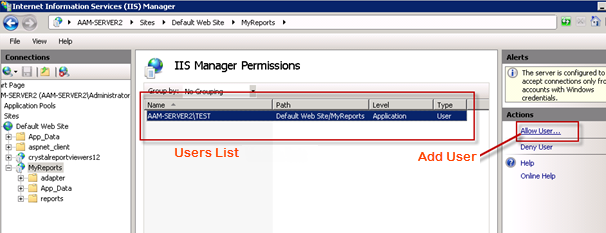
- Click the Crystal Reports site in the Connections panel, and then
click IIS Manager Permissions from the Security section.

- Click Allow User on the right side of the screen, and add
a user with access to Crystal Reports.
- Go to .
- Open an existing report service or create a new one. Complete the fields in the
Report Service Form:
-
Report Name List URL: http://<Crystal Reports Server IP address>/myreports/adapter/FileDirectory.aspx
-
Report Service URL: http://<Crystal Reports Server IP address>/myreports/adapter/XReport.aspx
-
Report Service Type: Crystal Reports
-
Authentication Method: Basic Authentication
-
User Name and Password: The credentials of a user with access to the Crystal Reports Server.
-
- Associate a report to the Report Service. Set the Output Format. Make sure the
selected report service from the Process Service drop-down list is the one you
created or edited in the previous step.
- For non-default format, click the Parameters tab to set up the data
filters.
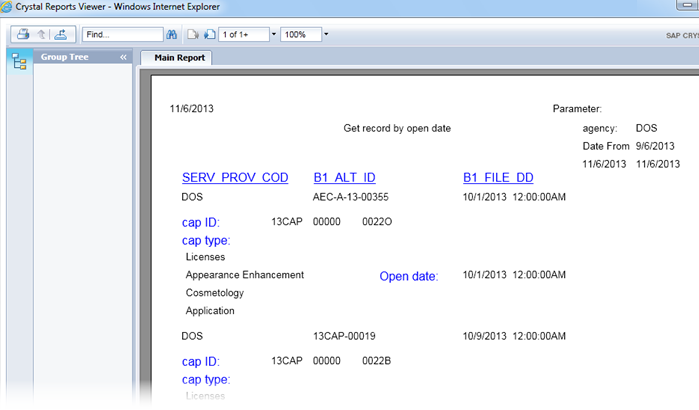
- Click Preview. In the Authentication window, enter
the credentials to display the associated report.
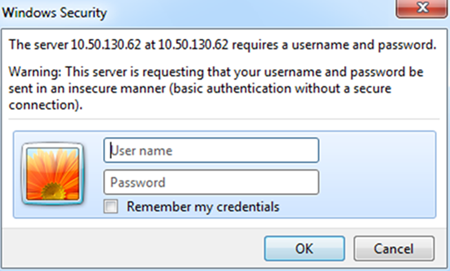
- Click OK. A report preview displays:
NT Authentication
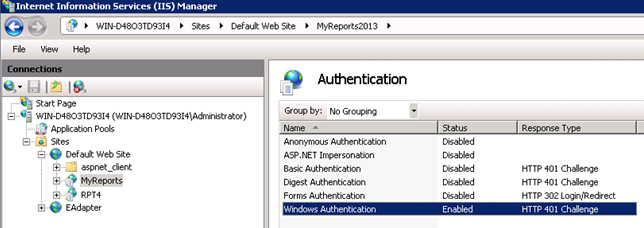
- Start Internet Information Services (IIS) Manager, expand the Crystal Reports site, then click the adapter folder in the Connections panel.
- In the Security section, click Authentication.

- In the Authentication list, right-click the
Windows Authentication item and select
Enable.
- In Civic Platform, go to .
- Open an existing report service or create a new one, then fill out the Report
Service Form:
Report Name List URL: http://<Crystal Reports Server IP address>
/myreports/adapter/FileDirectory.aspxReport Service URL: http://<Crystal Reports Server IP address>
/myreports/adapter/XReport.aspx-
Report Service Type: Crystal Reports
-
Authentication Method: NT Authentication
-
User Name and Password: The login credentials of the domain account.

- Associate a report to the Report Service. Set the Output Format. Make sure the
selected report service from the Process Service drop-down list is the one you
created or edited in the previous step.
- For custom reports, click the Parameters tab to configure data
filters.
- Click Preview. If the client user and Crystal Reports
Server are in the same domain, the report displays.