Expression Builder Scenarios
To learn about specific uses of Expression Builder and its effect on the Civic Platform daily user, review the scenarios in this section. The scenarios include screen shots that depict both the configuration details for the administrator who creates the expression, and the user’s experience when accessing the fields.
Topics
Populating a Field When Creating a Record Type
This scenario explains how to create the expression criteria that automatically set the Status to “Processing” when a user creates a specific record type. The expression uses the “onLoad” function for the record type of Building/Plan Review/Zoning Analysis and identifies the Target Portlet of Record Detail.
To build the expression criteria, refer to the steps in How to create the execute fields for onLoad function for a new record.
To see the effect of this expression from a user experience, refer to Where the Status field populates as “Processing” for the user.
For an overview of the user interface and its elements, see Figure 1.
Where the Status field populates as “Processing” for the user
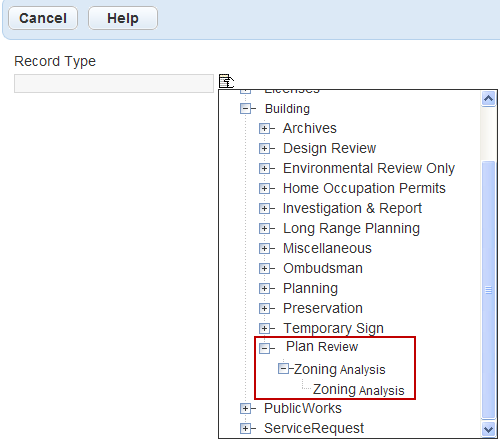
User creates a new record type of Building/Plan Review/Zoning Analysis/Zoning Analysis.
Civic Platform displays the application type picker.
Civic Platform loads the new application type and the status automatically updates to “Processing.”

How to create the execute fields for onLoad function for a new record
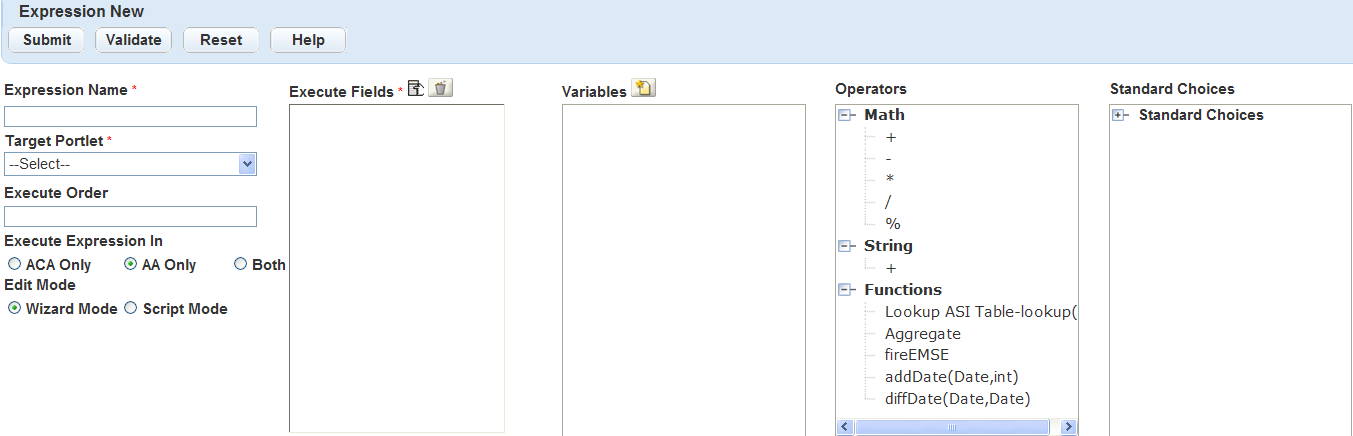
Create a New expression and navigate to the Expression Name field.
Civic Platform displays the New Expression fields where you define the criteria.
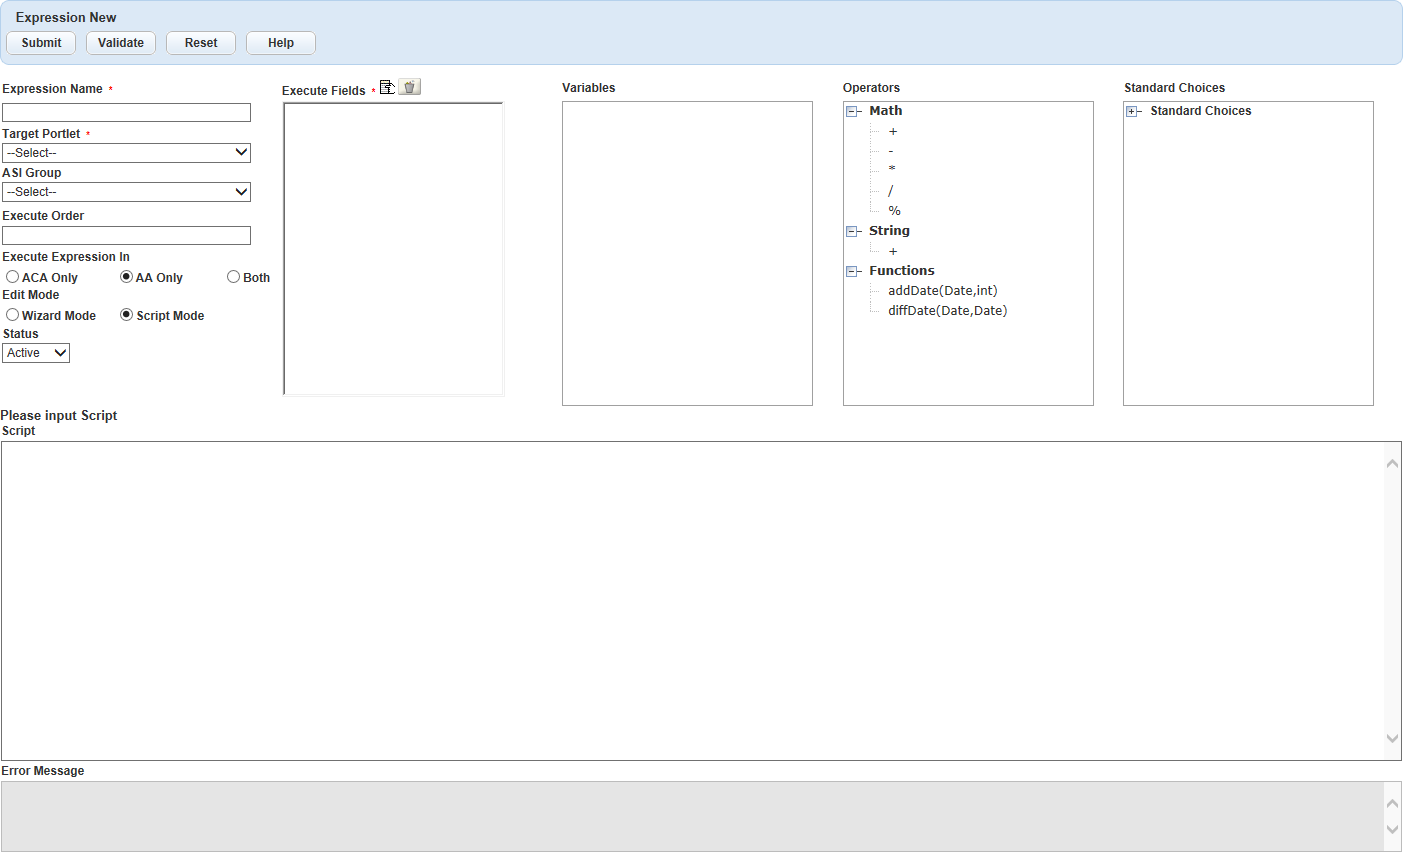
Enter an Expression Name. This scenario uses New Record Status.
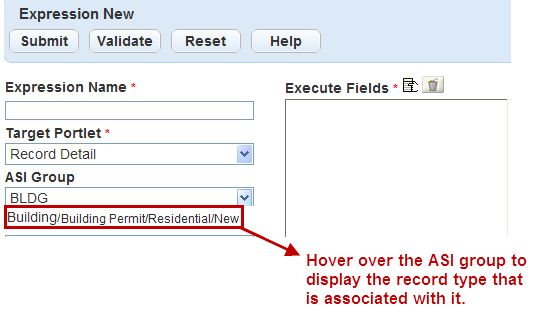
Select Record Detail from the Target Portlet drop-down list to specify that the expression takes effect in the Record detail area.
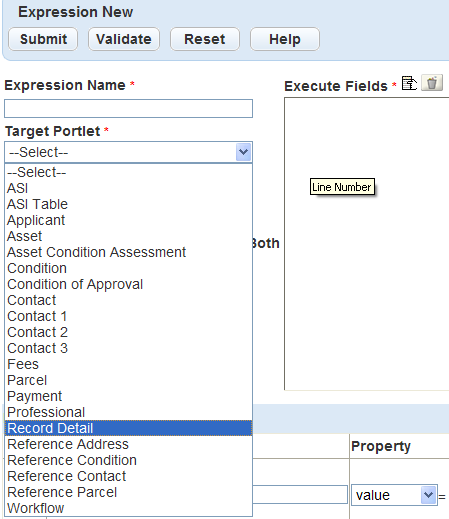
Select BLDG in the Custom Fields Group for this step. Expressions require the Target Portlet and the respective Custom Fields Group and Custom Lists Subgroup when creating or editing an expression.
Hover over the Custom Fields Group field, to display the associated Record type for the selected Custom Fields Group, for informational purposes.
Optionally, use the Execute Order field to define the order you want Civic Platform to process the expression.
Click the Execute Fields picker.
Civic Platform displays the Execute Fields list.
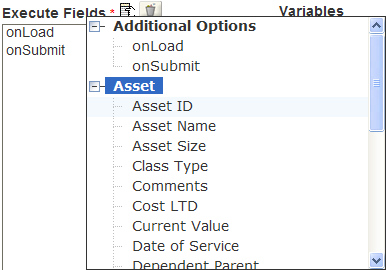
Expand Additional Options and click the onLoad function.
Civic Platform loads the onLoad function in the Execute Fields list.
In the Expressions area, do the following:
Single-click the Field Name to activate it.
Open the Variables list, and expand Record Detail.
From the Fields list click the Status field.
The Expressions Field Name populates with the record type and the record Status functions.

Click the Calculate Expression field to activate it.
In the Calculate Expression field, surround the new status for this record type in double quotes and then enter this phrase exactly: “Processing”
The “Processing” word is the default value displaying in the Status field when a user creates a new record type for Building/Building Permit/Residential/New.

Adding a Row in an Asset Attribute Table
This scenario explains how to create the expression that automatically adds a row into an asset attribute table when a user saves an asset.
To build the expression criteria, refer to the steps in Adding a new attribute table row.
To see the effect of this expression from a user experience, refer to Where to add a new row.
For an overview of the user interface and its elements, see Figure 1.
Where to add a new row
Where to add a new row in the attribute table of an assetUser creates a new asset with the asset group as HVAC, and the asset type as Boiler. The asset type belongs to an asset template Mechanical - Boiler that links to the attribute table Attribute Table_1.
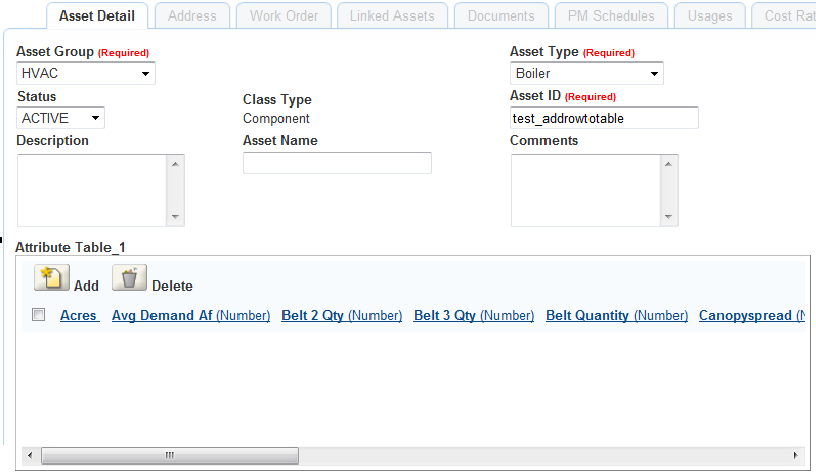
The asset saves successfully with a new row automatically added in the attribute table.

Adding a new attribute table row
How to add a new row for the attribute table fields of an assetCreate a New expression and navigate to the Expression Name field.
Civic Platform displays the New Expression fields where you define the criteria.
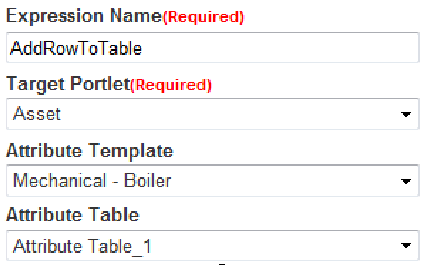
Enter an Expression Name. This scenario uses AddRowToTable.
Select Asset from the Target Portlet drop-down list, select Mechanical - Boiler from the Attribute Template drop-down list, and Attribute Table_1 from the Attribute Table drop-down list. The attribute table drop-down list shows all the attribute tables that associate with the selected attribute template.
Click the Execute Fields list picker to select
Civic Platform displays the Execute Fields list.
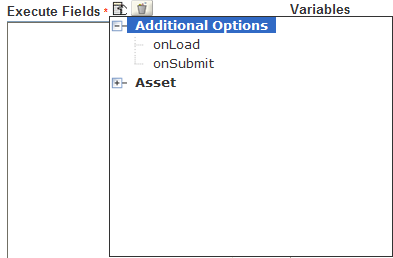
Expand Additional Options and click the onSubmit function.
Civic Platform loads the onSubmit function in the Execute Fields list.
Select Insert Table Row in the Expressions area.

Assign values to the attribute table fields in the expression.
Single-click the Field Name in the Expressions area to activate it.
In the Variables list, expand the Fields under Attribute Table.
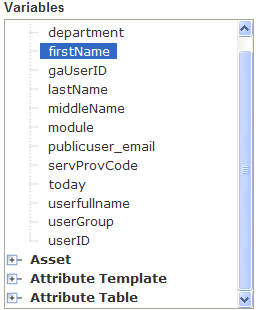
Click the Acres field.
The Expressions Field Name populates with the field name.

Set the Property in the Expressions area as “value,” and enter the numeric value in the Calculate Expression field: 220.
Click Add Expression Line to add more lines.
Select another field from the Variables list, and set its value.
Repeat step 10 until you assign values to all the necessary fields in the attribute table.
Click Submit to save the expression.
Populating Fields in Custom Fields Section
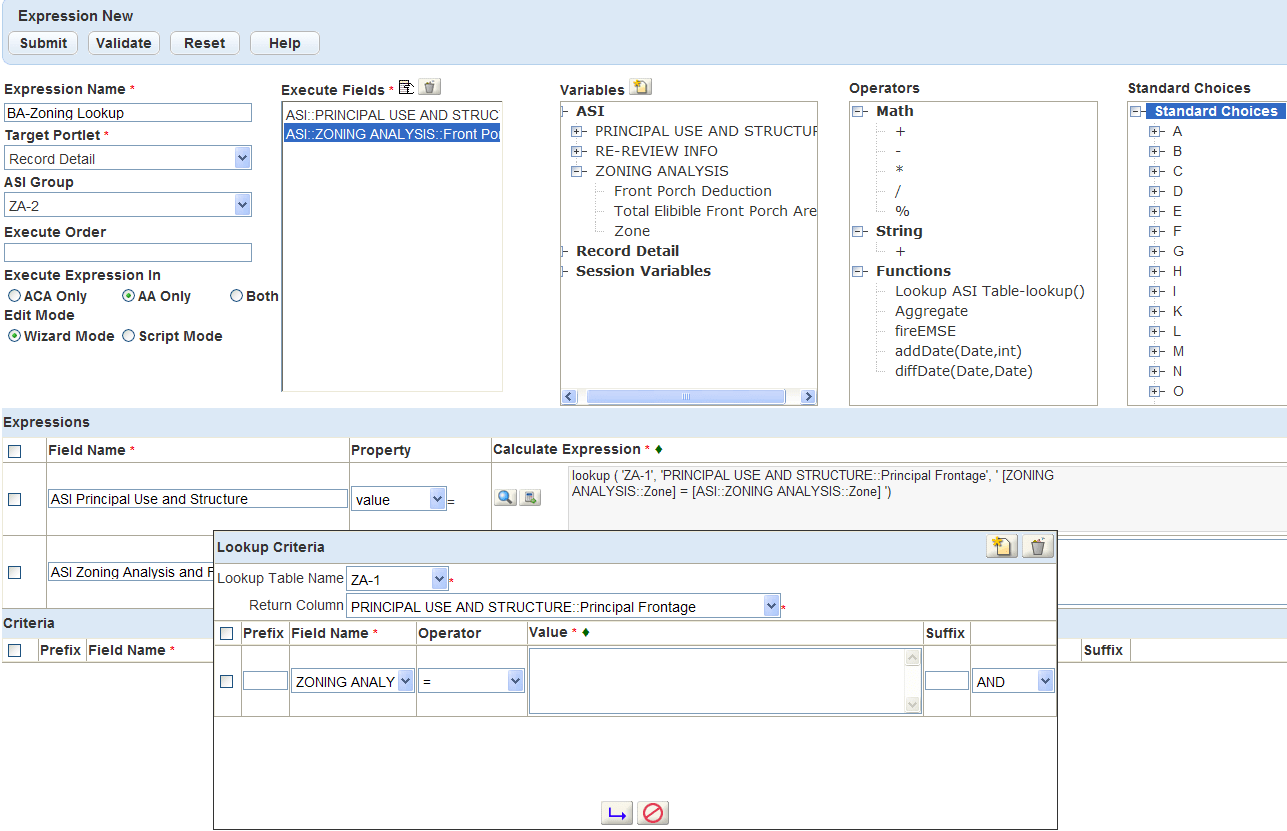
This section explains how to create the expression criteria that populates read-only fields in the Custom Fields Section of a record type, based on selections made. This expression uses columns and data from a Custom Fields Lookup Table named ZA-1. This expression’s name is Zoning Lookup, because it populates the appropriate references, based on the zones the user selects.
With Expression Builder, you can use the record type of Building/Plan Review/Zoning Analysis, and then identify the Target Portlet of a Custom Field, which is where the user accesses the fields. To build the expression criteria, refer to the steps in How to prepare a Custom Fields lookup table for creating the expression.
To see the effect of this expression from a user experience perspective, refer to How a user completes Custom Fields that populate messages.
For an overview of the user interface and its elements, see Figure 1.
How a user completes Custom Fields that populate messages
User creates a record type of Building/Plan Review/Zoning Analysis/Zoning Analysis.
Locate the Custom Fields section of the application. An alternate location to modify this information might be in the Zoning Analysis portlet for the record type.
Civic Platform displays the Custom Fields in the Zoning Analysis section of the record.
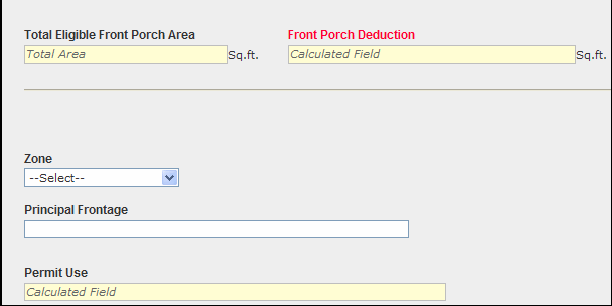
- Enter the value
into the Total Area (in square feet) of the Eligible Front Porch Area field.110 - Select
from the Zone drop-down list.R4Civic Platform populates the values for the Principal Frontage, Permit Use, and Front Porch Deduction fields.

How to prepare a Custom Fields lookup table for creating the expression
This scenario uses data from an existing table called Custom Fields Lookup Table called ZA-1.
The ZA-1 table contains the regulation data for zoning that populates when a user completes the Custom Fields section as they create a new record type of Building/Plan Review/Zoning Analysis/Zoning Analysis.
Reviewing this table now makes it easier to follow the scenario. Refer to Figure 1 to see the structure, columns, and data in the ZA-1 table.
Figure: Custom Fields Lookup Table Structure
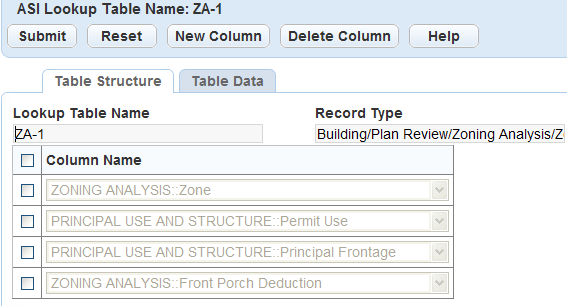
Figure: Custom Fields Lookup Table Data

How to create expression criteria for this Custom Fields target portlet scenario
Create a New expression and navigate to the Expression Name field.
Civic Platform displays a new expression fields where you define the criteria.
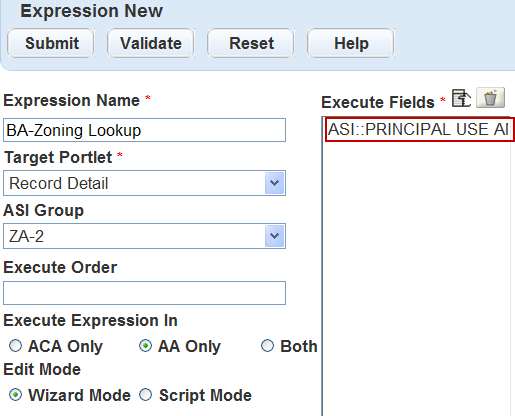
- Enter an Expression Name. This scenario uses
.BA-Zoning Lookup Select Record Detail in the Target Portlet drop down list.
- In the Custom Fields Group field, select the group that contains the record type and the fields you want to place an expression in. This scenario uses Custom Fields Group ZA-2, because it requires the record type
.Building/Plan Review/Zoning Analysis/Zoning Analysis
For these sub-steps, add each of the fields affected within the Target Portlet into the Execute Fields list. The Execute Fields are the fields where users enter data and Civic Platform populates fields with read-only information based on the user’s selections. This scenario affects these four fields:
ASI::PRINCIPAL USE AND STRUCTURE::Permit Use
ASI::PRINCIPAL USE AND STRUCTURE::Principal Frontage
ASI::ZONING ANALYSIS::Front Porch Deduction
ASI::ZONING ANALYSIS::Zone
Click the Execute Fields picker and expand Custom Fields to locate and double-click ASI::PRINCIPAL USE AND STRUCTURE::Permit Use.
ASI::PRINCIPAL USE AND STRUCTURE::Permit Use. The Permit Use field populates with data based on what the user selects from the Zone drop-down list. In this scenario, when the user selects R4 the Permit Use field populates with specific data from the ZA-1 Custom Fields Lookup Table.
Civic Platform populates the field name Permit Use into the Execute Field list.
Locate the other fields for this expression with the Execute Fields picker. Double-click each field label to add it to the Execute Field list.
ASI::PRINCIPAL USE AND STRUCTURE::Principal Frontage. The Principal Frontage field populates with data based on what the user selects from the Zone drop-down list. In this scenario, when the user selects R4 the Principal Frontage field populates with specific data from the ZA-1 Custom Fields Lookup Table.
ASI::ZONING ANALYSIS::Front Porch Deduction. This field populates with data based on the user who enters the Total Eligible Square Feet Area. See the screenshot below.
ASI::ZONING ANALYSIS::Zone. This field provides the Zone drop-down items that affect what data populates in the Principal Frontage, Permit Use, and Front Porch Deduction fields.

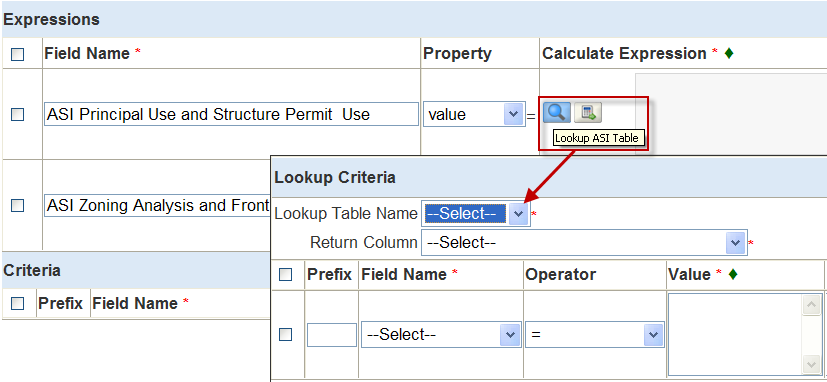
Scroll to the Expressions area. The Expressions area is where you define the lookup criteria for each Execute Field that calculate or trigger an expression.

For each field that calculates an expression, click Add Expression Line to add the field name to the Field Name field list.
Click the Lookup Criteria search button to locate the table name and the column. Define the lookup criteria for each Calculated Expression field for this scenario, click Lookup Custom Fields Table.
Civic Platform displays the Lookup Criteria form.
When defining expressions, you can use Custom Fields Lookup Tables. You can add an item to a Custom List using an expression. You can populate a field with data from the Custom List.
The benefit when using table data is that it eliminates data entry errors that might occur if the permit intake clerk has to manually open a separate document to locate the correct data and then type it into specific fields.
- To define the table and identify which columns to populate the data for the ASI::PRINCIPAL USE
AND STRUCTURE::Principal Frontage field, follow these two
sub-steps:
Define the Lookup Table Name for the Principal Frontage field. Choose the Custom Fields Lookup Table Name ZA?1 for this scenario.
Set the Return Column for Principal Frontage. The Return Column is a column in ZA-1 that contains the values that should populate data based on the values the permit intake clerk selects. The Custom Fields Lookup Table columns for the selected Lookup Table display in the drop-down. If a user selects a column from the Variables list portlet, it defaults into this field.
- Use the Field Name drop-down list and select the field for Principal Frontage.
- Set the Operator to equal (=).
- Click the Value field and then use the Variables to locate and add ASI::PRINCIPAL USE AND STRUCTURE::Principal Frontage.
- Click OK on the Lookup Criteria page.
- Repeat the steps to provide a value for the Front Porch Deduction field with the correct references and correct value.
- To define the table and identify which columns to populate the data for the ASI::PRINCIPAL USE
AND STRUCTURE::Principal Frontage field, follow these two
sub-steps:
- Click Submit in the Lookup Criteria form to save the
expression.
Expression Builder saves the expression criteria.