Setting Up a Report
To add reports to Report Manager each report must have the appropriate security parameters and must reside in the reports directory on the server. Reports you do not add to this directory are not accessible to Report Manager.
There are two ways for a user to run reports in Civic Platform. One is through the use of the Reports Portlet, which allows users to select a management-type report that typically analyzes data from across the database, such as a daily cash receipts report, or a monthly C-404 Statistical Report. The second way is from specific form or list portlets. These reports generally focus on a specific record or set of records such as a Permit Print or notification letter.
You can organize reports by category, so that users can easily find the reports they need in the Reports Portlet.
After adding reports to Reports Manager, you can configure additional options, such as adding parameters, assigning permissions to user groups and modules, and associating reports with workflow tasks. For more information on these configuration options, refer to the appropriate topics in this guide.
On-premise customers are responsible for setting the security parameters in each report and maintaining the reports directory. For information on how to do this, refer to the Civic Platform On-premise Administrator Supplement.
Topics
Adding a Report
Before you add a report to the report administration, you must add specific security parameters to the physical report. Accela-hosted and subscription customers must send each newly developed report to an Accela implementation specialist. Civic Platform adds the security parameters to the report and places it in the appropriate directory on the report server. You can access this directory from the Report Link in the Report Manager administration setup. On-premise customers, refer to the Civic Platform On-Premise Administrator Supplement for steps on setting these parameters and placing the reports in the appropriate directory.
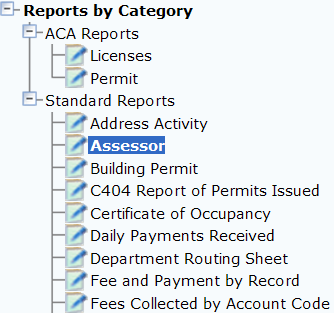
Civic Platform organizes reports within reports administration by category. You must identify the categories before adding reports to Report Manager. These categories also display in the Reports Portlet, so that users can easily find the reports they need.
You can create and manage online inspection reports in Mobile Office the same way as they create and manage reports in Civic Platform. The Report Manager portlet provides a report category, Mobile Office Reports. If you add reports into the report category, and configure the Standard Choice ENABLE_AMO_ONLINE_REPORT, the reports are accessible on Mobile Office devices.
When adding a report to the reports administration, you must specify the report process service such as Crystal, Oracle, Microsoft Reporting, Accela Report Writer, RTF, or URL Report. This identification sends the request to execute the appropriate report engine when a user runs a report. Depending on the report service, different formatting options are available including Adobe Acrobat (.pdf), Microsoft Excel (.xls), Rich Text Format (.rtf), and many others. A preview of each report is available from the Report Detail form portlet. Use the preview to confirm that the correct reporting engine launches and the correct report displays before moving on to additional setup and configuration steps.
You can save reports to an Electronic Document Management System (EDMS), except for client executable reports, which you cannot save to an EDMS. With the EDMS options in the Report Detail form, you can set the report to automatically save to the EDMS and categorize the report into a document group. You can also save reports to specific objects such as Record, Parcel, Workflow, and Asset Inspection. For more information on saving reports to EDMS, see Saving Reports to a Document Management System.
You can assign a report to a default printer to automatically print when a user runs the report. When a user runs a report set to automatically print, they receive a notification message when their report prints.
After you add reports to Report Manager, you can make them accessible to users in Civic Platform from the Reports portlets, other portlets, and workflow tasks. There are also additional set up and configuration steps for reports that include; adding parameters and assigning permissions to user groups and modules. These options are available in the reports administration of Report Manager. For more information on these options, refer to the appropriate topics in this guide.
To add a report
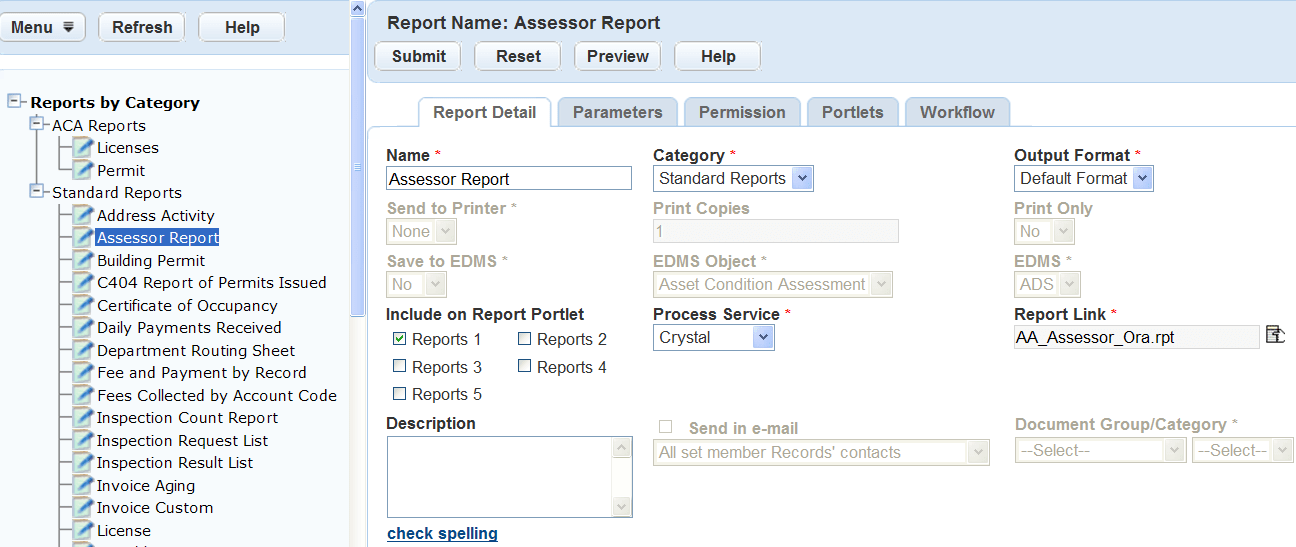
Access the Report Manager portlet (Accessing the Report Manager Portlet).
Click New Report at top of the navigation tree or right-click a category or report in the navigation tree and select New Report.
Civic Platform displays the Report Detail form portlet.
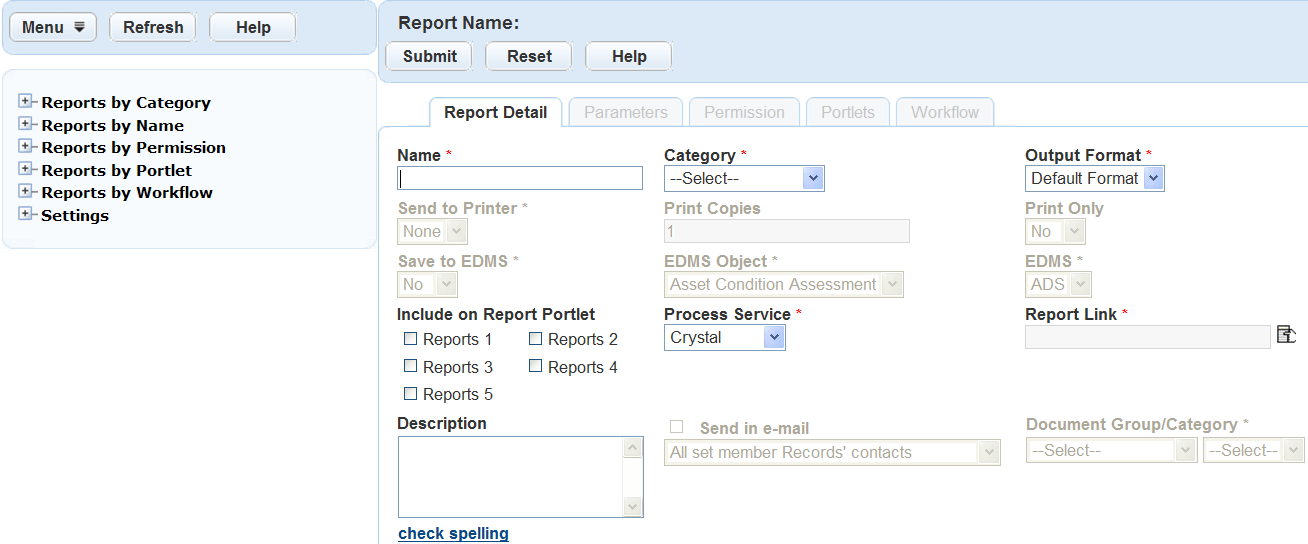
Complete the fields described in Table 1.
Click Submit to save the report detail.
Civic Platform saves the report detail and adds the report to the selected category in the navigation tree.
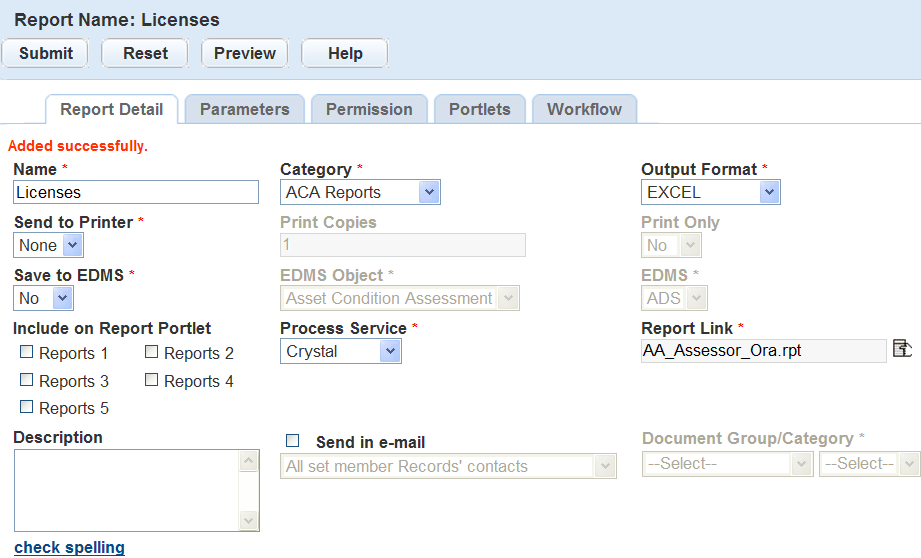
Click Preview to preview the report.
Civic Platform prompts you to enter any required parameters.
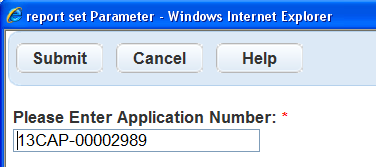
Enter the report parameters if required.
Civic Platform displays the report preview in another window.
Table 1. Report Detail Authentication Method Select the authentication method for the report service type. Note: This field displays only when you select the URL_Report process service. With other process services, Civic Platform configures this field when you set up the related report service. See Setting Up Report Services.Category Select the appropriate category for the report. Civic Platform uses this category to organize and display the report for the user in the Reports Portlet or in form and list portlets. If you add a report to run in Mobile Office, Select the Mobile Office Reports.
Description Enter a description of the report. For example, enter “The inspection list report displays the total number of inspections within a specific date range, ordered by inspection type.” Document Group/Category Categorize the report by first selecting a value from the Document Group drop-down list, then a value from the Category drop-down list. It is important to select the Document Group first, because the Category drop-down list can be different, depending on which document group you choose. EDMS Select the Electronic Document Management System (EDMS) you want to save the report to. EDMS is available for all report services and types with the exception of client executables. EDMS Object Select the Electronic Document Management System (EDMS) object you want to save the report to. When you save the report it displays under the Documents or Attachments tab for the associated object. Options include: Record, Parcel, Workflow, Asset Condition Assessment, Inspection, Reference Contact, Reference Professional and Set. EDMS is available for all report services and types with the exception of client executables. If you select Record Contact (or Record Professional) as the EDMS Object option, you can further select one or more contact types (or licensed professional types) in the Type selection box. When users run the report in a record, Civic Platform attaches the report to the contacts (or licensed professionals) of the selected types that are associated with the record. If none of the record contacts (or licensed professionals) are of the selected types, Civic Platform does not attach the report to any record contact (or licensed professionals). Name Enter the name you want to display for the report in the Reports Portlet or Report Menu. Output Format Select the output format of the report. The options vary depending on the formats the report service supports. Options can include Adobe Acrobat (.pdf), Microsoft Word (.doc), Microsoft Excel (.xls), Rich Text Format (.rtf), and CSV comma-delimited (.csv). If you leave Output Format blank or set it to default, Civic Platform uses the default viewer for the report service. For information on updating output formats, see Setting Up Report Services. Note:Tag reports in authorized service sales only supports “PDF” format.
Mobile Office online reports do not support Default Format.
Print Copies Enter the number of copies you can print. Print Only Select Yes or No from this drop-down list to indicate whether you want to print the report. Report Link Click the Select Report Link to choose the reports available in the report directory on the server. To expand the reports list, select Expand Reportsfrom the menu. To contract the list to display a small list of reports, select Contract Reportsfrom the menu. Note: Because Mobile Office users can only run an online report on an inspection, the report you choose must include one and only one parameter for getting the inspection ID. The parameter for getting the inspection ID is already hard coded for Mobile Office online reports. You need not follow the instructions in Adding Report Parameters to add the parameter.Reports Portlet 1
Reports Portlet 2
Reports Portlet 3
Reports Portlet 4
Reports Portlet 5Select the Reports portlet where you want the report to appear. A report can appear on more than one Reports portlet. For instructions and information on where the Reports portlets appear or how to make them visible, see Designing Forms for Pages. Reprint Limit on Citizen Access If you are adding a license tag report for authorized service sales in Citizen Access, you must select the maximum number of reprint requests that an authorized agent or authorized agent's clerk can make. This field displays when you set the “Sent to Printer” option to Local DataMax-O’Neil E-Class Mark III Printer, and associate the report with the Print Tag button (portlet name: Button - Citizen Access Print Tag).
Note: You must configure the Standard Choice REPRINT_REASONS to define a list of possible reprint reasons for the authorized agent or clerk to select.Password Enter the authentication password. Note: These fields display only when you select the URL_Report process service and choose the authentication method as basic authentication or NT authentication. With other process services, Civic Platform configures these fields when you set up the related report service. See Setting Up Report Services.Process Service Select the report service to use for the specified report. The options selected in the drop-down filter the reports that display in the Report Link window. The RTF and URL_Report options is always available. For details on these options, see Using RTF Templates and Using URL Reports. The other process service options are the report services you set up in Setting Up Report Services. Note: If you select the URL_Report process service and then set the authentication method to “Basic Authentication” or “NT Authentication,” users can run a report and have it open directly without a login prompt appearing. Civic Platform passes the authentication information to the report server. However, if the report opens in a web browser, users have view-only access, and any links within the report do not function.Save to EDMS Select whether or not you want to save the report to the Electronic Document Management System (EDMS) specified in the EDMS field. Choose Yesto automatically save the report to EDMS. Choose No to not save the report automatically to EDMS. Send in Email This option is either active or inactive, based on the report format you select in the Output Format box. To activate this option, you must select any output format other than the default format. Select this option to enable users to send a report to record contacts. When you select this option, you must also designate a corresponding set of email recipients from the associated drop-down list. The record contacts in the drop-down list values refer to the contacts for the session application.
Drop-down list values include:Attach all Record Contacts:All application contacts and licensed professionals. When you select this option and users run a report, a Send in Emailbutton appears on the report preview page. Users click this button to select email recipients.
Attach Primary Record Contacts: Application primary contacts and licensed professionals. When you select this option and users run a report, a Send in Emailbutton appears on the report preview page. Users click this button to select email recipients.
Auto-Attach all Record Contacts: All application contacts and licensed professionals. When you select this option and users run a report, Civic Platform automatically sends an email to application contacts and licensed professionals.
Auto-Attach Primary Record Contacts: Application primary contacts and licensed professionals. When you select this option and users run a report, Civic Platform automatically sends an email to primary application contacts and licensed professionals.
You can define email subject matter and email content under the EMAIL_REPORT_SUBJECT and EMAIL_REPORT_CONTENT content customize types. This field supports multiple languages. For more information on working with the content customize form, see Customizing the Content of Agency Communications.
To configure email reports for Citizen Access Users, contact the Accela Services Implementation Staff, who can assist in writing event logic for the following scripts: SendReportInEmail-1 and SendReportInEmail-2
Send to Printer Select the printer you want to use. Enter a default printer to automatically print the report and notify the user of its completion. To add a default printer to the list, see Setting a Default Printer. Note: Authorized agents or authorized agent clerks print license tags for their customers in authorized service sales in Citizen Access. To enable agent to print license tags to their local printer, you must select the printer option “Local DataMax-O’Neil E-Class Mark III Printer” for the tag report. You must also associate the report with the Print Tag button (portlet name: Button - Citizen Access Tag).Template Click Browse and select a report template in Rich Text Format (.rtf). The template can be up to 5MB. This field only applies to RTF report service type. User Name Enter the authentication user name. Note: These fields display only when you select the URL_Report process service and choose the authentication method as basic authentication or NT authentication. With other process services, Civic Platform configures these fields when you set up the related report service. See Setting Up Report Services.
Editing a Report
You can edit report details, but be aware that your edits can affect how the report behaves and runs. If you identify report parameters, permissions, and workflows for the report and you modify the report link, the report might not behave correctly.
The Report Name, Category, and the Show in Report Portlet options affect what the user sees. If you rename, move, or hide a report the report list that displays for the user changes accordingly.
To edit a report
Access the Report Manager portlet (Accessing the Report Manager Portlet).
Locate the report you want to edit, using the navigation tree, and then click the report name.
Civic Platform displays the Report Detail form portlet.
Update the report details as necessary. For field definitions, see Table 1.
Click Submit.
Civic Platform updates the report detail.
Renaming a Report
The ability to rename the report is available under any of the categories in the navigation tree. It is important to understand that renaming a report under one category, such as Reports by Name, renames the report under another, such as Reports by Category.
The name that displays in the navigation tree is also the name that displays for the users. When you rename a report in the reports administration, the report reflects the change in the Reports Portlet and in the portlet where the user accesses the report.
To rename a report
Access the Report Manager portlet (Accessing the Report Manager Portlet).
Locate the report you want to edit, using the navigation tree, and then click the report name.
Civic Platform displays the Report Detail form portlet.
Right-click the report and click Rename.

Civic Platform displays the Rename Report page.

Enter the Report Name.
Click OK.
Civic Platform renames the report.
Deleting a Report
When you delete a report from Report Manager, it removes the report from the report administration, and removes the reference to the report under categories in the Reports portlet and from any form or list portlet in which it appears. The report remains in the report directory on the server and accessible to Report Manager at a later date if needed. To remove a report from the reports directory on the server, contact your Accela implementation specialist or refer to the Civic Platform On-premise Administrator Supplement.
To delete a report
Access the Report Manager portlet (Accessing the Report Manager Portlet).
Navigate and right-click the report you want to delete from the navigation tree.
Click Delete option.
Civic Platform displays a confirmation window to delete the report.
Click OK to confirm the deletion of the report.
Civic Platform deletes the report from Report Manager and any reference to the report from the user portlets.
Setting up Report Parameters
Use report parameters to assist users in filtering data for their report. You can set these parameters to prompt users to enter ranges of values that define the report’s content. Civic Platform presents users with drop-down lists, date pickers, and other parameter fields where users must specify the values and ranges for the data they want to display on their report.
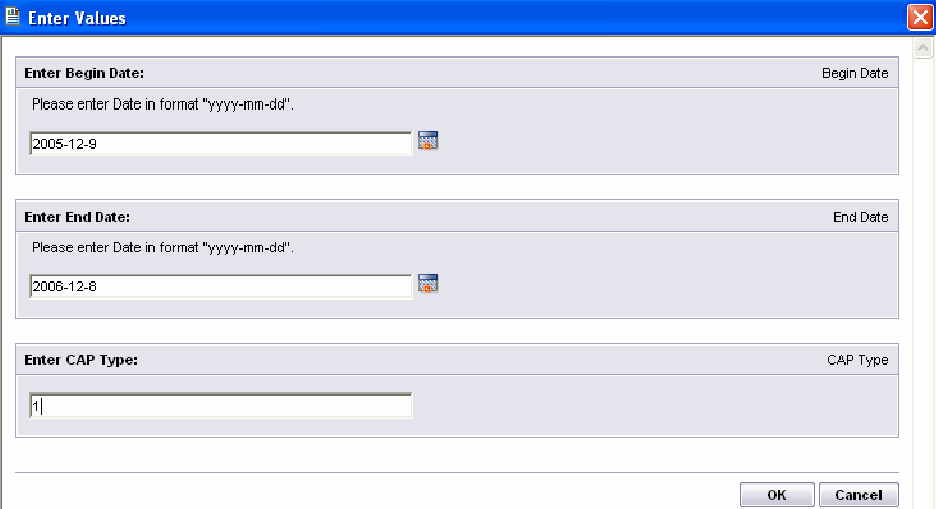
Figure: Civic Platform Parameter Prompt Window
Parameters not set up in Report Manager and required in the report display the parameter prompt window. These parameters require users to enter exact values to correctly filter the report. For example, users must enter dates in the correct format, MM/DD/YYYY or yyyy-mm-dd. The figure below shows a sample Crystal Reports parameter prompt.
Figure: Crystal Reports Parameter Prompt Window
Topics
Adding Report Parameters
Report parameters must exactly match the spelling of the parameter in the physical report. This includes parameters users must enter manually, as well as those provided by Civic Platform and automatically sent to the report. An example of an Accela provided parameter is record ID. The Building portlet supplies the record ID and automatically displays it on the report.
Use default values for parameters that generally do not change. You can also use default values to set or hard-code parameters, such as record type. The record type in a report run from a specific record portlet such as Building does not change. To hard-code a value, the parameter must not be visible in the parameter prompt window, and you must enter the value as the default value.
Set the visibility to no for any additional parameters that do not need to display in the parameter prompt window, such as an Accela-provided parameters. If the report has required parameters the user does not supply, the reporting service prompts for this value before running the report.
To add parameters for Rich Text Format (RTF) template type reports or URL reports, you must identify the variables used in the report as report parameters. For information on how to set up variable parameters for RTF templates, see Creating RTF Templates, Using Variables in Reports, and Setting Up URL Reports Containing Variables.
To add report parameters
Access the Report Manager portlet (Accessing the Report Manager Portlet).
Expand the category of the report you are looking for.
Click the report to which you want to add parameters.
Civic Platform displays the Report Detail form portlet.
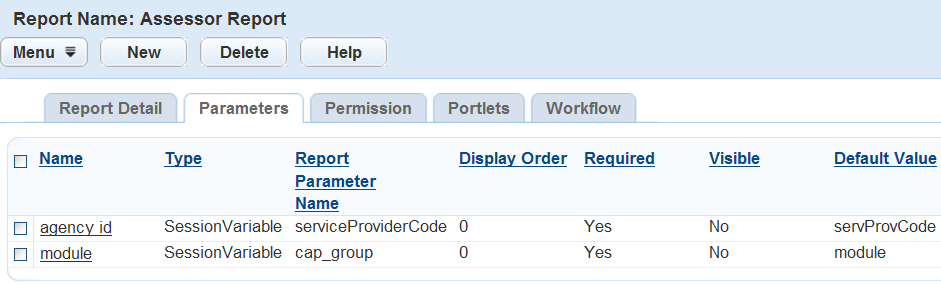
Click the Parameters tab.
Civic Platform displays a list of parameters for the report.
Click New.
Civic Platform displays the report parameter intake form portlet.

Complete the fields as described in Table 2.
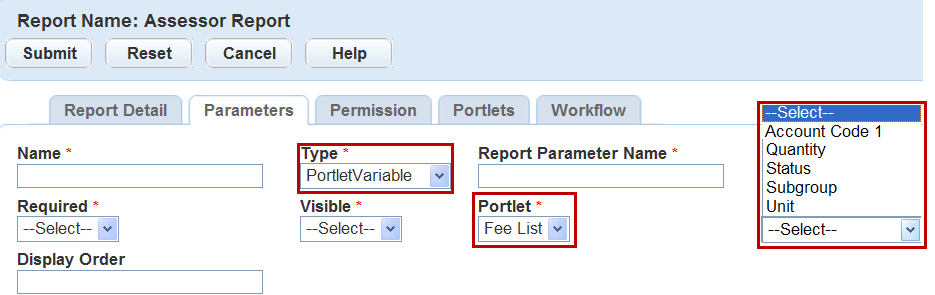
Note that the Type field option, PortletVariable populates additional required fields as shown here. The PortletVariable populates the Portlet drop‑down list so you can associate a report with a list or a form portlet. The available fields load in the Default Value field.
Click Submit.
Civic Platform saves the report parameter detail and returns to the report parameters list portlet.
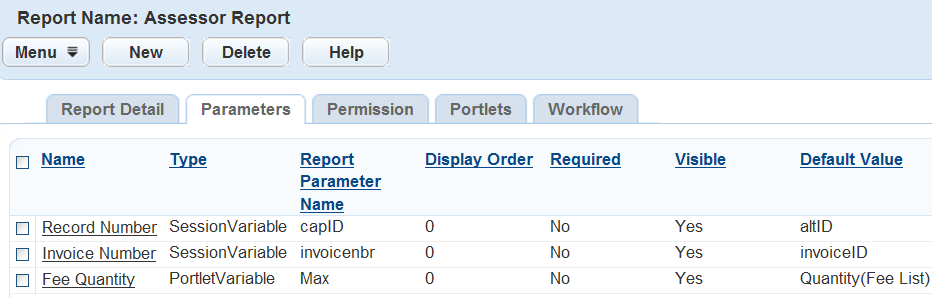
Table 2. Report Parameter Field Definitions Allow Multiple Values Select this option to enable users to select multiple values from the drop-down parameter list. This field is only available if you select the parameter type as drop-down list. Default Value Enter or select the default value that displays in the parameter prompt window for the parameter. If you select the parameter type as Variable, this field is a drop-down list with all the variables defined in Adding a Variable. Note that if you select a variable with a result-set of multiple columns as the default value, the drop-down list parameter only reads the first column value from the variable.
If you select the parameter type as PortletVariable, this field is a drop-down list that loads the available fields in the portlet you selected.
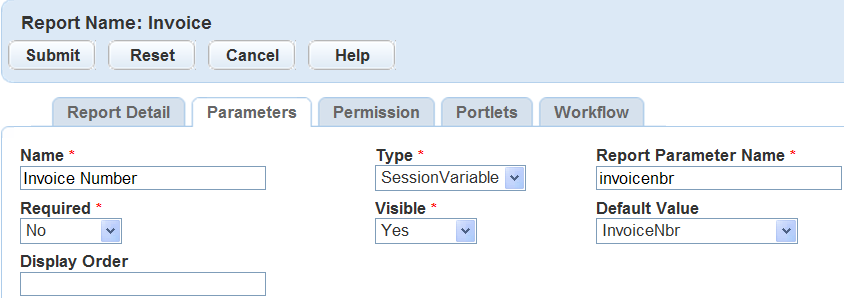
If you select the parameter type as SessionVariable, this field is a drop-down list with the standard session variables as listed in Table 1.
Display Order Enter the order number that the parameter should display in the parameter prompt window. Mask Enter the format for the parameter. For example, enter MM/DD/YYY for a date. Name Enter the name of the parameter you want to display to the user in the parameter prompt window. Report Parameter Name Enter the name of the parameter as it appears in the report. This field value must match the exact spelling of the report parameter. Required Use the drop-down to specify whether the parameter optional or required. If set to Required, the user must enter the parameter before running the report. Rows Returned If you select a variable parameter Type, this field enables you to limit the number of rows returned for the variable parameter. Type Select the data type of the parameter. To provide value options in a parameters drop-down list for users to select and send to report, select the type as Drop-down List.
To send the record type value automatically to the report from the record portlet, select the type as RecordType.
To link reports to a portlet and have values from the portlet passed as parameters, select the type as PortletVariable. For example, you can create a Trust Accounts detail report that links to the Trust Account list portlet or detail portlet. When users run the report, information from the selected trust account portlet acts as parameters for the report.Visible Use the drop-down to select if the parameter should or should not display in the parameter prompt window.
Editing Report Parameters
Editing a report parameter can affect if and how the report parameter displays in the Accela parameter prompt window. For example, when you change the visibility of a parameter to NO, the parameter no longer displays. If the report has required parameters, the user receives the parameter prompt window supplied by the reporting service. The parameter prompt window also displays if you do not properly enter the Parameter Name. This type of change can be confusing to the user and requires another step before a user can run the report.
Updating report parameters for template type reports and variables requires unique values that differ from the standard report parameters used by the major report services. For information on how to set up these unique parameters, see Using Variables in Reports.
To edit a report parameter
Access the Report Manager portlet (Accessing the Report Manager Portlet).
Expand the category that contains the report.
Click the report you want to edit.
Civic Platform displays the Report Detail form portlet.
Click the Parametersportlet tab.
Civic Platform displays a list of parameters for the report.
Click the Name of the parameter from the list.
Civic Platform displays the detail of the report parameter.
Update the fields as necessary; refer to Table 2 for field descriptions.
Click Submit.
Civic Platform saves the report parameter detail and returns to the report parameters list portlet.
Deleting Report Parameters
If you remove report parameters, including Accela provided parameters or values manually entered by a user, Civic Platform no longer sends them to the report. The parameter no longer displays in the parameter prompt window. If a report requires the parameter, Civic Platform prompts the user to enter the value in the prompt window provided by the reporting service. The parameter prompt can be confusing for users, and creates another step for the user before they can run the report.
To delete a report parameter
Access the Report Manager portlet (Accessing the Report Manager Portlet).
Expand the category that contains the report.
Click the report from which to remove parameters.
Civic Platform displays the Report Detail form portlet.
Click the Parameterstab.
Civic Platform displays a list of parameters for the report.
Select the Nameof the parameter you want to delete.
Click Delete.
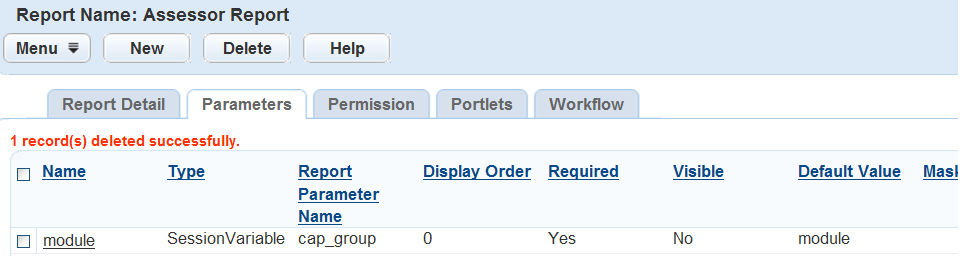
Civic Platform deletes the report parameter from the report.
Assigning Permissions to Reports
Permissions for both module and user groups apply to the Report Portlet and portlet-specific reports. Use report permissions to restrict access to a report to a specific module or user group. If an agency or department uses the Building and Service Request modules, they only see the reports that apply to those modules. User groups such as building inspectors, only see the reports that relate to inspections such as a Scheduled Inspections Report and Inspections by Inspector Listing Report.
Use report permissions to provide security for reports that contain sensitive data. For example, you can assign reports that contain sensitive data only specific management individuals should access, such as revenue based reports, to a specific user group. Only those users in that user group have access to the report.
Topics
Assigning a Report to a User Group
Report permissions include allowing a specific user group to access a report or a list of reports. You can also use this feature to filter reports that the user group should not see. For example, the Building module contains user groups such as field inspectors, permit technicians and property and maintenance. You assign the inspector user group only to those reports that relate to inspections, including reports that are accessible from the Reports portlet and portlet-specific reports. In order for a user group to have access to the report menu on a list or form portlet, they must have permission to at least one or more reports assigned to that portlet. If the user group does not have permission to any reports from that portlet, the report menu is not visible.
The navigation tree provides access to the list of reports assigned by module and then by user group from the Reports by User Group category. To view the user groups assigned to a specific report, navigate to the report using any of the categories in the navigation tree and, select the Permissions tab.
For more information on assigning report to a user group, see Managing Recipients in Administration Portlets.
Assigning a Report to a Module
You can assign a report to one or more modules as a way to control access to the report baseline. For example, an agency that uses the Building and Service Request modules only has access to the reports assigned to those modules.
You can assign a report that users access in more than one module, such as an address label, to all modules where it is applicable. Making copies of a report to apply to each individual module causes the report to display duplicated in the Reports Portlet or from form or list portlets.
All reports within Civic Platform from the Reports Portlet or list or form portlet use the permissions set on each report to filter the reports a user has access to. In addition to modules, you must assign reports to user groups. For more information, see Managing Recipients in Administration Portlets.
For more information on assigning a report to a module, see Setting Up Security Policies.
Assigning Permissions to Mobile Office Online Reports
Permissions for both module and user groups to an Mobile Office Online report apply to the users who run the report in the Mobile Office client:
When you assign an Mobile Office online report to a user group, only the Mobile Office users which belong to the same user group can access the report.
When you assign an Mobile Office online report to a module, the report is only available for the inspections which belong to the records in the same module.
Removing Report Permissions
You can remove report permissions when a report is no longer used by a user group or module -- or if you added it by mistake. When you remove a permission, the user group or module no longer has access to the report.
The navigation tree provides access to the list of reports assigned by module and then be user group from the Reports by User Group category. To view all permissions assigned to a specific report, navigate to the report using any of the categories in the navigation tree and, select the Permissions tab.
To remove a report permission
Access the Report Manager portlet (Accessing the Report Manager Portlet).
Expand the category and click the report.
Civic Platform displays the Report Detail form portlet.
Click the Permissions portlet tab.
Civic Platform displays a list of permissions for the report.
Select the permissions you want to remove.
Click Delete.
Civic Platform removes the permissions for the selected report.
Setting Permissions on Ad hoc Report Data Sources
Configure access to data and data sources (tables) for the Ad hoc Report portlet in Report Manager by setting permissions on a User Group and/or Module basis. When you set permissions for a data source, a user in the assigned user group (and/or with access to the assigned module) can use that data source to write reports in the Ad hoc Report portlet.
Use the standard choice ADHOC_REPORT_DB_VIEW to control which DB views (data sources) are available in the Report Manager Ad hoc Report Data Sources list. If you do not configure this standard choice, Civic Platform uses default DB Views.
For more information on setting permissions on Ad hoc report data sources, see Managing Recipients in Administration Portlets.
Removing Permissions for Ad hoc Report Data Sources
You can remove access to data and data sources (tables) for the Ad hoc Report portlet by deleting permissions from the Ad hoc Data Sources Permissions list. When you delete a permission, users from the deleted group or with access to the deleted module are no longer able to use the current data source for ad hoc reporting.
To delete ad hoc reporting permissions
Access the Report Manager portlet (Accessing the Report Manager Portlet).
Expand .
A list of data sources (tables) displays.
Select the data source you want to delete permissions for.
The Permissions form for the selected data source displays.
Select each permission setting you want to delete.
Before you click Delete, double check your deletion choices. You do not get an opportunity to confirm the deletion after you click the button. Click Delete.
Civic Platform removes the selected permissions for the current data source. The current data source is no longer available to users associated with the deleted module or user group for use in their ad hoc reports.
Attaching Reports to a Portlet with the Report Button
Users can run reports against a single record or small set of specific records. These portlet-specific reports are accessible from the reports menu located on a list or form portlet, as shown in the screen shot below. Examples of these reports include Permit Print, Certificates of Occupancy, and notifications.
Figure: The Report Button in Building Portlet
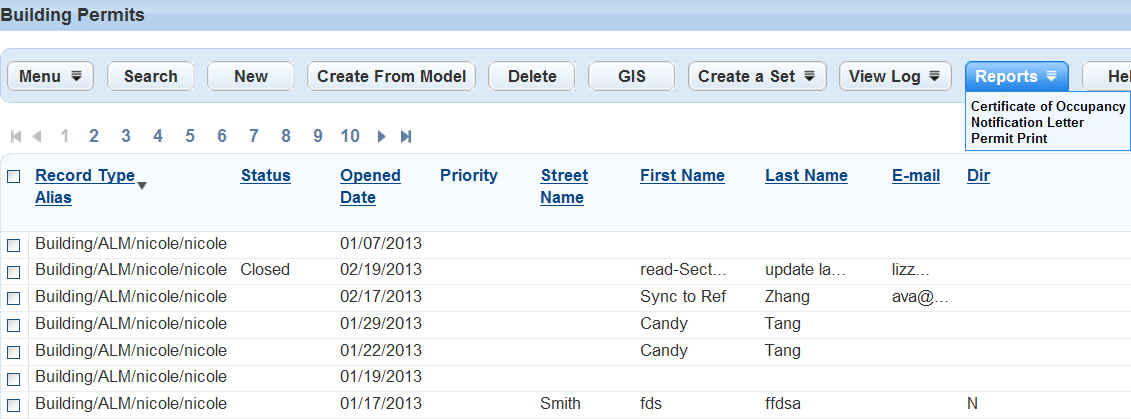
The Reports menu is accessible from any portlet within Civic Platform when you add at least one report to a portlet. The reports that display in each portlet vary depending on the user group and module permissions specified for each report. An administrator must assign user groups and modules to each report so that users can access them.
Portlet-specific reports generally use the Accela provided parameters that use a selected record or set of records to filter data in a report, which enables users to run very specific reports without having to enter parameter values. For example, a permit report generates when a user selects a specific permit from the Building portlet and runs the report. If the values required to run the report are not available, the report can return incorrect results and errors. For these types of reports, the report can be greyed-out in the report menu so that users cannot run the report. For example, to run a report on approved building permits, the permit must have a status of “Approved” in the Building portlet. If the building permit has any other status, the report is greyed-out in the report menu list, preventing the user from running the report. This feature not only prevents users from printing incorrect reports but provides a list of valid reports for the specific record.
If you use Citizen Access, you can display a print/view report button on the user interface for a specific report. Assign the record type report to a button by selecting the button name from the Portlet Name drop-down list. For more information on how to assign a report to a print/view button in Citizen Access, refer to the Citizen Access Administrator Guide.
Topics
Adding a Report to a Portlet using the V360 Interface
Portlet-specific reports use a single or small set of specific records such as a building permit, notification letter, or receipt. These types or reports can added to any of the form or list portlets within Civic Platform from a report drop-down list. The report menu only displays when you add a report to the portlet.
You can add a single report to more than one portlet and display it in the Reports Portlet. To do this you must verify that the report parameters work from the various locations.
Portlet-specific reports use the permissions set for each report, by user group and module, which means you must assign a user group and/or module to the report for it to display in the portlet. For information on assigning permissions, see Assigning Permissions to Reports.
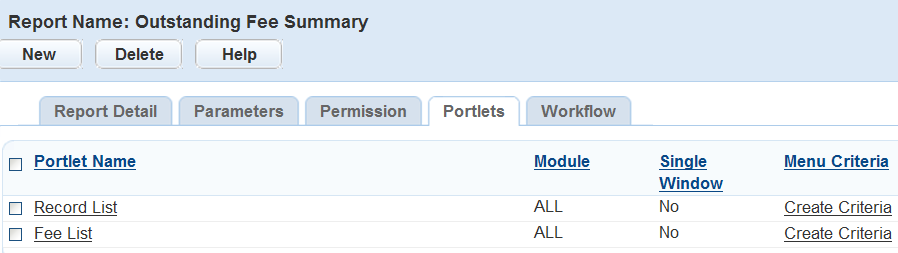
To view the list of reports for a specific portlet, expand the Reports by Portlet option in the navigation tree. To view the portlets that display on a specific report, click the report from any category on the navigation tree, and select the Portlet tab. To add criteria to a portlet-specific report, see Defining Criteria for a Portlet-Specific Report.
To add a report to a portlet
Access the Report Manager portlet (Accessing the Report Manager Portlet).
Navigate to the report you want to add to a portlet.
Click the report you want to add to a portlet.
Civic Platform displays the Report Detail form portlet.
Click the Portletstab.
Civic Platform displays the portlets for the report.
Click New.
Civic Platform displays the portlet detail form portlet.
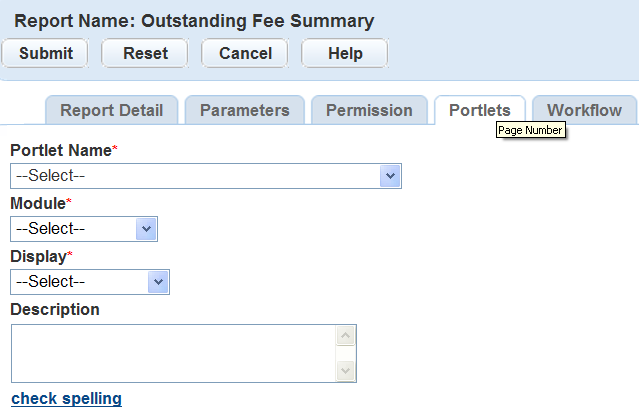
Enter the field described in Table 3.
Click Submit.
Civic Platform dynamically assigns the report to the portlet.
Table 3. Report Portlets Field Definition Description Enter a brief description on the report and how it should behave from the specific portlet. Display Select the type of display for the report. Module Select the module the for the portlet where you want to display the report. Portlet Name Select the portlet on which you want to display the report. If you use Citizen Access, select the appropriate Print/View Report button from the list. For more information on how to assign a report to a Print/View Report button in Citizen Access, refer to the Citizen Access Administrator Guide.
Adding a Report to a Portlet using the Oxygen UI
Best practices for setting up the Report Button in the Oxygen UI
- If you want to run a report for a single permit or record, add the Report Button to the Record page for the relevant record ONLY. Do not add the Report Button to the Report list page, and do not add the Report Button to the Record list page.
- If you want to run a report for multiple permits or records, add the report itself (not the Report Button) to the Reports list page or the Reports menu on the Record list page.
Defining Criteria for a Portlet-Specific Report
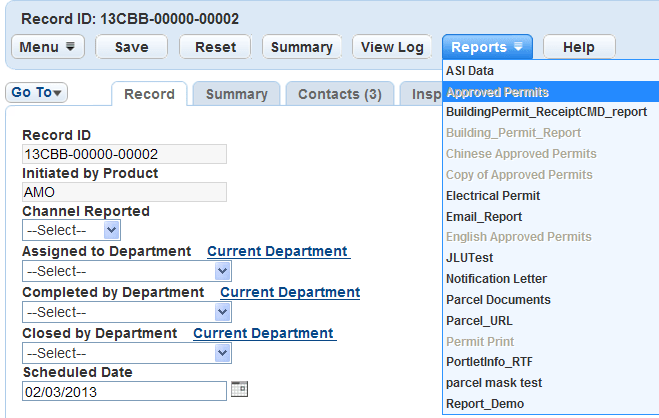
Portlet-specific reports generally use the Accela provided parameters that use a selected record or set of records to filter data in a report, which enables users to run very specific reports without having to enter parameter values. For example, a permit report generates by selecting a specific permit from the Building portlet and running the report. If the values required to run the report are not available within the selected record, the report can return incorrect results and errors. For these types of reports, the report can be disabled in the Report menu so that users cannot run it. For example, to run a report for approved building permits, the status must be “Approved” on the selected record. If the permit has any other status, the report displays inactive or “grayed-out” in the report menu list, as shown in the screen shot below. This feature prevents the user from selecting and running a report that is not applicable to the selected record or set of records.
Figure: Unsuccessful Report
For reports associated with Civic Platform portlets, you can set criteria only for form portlets. The criteria option is not applicable to list or search portlets.
If you associate several reports with the same Citizen Access Print/View button, you must set the criteria for every report.
To set criteria for a portlet-specific report
Access the Report Manager portlet (Accessing the Report Manager Portlet).
Navigate to and click the report to which you want to add criteria.
Civic Platform displays the Report Detail form portlet.
Click the Portletstab.
Civic Platform displays the portlets for the report.
Click the Create Criteria or Edit Criterialink for the portlet to which you want to add criteria. If the desired portlet does not display, you can add it by following the steps under Adding a Report to a Portlet using the V360 Interface.
Civic Platform displays the Portlet Criteria portlet.

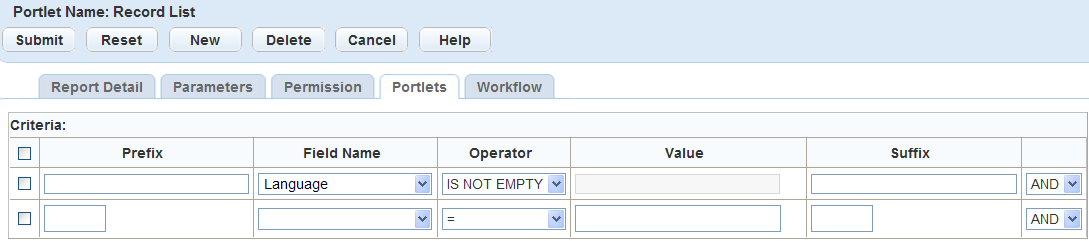
Complete the following fields:
Prefix Enter the prefix for the field name you want to use to set the criteria. You can also use Prefix to handle complicated criteria using brackets for the LIKE and OR expressions. See screen shot below. Field Name Select the portlet field for which you want to set criteria on the selected portlet. For example, to set criteria for building permits with an Approved status, select a field name of Status, and Operator of =, and a Value of Approved. Operator Select the appropriate operator you want to use in the criteria formula for the selected field. For example, to set criteria for building permits with an Approved status, select a field name of Status, and Operator of =, and a Value of Approved. Value Enter the appropriate value used to determine the criteria. For example, to set criteria for building permits with an Approved status, select a field name of Status, and Operator of =, and a Value of Approved. You can also use the wildcard % with the value. For example, to include all Permit Types that start with “Building,” use the value “Building%” with the wildcard. Suffix Enter the suffix for the field name you want to use to set the criteria. You can use Suffix to close complicated criteria using brackets in the Prefix for LIKE and OR expressions. See screen shot below. AND/OR Select one of the following to join two or more criteria conditions.AND operator displays a row of ALL conditions listed that are true. OR operator displays a row of ANY of the conditions listed that are true. Figure: Prefixes and Suffixes in Report Criteria

Click New Field to add additional criteria to a portlet.
Civic Platform displays another line in under the previous criteria record.
To delete a field, select the field and click Delete Field.
When you finish adding criteria click Submit.
Note: Make sure you remove all blank criteria before submitting the record. If you submit a record with blank criteria, the update fails, Civic Platform deletes the blank record, and you must submit the records again.Civic Platform updates the criteria for the portlet.

Click Cancel to return the Portlet list portlet.
Civic Platform displays the Portlet list and updates the Menu Criteria.
Removing a Report from a Portlet
You remove reports from a portlet by removing the reference to the portlet. When you remove a report, it no longer displays in the report drop-down list.
If you are removing the only report associated with the portlet, the report drop-down list disappears. There must be at least one report assigned to the portlet in order for the report menu to be display.
To remove a report from a portlet
Access the Report Manager portlet (Accessing the Report Manager Portlet).
Navigate to the report you want to remove from the portlet.
Click the report you want to remove from the portlet
Civic Platform displays the Report Detail form portlet.
Click the Portletstab.
Civic Platform displays the portlets for the report.
Select the portlets you want to remove the report from.
Click Delete.
Civic Platform removes the report reference from the deleted portlet.

Example: Setting a Portlet for Meeting Reports
You can configure reports so that agency users can access and run reports from the Meeting Agenda portlet in the Calendar list portlet and the Meeting record tab in the Record list portlet.
You must add Meeting Reports to Report Manager before you can set the portlet display. For instructions on how to add a report, refer to Adding a Report.
To set up a portlet for a meeting report
Access the Report Manager portlet (Accessing the Report Manager Portlet).
Expand and collapse the tree nodes to find the Meeting Report you want to modify.
Civic Platform displays the Report Detail form portlet.
Click the Portlets tab.
Civic Platform displays the portlets associated with the selected report.
Click New.
Civic Platform displays the Portlet detail page.
If you want the selected report to display on the Meeting Agenda portlet, select List - Meeting Agenda List from the Portlet Name drop-down list. If you want the report to display on the Meetings tab in the Record list portlet, select List - Record Meeting List from the Portlet Name drop-down list.
Complete these remaining fields:
Description Enter a report description. For example: “The meeting report displays the meeting date, location, and associated applications.” Display Select a value from the drop-down list that indicates if you want the report to display in one or more windows. Module Select a module from the drop-down list that indicates where you want the report to display. Click Submit.
Civic Platform updates the report detail.
Attaching Reports to a Workflow
You can associate reports with workflow tasks and configure them to automatically print when the user changes the status of a task. For example, if you want to print a building permit at the end of the application process, you can associate the building permit with the application acceptance task. Then you configure the status to execute the automatic printing of the report.
Topics
Adding a Report to a Workflow
You can configure reports to automatically print at the end of a workflow task. For example, to print a building permit at the end of the application acceptance process, select the building permit report from the report administration. Then, associate a workflow to the report by selecting the application process, acceptance task, and the complete status; this enables you to automatically run and print the building permit report when its status changes to “Complete.”
To add a report to a workflow
Access the Report Manager portlet (Accessing the Report Manager Portlet).
Navigate to and click the report you want to add to a workflow.
Civic Platform displays the Report Detail form portlet.
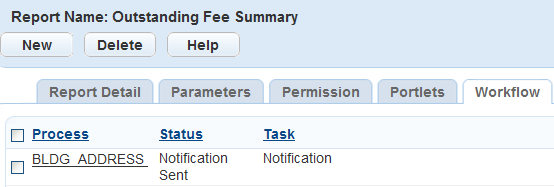
Click the Workflowtab.
Civic Platform displays the workflow assigned to the report.
Click New.
Civic Platform displays the report intake form by workflow portlet.
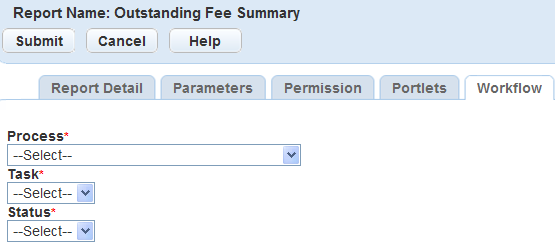
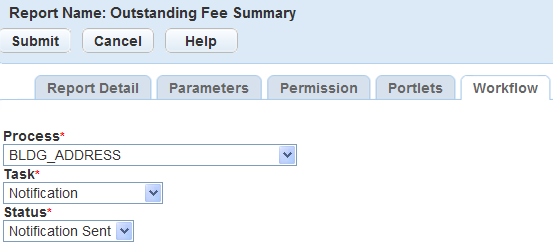
Enter information in the fields as described in Table 4.
Click Submit.
Civic Platform saves the report to the workflow task.
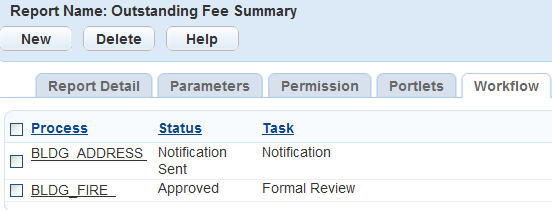
Table 4. Reports by Workflow Field Definitions Process Select the workflow process. For example, to print a building permit at the end of the application acceptance process, select Building. Status Select the workflow task status that should trigger the report. For example, if you want to print a building permit at the end of the application acceptance process, you might select Complete. Task Select the workflow task you want to associate with the report. For example, to print a building permit at the end of the application acceptance process, select Application Acceptance.
Editing a Report Association with a Workflow
When the requirements for the automatic printing of a report from a workflow task change, you must edit the information in report administration. When you change a workflow’s process, task, or status, it effects when the report automatically prints, and you must make the appropriate changes.
If the existing report is incorrect, you must remove the association between the report and workflow, select the correct report and then associate it with the workflow task. For more information, see Removing a Report from a Workflow and Adding a Report to a Workflow.
To edit a report associated with a workflow
Access the Report Manager portlet (Accessing the Report Manager Portlet).
Navigate to and click the report you want to edit the workflow.
Civic Platform displays the Report Detail form portlet.
Click the Workflowtab.
Civic Platform displays the workflow assigned to the report.
Click the link for the workflow task you want to edit.
Civic Platform displays the report by workflow detail form portlet.
Update the fields as necessary. For field definitions see Table 4.
Click Submit.
Civic Platform saves the changes to the association with the workflow task.
Removing a Report from a Workflow
Remove reports from workflow tasks from the report administration workflow tab or the Reports by Workflow category in the navigation tree. To remove the association from the navigation tree, search for the report under the workflow task, right-click the report, and select Remove Association. Removing the report association stops the report from automatically printing when the workflow status updates.
To remove a report from the workflow tab
Access the Report Manager portlet (Accessing the Report Manager Portlet).
Navigate to and click the report you want to remove a workflow.
Civic Platform displays the Report Detail form portlet.
Click the Workflowtab.
Civic Platform displays the workflow assigned to the report.
Select each workflow you want to remove.
Click Submit.
Civic Platform removes the report from the workflow and displays the report by workflow list portlet.