Configuring APO Functionality
You can configure the address, parcel, and owner (APO) portlets in Civic Platform according to your agency’s best practices.
After you configure how you want to handle APO transactions in Civic Platform, users can add, edit, split, merge, and copy or move parcel associations, according to your agency’s objectives.
Refer to the Accela Civic Platform User Guide for full details on establishing parcel genealogy, splitting, and merging parcels.
Topics
Configuring FIDs and Standard Choices
Refer to the Civic Platform Configuration Reference, "Address, Parcel, Owner (APO)" section for complete details on the FIDs and Standard choices you must configure to enable their functionality in Civic Platform.
You can configure your system to synchronize parcel information associated to addresses and owners you add or remove from a permit record. When you associate a parcel to an address, if you add or remove that address from a permit record, the parcel information can populate the record as well, either automatically or following a message prompt. For information on configuring reference data synchronization, see APOSE_SYNCHRONIZE in the Accela Civic Platform Configuration Reference.
Configuring APO Form Fields
The following tables represent the fields available on the tabs of the address, parcel, and owner (APO) portlets. You can choose to include or exclude any of these fields, based on your agency’s needs and preferences. You can set user access levels and specify which fields are required and which are optional.
For instructions on configuring the fields, refer to Designing Forms for Pages.
Address Fields
| Street # (Start) | In combination with the Street # (End) field, use this field to specify the street number for this address. Use the Fraction drop-down list to include fractional street numbers such as “1/2.” |
| Street # (End) | In combination with the Street # (Start) field, use this field to specify the street number. Use the Fraction drop-down list to include fractional street numbers such as “1/2.” |
| Unit # (Start) | In combination with the Unit # (End) field, use this field to specify a range of unit numbers for this address. |
| Unit # (End) | In combination with the Unit # (Start) field, use this field to specify a range of unit numbers for this address. |
| Unit Type | Choose a unit type such as Apt. or Suite. |
| Direction | Use this drop-down list to indicate a street direction. For example, choose “N” to indicate a north direction. This usually indicates the directional area of a city or street, such as “North Broadway.” |
| Street Name | Enter the street name. |
| Suffix | Use this drop-down list to choose a street type such as “Lane” or “Boulevard.” |
| City | Enter the city name or click Get City to choose a standardized city name. |
| State | Use this drop-down list to choose the state name. |
| Zip | Enter the ZIP code. Because this is a free-text field, you can include a four-digit extension. For example, enter 84070-2431. |
| County | Enter the county to which the address belongs. |
| Country | Enter the country to which the address pertains. |
| Address Description | Enter a description of the address. |
| X Coordinate | Enter the latitudinal coordinate for the parcel. |
| Y Coordinate | Enter the longitudinal coordinate for the parcel. |
| Primary Address | You can indicate the primary address of a parcel when you edit the parcel. |
| Status | If you want to make the address available in Civic Platform, select Enable; otherwise, select Disable. |
Address Search Fields
| Parcel # | Enter the parcel number. |
| Subdivision | If you have set this up, enter the name of the subdivision. If you have defined subdivisions, choose the subdivision from the drop-down list. |
| Lot | If you have set this up, enter the lot name. If you have defined lots based on subdivisions, choose the lot from the drop-down list. |
| Owner Name | Enter the name of the parcel owner. |
| Street # (Start) | Enter the starting street number. |
| Street # (End) | Enter the ending street number. |
| Street Direction | Use this drop-down list to indicate a street direction. For example, choose “N” to indicate a north direction. This usually indicates the directional area of a city or street, such as “North Broadway.” |
| Street Name | Enter the name of the street. |
| Street Suffix | Use this drop-down list to choose a street type such as “Lane” or “Boulevard.” |
| Unit # (Start) | Enter the starting unit number. |
| Unit # (End) | Enter the ending unit number. |
| City | Enter the city name or choose a standardized city name. |
| State | Use this drop-down list to choose the state name. |
| Zip Code | Enter the ZIP code. Because this is a free-text field, you can include a four-digit extension. For example, enter 84070-2431. |
| County | Enter the county to which the address belongs. |
| Country | Enter the country to which the address pertains. |
| Status | If you want to search for addresses available in Civic Platform, select Enable; otherwise, select Disable. |
Parcel Fields
| Parcel # | Enter the official parcel number as determined by the county assessor. |
| Section | Enter a section number to download any parcels in that section number. |
| Township | Enter a township number to download any parcels in that township number. |
| Range | Enter a range number to download any parcels in that range number. |
| Subdivision | If you have set this up, enter the name of the subdivision. If you have defined subdivisions, choose the subdivision from the drop-down list. |
| Lot | If you have set this up, enter the lot name. If you have defined lots based on subdivisions, choose the lot from the drop-down list. A block can contain one or more lots on a plot survey. |
| Block | Enter the name or the street number of the block associated with this application. A block is a rectangular space, surrounded by streets. A parcel can contain one or more blocks. |
| Tract | Enter the name of the tract associated with this application. A tract consists of contiguous parcels all with the same owner. |
| Area | Enter the total area of the parcel. Your agency determines the standard unit of measure, such as acres or square feet. |
| Census Tract | Enter the unique number assigned by the Census Bureau that identifies the tract to which this parcel belongs. |
| Book/Page/Parcel | Use these three fields to enter a reference to the physical location of this parcel information in the County Assessor’s or other responsible department’s records. |
| Land Value | Enter the total value of the land within the parcel. |
| Exempt Value | Enter the total value of any tax exemptions that apply to the land within the parcel. |
| Improved Value | Enter the total value of any improvements to the land within the parcel. |
| Inspection District | Enter the inspection district to which the parcel belongs. |
| Supervisor District | Enter the supervisor district to which the parcel belongs. |
| Council District | Enter the council district to which the parcel belongs. |
| Map Reference | Enter the reference to where the map for this parcel exists, such as a map book. |
| Map # | Enter the unique map number that identifies the map for this parcel |
| GIS Sequence # | Enter the ID number that you use to identify the parcel in Geographic Information Systems (GIS). |
| Plan Area | Enter the plan area in which the parcel belongs. |
| Legal Description | Enter the legal description of the parcel, the parcel bounds, or its characteristics. You can also include a reference to the official documents that contain this description. |
| Parcel status | If you want to make the parcel available in Civic Platform, select Enable; otherwise, select Disable. |
| Primary Parcel | When an application has more than one parcel associated with it and you need to
designate a primary parcel, click Yes. For each application there
can be only one primary parcel. If an application has only one parcel, Civic Platform automatically designates it as the primary parcel. To change the option from “No” to “Yes” you must first change the current primary parcel designation. In most other actions, the primary parcel setting information also applies. For example, when cloning or copying the application (Daily > Application > Copy Application) the parcel primary setting copies over to the new application. |
Parcel Search Fields
| Parcel # | Enter the official parcel number determined by the county assessor. Depending on the issuing department, the format of the parcel number can be different on different applications. |
| Subdivision | If you have set this up, enter the name of the subdivision. If you have defined subdivisions, choose the subdivision from the drop-down list. |
| Lot | If you have set this up, enter the lot name. If you have defined lots based on subdivisions, choose the lot from the drop-down list. |
| Address: Street # | Enter a range of street numbers in the start field and end field. |
| Address: Direction | Enter the direction of the street. For example, enter “North.” |
| Address: Street Name | Enter the name of a street. |
| Address: Suffix | Choose a street type such as “lane” or “boulevard.” |
| Address: Unit # | Enter a range of units in the start field and end field. |
| Address: City | Enter a city name. |
| Status | Select the current mode of the parcel that you want to find. You can search for enabled, disabled, pending, or all items. |
| Primary Parcel | Specify “All” to search every parcel in Civic Platform. This search option
ignores if you define the parcel as the primary parcel or not on an
application. Specify “Yes” to search for only primary parcels on an application. Specify “No” to search for parcels that are not the primary parcel on an application. |
| Owner Name | Enter the name of the person, business, or
organization that owns the parcel. Note:
Civic Platform supports fuzzy string searching on the field even if users does not enter the fuzzy search symbol (%). |
Owner Fields
| Owner Title | If applicable, enter the owner’s title. |
| Full Name | Enter the owner’s full name. Note:
Civic Platform supports fuzzy string searching on the field even if users does not enter the fuzzy search symbol (%). |
| Name (F/M/L) | Enter the first, middle, or last name of the owner. |
| Address | Enter the owner’s street address. |
| City | Enter the city or click Get City to choose the city that corresponds with the owner’s street address. |
| State | Choose the state that corresponds with the owner’s street address. |
| Country | Enter the country that corresponds with the owner’s street address. |
| ZIP code | Enter the ZIP code that corresponds with the owner’s street address. |
| Phone # | Enter the owner’s telephone number. |
| Fax # | Enter the owner’s fax number. |
| Address | Enter the owner’s mailing address. |
| City | Enter the city or click Get City to choose the city that corresponds with the owner’s mailing address. |
| State | Choose the state that corresponds with the owner’s mailing address. |
| Country | Enter the country that corresponds with the owner’s mailing address. |
| ZIP code | Enter the ZIP code that corresponds with the owner’s mailing address. |
| Tax ID # | Enter the owner’s tax ID number. |
| Event ID # | Enter the ID number of the significant event related to the parcel. |
| Primary Owner | You can indicate the primary owner of a parcel when you edit the parcel. |
| Owner Status | If you want to make the owner available for searching in Civic Platform, select Enable; otherwise, select Disable. |
New Attachment Form Fields
| Document Description | Enter a brief description of the document. |
| Document Group/Category | Select the document group and document category for the file. When selecting a document group, the category field drop-down list changes to provide list items for the selected document group. |
| Document Name | Enter a title for the document. |
| File Name | Click Browse to locate the file. |
| Source/EDMS Name | Select the name for your agency’s electronic document management system. Note that this field can have either of these titles, depending upon your agency’s configuration. |
| User Email | Enter one or more email addresses that you want to associate with the attachment. You can enter the user’s email address, the address of the document author, or any other related email address. Separate multiple addresses with commas. |
Mapping GIS Attribute Fields to Parcel Fields
To enable users to create parcels for selected GIS features from ESRI ArcMap and support synchronizing parcel information between Civic Platform and the legacy Accela GIS, you must map each GIS attribute to a parcel field in Civic Platform. For more information about where the GIS attribute comes from and how its maximum field length is determined, see “Understanding Field Mapping” in the Accela Extension for Esri ArcMap User Guide.
To map GIS attributes to parcel fields
- Access the GIS Attribute Mapping portlet (Navigating to the Setup).
Civic Platform displays the GIS Attribute Mapping portlet.
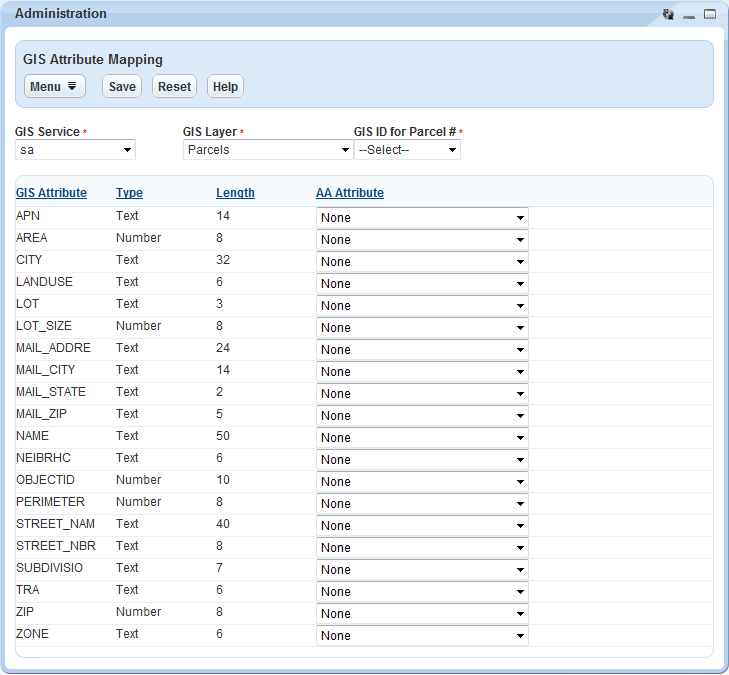
- Complete these fields that appear in sequence:
GIS Service This drop-down list displays all the map services configured for your agency. After you select a map service, the GIS Layer drop-down list populates with all the related map layers. GIS Layer This drop-down list displays all the map layers configured for the map service you select in the GIS Service drop-down list. After you select a map layer, the GIS ID for Parcel # drop-down list populates with all the related GIS attributes. GIS ID for Parcel ID This drop-down list displays all the attributes for the map layer you select in the GIS Layer drop-down list. Select the GIS attribute that you want to use for the Parcel ID in Civic Platform. Civic Platform displays the attributes that belong to the selected map service and map layer.
- Select a desired parcel field from the Civic Platform Attribute drop-down list next to the
GIS attribute that you want to map the parcel field to.
Note:Make sure that each Civic Platform attribute is of the same data type and at minimum the same data length with the mapped GIS attribute. For a numeric Civic Platform attribute that has decimal places, make sure both its integer and its fraction length is no less than that of the mapped GIS attribute. Otherwise, you cannot save the mapping.
- Click Save.