Managing Payments
Use Civic Platform to record and process payments that your agency receives. You can apply payments to one or more invoices for one or more accounts as needed. Your agency’s cashier can use Civic Platform to consolidate payments for fee items from different records, or to pay fees for one record at a time.
Note:
Before a cashier can process a payment, you must add fee items to the record and invoice the licensed professional or owner. For instructions on how to invoice a fee, see Invoicing. You must start a cashier session before you can process a payment. For information about managing cashier sessions, see Working with a Cash Drawer Interface. |
Topics
Receiving a Payment for a Record
You can work from both the Payment tab on the Record portlet or the Payment Processing portlet to receive payments for records.
If your agency is an on-premise agency, a third-party clearinghouse processes your payments.
Note:
You must start a cashier session before you can process a payment. If you do not, Civic Platform automatically displays a cashier session window. You can click the New Session button to open a session or continue a previous session by clicking the red X on the top right-hand corner to close the pop-up window. |
Topics
Receiving a Payment in the Record Portlet
Navigate to the Record portlet.
Use search to locate the record you want to work with (see Using the Search Features).
Click the Payment tab.
Click Pay.
Civic Platform displays the Payment Details page.
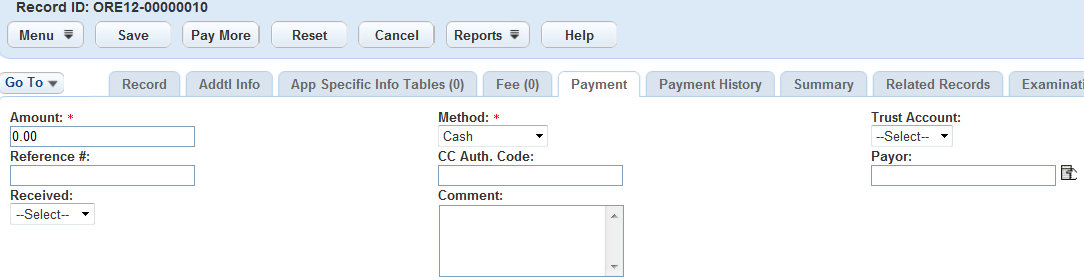
Select a payment method from the Payment Method drop-down list.
The Payment portlet displays the associated fields for the payment method.
Enter the payment details for the selected payment method.
See Common Payment Details, Cash Payment Details, Credit Card Payment Details, and/or Check Payment Details for field definitions.
If there are multiple payment methods or multiple payees for the payment, click Pay More, and repeat the previous two steps.
Click Save.
If the payment equals or exceeds the total amount due, the payment is complete. Civic Platform displays a receipt summary and receipt as confirmation of the payments.
If the payment is less than the total amount due, you need to allocate the paid amount among the fee items before completing the payment (see Allocating Payments).
Receiving a Payment in the Payment Processing Portlet
Navigate to the Payment Processing portlet.
Click the Payment tab.
Use search to locate the record you want to work with (see Using the Search Features).
Note:The Payment Processing portlet ignores the records that have negative outstanding total of its fee items.
Civic Platform displays the results in the Payment portlet.
Select the record in the Payment list to which you want to apply a payment and click Pay.
Civic Platform displays the Payment Details page.
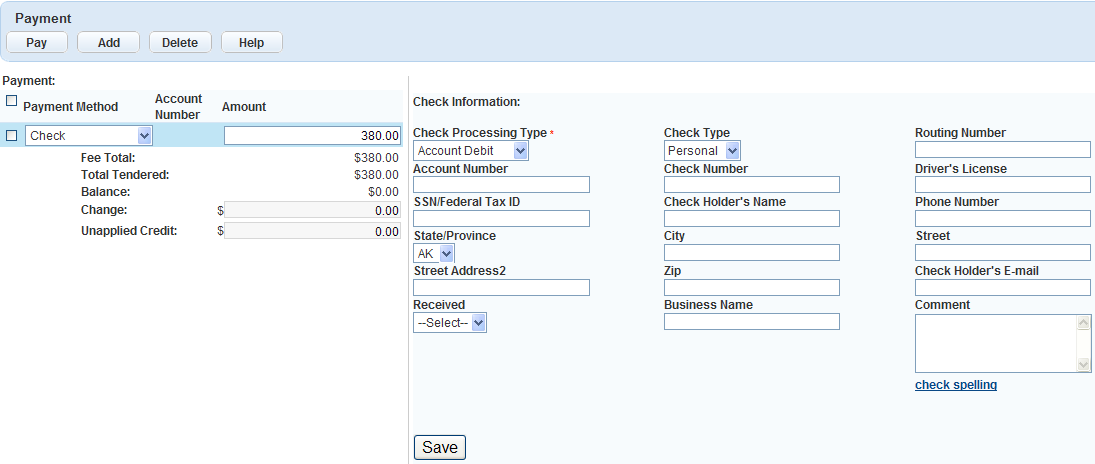
Select a payment method from the Payment Method drop-down list.
The Payment portlet displays the associated fields for the payment method.
Enter the payment details for the selected payment method.
See Common Payment Details, Cash Payment Details, Check Payment Details, or Credit Card Payment Details for field definitions.
Note:Some agencies set up a magnetic card reader to automatically read the credit card information (card type, account number, expiration date, first name, last name, cardholder’s name) into the corresponding Civic Platform fields.
If you have multiple payment methods or multiple payees for the payment, click Save to save the payment details you just entered, and then click Add and repeat the previous two steps.
Click Pay.
Civic Platform displays a receipt summary and receipt as confirmation of the payments.
If your attempt to process the payment fails, see Reviewing Failed Payments for information before proceeding anew.
Civic Platform automatically allocates the paid amount among the fee items in the payment. For information about allocation rules, see Allocating Payments.
Reviewing Failed Payments
There are many reasons why a payment might fail. Review the possibilities listed in this section with the citizen before you try to process a payment again.
Credit Card Related Payment Issues
It is not uncommon for a credit card authorization request to fail before the request finally clears. Retry the payment if the request fails.
The request for payment has exceeded the credit card limit.
Invalid Address Information: The address supplied on the registration form does not match the billing address that the credit card issuer has on file.
Invalid Credit Card Expiration Information: You (or the customer) entered the credit card account number or the credit card expiration date incorrectly. Check the numbers again and re-enter.
Invalid Card Validation Number (CVN): The Card Validation Number from the back of the card is incorrect. Please check the CVN and re-enter.
The account might have fraud protection services. Contact the financial institution to authorize the transaction.
The account might have insufficient funds. Contact the financial institution and verify the available credit limit.
Check Related Payment Issues
The check might not have a signature.
The account might have fraud protection services. Contact the financial institution to authorize the transaction.
The account might have insufficient funds. Contact the financial institution and verify the available credit limit.
Transferring Funds from One Record to Another
When a related record has excess funds, you can transfer those funds to the record that you are currently working on. When you transfer funds, Civic Platform creates an entry in the transaction section of the invoice for both the “transfer to” and the “transfer from” records. You can view information about a fund transfer on the automatically generated receipt, as well as the payment history.
To transfer funds
Navigate to the portlet you want, and use search to locate the record you want to work with.
Click the record ID link in the Record ID column.
Civic Platform displays the record details.
Click the Payments tab.
Civic Platform displays the main payment summary.
Click Fund Transfer.
Civic Platform displays the fund transfer application search form.
Enter search criteria as needed to locate the record that you want.
Click Submit.
Civic Platform displays search results.
Select the application from which you want to transfer the funds and click Select.
Civic Platform displays the Fund Transfer From details. You can see the total amount available for transfer.
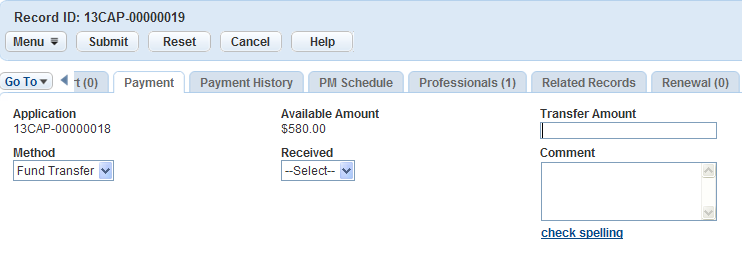
Complete the following fields:
Transfer Amount Enter the amount you want to transfer. Method Currently there is only one transfer method to choose from: Fund Transfer. Civic Platform selects this value by default. Comment Enter comments or notes about the transfer. Click Submit.
Civic Platform confirms a successful transfer and generates a Fund Transfer transaction and receipt for each application involved in the transfer.
Generating Receipts
After you accept a payment or issue a refund, you can need to generate a receipt as confirmation of the transaction. When you process multiple items, you can generate a transaction summary receipt or a transaction report to provide a detailed breakdown of each action in the transaction group.
Topics
Generating a Payment Receipt from an Application
After you accept a payment, you can generate a receipt so that the payee can verify the payment.
To generate a payment receipt
Open the Building record you want to work with and locate the application you want by clicking the record ID link in the Record ID column.
Civic Platform displays the application details.
Click the Payments tab.
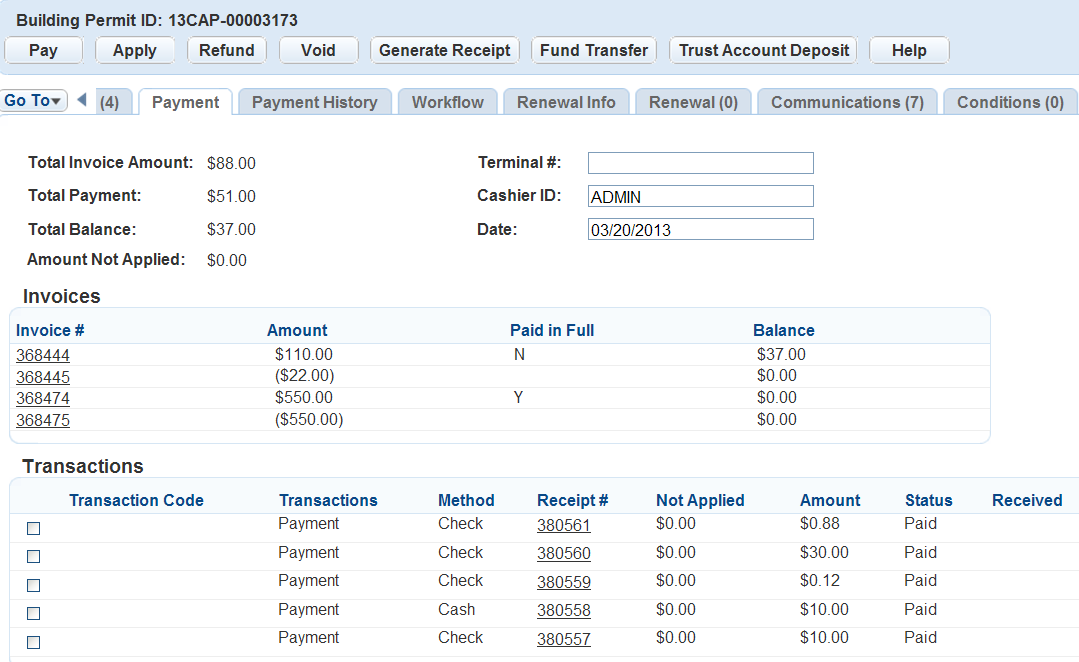
Civic Platform displays the main payment summary.
Select the payment transactions for which you want to generate a receipt.
By default, Civic Platform marks all the payment transactions so that they display on the receipt. If you want to remove one or more of the transactions, clear the corresponding box.
Note:If your agency sets the Payment tab to automatically generate a receipt after a transaction is complete, the Generate Receipt page does not display and you can skip steps 4 through 7.
Civic Platform checks all payments that the Generate Receipt page can display. Civic Platform then displays the Invoices information and the receipt and Receipt Summary pop-up pages.
Click Generate Receipt.
Civic Platform generates a receipt of payment and a receipt summary, then it displays each in a separate window.

To view or print the receipt, click the link to the receipt number.
You can use your browser’s print command to print the receipt.
Viewing a Receipt from the Payment Processing Portlet
Depending on how your administrator has configured your system, Civic Platform can automatically generate and display a summary receipt or a transaction report when you complete a transaction through the Payment Processing portlet. However, you can also return to the Payment Processing portlet later so that you can view or print a receipt for an individual item in a particular transaction.
To view a transaction receipt for a single item
Navigate to the Payment Processing portlet.
Select the History tab.
Civic Platform displays the Payment Processing - History portlet.
Locate the desired Transaction ID.
If known, enter the Transaction ID, Receipt Number, Invoice Number, Date range of the transaction, or choose the Transaction Type from the drop-down list and press Enter.
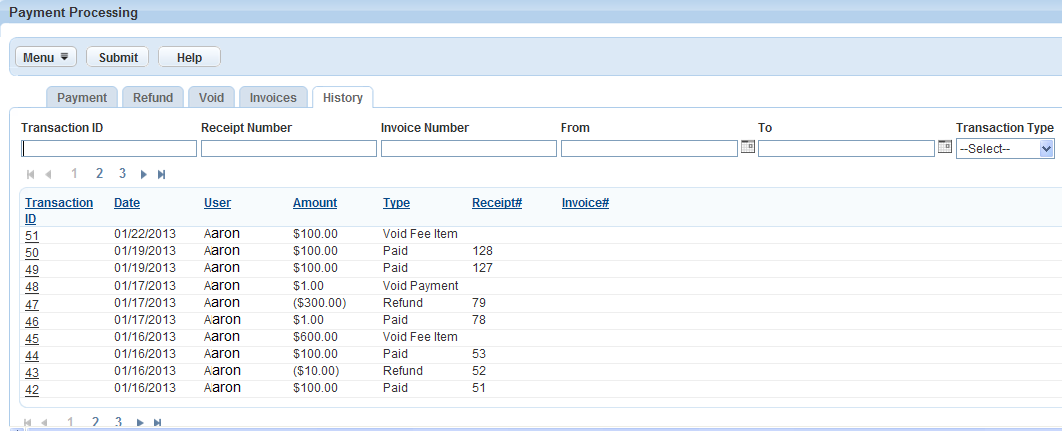
Civic Platform displays the list of transactions that match the specified parameters.
Select the desired Transaction ID.
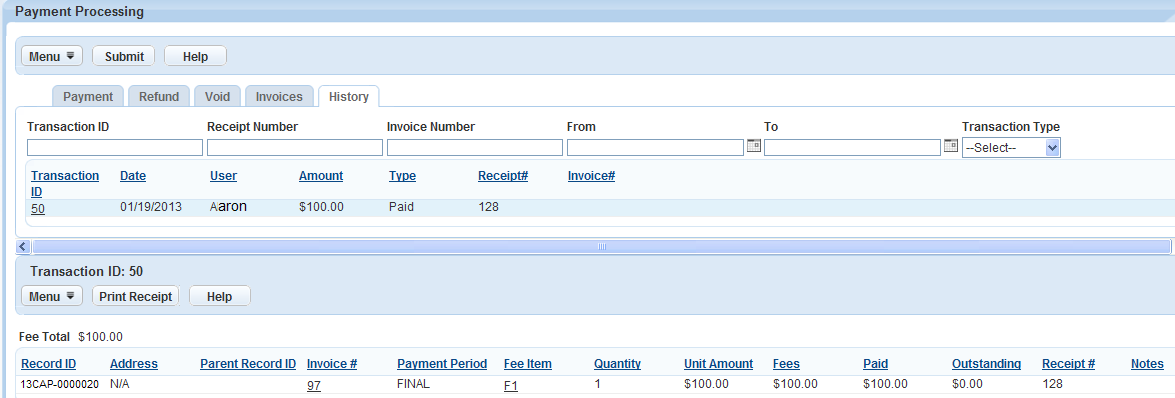
Civic Platform displays the list of transactions performed in this group.
Select the desired Record ID from the transaction list.
Civic Platform displays the Record detail portlet.
Scroll to the Payment tab.
From the Transactions listed on this page, click the desired Receipt #.
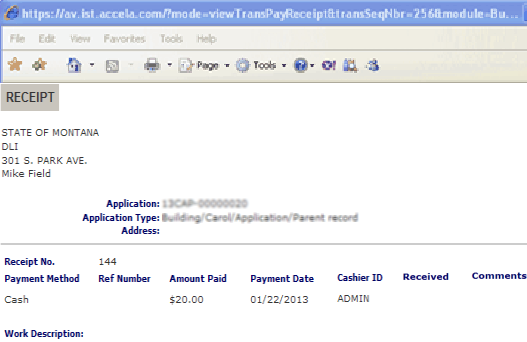
Civic Platform displays the Receipt for you to view and print as desired.
Viewing a Transaction Receipt Summary from the Payment Processing Portlet
Depending on how your administrator has configured your system, Civic Platform can automatically generate and display a summary receipt when you complete a group of transactions through the Payment Processing portlet. However, if your administrator has configured a transaction report, you can return to the Payment Processing portlet later to view and print a receipt summary for a particular transaction.
To view a receipt summary for a group of transactions
Navigate to the Payment Processing portlet.
Select the History tab.
Civic Platform displays the Payment Processing - History portlet.
Locate and select the desired Transaction ID.
Civic Platform displays the list of transactions performed in this group.
To print a Transaction Receipt that lists all items in this transaction group, click Print Receipt.
Civic Platform generates and displays the Receipt Summary.
To print a copy of the receipt summary, click Print Receipt.
Voiding a Payment
When you void a payment, Civic Platform decreases the total payment amount and then increases the balance owed, as if you never made the payment. You can void payments directly from the application or from the Payment Processing portlet. Voiding from the Payment Processing portlet allows you to void payments for both single record and multiple records.
Topics
Voiding a Payment from the Application
Open the Building record you want to work with and locate the application you want by clicking the record ID link in the Record ID column.
Civic Platform displays the application details.
Click the Payments tab.
Civic Platform displays the main payment summary.
Select each payment transaction that you want to void.
Click Void.
Civic Platform displays a Void Payment pop-up window.
Select a void reason from the Reason drop-down list, and enter any pertinent comment describing more for the Void action, if desired.
Click Submit.
Civic Platform voids the selected payments.
Voiding a Payment from the Payment Processing Portlet
When you void a payment from the Payment Processing portlet, you can void payments for a single record or for multiple records simultaneously.
To void a payment from the Payment Processing Portlet
Find the Building record you want to work with.
Navigate to the Payment Processing portlet.
Click the Void tab.
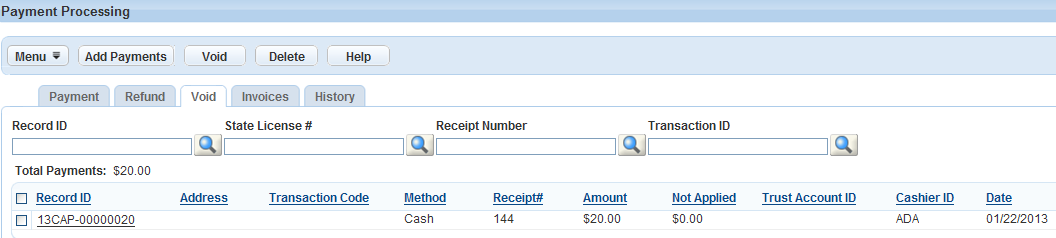
Civic Platform displays the Payment Processing - Void portlet.

Use Search to locate the items that you want to void.
Repeat the Search until you locate all items that you want to void.
Civic Platform displays a list of all items that match your search criteria. Notice that the Total Payments amount listed updates as you add items to the list.
Select each item that you want to void.
Click Void.
Civic Platform displays a Void Payment pop-up window.
Select a void reason from the Reason drop-down list, and enter any pertinent comment describing more for the Void action, if desired.
Click Submit.
Civic Platform voids the selected payments.
To view the transaction details, click the History tab and select the desired Transaction ID. Drill down to view additional details, as desired.
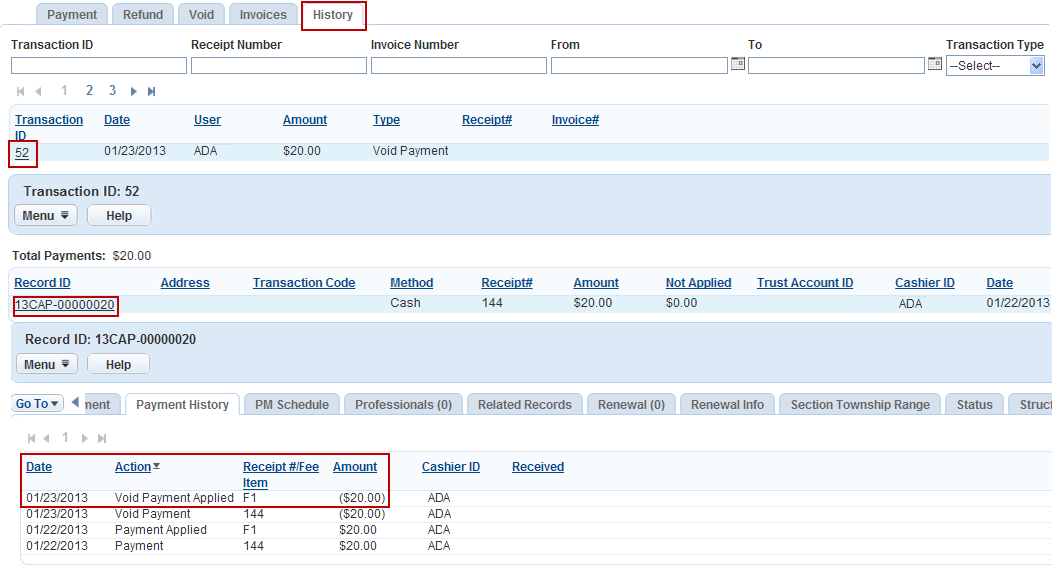
Viewing the Payment History for a Record
View the payment history associated to a record to see the date, amount, cashier ID, and receipt number. You can also view the payment method or the action of payments made for the record.
To view a payment history
Open the Building record you want to work with and locate the application you want by clicking the record ID link in the Record ID column.
Civic Platform displays the application details.
- Click the Payment History tab.
Civic Platform displays the payment history.
Processing Record Payments Using a Barcode Scanner
Your administrator can configure the payment processing interface to enable you to read and retrieve system-generated invoices by scanning barcodes on each invoice, or by entering the invoice number manually.
Note:
To use the barcode scanning functionality, you must connect an Intermec SR30 Handheld scanner to your system. |
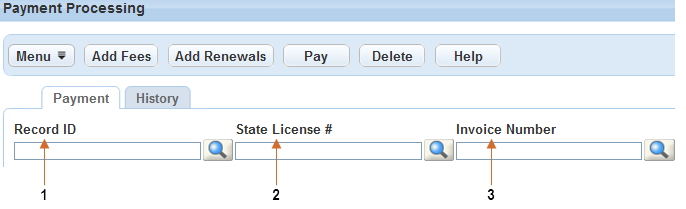
The payment processing interface requires you to first select one of these fields: Record ID, State License #, or Invoice #, and then to scan the invoice with the barcode reader device.
You can select the field using the mouse or enter a hotkey.
To use the hot keys, select one of these fields as follows: type Ctrl+Shift+<Display Order #> and substitute the Display Order # by entering the associated number of 1, 2, or 3. The Record ID field is 1, State License # field is 2, and Invoice # field is 3. Refer to Hotkey Display Order Number for Barcode Search Fields.
Use Ctrl+Shift+S to select the Global Search field. If you select the Global Search field, then you can scan any barcode value so you can locate the associated invoice and the fee items. When you use the barcode scanner, the Search button triggers automatically after the barcode reader populates the value into the selected field.
For information on how to manage payments, see Receiving a Payment for a Record.
Figure: Hotkey Display Order Number for Barcode Search Fields
To process payments with the barcode scanner
Navigate to the Payment Processing portlet.
Click the Payment tab.
Use the mouse or enter the hotkey to select one of these fields: Record ID, State License #, or Invoice #.
To use a hotkey, select one of these fields by typing Ctrl+Shift+<Display Order #> and substitute the Display Order # by entering the associated number of 1, 2, or 3. The Record ID field is 1, State License # field is 2, and Invoice # field is 3.
Note:To use the barcode scanning functionality, you must connect an Intermec SR30 Handheld scanner to your system.
Click Search.
Civic Platform displays fee items associated with the invoice.

Select the Record from the search results.
Scan the invoice number using the barcode device.
Click Pay.
Civic Platform Displays associated fields for Payment.
Processing Payments for Multiple Records
Civic Platform has cashiering tools that allow for easy intake of payments across multiple records and Point of Sale items. When an owner or licensed professional is ready to pay for invoiced items, the cashier can consolidate payments for fee items from different records. For example, a contractor wants to pay the fees for the electrical applications on three different records. This feature also allows individuals to pay for fee items using multiple tenders. Civic Platform stores the payment as a transaction payment history.
Several processes must occur before the cashier can process a payment:
A user must add the fee items to the record.
A user must invoice the fee items and send the invoice to the licensed professional or owner (see Invoicing).
When the licensed professional or owner is ready to make payment, the cashier needs to open a cashier session and then make sure the cash drawer functions properly (see Working with a Cash Drawer Interface).
Customers can pay separately for Point of Sale (POS) items, or they can pay for the items along with the record fees.
Whether a cashier receives an overpayment, an underpayment, or a full payment, the Payment Processing portlet automatically allocates the payment according to the instructions you provide (see Allocating Payments).
Topics
Searching for Fee Items
You need to complete a search for the Record ID or State License # so that you can specify which fees that the customer is making payment on.
To look up a fee item
Find the Building record you want to work with.
Navigate to the Payment Processing portlet.
Civic Platform displays the Payment Processing portlet.
Enter the desired Record ID or State License # and click Search.
Civic Platform displays a list of the fees related to the selected Record ID or State License #.
To add more fee items to the payment session, click Add Fees and complete the search again with a different Record ID or State License #.
If the individual does not want to make payment on all of the items in the Fee Item list, select the items the individual does not want to pay, and click Delete.
Civic Platform removes the checked fee items from the Fee Item list, and recalculates the payment total.
Adding Point of Sale Items to the Payment List
Customers can purchased Point of Sale (POS) items either separately or in addition to the record fees. These include items sold at the agency, such as a map.
To add a Point of Sale item to the payment list
Find the Building record you want to work with.
Navigate to the Payment Processing portlet and click the Search button.
Enter the desired Record ID or State License # and click the Submit button.
Civic Platform displays a list of the fees related to the selected Record ID or State License #.
Complete one of these options:
Click Add POS Item.
Click the Payment tab, then click the Add POS Item button.
Civic Platform displays the POS portlet.
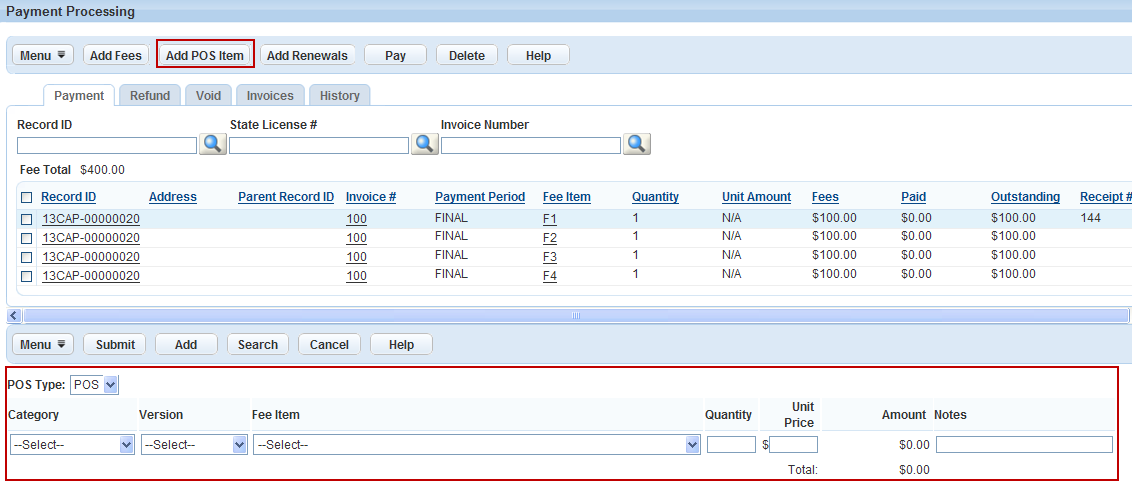
Select the POS Type, Category, Version, and Fee Item from the drop-down lists.
Enter a value into the Quantity, Unit Price, and Notes fields.
To add more than one POS item, click Add in the POS portlet.
Click Submit.
Civic Platform adds the POS item(s) to the Fee Item list.
Adding Records for Renewal
When a record expires, you can renew the record and pay for the newly generated fee through the Payment Processing portlet.
To add records for renewal
Navigate to the Payment Processing portlet.
Click Add Renewals.
Civic Platform displays Add Records for Renewal portlet.
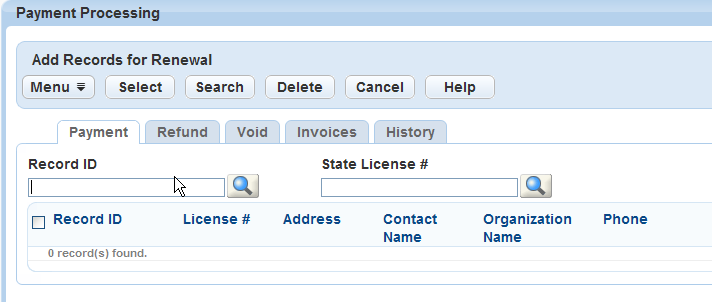
Enter the desired Record ID or State License # and click the Search icon.
Civic Platform displays a list of records related to the selected Record ID or State License #.
Select the record you want to work with and click Select.
Civic Platform creates a renewal record for the selected record and adds a fee item to the renewal record.

Processing Payments
Individuals can pay invoiced fees for one or more records, as well as any Point of Sale items that they encounter at the agency. When using this feature, customers must pay in full. Partial payments are not possible. However, you can remove fees from the implied payment set without impacting the database fee information. This feature also allows individuals to use multiple payment methods, such as cash, trust account, check, and credit card.
After the payment is complete, the cashier can print a receipt that details the fee items, the amount paid, and the payment methods used.
To process payments
Search for the Record ID(s) or State License #(s) with the fees the individual wants to make payment on, and add POS items if needed.
For instructions on searching for payment items, see Searching for Fee Items.
For instructions on adding POS items to a transaction, see Adding Point of Sale Items to the Payment List.
In the Payment Processing portlet, use the drop-down list to select the Payment Method.
Note:Certain payment methods require the cashier to enter additional fields. For example, a Credit Card needs the card type, account number, and so forth recorded. These fields appear in a record portlet to the right of the Payment portlet. Enter the required information, and click Save.
Enter the payment details for the selected payment method.
If you are entering a cash payment, see Common Payment Details and Cash Payment Details for field definitions.
Note:If there is overpayment, you can adjust the amount in the Change and Unapplied Credit fields so you can define the amount of money to return to the payor and amount of money to add as credit.
If you are entering a credit card payment, see Common Payment Details and Credit Card Payment Details for field definitions.
Note:Some agencies set up a magnetic card reader to automatically read the credit card information (Card Type, Account Number, Expiration Date, First Name, Last Name and Cardholder’s Name) into the corresponding Civic Platform fields.
If you are entering a check payment, see Common Payment Details and Check Payment Details for field definitions.
Click Save to save the payment details for the selected payment method.
To add another payment, click Add in the Payment Processing portlet, and repeat In the Payment Processing portlet, use the drop-down list to select the Payment Method. through Click Save to save the payment details for the selected payment method..
Note:The Add option lets you quickly record successive payments from different payees as well as payments from one payee who uses various payment methods.
To use multiple payment methods, click Add, then select the payment method and enter the amount paid for that method type.

To remove a payment line, mark the check box next to the line then click Delete.
Click Pay.
If there is overpayment or underpayment, Civic Platform automatically allocates the payment. See Allocating Payments.
Civic Platform displays a list of Record IDs and paid fee items. Receipt Details and Receipt Summary display in a pop-up window.

Viewing the Transaction Payment History
You can view the transaction payment history. When viewing a payment history you can see the transaction ID, date, cashier ID, and total amount. The cashier can also print a receipt for the transaction. If you have any questions regarding a payment contact your agency administrator.
To view the transaction payment history
Navigate to the Payment Processing portlet.
Civic Platform displays the Payment Processing portlet.
Click the History tab.
Civic Platform displays the Transaction History tab.
To search for a transaction ID, enter the Transaction ID or the date of the transaction and click Submit.
To view all transactions within a certain time period, enter the date range for the transactions and click Submit.
To view the details of a transaction, click the Transaction ID number.
Civic Platform displays the Transaction ID details.
To print a receipt for the transaction, navigate to the transaction details, then click Print Receipt.
Civic Platform displays the Receipt Detail and Receipt Summary in a pop-up window.
Allocating Payments
In case of overpayments or underpayments for the selected fee items, the Record portlet or the Payment Processing portlet give you different solutions to allocate the payment. The Payment Processing portlet always automatically allocates a payment, while the Record portlet allows you to either allocate a payment manually or automatically.
Note:
The mechanisms for automatically allocating underpayments are different in the Record portlet and Payment Processing portlet. Please read more of the topics in this section. |
Topics
Automatic Allocation of Payments in the Record Portlet
Depending on the configuration by your agency administrator, automatic allocation of payments might or might not work in the Record portlet.
If you pay more than the total amount, then after you click Save, the payment is complete, and the overpayment directly adds to the Amount Not Applied of the record.
If you pay less than the total amount, then after you click Save on the payment screen in the Record portlet, the fee allocation screen displays. You can then click Full Pay to determine the status of automatic allocation for your agency.
Figure: Fee Allocation Screen
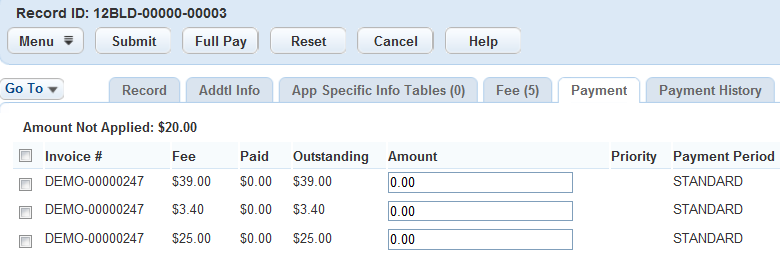
When you click Full Pay:
If automatic allocation is not functional, the Amount field at each fee item populates with the value in the Outstanding field. The total amount of the listed fee items can be greater than the Amount Not Applied. You must adjust the amount to make sure the total amount is equal to or is less than the Amount Not Applied. Otherwise, the payment might fail.
If the automatic allocation is functional, Civic Platform allocates the Amount Not Applied in the fee allocation screen to the Amount fields of the listed fee items. Below is the automatic allocation rule that applies:
Civic Platform pays negative fee items in full with the topmost priority;
Civic Platform allocates the balance of the payable amount (which is the sum of the Amount Not Applied and the absolute values of the negative fees) to fee items by priority first.
Allocation might or might not happen depending on whether your administrator has configured the fee items with priorities.
If Civic Platform allocates the final amount among fee items with the same priority, it allocates to the fee items according to the orders of the fee items in the list.
If Civic Platform allocates the final amount among fee items without priority setting, it allocates to all the fee items. Each fee item takes a proportion of the final amount equal to the proportion of the outstanding amount in the total outstanding amount.
If the proportion for a fee item is a decimal value (for example, 20.3), Civic Platform rounds up to the next integer (from 20.3 to 21) provided the fee item is not the last one. The last fee item gets the remainder of the final amount.
Automatic Allocation of Payments in the Payment Processing Portlet
Civic Platform only supports automatic payment allocation function in the Payment Processing portlet in case of overpayments or underpayments. After you click Pay, the payment is complete with the paid amount automatically allocated.
If a payment in the Payment Processing portlet involves multiple payment methods, Civic Platform allocates the paid amount from non-Cash payment methods first, following the order of the payment methods on the payment screen. Civic Platform allocates the paid amount using the Cash payment method last.
If you pay more than the total amount, the over-paid amount populates in the Change field first of the payment screen. You can set part or all of the over-paid amount as Unapplied Credit. The Unapplied Credit directly adds to the Amount Not Applied of the record. Civic Platform pays the highest record ID.
If you pay less than the total amount, Civic Platform allocates the Total Tendered in the payment screen to the Amount fields of the record fee items and POS items that you are paying. Below is the automatic allocation rule that applies:
Civic Platform allocates POS items as the first priority, from the lowest to the highest POS item IDs; in one POS item, from the lowest to the highest transaction IDs.
Civic Platform allocates records after it allocates all POS items, from the lowest to the highest record IDs.
If the final amount cannot paid in full for a record:
Civic Platform pays negative fee items in the record in full with the topmost priority;
Civic Platform allocates the remaining payable amount (the sum of the Amount Not Applied and the absolute values of the negative fees) to fee items by priority first.
This allocation might or might not happen depending on whether your administrator has configured the fee items with priorities.
If Civic Platform must allocate the final amount among fee items with the same priority, it does so according to the outstanding amount of the fee items in the list, from the least outstanding amount to the highest outstanding amount.
If Civic Platform must allocate the final amount among fee items without priority setting, it does so according to the outstanding amount of the fee items in the list, from the least outstanding amount to the highest outstanding amount.
Manually Allocating a Payment in the Record Portlet
When you allocate a payment, you apply all or part of the payment toward individual assessed fee items for an application. You can allocate a payment at the time you receive the payment, or at a later time as needed.
To allocate a payment at the time of receipt
Receive a payment. For details, see Receiving a Payment for a Record.
Locate any fees with an outstanding balance (Fees with an outstanding balance show a balance greater than zero on the O/S column).
To allocate a payment that covers the full balance of an outstanding fee, mark the check box next to the fee and click Full Pay.
To allocate a payment that covers only part of the balance of an outstanding fee, enter the partial payment amount in the Amount field next to the fee.
To calculate the total allocation, press TAB.
Note:Do not press the ENTER key to recalculate the total amount. Doing so completes the transaction
Click Submit.
Civic Platform displays the main Payment Summary.
To allocate a payment separate from the time of receipt
Open the Building record you want to work with and locate the application you want by clicking the record ID link in the Record ID column.
Civic Platform displays the application details.
Click the Payments tab.
Civic Platform displays the main payment summary.
Select the transaction with an unallocated balance.
Follow steps 2-5 of the instructions to allocate a payment at time of receipt.