Working with Inspections
There are many tasks that you can perform when working with inspections. Choose from the list of topics below for information about working with inspections.
Topics
About Scheduling Inspections
Your agency administrator configures the inspection types that are available for scheduling in an application. Your agency administrator can also configure the maximum number of inspections per day for an inspector (although users with supervisory privileges can schedule inspections that exceed the maximum number of inspections, or on holidays or weekends).
After selecting the application for which to schedule inspections, you can specify when each inspection should occur, and by which inspector. If your agency predefines an inspection flow or a series of milestones, you must follow the orders in the milestones to schedule inspections. Inspections can be scheduled in multiple ways:
Specify an exact date and time for the inspection to occur.
Specify an estimated date and time of the inspection.
Schedule the inspections automatically (if configured).
You can schedule multiple inspections for the same application, and can also schedule inspections from different inspection groups. The inspector follow the checklist of each inspection to complete all the inspections required in an application, and can conduct both the necessary workflow inspections and other inspections that do not affect the inspection workflow.
If you prefer, you can schedule the date and time now and then assign an inspector later.
Scheduling an Inspection from the Record Portlet
You can schedule an inspection by parcel, discipline, date, and ‘completed by’ time. An inspector can receive an assignment manually, or automatically based on the schedule detail, such as department, date, and time.
To schedule an inspection from the Record portlet
Navigate to the Record portlet.
Use search to locate the application you want to work with. See Using the Search Features for more information about performing searches.
Click the link in the Record ID column for the record you want.
Civic Platform displays the application details.
Click the Inspections tab in the details portlet.
Civic Platform displays a list of the assigned inspection types for the selected application.
Hover your mouse cursor on Manage Inspections and select Schedule Inspections.
Civic Platform displays the Pending Inspections portlet.
Select the inspection group containing the inspection types you want to schedule from the Inspection Group drop-down list.
Civic Platform displays the selected inspection group and associated inspection types in the Available Inspection Types box.
Select the inspection types you want to schedule from the Available Inspection Types list.
Click the right arrow button to move the selected inspection types to the Selected Inspection Types list.
Civic Platform automatically adds the new inspections to the list of pending inspections at the bottom of the page and auto-checks the new inspections for scheduling.
Do one of the following:
To create pending inspections:
Click Pending Inspections.
Civic Platform sets all selected inspections to pending and prompts you to close the window.
Click OK to return to the Inspections portlet.
To schedule an inspection:
Click Schedule Inspections.
Complete the fields in the Schedule Inspections portlet. For a complete list of fields, see Inspection Scheduling and Results Fields.
Click Submit.
Civic Platform displays a confirmation message.
Scheduling an Inspection from the Inspections Portlet
There are two ways to schedule an inspection from the Inspections portlet. Which method is available depends on your agency’s configuration.
Using the Manage Inspections Button to Schedule an Inspection
Navigate to the Inspections portlet.
Civic Platform displays a list of inspections.
Hover your mouse over Manage Inspection to display a command menu.
Select Schedule Inspections.
Civic Platform displays the Pending Inspections portlet.

You can locate and select one or more records by doing one or both of the following:
Enter an application number in the Application No. field and click Search.
Civic Platform lists the application record meeting the search criteria that you entered, along with inspection setup fields.
Leave the field blank and then click Search to open a page containing additional search criteria you can use to locate the records you need.
Enter search criteria and then click Submit.
Civic Platform lists the application records meeting the search criteria that you entered.
Select each application record you want to schedule inspections for.
Click Submit.
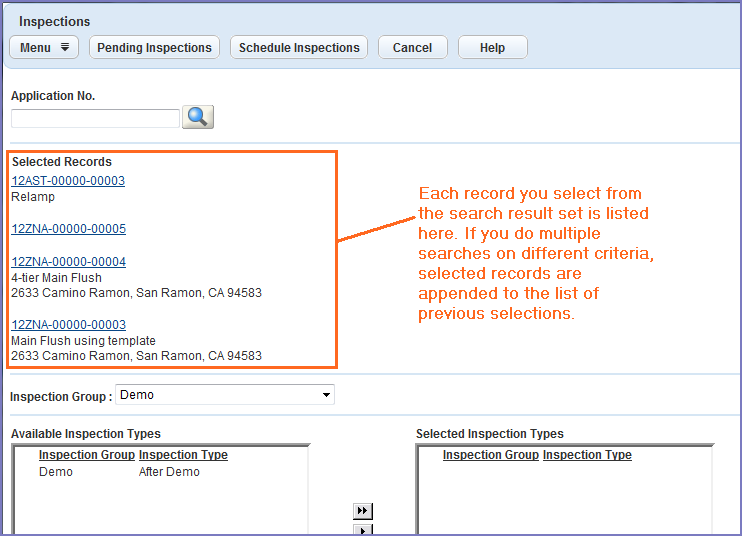
Civic Platform lists the selected records, along with inspection setup fields. If you perform more than one search on different criteria and select application records from multiple search result sets, your selections append to the list of previous selections. This multiple search process enables you to schedule several inspections for different applications at the same time.
After you have selected all the application records you want to work with, select the inspection group containing the inspection types you want to schedule from the Inspection Group drop-down list.
Civic Platform displays the selected inspection group and associated inspection types in the Available Inspection Types box.
Highlight the inspection type(s) you want to schedule.
Use the right arrow button to move the selected inspection type(s) to the Selected Inspection Types box.
The selected inspection type(s) now appear in the Selected Inspection Type box.
Do one of the following:
Click Pending Inspections to request an inspection for an application, then click OK.
A confirmation message displays.
Click Schedule Inspectionsto schedule an inspection for an application, complete fields as needed, then click Submit.
Civic Platform displays a confirmation message.
Using the New Button to Schedule an Inspection
Navigate to the Inspections portlet.
Civic Platform displays a list of inspections.
Click New.
Civic Platform displays a search portlet.
You can locate and select one or more records by doing one or both of the following:
Enter a record number in the Record # field and click the Search button.
Civic Platform lists the application record that meets the search criteria that you entered, along with inspection setup fields.
Leave the field blank and then click the Search button to open a page containing additional search criteria you can use to locate the records you need.
Enter search criteria and then click Submit.
Civic Platform lists the application records meeting the search criteria that you entered.
Select the record you want to schedule inspections for.
Click Submit.
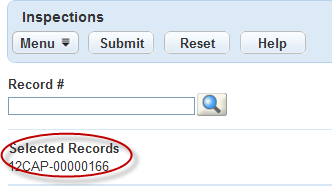
Civic Platform lists the selected records.
Select the inspection group containing the inspection types you want from the Inspection Group drop-down list.
Civic Platform displays the selected inspection group and associated inspection types.
Select the inspection type you want to schedule.
Select Required or Optional.
Click Submit.
Civic Platform displays the selected inspection details of the record.
Complete the fields in the Inspections portlet with available data. See Inspection Scheduling and Results Fields for a list of fields and definitions.
Click Submit.
Civic Platform displays a confirmation message.
Carrying Over Checklist Items
If your agency administrator enabled the checklist item carry-over feature, when you schedule an inspection in an application, if some previous inspection in the application has failed checklist items that are still hanging, the new inspection carries over the failed checklist items.
To carry over failed inspection items
Navigate to the Record portlet, and use Search (See Using the Search Features) to locate the application you want to work with.
Click the Inspections tab.
Hover your mouse over the Manage Inspection button to display a command menu
Select Schedule Inspections.
Civic Platform displays the Schedule Inspections portlet.
Complete the fields. See Inspection Scheduling and Results Fields for field definitions.
Click Submit.
If someone canceled, rescheduled, or completed an inspection of the same type in the application, and the inspection contained failed checklist items which are still hanging, Civic Platform displays the Carryover checklist items page.
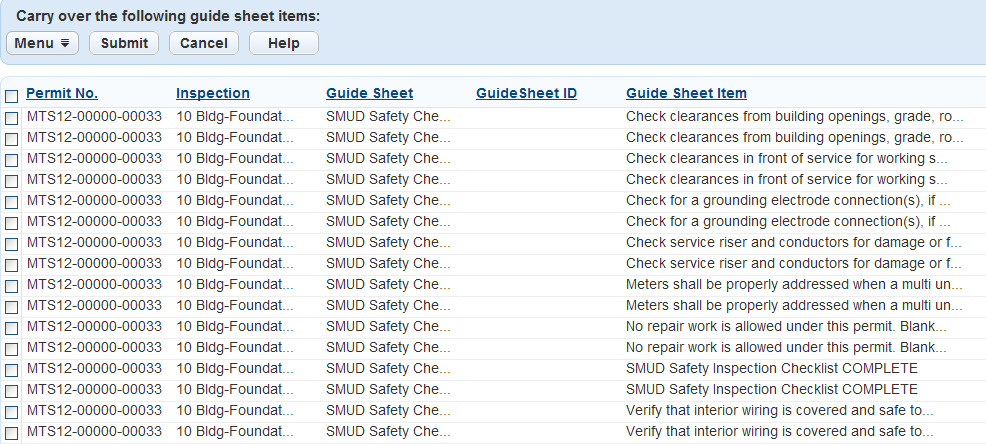
Select the checklist items you want, then click Submit.
Civic Platform carries over the failed checklist items and schedules an inspection.
Viewing Inspection Statistics
Before you assign an inspection task, you might find it useful to review inspector information, such as availability. You can also view an inspector’s previous work status and compare it to other inspectors’ workloads. You can view inspection statistics to perform these tasks.
To view inspection statistics
Navigate to Inspections portlet.
Hover your mouse cursor over the Menu button to display a command menu, then select Statistics.
Civic Platform displays the statistics page.
Choose a department, an inspector, schedule date from and schedule date to from the drop-down lists.
Click Submit.
Civic Platform returns the inspector’s statistics.
Editing Inspection Milestones
The agency administrator may have set an inspection flow or a milestone order that determines which inspections that the agency must complete, as well as the order of the inspections in the workflow. After an inspection flow begins, the inspector cannot schedule inspections out of order. Agency personnel must complete previous required inspections in the workflow before the inspector can schedule the next inspection.
However, users with supervisory privileges can edit inspection milestones within individual applications. After the supervisor updates the inspection milestone values in the application, Civic Platform regenerates the inspection flow data based on the new inspection milestone values.
To edit inspection milestones
Locate the application you want to work with.
Civic Platform displays the application record.
Click the Inspections tab.
Civic Platform displays the Inspections tab.
Click Edit Flow.
Civic Platform displays the Edit Milestones page.
In the Milestone field for each inspection type, enter a non-negative integer that represents the checkpoint for that type.
Select Required or Optional to indicate whether an inspector can schedule inspections within the next milestone before completing the current inspection
Click Submit.
Civic Platform updates the milestone order.
Rescheduling an Inspection
There are many reasons that you might need to reschedule an inspection. You may need to reschedule an inspection because a contractor did not finish the work on time or perhaps the inspector did not have time to do the inspection on the originally scheduled date.
You can reschedule an inspection via the Service Request /Building portlet or the Inspection portlet.
Note:
If you reschedule an inspection from a group that is not the default inspection group, the rescheduled inspection does not affect the inspection workflow. |
Topics
Rescheduling an Inspection from the Building Portlet
-
Locate and open the application you want to work with.
Civic Platform displays the application details.
-
Click the Inspections tab.
Civic Platform displays a list of scheduled and completed inspections.
-
Select each inspection you want to reschedule.
-
Hover your mouse over Manage Inspectionto display a command menu, then select Reschedule Inspections.
Civic Platform displays the Reschedule Inspections portlet.
-
Complete the fields in the Schedule Inspections portlet. For a list field descriptions, see Inspection Scheduling and Results Fields.
-
Click Submit.
Civic Platform confirms rescheduled inspection.
Rescheduling an Inspection from the Inspections Portlet
You can reschedule inspections from the Inspections portlet as necessary.
To reschedule an inspection from the Inspections portlet
Navigate to the Inspections portlet.
Civic Platform displays the Inspections list portlet.
Select the inspection you want to reschedule.
Hover your mouse over Manage Inspectionto display a command menu, then select Reschedule Inspections.
Civic Platform displays the Reschedule Inspections portlet.
Complete the fields in the Schedule Inspections portlet. For a list field descriptions, see Inspection Scheduling and Results Fields.
Click Submit.
Civic Platform confirms the rescheduled inspection.
Cancelling an Inspection
Inspections need to be cancelled on occasion. For example, if a builder is waiting for materials to finish a job, or inclement weather delays the finish date of a project, an inspection should be cancelled and rescheduled as needed.
Note:
If you cancel an inspection from a group that is not the default inspection group, the cancelled inspection does not affect the inspection workflow. |
Topics
Cancelling an Inspection from the Building Service or Request Portlet
-
Navigate to the Building or Service Request portlet as appropriate.
-
Use search to locate the record you want to work with. See Using the Search Features for more information about searching.
Civic Platform displays a list of records.
-
Click the link in the Record ID column for the record you want to work with.
Civic Platform displays the record details portlet.
-
Click the Inspections tab in the details portlet.
Civic Platform displays a list of scheduled and completed inspections.
-
Select each inspection you want to cancel.
-
Hover your mouse cursor over the Manage Inspection button to display a command menu.
-
Select Cancel Inspections.
Civic Platform displays the Cancel Inspections portlet.
-
Click Submit.
Civic Platform confirms that the inspection is cancelled.
Cancelling an Inspection from the Inspections Portlet
Navigate to the Inspections portlet.
Civic Platform displays the Inspections list portlet.
Select the inspection(s) you want to cancel.
Hover your mouse cursor over the Manage Inspection button to display a command menu.
Select Cancel Inspections.
Civic Platform displays the Cancel Inspections portlet.
Click Submit.
Civic Platform confirms that the inspection is cancelled.
Transferring Inspections
You can move inspections from one inspector’s queue to other inspectors’ queues as needed. You can implement a number of different scenarios using this functionality:
You can transfer all of an individual’s inspection assignments at one time to another individual.
You can transfer all of an individual’s inspection assignments at one time to multiple individuals using auto-assign.
You can cancel all of an individual’s inspection assignments at one time.
You can transfer multiple inspection assignments (assigned to multiple individuals) at one time to one person.
You can transfer multiple inspection assignments (assigned to multiple individuals) at one time to multiple individuals using auto-assign.
You can cancel multiple inspection assignments (assigned to multiple individuals) at one time.
Topics
Transferring All of an Individual’s Inspection Assignments
You can transfer all of an individual’s inspection assignments at one time either to another individual, or to multiple individuals (using auto-assign functionality). When you transfer inspection assignments using auto-assign, Civic Platform checks the calendars of potential recipients and then makes assignments that do not conflict with existing assignments. Civic Platform then generates an alert that lists any inspection assignments that remain unassigned because of calendar conflicts. You can open the alert message and access the affected inspection records, and manually reassign the inspections.
To transfer an individual’s inspection assignments
Access either the Inspections portlet or the Inspection tab on the record detail portlet, the Calendar portlet, or the My Tasks portlet, depending on which view you want.
Do one of the following:
To transfer inspections from a single individual to another individual:
Do not select any inspection events.
Hover your mouse cursor on the Manage Inspections button to display a command menu.
Select Transfer Inspections.
The Transfer form displays.

Use the top two fields to select the department and name of the individual you want to transfer inspection assignments from.
Use the bottom two fields to select the department and name of the individual you want to transfer inspection assignments to.
Click Submit.
Civic Platform transfers all open inspections to the new individual. If there are any scheduling time conflicts, you can check the Alerts portlet for links to the inspections with conflicting times, and manually reschedule those inspections.
To transfer inspections from a single individual to multiple individuals using auto-assign:
Do not select any inspection events.
Hover your mouse cursor on the Manage Inspections button to display a command menu.
Select Transfer Inspections.
The Transfer form displays.
Use the top two fields to select the department and name of the individual you want to transfer inspection assignments from.
Leave the bottom two fields blank.
Select Auto Assigned to appropriate inspector.
Click Submit.
Civic Platform transfers all open inspections to new inspectors using auto-assign functionality. If Civic Platform encounters inspections that it cannot transfer due scheduling time conflicts, you can check the Alerts portlet for links to the inspections with conflicting times, and manually reschedule those inspections as needed.
Removing All of the Inspections from an Individual’s Queue
You can use the transfer form to quickly and easily clear all of the inspections in an individual’s queue, moving them to the unassigned queue.
To remove all of an individual’s inspection assignments
Access either the Inspections portlet or the Inspection tab on the record detail portlet, the Calendar portlet, or the My Tasks portlet, depending on which view you want.
Hover your mouse cursor on the Manage Inspections button to display a command menu.
Select Transfer Inspections.
The Transfer form displays.
Use the top two fields to select the department and name of the individual you want to transfer inspection assignments from.
Leave the bottom two fields blank.
Clear the Auto Assigned to appropriate inspector option.
Click Submit.
Civic Platform displays a warning that you did not select a destination and that Civic Platform will change all assigned inspections for the named individual to an unassigned status.
Click OK.
Civic Platform moves all of the selected inspectors to the unassigned queue.
Transferring Inspections Assigned to Multiple Inspectors
You can transfer inspections assigned to multiple inspectors either to a single individual or to multiple inspectors using auto-assign functionality. You can only transfer scheduled inspections.
To transfer inspections assigned to multiple inspectors
Access either the Inspections portlet or the Inspection tab on the record detail portlet, the Calendar portlet, or the My Tasks portlet, depending on which view you want.
From the list of inspections, select the inspections you want to transfer. You can only transfer scheduled inspections (Status = Scheduled) or resulted inspections that are not yet completed.
Hover your mouse cursor on the Manage Inspections button to display a command menu.
Select Transfer Inspections.
The Transfer form displays.
Do one of the following:
Transfer the selected inspection events to a single individual.
Choose the department, then the staff member to whom you want to transfer the inspection events.
Click Submit.
Transfer the selected inspection events to multiple individuals using auto-assign.
Leave the Department and Staff fields blank.
Select the Auto Assigned to appropriate inspector option.
Click Submit.
Unassigning Multiple Selected Inspections
You can use the transfer form to quickly and easily move multiple selected inspections to the unassigned queue so that they can be reassigned.
To unassign multiple inspections
Access either the Inspections portlet or the Inspection tab on the record detail portlet, the Calendar portlet, or the My Tasks portlet, depending on which view you want.
From the list of inspections, select the inspections you want to unassign.
Hover your mouse cursor on the Manage Inspections button to display a command menu.
Select Transfer Inspections.
The Transfer form displays.
Leave the two fields blank and clear the Auto Assigned to appropriate inspector option.
Click Submit.
Civic Platform warns that you did not select a destination and that Civic Platform will change all assigned inspections for the named individual to an unassigned status.
Click OK to proceed.
Civic Platform moves all of the selected inspections to the unassigned queue.
Adding Related Inspections
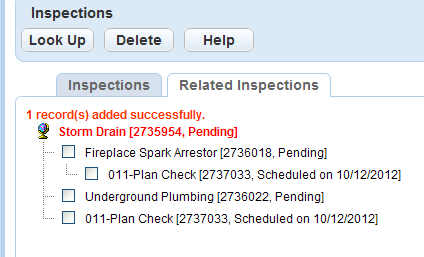
You can add an inspection with one or more inspections. The Related Inspections tab provides a tree view of related inspections.
To add related inspections
Navigate to the Inspection portlet.
Civic Platform displays a list of inspections.
Click an inspection link.
Civic Platform displays the inspection details portlet.
Click Look Up.
Complete the fields and click Submit.
Civic Platform displays a list of related inspections.
Select the inspection you want to add.
Click Select.
Civic Platform adds the related inspection to the tree view.
Displaying an Inspection in ACA
You can define whether or not to display inspections in ACA from the Civic Platform console. This ability allows agencies to define specific types of inspections to display to or hide from public users by default, while still giving agency users the ability to apply show/hide setting to individual inspections. This section describes how to set an inspection to display in or hide from ACA.
To set an inspection in Building portlet to display in or hide from ACA
Navigate to the record list portlet
Use search to locate the record you want to work with. See Using the Search Features for more information about searching.
Civic Platform displays a list of records.
Click the link in the Record ID column for the record you want to work with.
Civic Platform displays the record details portlet.
Click the Inspections tab.
Civic Platform displays the current list of inspections for the application.
Do one of the following:
If you have a Manage Inspection drop-down button in your toolbar, hover your mouse over Manage Inspectionto display a command menu, then select Display Inspections in ACA or Hide Inspections in ACA.
If you do not have a Manage Inspection drop-down button in your toolbar, select the inspections you want, then click Display in ACA or Hide in ACA, depending on what you want to do.
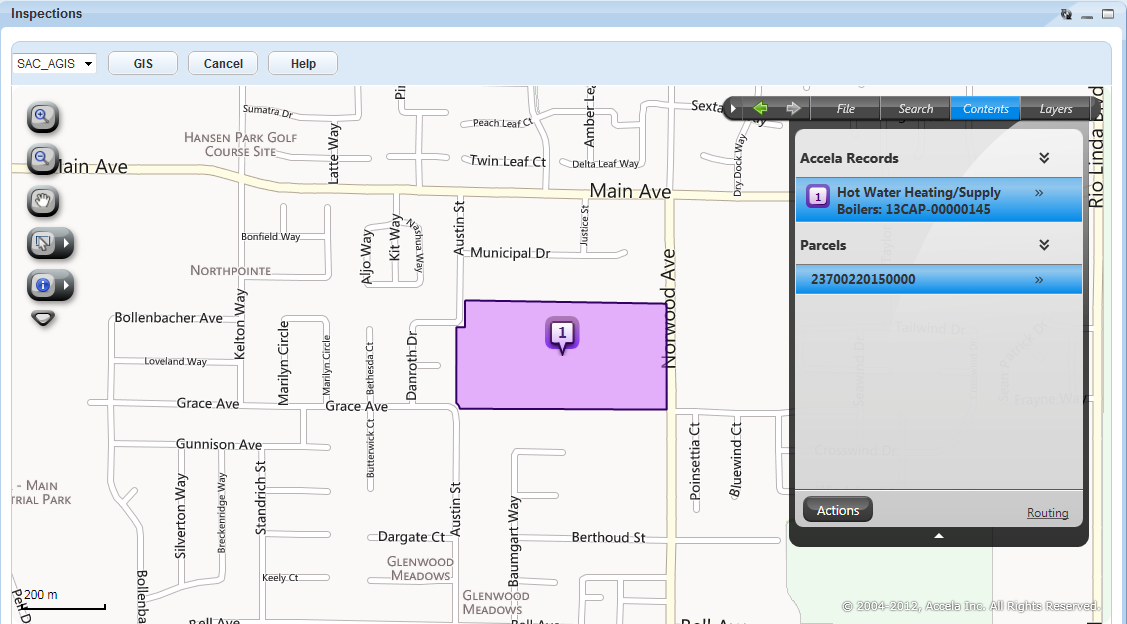
Working with Inspections in GIS
Accela GIS can plot inspections on a map. With the map, you can do various jobs such as routing inspections.
To plot an inspection on a map
Navigate to the Inspections portlet.
Select each inspection that you want to plot on a map.
Do one of the following:
Click GIS.
Civic Platform launches the map viewer with a purple map marker that indicates the scheduled location of the inspection.
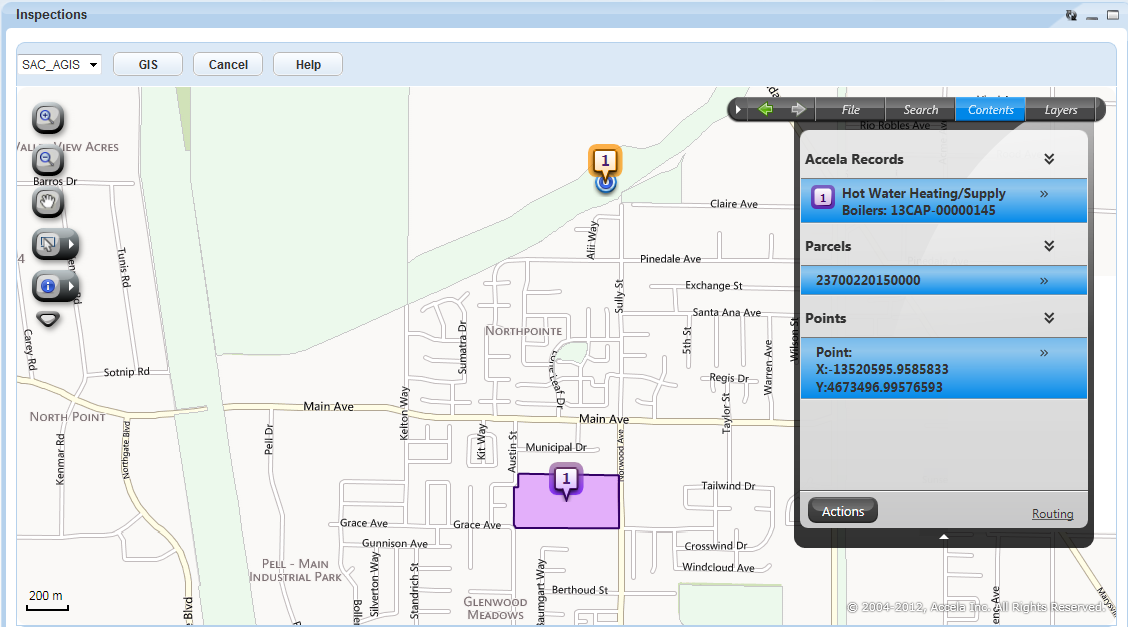
Click GIS and select one of the following options:
Show Scheduled Location
Civic Platform launches the map viewer and then displays a purple map marker that indicates the scheduled location of the inspection.
Show Scheduled and Submitted Locations
Civic Platform launches the map viewer and then displays both the scheduled and inspected locations of the inspection with different map markers. The purple map marker indicates where the scheduled location is. The orange map marker indicates where the inspector submits the inspection.
Managing Pending Inspections
Pending inspections can inform both an agency and an applicant about the inspections that need to occur before the agency can process an application. When you add a pending inspection to an application that belongs to an inspection flow or an inspection milestone process, Civic Platform displays an icon that indicates the status of the inspection.
If your agency uses inspection flow or inspection milestone functionality, you can only schedule pending inspections in sequence within the inspection flow or inspection milestone order. If you attempt to associate a pending inspection type with an application when the prior inspection in the inspection flow or inspection milestone process is unscheduled, Civic Platform disables the inspection type until you schedule the preceding inspection. Your agency administrator can configure Civic Platform so that supervisors can schedule any inspection at any time, regardless of its order within an inspection flow or inspection milestone process.
Accela Wireless and Citizen Access users can request inspections. For example, a public user without inspection scheduling privileges can set up a pending inspection. After he adds the pending inspection, agency users with inspection scheduling privileges receive a notification about the pending inspection, and they can schedule the inspection.
You can use the Pending Inspections portlet to add inspections that are outside of the default inspection group to an application, which enables you to add and schedule any necessary special circumstance inspections after an application’s initial submission.
Note:
You can schedule, reschedule, or cancel pending inspections. When you cancel an inspection, Civic Platform removes it from the application. You cannot result a pending inspection. |
Topics
Requesting an Inspection from the Building Portlet
You can create a pending inspection from the Building portlet as necessary.
To create a pending inspection from the Record List Portlet
Navigate to the record list portlet (such as Building or Service Request) and use Search to locate the record you want to work with. See Using the Search Features for more information about searching.
Civic Platform displays a list of records.
Click the link in the Record ID column for the record you want to work with.
Civic Platform displays the record details portlet.
Click the Inspections tab.
Civic Platform displays the current list of inspections for the application.
Move your mouse cursor over the Manage Inspection button to display a command menu.
Select Schedule Inspection.
Civic Platform displays the Pending Inspections portlet.
Select the inspection group from which you want to add pending inspections from the Inspection Group drop-down list.
Civic Platform displays the selected inspection group and associated inspection types in the Available Inspection Types box.
Click the inspection types you want to add as pending.
Civic Platform highlights the selected inspections.
Click the right arrow to move the inspection types to the Selected Inspection Types box.
Civic Platform displays the inspection types in the Pending Inspections list.
Click Pending Inspections.
Civic Platform displays a confirmation message indicating that the inspection is pending.
Click OK.
Civic Platform adds the inspections to the Inspections list portlet.
Requesting an Inspection from the Inspections Portlet
You can create a pending inspection from the Inspections portlet as necessary.
To create a pending inspection from the Inspections Portlet
Navigate to the Inspections portlet.
Civic Platform displays the Inspections list portlet.
Hover your mouse cursor over Manage Inspection to display a command menu.
Select Schedule Inspections.
Civic Platform displays the Pending Inspections portlet.
Select the inspection group from which you want to add pending inspections from the Inspection Group drop-down list.
Civic Platform displays the selected inspection group and associated inspection types in the Available Inspection Types box.
Click the inspection types you want to add as pending.
Civic Platform highlights the selected inspections.
Click the right arrow to move the inspection types to the Selected Inspection Types box.
Civic Platform displays the inspection types in the Pending Inspections list.
Click Pending Inspections.
Civic Platform displays a message confirming that the inspection is pending.
Click OK.
Civic Platform adds the inspections to the Inspections list portlet.
Copying an Inspection
You can copy an inspection from any existing record and attach it to the current record. To help you choose an appropriate inspection to copy, you can view a list of related checklists. You can copy any inspection that has a matching Inspection Group Code with the current record.
Note:
To review a checklist and verify you are copying the correct inspection, click the checklist tab and the checklist you want to view. Return to the inspection list detail page by clicking the inspection detail tab. Your agency administrator defines the security settings that dictate what your level of access is to checklists assigned to an inspection. For example, if an inspection is read-only, you can only view it. You cannot modify, delete, or copy checklists assigned to the inspection. |
To copy an inspection from the Inspection portlet
Navigate to the Inspection portlet and use search to locate the record you want to work with.
Civic Platform displays a list of inspections.
Click the link in the Record ID column for the record you want to copy.
Civic Platform displays the inspection details.
Click Select Record to Copy from in the Inspections portlet.
Civic Platform displays the Record ID list.
Search for and select the record you want to copy the inspection from.
Click Submit
Civic Platform copies the inspection.
Note:If the inspection status is Scheduled, you can edit the Schedule comment. If the inspection status is a result, you can edit both the Schedule and the Result comment.
When you finish editing the copied inspection, click Submit.
Civic Platform copies the inspection with all its associated checklists to the Record you opened at the beginning of the task.
Editing a Default Inspection
Civic Platform adds default inspections automatically when you create a new application or a new service request. Your agency defines which inspections that Civic Platform adds by default. For example, your agency may require that all new building applications have electrical, plumbing, and framing inspections or that all new service request applications have investigation, progress, and completion inspections.
You can edit a default inspection. However, you may only change whether a default inspection is optional or required.
Assigning an Inspection
Agencies can assign inspections to inspectors either manually or automatically. There are several methods to choose from when assigning inspections. For example, the inspector with the lightest workload might receive the first inspection assignments, or an agency might schedule an inspection based on the requirements of the inspection type.
Inspections may be assigned automatically to inspectors following the auto assign configuration by the agency administrators. Automatic assignment searches availably inspectors by disciplines first, then by districts, then by inspector workload or availability.
Note:
Civic Platform follows the following priorities to get the district of an application: (1) The inspection district setting of the application parcel; (2) The inspection district setting of the application address; (3) The inspection district that the application parcel belongs to in the GIS map. A parcel may overlays multiple GIS inspection districts. Your agency administrator may have configured to get the inspection district by the major portion of the parcel maps to. Or, a dialog box prompts you to select the inspection district. |
Civic Platform allows you to assign and re-assign inspections from both the Inspections and Building modules. The topics below describe how to assign inspections from both.
Topics
Assigning an Inspection from the Inspection Portlet
Go to the Inspection portlet. If you are using default settings, this appears on the Inspections main link.
Civic Platform displays a list of inspections.
Select the scheduled inspection(s) you want to assign. If a record has more than one inspection associated with it, you can schedule multiple inspections for that record at the same time.
Hover your mouse cursor over the Menu button to display a command menu.
Select Assign Inspector.
Civic Platform displays the Assign Inspection detail form portlet.
Select the department from the Assign to Department drop-down list.
Select the staff member from the Assign to Staff drop-down list.
If you click the Current User link, your user name goes in the Assign to Staff field, and the associated department field updates to reflect your department.
Click Submit.
Civic Platform assigns the inspection and displays the inspection list.
Assigning an Inspection Automatically from the Inspections Portlet
Inspections may be set up by the agency administrator so they are scheduled automatically when a new application is created. When prompted to automatically schedule inspections, a schedule is identified which will be used to assign the appropriate inspector and schedule the appropriate date and time to the inspection.
The parameters used in determining the automatic inspection assignment are built into Civic Platform in order to effectively determine automated inspection assignments. Automatic assignment is predetermined to search by disciplines first, then by districts, then by inspector workload or availability.
To assign an inspection automatically from the Inspections portlet
Navigate to the Inspection portlet.
Civic Platform displays a list of inspections.
Click New.
In the Record ID column, click the link for the record you want.
Civic Platform displays the record details.
Click Auto Assign.
Complete the following fields.
Date Select the date of the inspection. Requester Phone Number Enter the phone number for the person who requested the inspection. Auto Assign Civic Platform automatically assigns an inspector. Click Submit.
Civic Platform automatically assigns the inspection to an inspector.
Reassigning an Inspection Automatically from the Inspections Portlet
Navigate to the Inspection portlet and use search to locate the record you want to work with (See Using the Search Features for more information).
Civic Platform displays a list of inspections.
Select the record you want by clicking the record ID link.
Civic Platform displays the record details.
In the Auto Assign column, click the link for the inspection you want to reassign.
Civic Platform displays the inspection details for the inspection that you chose.
Complete the fields.
Date Select the date of the inspection. Requester Phone Number Enter the phone number for the person who requested the inspection. Auto Assign Civic Platform automatically assigns an inspector. Click Submit.
Civic Platform automatically assigns the inspection to the qualified inspector with the lightest workload.
Assigning an Inspection Automatically from the Service Request or Building Portlet
Open the Building or Service Request record you want to work with and locate the application you want to work with by clicking the record ID link in the Record ID column.
Civic Platform displays the record details.
Click the Inspections tab.
Civic Platform displays a list of scheduled and completed inspections for the record.
Click New.
Civic Platform displays a list of inspections required for the record.
Click Auto Assign.
Civic Platform displays the new inspection details.
Complete the available fields.
Date Select the date of the inspection. Requester Phone Number Enter the phone number for the person who requested the inspection. Auto Assign Civic Platform automatically assigns an inspector. Click Submit.
Civic Platform automatically assigns the inspection to the qualified inspector with the lightest workload.
Reassigning an Inspection Automatically from the Building or Service Request portlet
Open the Building or Service Request portlet and locate the record you want to work with.
Click the record ID link in the Record ID column for the record you want.
Civic Platform displays the application details.
In the Auto Assign column, click the link of the inspection you want to reassign.
Civic Platform displays the inspection details of the inspection that you chose.
Complete the available fields.
Date Select the date of the inspection. Requester Phone Number Enter the phone number for the person who requested the inspection. Auto Assign Civic Platform automatically assigns an inspector. Click Submit.
Civic Platform displays the new inspection details.
Automatically Scheduling by District
Agencies covering large geographic areas (districts) often establish and assign regions to their inspectors. The agencies use application addresses and parcel addresses to determine the available districts, and then use this information as criteria to determine a list of valid inspectors for the inspection.
You must associate districts with both inspections and inspectors to automatically schedule inspections. You can manually assign the districts to inspections. You can also assign districts by selecting areas in Accela GIS. See your agency administrator for information on how to associate districts with inspections using Accela GIS and on how to set up an inspector profile.
To automatically schedule an inspection by district
Go to the Inspection portlet.
Civic Platform displays the Assign Inspection screen.
From the list of Inspections, select the Assign by District link next to the inspection you want to work with.
Civic Platform displays the Address and Parcels with districts.
Click Select next to the address or parcel you want.
Civic Platform displays a list of valid inspectors within the district selected.
Click Select next to the inspector you want.
Civic Platform assigns the inspector to the inspection.
Automatically Scheduling by Districts, Disciplines, Calendar, and Workload
There are four factors that you need to take into account for automatic inspection scheduling:
Geographic area (also known as a district).
Discipline.
Calendar availability.
Workload availability.
You can schedule Inspections by parcel, discipline, and the date and time of required completion of the inspection. You can also assign an inspector at this time, or your agency can configure Civic Platform to automatically assign an inspector based on entered parameters.
If you schedule an inspection for the wrong date/time, you can reschedule it or cancel it as needed.
Note:
If a user has supervisory privileges, he can schedule inspections that exceed the maximum number of inspections per day. He can also schedule inspections on holidays or weekends. |
To automatically schedule an inspector to an inspection
Go to the Inspection portlet.
Civic Platform displays the Inspection Scheduling—Inspection List screen.
From the list of Inspections, select the Auto Assign link next to the inspection you want to work with.
Civic Platform displays the Inspection Scheduling—Schedule window.
Complete the fields with available data. See Inspection Scheduling and Results Fields for field definitions.
Note:As you enter data, Civic Platform filters the list of available inspectors for assignment to match the entered data.
When you select an inspector, the Department field automatically populates with the selected inspector’s department.
Click Auto Assign.
Civic Platform displays a list of valid inspectors for the criteria.
Click Select next to the inspector you want.
Civic Platform returns to the Inspection Scheduling - Schedule portlet and automatically populates the department name and inspector name.
Click Submit.
Entering Inspection Results
After completing an inspection, inspectors can enter inspection details and inspection results either directly and/or by filling in the checklist item results. If an inspector conducts a series of inspections simultaneously, he has the ability to quickly update the inspection status and results for all of the inspections in one action.
Inspectors can enter inspection results at any time, regardless of an inspection’s status. For example, a public user without inspection scheduling privileges requests a mechanical inspection for a building application. Civic Platform assigns a status of Pending to the inspection. However, before the agency officially schedules the inspection, an inspector completes the inspection. He can still enter his results, even though the status is Pending.
Upon entering inspection details, Civic Platform updates inspector workloads accordingly. For example, Amy, a building inspector, has eight inspection units per day. On Monday, Amy’s schedule has her conducting an electrical inspection at 3pm (utilizing one inspection unit). However, Amy completes the inspection at 10am instead, and enters the inspection results. Civic Platform updates her daily workload from eight units to seven units. Amy’s supervisor can then assign another inspection to Amy at 3pm.
Note:
Supervisors can modify any result field that an inspector populates. |
Topics
Entering Results for Inspections
After completing an inspection, you can update the inspection details. You may enter results for multiple inspections. However, some inspections may have specific information that differs from others. Such inspections are not updated. Civic Platform provides a summary listing which inspections were not updated, along with the reasons why not.
To enter inspection results for inspections
Open the Inspection list portlet either via the main link or via the Inspections tab of a record.
Select the inspection for which you want to enter a particular result.
Complete the checklist. See Completing a Checklist for more information.
Access the Result Inspections portlet in one of two ways:
Hover your mouse over Manage Inspectionto display a command menu, then select Result Inspections.
Hover your mouse Menu to display a command menu, then select Result.
Civic Platform displays the Result Inspections portlet.
Update the available fields.
Note:(1) Values entered in the Inspection Date and Inspection Time fields auto-populate the Result Date and Result Time fields.
(2) If you have no supervisory privileges, the Inspection Score, Inspection Result, and Inspection Grade fields may be read-only.
For field definitions, see Inspection Scheduling and Results Fields.
Click Submit.
Civic Platform displays a summary of the updated inspections, skipped inspections, and failed updates. The inspection list reflects the changes to the inspections.
Editing an Inspection Result
Civic Platform provides the ability for a supervisor to modify an inspection after it has been resulted.
To enter inspection results
Locate the inspection you are working on, either via the Inspections main link or via the Inspections tab for the record you are working with.
Select the inspection you want to work with.
Access the Result Inspections portlet in one of two ways:
Hover your mouse over Manage Inspectionto display a command menu, then select Result Inspections.
Hover your mouse over Menu to display a command menu, then select Result.
Civic Platform displays the Result Inspections portlet.
Update the available fields. See Inspection Scheduling and Results Fields for field definitions.
Click Submit.
Following Up an Inspection
Some agencies elect to configure some inspection types to require follow-up inspections.
To follow up an inspection
Navigate to the Inspection portlet.
Civic Platform displays a list of inspections.
Select the inspection that you want to work with.
Hover your mouse over Menu to display a command menu, then select Result.
Complete the Status and the Schedule Date fields.
Click Save.
Civic Platform displays the follow-up inspections.
Select the follow-up inspection and click Submit.
Civic Platform adds the follow-up inspection.