Classic Workflow Tool
This section provides instructions for using the Classic Workflow tool. However, because most functions in the Classic Workflow tool are available in Workflow Designer, best practice dictates the use of Workflow Designer instead of the Classic Workflow tool in most cases. See Deciding Which Tool to Use for more information.
With the Classic Workflow tool, we highly recommend that you draw a diagram on paper first, and then use the diagram as a guide when creating your workflow. With Workflow Designer you can create the diagram directly in the workspace.
Topics
Understanding Workflow Tasks
You can set up several different types of tasks in each workflow process:
Parallel. A parallel task is any task in a group of tasks that share the same parallel indicator. You can set up parallel tasks to activate independently of one another, depending on their task numbers. Workflow participants must complete all parallel tasks in a single workflow process before the process can move forward. You can override this constraint with a combination of skip activators and indicators.
Branch. A branch in a workflow process lets users jump to any future task in the workflow process, possibly bypassing tasks in the process. You can set up a branch by using the next number of the task that you want to jump from.
Loop. A loop in a workflow process lets users return and repeat any task that they have already completed. You can set up a branch by using the next number of the task that you want to return from and the a number of the task that you want to return to.
Two 15-digit numbers drive any workflow process that you set up: a phase number and a next number.
Topics
Understanding Phase Numbers
A workflow process phase number is a series of five 3-digit numbers that identify the unique position of this task in the workflow process and its relationship with other tasks. Depending on how you set up this number, you can determine when a user activates and when it is skipped throughout the workflow process.
Figure: Example Phase Number
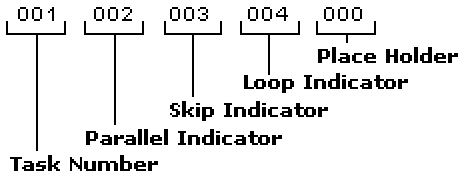
| Task Number | Enter a unique 3-digit number that identifies this task and its order in the workflow process. |
| Parallel Indicator | If you want to activate this task simultaneously with other tasks, enter the
3-digit number that matches the 3-digit number in this position for
each parallel task. Enter “000” if this task is not a parallel task. |
| Skip Indicator | If you want to skip this task at some point during the workflow process, enter a
3-digit indicator that matches the 3-digit activator of the task
that initiates this skip. Enter “000” if you never want to skip this task. |
| Loop Indicator | If you need to repeat this task after a user has completed it, enter a 3-digit
indicator that matches the 3-digit activator of the task that
initiates this loop. Enter “000” if you never want to repeat this task. |
| Place Holder | This component is currently acting as a placeholder. You can enter any 3-digit number, or simply enter “000” |
Understanding Next Numbers
A workflow process next number in is a series of five 3-digit numbers that identify the next task, or tasks, in the workflow process. Depending on how you set up this number, you can set up the workflow to activate the next task in the workflow process, jump to a future task, or to return to a completed task after a user completes this task. You can also set up the workflow to skip another task when a user completes this task.
Figure: Example Next Number
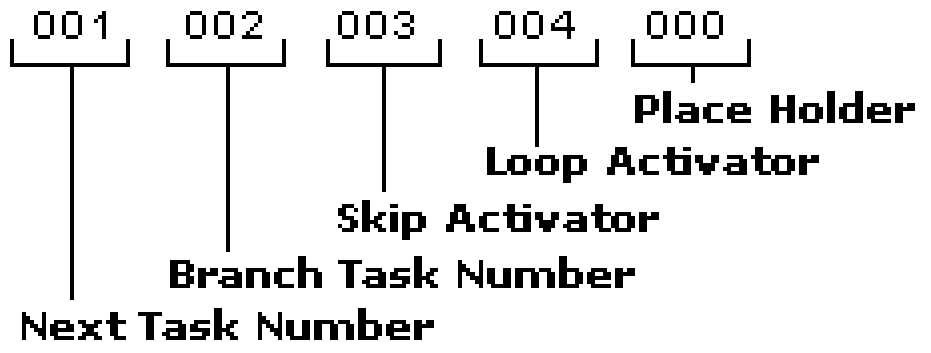
| Next Task Number | Enter the unique 3-digit number that identifies the next task in the workflow
process. Enter “000” if this task is the final task in the workflow. |
| Branch Task Number | If you want to jump to a future task without completing other tasks, enter the
unique 3-digit number that identifies the future task in the
workflow process. Enter “000” if you do not want to jump to a future task. |
| Skip Activator | If you want to skip a task after this task is complete, enter the 3-digit
activator that matches the 3-digit indicator of the task that you
want to skip. Enter “000” if you do not want to skip any tasks. |
| Loop Activator | If you need to repeat a task after this task is complete, enter the 3-digit activator that matches the 3-digit indicator of the task that you want to repeat. |
| Place Holder | Enter “000” if you do not want to repeat any task. This component is currently acting as a placeholder. You can enter any 3-digit number, or simply enter “000”. |
Managing Workflow Processes
Topics
Adding a Workflow Process
Each workflow process is a series of tasks that a workflow participant must complete before issuing a certain type of permit or license. When you first implement Civic Platform, you must implement several workflow processes. As necessary, you can set up additional workflow processes at any time. You can also add or delete tasks from a process at any time.
In addition, you can put tasks into specific groups so they have the same task-specific information in a summary that a user can view.
To add a workflow process
Access the Classic Administration page (Accessing Classic Administration).
Choose Workflow > Process.
Civic Platform displays the Workflow Process—Edit window.
Click Add.
Enter the new process name in the Process field.
Click Submit.
Civic Platform supplies the default workflow process.
Update the fields for each task in the workflow process. For a description of fields, see Table 3.
Note:Click the yellow light bulb that appears to the left of the task if you want to use the Task Flow Assistant to help you set up phase and next numbers.
Click Update.
Table 3. Workflow Process Fields Phase # Enter the 15-digit number that identifies the position of this task in the workflow process and its relationship to other tasks. For more information about each component of a Phase number, see Understanding Phase Numbers. Next # Enter the 15-digit number that identifies one or more tasks in the workflow process that you want to activate after this task is complete. For more information about each component of a Next number, see Understanding Next Numbers. Task Name Enter the name of the task as you want it to display to users. This field accommodates up to 100 characters. Initial Status Select the task status you want to display when the task first becomes active. When you first set up a workflow process, this list is empty. After you set up the initial process, you must set up each task status. You can then return to the workflow process and choose an initial status.
Duration Enter the number of days required to complete this task after it is active. Estimated Hours Enter the number of estimated hours required to complete this task. Citizen Access Displayable If you want Citizen Access to display the task, select Yes; otherwise, select No. Workflow Calendar Use the drop-down list to assign a workflow calendar to the task. Department Use the Department button to search for the department that is responsible for the task. Note:To search for a specific staff member, complete only the Staff field explained below. Civic Platform automatically populates the Department field with the corresponding department.
Staff Use the Staff button to search for a department and a staff member that is responsible for the task. If you enter a value in this field, Civic Platform carries this task assignment over to all new applications that follow this workflow.
After creating a new application, authorized users have the option to change this assignment.Task-Specific Info Group Select the specific task information group you want to associate with each task in the workflow process. Your agency sets up these groups, which allow you to associate similar tasks in the same group. Hours Spent Required Choose Yes if you want to require that anyone who works on the task records the number of hours spent. If you do not want to require the hours spent, choose No.
Editing a Workflow Process
After you add a workflow process to Civic Platform, you might need to edit workflow task details. For example, you might need to change the order of the tasks, or change the person who is responsible for a task. You can change the details about any task as well as add or delete tasks.
Any changes that you make to a workflow process do not affect existing applications associated with the process.
To edit a workflow process
Access the Classic Administration page (Accessing Classic Administration).
Choose Workflow > Process.
Civic Platform displays the Workflow Process—Edit window.
Enter the name of the workflow process that you want to find in the Process field.
Click Submit.
Civic Platform displays the Workflow Process browse page.
Click the red dot that appears next to the process you want under the Edit column.
To edit a task in the process:
update the fields for the task in the workflow process.
Note:Click the yellow light bulb that appears to the left of the task if you want to use the Task Flow Assistant to help you set up phase and next numbers.
For a description of the fields, see Table 3.
Click Update.
To add a new task to the process:
Click Add.
Civic Platform displays the Add Task page.
Enter the name of the task in the Task Name field.
Click Submit.
Civic Platform displays the new task at the top of the workflow process.
Complete the fields for each new task.
Note:Click the yellow light bulb that appears to the left of the task if you want to use the Task Flow Assistant to help you set up phase and next numbers.
For a description of fields, see Table 3.
Click Update.
Note:When deleting a task, make sure you delete any references to that task you included in the phase number or next number of another task.
To remove a task from the process:
Click Delete to the right of the task that you want.
Click OK.
Viewing a Process Diagram
Viewing a workflow process lets you see a visual representation of the process. Civic Platform outlines the structure of the workflow process for you with a flowchart. Seeing a picture of a process gives you a better understanding of how each task relates to other tasks. Viewing the process can also help you to catch any errors in your setup. Refer to the example of a process diagram in Figure 3.
Figure: Example Workflow Process Diagram
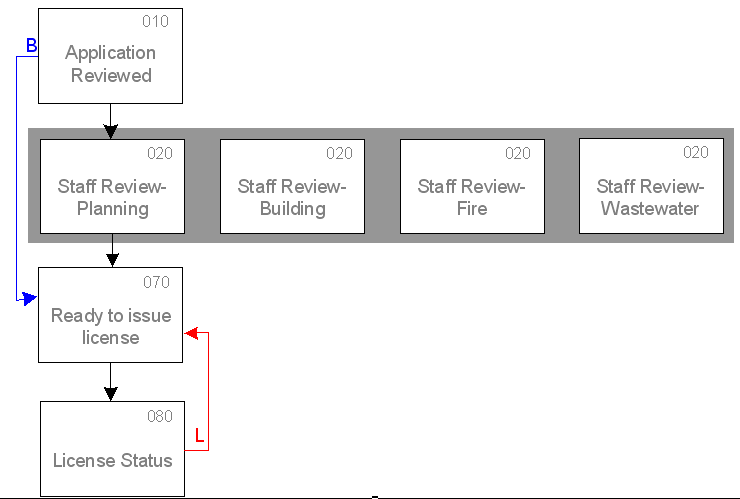
Consecutive tasks appear one after the other. Parallels tasks appear on the same row and they share the same parallel indicator. Blue arrows indicate branches in the process. Red arrows indicate loops.
To view a process diagram
Access the Classic Administration page (Accessing Classic Administration).
Choose Workflow > Process.
Civic Platform displays the Workflow Process—Edit window.
Search for the workflow process you want to work with.
Do one of the following:
Click the red dot that appears to the right of the process name under the View column.
Click the red dot that appears in the Edit column next to the process that you want to view; then click the Diagram View link that appears over the task details.
To maximize the view of the process, click Maximize. To restore the size of the window, click Restore.
When you finish viewing the process, click Cancel or close the view window.
Viewing Process Status
You can view the status of every task in a workflow process. The Process Statuses view, lets you see the relationship between tasks and task statuses, and link to the Task Statuses—Edit window.
To view a workflow process
Access the Classic Administration page (Accessing Classic Administration).
Choose Workflow > Process.
Civic Platform displays the Workflow Process—Edit window.
Search for the workflow process or task you want to work with.
Civic Platform displays the Workflow Process—Edit window or the Task Status—Edit window.
Click the Process Status View link that appears near the top of the window.
Click the plus sign that appears to the left of any task to view the statuses defined for that task.
Click the link to any task status to edit the status details.
Managing Workflow Hierarchy
A workflow hierarchy is an ordered collection of processes and sub processes. You can use a workflow hierarchy to manage sophisticated workflows at your agency. In addition to tasks and sub tasks, you can combine processes and establish sub processes.
Editing a workflow hierarchy involves adding and removing sub processes. A sub process is similar to a sub task that lets you break down a workflow task into smaller tasks. Sub processes let you break down a workflow hierarchy into smaller processes. For instructions on editing the tasks in the main process or in a sub process, see Managing Workflow Processes.
Topics
Establishing a Workflow Hierarchy
Establishing a workflow hierarchy involves creating several workflow processes and then combining them in a hierarchical organization. The benefit of establishing a workflow hierarchy is that you can create a validated set of sub tasks that users must accomplish in a certain order.
When you establish your workflow hierarchy keep in mind that you can add only one sub process to each task. For information about adding a sub process to the hierarchy, see Adding a Workflow Sub Process to a Workflow Hierarchy.
To establish a workflow hierarchy
Access the Classic Administration page (Accessing Classic Administration).
Choose Workflow > Workflow.
Civic Platform displays the Workflow—Search page.

Click Add.
Civic Platform displays the New Workflow window.
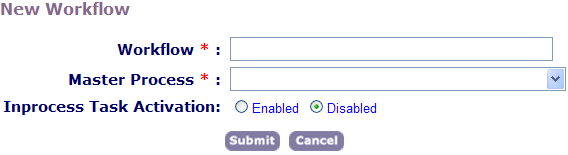
Complete these fields:
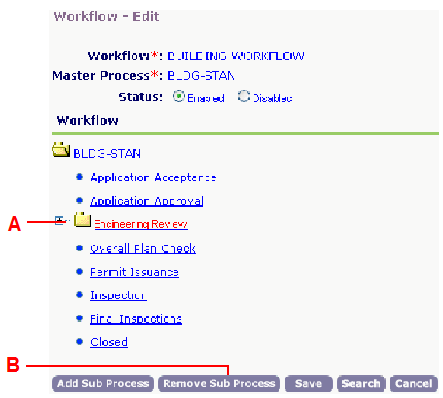
Workflow Enter the name of the workflow hierarchy that you want to create. Master Process Select the name of the master workflow process to which the sub process belongs. Inprocess Task Activation Select whether you want to allow in-process task activation for the workflow hierarchy. Click Submit.
Civic Platform displays the Workflow—Edit window
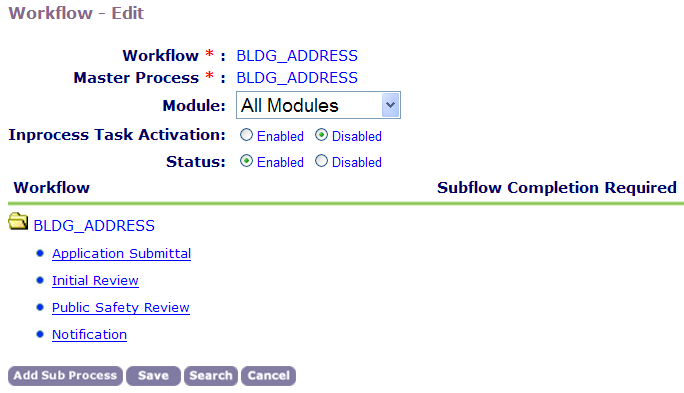
| A | Current mode of this workflow hierarchy |
| B | The master process folder that contains workflow tasks |
| C | Blue dot, which indicates a task without a sub process |
| D | Hierarchy command options |
Adding a Workflow Sub Process to a Workflow Hierarchy
In a Civic Platform workflow, a sub process is a workflow process that you have already defined and which you want to add to a task within another process.
Because you are associating an actual workflow process to a task in another workflow process, known as the master process, you can enforce the tasks that make up the sub process. In other words, you can determine which tasks a user must complete when, and you can require that the user complete them before moving on to other tasks. You can also attach documents, checklists, and comments to these tasks, just as for a master workflow process.
To add a sub process to a workflow hierarchy
Access the Classic Administration page (Accessing Classic Administration).
Choose Workflow > Workflow.
Search for the workflow hierarchy you want.
Click a task within the master process folder.
Civic Platform displays the selected task in red.

Click Add Sub Process.
Civic Platform displays the search window for a workflow process.
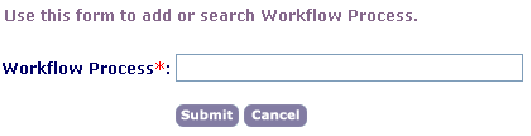
Enter the name of the sub process that you want to add to the master flow. If you do not know the complete name of the process, you can enter the first few characters of the name, or click Submit to see a list of all defined processes.
Click Submit.
Civic Platform displays your search results.
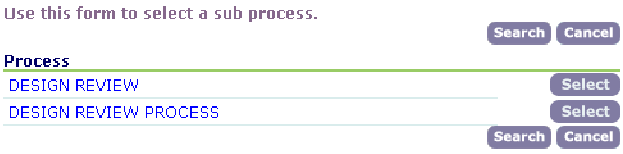
Click Select to the right of the process that you want to add to your workflow hierarchy.
Civic Platform adds the sub process to the selected task in the master process folder.
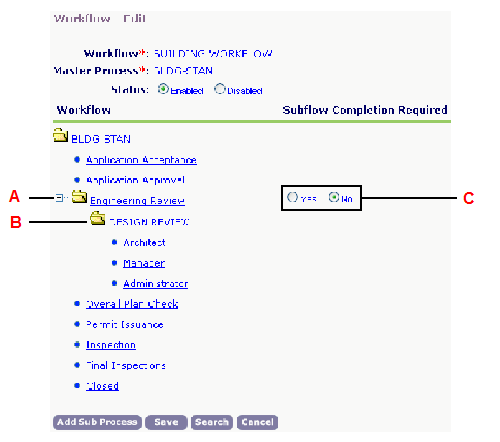
A The plus or minus symbol indicates a task with a sub process B The sub process folder with tasks within it C The sub process completion requirement option If you want to require that users complete the new sub process as part of the master process, select Yes; otherwise, select No.
Click Save.
Removing a Sub Process from a Workflow Hierarchy
To remove a sub process from a main process does not delete the process from your system, but does delete it from the master process.
To remove a sub process from a workflow hierarchy
Access the Classic Administration page (Accessing Classic Administration).
Choose Workflow > Workflow.
Search for the workflow hierarchy you want.
Click a task within the master process folder.
Civic Platform displays the selected task in red.
A Selected task B Civic Platform enables the Remove Sub Process button only when you select a task with a sub process. Click Remove Sub Process.
Click OK.