Managing Accounts for Registered Agencies
To register a public user in an agency, you must associate at least one enabled reference contact in the settagency with the public user account, and then enable and activate the public user account for the agency.
Topics
Managing Contacts Associated with Public User Accounts
Follow the instructions below to manage the associations between public user accounts and contacts. You can associate a contact with a public user; approve, reject, or remove the association; or set a contact as the account owner of a public user.
Topics
Associating Contacts with a Public User Account
To associate contacts with a public user account
Access the Public User portlet (Accessing the Public User Portlet).
Select the user account you want to edit.
Civic Platform displays the public user account registration details.
Click the Contact tab.
Civic Platform displays the Contact list portlet.
Do any of the following:
To search and associate a contact with a public user account.
Click Look Up.
Civic Platform displays the contact search form.
Enter your search criteria and then click Submit.
Civic Platform displays a list of reference contacts meeting the search criteria.
If you cannot find the contact in the results list, click Close Matches to view the close matches to the search criteria, and select the contact from the close match contacts.
The Standard Choices INDIVIDUAL_CONTACT_MATCH_CRITERIA and ORGANIZATION_CONTACT_MATCH_CRITERIA define the close match criteria respectively for individual contacts and reference contacts. See the Accela Civic Platform Configuration Reference for more information about Standard Choices.
Select the contact that you want to associate with the public user.
Click Connect.
Civic Platform links the contact with the public user account.
For contacts directly added in the public user portlet, Civic Platform approves the association by default.
To approve the association between a contact and the public user account.
Select the contact.
Click Approve.
To reject the association between a contact and the public user account.
Select the contact that you do not want to approve the association.
Click Reject.
Civic Platform rejects the association.
Note:A public user account must have at least one approved contact association to stay enabled, so you cannot reject an association if it is the only one with the approved status in an enabled public user account.
To delete the association between a contact and the public user account.
Select the contact that you want to remove.
Click Delete.
Civic Platform deletes the contact from the public user account.
Setting an Associated Contact as the Account Owner
A public user may be associated with more than one contact, but only one contact can be the account owner of the public user. Public users can designate or change the account owner in their accounts on the Account Management page in Citizen Access. You can also designate or change the account owner of a public user account following the instruction in this section.
Note:
If your agency enables the Automatically Activate New Association feature in Citizen Access, the first contact added to an account is the account owner of the account by default. If an account is created in a version earlier than 7.3 FP2 or with the Automatically Activate New Association feature disabled, there is no default account owner in the account. |
When you add variables (for example, $$firstName$$, $$middleName$$, $$lastName$$) about the public user contact information in notification templates, Civic Platform uses the following priority order to decide from which contact, out of all the contacts that have approved association with the public user, to get the variable values:
Priority one, the account owner of the public user
Priority two, the first individual contact that has the same email address as the account
Priority three, the first organization contact that has the same email address as the account
Priority four, the first individual contact that has approved association with the account
Priority five, the first organization contact that has approved association with the account
For more information about how to create notification templates, seeWorking with Communication Manager.
To change the account owner of a public user
Access the Public User portlet (Accessing the Public User Portlet), and select the user account you want to edit.
Civic Platform displays the public user account registration details.
Click the Contact tab.
Civic Platform displays the Contact list portlet.
Select an approved contact which you want to set as the account owner of the public user.
Click Set as account owner.
Civic Platform changes the account owner of the public user to be the current contact.
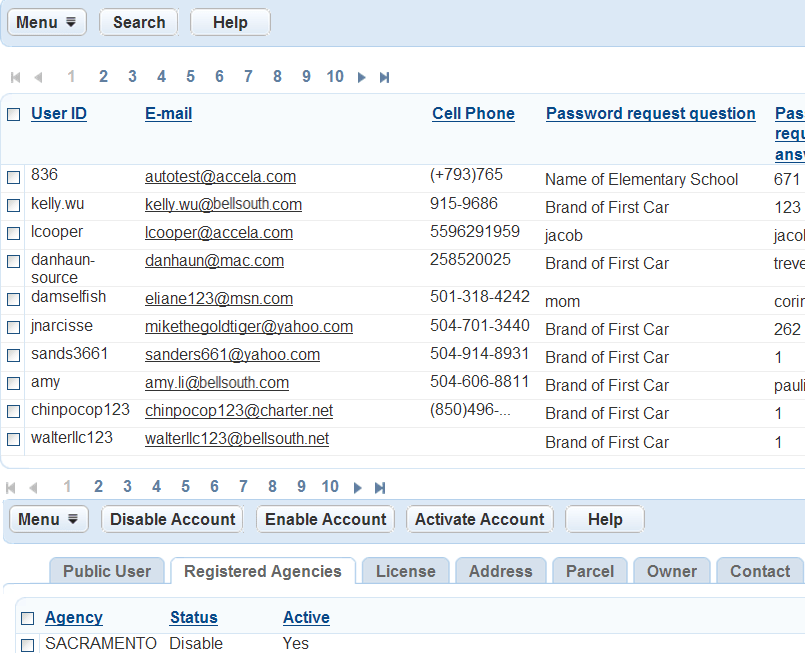
Enabling or Disabling an Account
To enable or disable a public user account
Access the Public User portlet (Accessing the Public User Portlet).
Click the user account which requires a change of status.
Civic Platform displays the public user account registration details in the detail portlet.
Click the Registered Agencies record tab.
Select the Agency that requires a change status.
Note:If you have enabled the multiple agency administration feature (see Setting Up Cross-Agency Operations), after a public user attempts to log in to Citizen Access hosted by a different agency from the one that created the account, you can enable and activate the public user account in the new agency.
If you enable an authorized agency or authorized agent clerk account in a different agency from the one that created the account, the account type is Citizen, not Authorized Agent nor Authorized Agent Clerk, in the new agency.
Click one of the following buttons to change the status of an account.
Disable Account. Click this button to disable the public user for the agency. Disable, in this context, means that the public user is not able to log in to Citizen Access.
Note:If you disable an authorized agent account, the authorized agent account becomes inactive, and all the authorized agent clerk accounts created by the agent account become inactive as well.
Enable Account. Click this button to enable the public user to use the account for the agency.
Civic Platform displays a message indicating a status change.
Activating a Public User Account
Topics
Activating the Public User Account
If your agency does not use the activation email, your agency can activate an account manually for a user in the Public User portlet. For example, if an account requires additional information before the agency allows activation, you can manually activate their account for public users after the additional information arrives at the agency in the Public User portlet.
To activate a public user account
Access the Public User portlet (Accessing the Public User Portlet).
Click the user account which requires activation.
Civic Platform displays the public user account registration details in the detail portlet.
Click the Registered Agencies record tab.
Select the Agency that requires activation for this account.
Click Activate Account.
Civic Platform displays the account is active and the user has permission to log in to Citizen Access for that agency.
Using EMSE to Activate a Public User
Your agency can activate a public user account using an EMSE script. The script works with the ApplicationSubmitAfter event to activate the public user in the agency, activate licenses for the public user, and send out the activation email to the user. For example, an applicant comes to the counter to apply for a license. While submitting the application users receive the option of creating a Citizen Access account so that they can track progress. The counter clerk selects the option “Create online account.” EMSE creates the online account and email the link, login, and password to the applicant.
For more information on EMSE scripts, see the Accela Civic Platform Scripting Guide.
To activate a public user account through EMSE scripting
Refer to the sample EMSE script below to activate a public user account, activate any licenses associated with the account, and send the activation emails to the public user.
//Get the Service Provide Code.var servProvCode = Accela Automation.env.getValue(“servProvCode”);//Get the Universally Unique Identifier for public user verification.var uuid= Accela Automation.env.getValue(“UUID”);//Activate Public User by servProvCode and uuid.var result = Accela Automation.publicUser.activatePublicUser(servProvCode,uuid);if(result.getSuccess()){//If Activate Public User Successefully, then print the User ID.Accela Automation.print(result.getOutput());}else{//If Activate fail, then print the error message.Accela Automation.print(result.getErrorMessage());}