Establishing Checklists
Topics
Creating a Checklist
You can create checklists and add them to your system as necessary. Users can choose from any checklists defined on your system to help them complete a certain inspection or document review. When you add a checklist, you must set up the values you to appear in the individual checklist items. For instructions, see Adding an Item to a Checklist.
To create a checklist
Access the Classic Administration page (Accessing Classic Administration).
Choose .
Civic Platform displays the Reference Checklist page.

Click the Add button next to the Checklist drop down list.
Civic Platform displays the Reference Checklist—Add page.
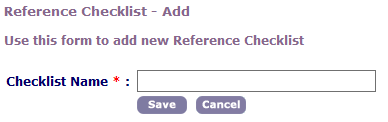
Enter the name of the checklist in the Checklist Name field.
Click Save.
Civic Platform adds the new checklist and displays the Reference Checklist page.
Add one or more items. For instructions, see Adding an Item to a Checklist.
Editing a Checklist
After you create a checklist you can determine the sequence order of checklist items; add title (guide text) for the user; set defaults for comments, statuses, and scores; and set a points threshold for inspections. To change a checklist item, see Working with Checklists.
To edit a checklist
Access the Classic Administration page (Accessing Classic Administration).
Choose .
Civic Platform displays the Reference Checklist page.
Choose the checklist that you want from the Checklist drop-down list.
Update the fields for each checklist item as described in Table 1.
Table 1. Checklist Fields Custom Fields Group Select the Custom Fields group you want to display for the checklist item. The Custom Fields Group might not be visible, depending on the settings for the reference checklist item. For more information, see Associating Checklist Items with Custom Fields Groups.
Carry Over Failed Items Select this option to indicate that you want the item to automatically appear on a new checklist if it fails (the user results the item with a denied status). If the item fails in a checklist for an inspection, the item is transferred to the next inspection(s) that users schedule on the record (in either Civic Platform or Citizen Access). If the item fails in a checklist for a document review task, the item is transferred to the document that users resubmit.
Default Comment Enter a default comment to display in the Comment field. The Default Comment might not be visible, depending on the settings for the reference checklist item. Default Status Choose the default status from the drop-down list. This status appears in the status field for any inspection or document review task that uses this checklist, and the user can modify it. The default status might not be visible, depending on the settings for the reference checklist item. Default Score Choose a default score from the drop-down list. This is a number that appears in the score field for any inspection that uses this checklist, but the user can modify it in the specific inspection. The default score might not be visible, depending on the settings for the reference checklist item. Title Enter a question or provide instructions for the user. Major Violation/Critical Item Select this option if you want to display the “Major Violation” check box for the checklist item. If users select a status for a “Major Violation/Critical Item” checklist item, Civic Platform applies the critical score of the status for the checklist item. If users select a status for a non-“Major Violation/Critical Item” checklist item, Civic Platform applies the non-critical score of the status for the checklist item.
Civic Platform automatically assigns the “Major Violation” status for the checklist item, only when you select a “Major Violation” status for a “Major Violation/Critical Item” checklist item.
Max Points If desired, enter the maximum number of points allowed before this type of inspection cannot pass. Order Enter the sequence in which Civic Platform should display the different checklist items. If multiple items share the same order number, Civic Platform reorders duplicate sequence numbers by increasing duplicates by one. Required Select this option if you want the checklist item to be required in the checklist. During inspections, inspectors must specify the status and score for every required checklist item in a checklist to complete the checklist.
During document reviews, reviewers must complete all the required checklist items in a document review task (that is, setting their statuses to an Approved result type) before updating the task to a status that the Standard Choice for the document review status group specifies as validation required.
Deleting a Checklist
If you no longer want users to follow a certain checklist when recording inspection or document review results, you can delete it from your system.
To delete a checklist
Access the Classic Administration page (Accessing Classic Administration).
Choose .
Civic Platform displays the Reference Checklist window.
Use the Checklist drop-down list to choose the checklist that you want.
Click Delete.
Civic Platform displays a confirmation.
Click OK.
Working with Checklists
Topics
Adding an Item to a Checklist
After you create a checklist, you should add at least one checklist item. At any time, you can add and delete checklist items.
To add an item to a checklist
Access the Classic Administration page (Accessing Classic Administration).
Choose .
Civic Platform displays the Reference Checklist page.
Use the Checklist drop-down list to choose the checklist that you want to work with.
Click the Add button that appears to the right of the Checklist Items section.
Civic Platform displays the Reference Checklist Item—Add page.
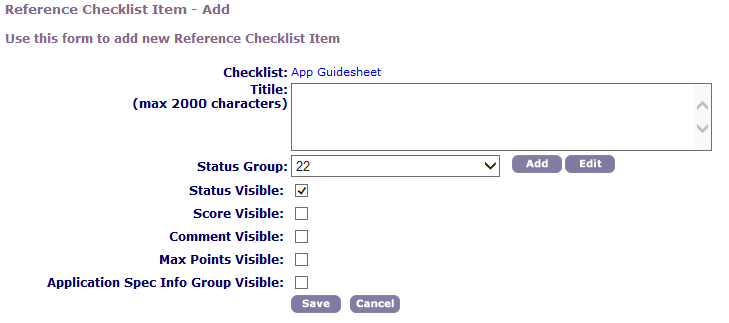
Complete the fields as described in Table 2.
Click Save.
Table 2. Checklist Item Fields Title Enter the details about the item as you want it to display to users. You can use this text to ask a question, or provide instructions. For example, you can ask the inspector whether the builder used approved building materials. Status Group Select the status group, or click Add or Edit. to choose the values that users see in a status drop-down list. You can choose a group of statuses from the drop-down list, edit the list to meet your needs, or add a new group of selections that users can choose from. For instructions, see Creating a Status Group. Status Visible Select this option if you want the status drop-down list visible. Score Visible Select this option if you want the score value visible. Comment Visible Select this option if you want the comment box with your comments visible. Max Points Visible Select this option if you want the Max Points column to display on the Admin Checklist Item and Daily Checklist Detail pages. If you select this option, you must also select the Score Visible option. Custom Fields Group Visible Select this option if you want the application-specific information group fields to display on the Admin Checklist Item and Daily Checklist Detail pages. For more information, see Associating Checklist Items with Custom Fields Groups.
Editing an Item on a Checklist
If you want to change one of the items in a checklist, you can edit it. To change the checklist itself, see Editing a Checklist Group.
To edit an item from on a checklist
Access the Classic Administration page (Accessing Classic Administration).
Choose .
Civic Platform displays the Reference Checklist page.
Use the Checklist drop-down list to choose the checklist that you want.
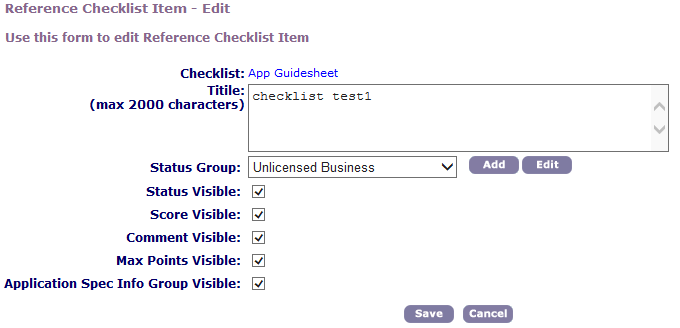
Click Edit next to the item you want.
Civic Platform displays the Reference Checklist Item—Add page.

Complete the fields as described in Table 2.
Click Save.
Deleting an Item from a Checklist
If you no longer want to include a certain item on a checklist, you can delete it. When recording inspection results, users are no longer able to see any item that you delete.
To delete an item from a checklist
Access the Classic Administration page (Accessing Classic Administration).
Choose .
Civic Platform displays the Reference Checklist page.
Use the Checklist drop-down list to choose the checklist that you want.
Click Delete next to the checklist item that you want to delete.
Civic Platform displays a confirmation.
Click OK.
Associating Checklist Items with Custom Fields Groups
Administrators can customize checklist item templates by associating the item with a Custom Fields group. Checklist items are the actual specifications on a checklist. For example, an Electrical checklist might contain items necessary for the inspector to pass off, such as Required Lighting Outlets, Required Branch Circuits, and Ground Fault Protection. When you attach a Custom Fields group to a checklist item, the information determined within the custom field displays on the checklist as an additional field.
With this feature, you can use Custom Field and Custom List definitions for checklist items such as fields, lists, and check boxes. Custom Fields add a single line to the checklist item, and Custom Lists add multiple options. This enables you to associate the Custom Fields group code to a record type or checklist item. You can arrange these Custom Fields items according to your agency's preferences with the Form Layout Editor.
To associate a checklist item template to a Custom Fields group
Access the Classic Administration page (Accessing Classic Administration).
Choose .
Civic Platform displays the Reference Checklist page.
Locate the existing checklist that contains the item you want to associate to the Custom Fields group, or create a new checklist. For example, you want to associate the Required Lighting Outlets with a Custom Fields group that contains the option to enter the number of lighting outlets currently installed and the total number of outlets.
For instructions on creating a new checklist, see Creating a Checklist.
Civic Platform displays the selected checklist.
Add a new or edit an existing checklist item by clicking the Add button or the Edit button next to the Checklist Item.
Civic Platform displays the Reference Checklist Item - Add or Reference Checklist Item - Edit page.
Select Custom Fields Group Visible and click Save. Update the other fields as necessary.
For a description of the fields, see Table 2.
Civic Platform displays the Custom Fields Group field next to the checklist item on the Reference Checklist page.
Click Search to locate the Custom Fields group you want to associate with the checklist item template.
Note:If Civic Platform displays the Custom Fields group in the field, you cannot search for another unless you delete the current Custom Fields group.
Civic Platform displays the Custom Fields - Browse screen.

Click Select next to the Custom Fields group you want to associate with the checklist item.
Civic Platform displays the group in the Custom Fields Group field.

- Edit the Custom Fields group as necessary.
- Click Save.
Managing Checklist Status Groups
Checklist status groups allow you to have more than one set of status values for users to choose from when they complete a checklist. You can set up any number of statuses and group them together.
The status is like a disposition, or result, for a particular checklist item. You can assign scores to statuses. When users select a status for a checklist item, the score of the status automatically fills in the score of the checklist item. You can set a status as a major violation. When users select a “Major Violation” status for a “Major Violation/Critical Item” checklist item, the number of major violations in an inspection increments by 1.
After you create a checklist status group, you can associate it with a particular checklist item. For instructions, see Associating a Status Group to a Checklist Item.
Topics
Creating a Status Group
To associate a status group with a checklist item, you must first create the status group. You can create more than one status group for any checklist item, but you can associate only one status group with a checklist item at any one time.
You can reuse checklist item status groups, so create an easily identifiable name. For example, you might name a checklist item status group YES NO if the options are “yes” and “no.”
To create a status group
Access the Classic Administration page (Accessing Classic Administration).
Choose .
Civic Platform displays the Reference Checklist window.
Use the Checklist drop-down list to choose the checklist that you want.
Click Edit next to the item you want.
Civic Platform displays the Reference Checklist Item—Edit window.
Click the Add button next to the Status Group drop-down list.
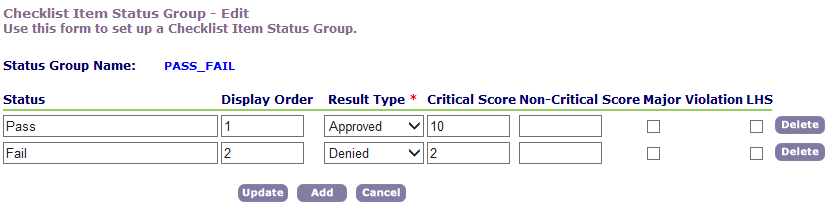
Civic Platform displays the Checklist Item Status Group—Add page.
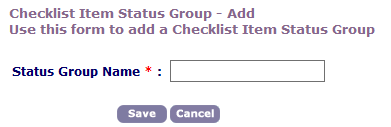
Enter the Status Group Name that you want.
Click Save.
Civic Platform displays the Checklist Item Status Group—Edit page.

Click Add.
Civic Platform displays the Add Status to Checklist Item Status Group page.

Enter the name of the new status in the Status field.
Click Save.
Civic Platform displays the Checklist Item Status Group—Edit window.

Complete the fields as described in Table 3.
Click Save.
Click Update.
Click Cancel to return to the Edit window.
Table 3. Checklist Item Status Fields Critical Score Enter the critical score for the status. If a checklist item is a “Major Violation/Critical Item” in the reference checklist, when users select a status for the checklist item, the critical score of the status automatically fills in the score of the checklist item. Display Order Enter a number to indicate the position of this status within the list. LHS Select this option to designate the checklist item as LHS (Life/Health/Safety). For LHS-type items, the maximum point value becomes the default score. Inspectors can edit the number. Major Violation Specify whether or not a status is major violation. If a status is a major violation, when users select the status for a “Major Violation/Critical Item” checklist item, Civic Platform automatically selects the “Major Violation” check box for the checklist item.
Non-Critical Score Enter the non-critical score for the status. If a checklist item is not a “Major Violation/Critical Item” in the reference checklist, when users select a status for the checklist item, the non-critical score of the status automatically fills in the score of the checklist item. Result Type There are three result types:Approved: Approves (passes) the checklist item.Denied: Denies (fails) the checklist item.Informational: Indicates that the checklist items do not need a status of approved or denied, but the agency wants to collect information in the checklist for that inspection. Status Enter the name of the status. What you enter here displays as a choice in the drop-down list of statuses for this checklist item. Users can choose this status from a list of values when completing a checklist. For more information, see “Completing a Checklist” in the Accela Civic Platform User Guide.
Associating a Status Group to a Checklist Item
If you want users to be able to choose from a list of statuses for a checklist item when completing a checklist, you can add a status group and associate it to a checklist item.
Before you begin, you must create a checklist item status group. For instructions, see Creating a Status Group.
To associate a status group with a checklist item
Access the Classic Administration page (Accessing Classic Administration).
Choose .
Civic Platform displays the Reference Checklist window.
Use the Checklist drop-down list to choose the checklist that you want.
Click Edit next to the item you want.
Civic Platform displays the Reference Checklist Item—Edit window.
Choose the Status group that you want from the Status Group drop down list.
Click Save.
Editing a Status Group for a Checklist Item
You can edit the values in a status group.
To edit a status group for a checklist item
Access the Classic Administration page (Accessing Classic Administration).
Choose .
Civic Platform displays the Reference Checklist window.
Use the Checklist drop-down list to choose the checklist that you want.
Click Edit next to the item you want.
Civic Platform displays the Reference Checklist Item—Edit window.
Click Edit next to the Status Group drop down list.
Civic Platform displays the Checklist Item Status Group—Edit window.
Update the fields as described in Table 3.
If you want to add a status, click Add.
If you want to delete a status, click Delete next to the value you want to delete, then click OK.
Click Update.
Click Cancel to return to the Edit window.
Carrying Over Failed Checklist Items
If you enable the failed checklist item carry-over feature for an inspection type, Civic Platform or Citizen Access carries over the failed checklist items from an inspection to the subsequent inspection (or inspections) that users schedule in the same record, until all the failed items are resolved.
To enable the failed checklist item carry-over for an inspection type
Go to the Inspection - Edit page, and set the “Capture and carry over failed checklist items” option of the target inspection type to Auto or Auto-All. If you set it to Prompt, the carry-over feature works in Civic Platform and not in Citizen Access. For more information, see Editing an Inspection Type.
Go to the Inspection Results Group - Edit page of the result group which is associated with the target inspection type, and set one or more results with the Result Type as Approved or Denied. For more information, see Adding a Result to an Inspection Result Group.
Go to the Reference Checklist page, select the checklist which is associated with the target inspection type, and mark the Carry Over Failed Items check box for one or more checklist items in the checklist. For more information, see Editing a Checklist.
Open the checklist item status group edit page, and create one or more statuses with the Result Type as Denied. For more information, see Editing a Status Group for a Checklist Item.