Understanding Fee Items
Topics
Understanding Fee Item Fields
This section provides you with descriptions of fee items fields. It is critical to understand how the fee item configuration works so you can create the various ways to create fees in Civic Platform. This section provides instructions on how to create simple fees and complex fees.
To access the fee item page
Access the Classic Administration page (Accessing Classic Administration).
Navigate to .
Civic Platform displays the Fee Item-Search page.
Choose one of the following to access a Fee Item page:
Click Add to create a new fee item.
Click Submit with or without any search criteria. Select a fee item from the results list to display the Fee Item Edit page displays.
Figure: Fee Item-Add Page
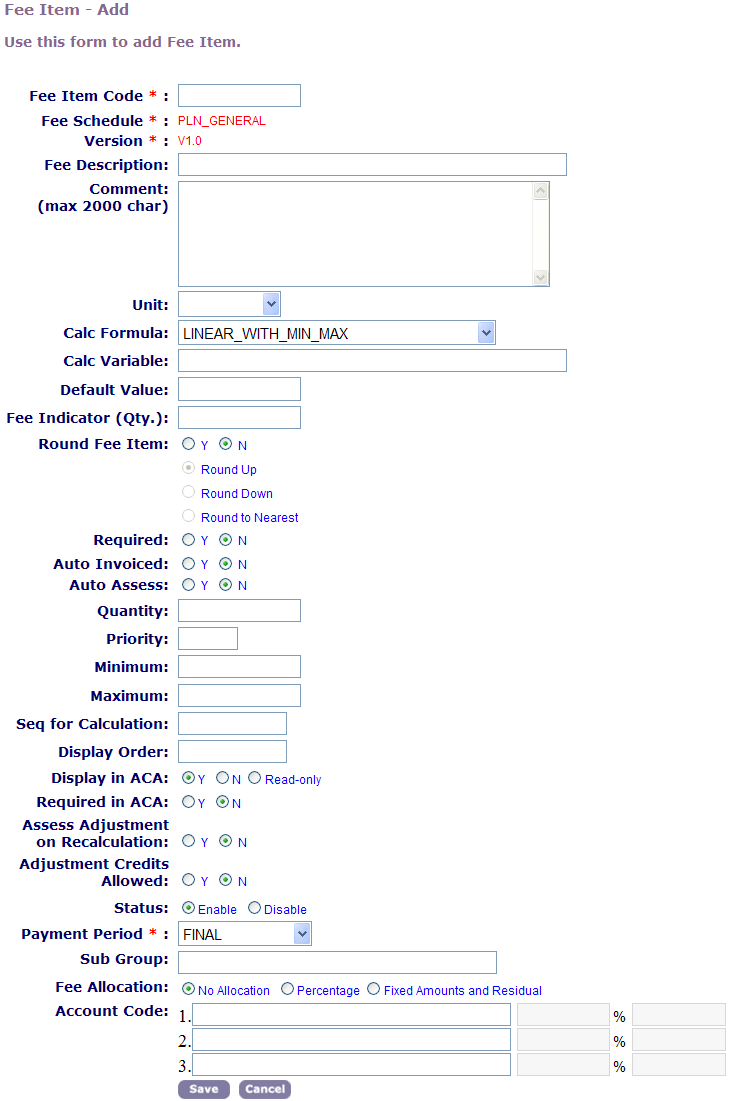
Table 1. Fee Item Fields Fee Item Code Enter a unique code to identify the source or purpose of the fee item. For example, if you use this fee item to calculate the value of a window as part of a remodeling project, enter “Window.”If it is a Point of Sale item, provide a unique code to identify the POS item's source and purpose. For example, shirt, hat, map, or mug. Fee Schedule Enter the fee schedule that this fee item belongs to. For example, enter “Remodel.”For a Point of Sale item, make certain that the fee schedule is exactly the same as the Standard Choice Value Description for POINT_OF_SALE_FEE_SCHEDULE. Note:You can add the same fee item to different fee schedules by copying a fee item and changing the fee schedule or applying it to a new version of the fee schedule.
Version Choose the version for the fee schedule set up for the fee item. A fee schedule can have different versions based on the start and end dates. Fee Description Enter a brief description of the fee item to identify its source or purpose. For example, enter “Remodel Window Fee” or a “Map of Sandy City and Streets” for a Point of Sale item. Comment Enter a detailed description of the fee item to explain the fees purpose, logic, and any additional information associated to the fee. Unit Choose a fee unit from the drop-down list. For example, if you assess the fee depending on area, select the unit representative of square footage. Calc Formula Choose the formula that you want to use to calculate this fee item. Accela provides a list of standard fee formulas when you implement Civic Platform. For all point of sale fee items, choose CONSTANT from the drop-down list. The CONSTANT fee formula allows you to establish a set fee independent of ranges or valuations. For example, if you want to establish a flat rate for a city map, you can use the CONSTANT fee formula to establish a $10 fee. Any fee calculated using this formula is the product of the constant and the quantity that a user enters while assessing fees. For example, if you specify that the constant for a city map is $10 and a user enters 2 as the quantity, then the total fee for two electrical applications is $20.00.
For more information about calculation formulas, see Fee Formulas.Calc Variable Enter the parameter(s) for the fee formula. If you want to define multiple parameters, separate each parameter with a comma. The number and order of the parameters vary depending on the standard fee formula. Administrators define most of these parameters, but agency users or public users generally determine the variable x (Quantity) in the mathematical equation of the fee formula. All Point of Sale items use the CONSTANT Calc Formula, or (ax). So you can enter the amount of the fee for one item (variable a) in this field and it is multiplied by the number a public user enters for the quantity on the application intake form (variable x).
Another example of a Calc Variable is when you calculate a fee item based on the LINEAR_WITH_MIN_MAX fee formula (ax + b). You can enter 15,0,0,9999 and, in this example, a = 15, b = 0, minimum value = 0, and the max value = 9999.For more information on variables, see Fee Formulas.
Default Value If you want the fee item to have a default quantity value, choose Y and enter the default quantity in the field. If you do not want a default quantity, choose N. Fee Indicator (QTY) Civic Platform uses this text field to enable you to enter a custom fee indicator to populate the quantity field in ACA. Enter a unique code in this field. When the 'Fee Indicator' in the fee item has a value of (range. $FI10100$~$FI10599$), Citizen Access locates the application specific information which has the matching 'Fee Indicator' value (range. $FI10100$~$FI10599$) and then replaces the quantity (Qty) with the Custom Fields value. Citizen Access implements this functionality regardless of 'Auto Assess' settings. If the 'Fee Indicator' in fee item has no value, Citizen Access follows the existing logic to retrieve the 'Quantity' value for the fee item when you set 'Auto Assess' to 'Y'.
Note:If the Fee Indicator in the fee item and the fee indicator in Custom Fields do not match, Civic Platform uses the default value of 0. For more information, see Creating Fees with Fee Calculation and Custom Fields Data.
Round Fee Item If you want the calculated fee item to round to the nearest dollar amount, choose Y, and then choose either Round Up, Round Down, or Round to Nearest dollar. If you want the fee to display the exact value, choose N. For example, your agency charges an Inspection Penalty Fee if a property is not ready for an inspection when the inspector arrives. You can use a percentage formula to penalize 10% of the original inspection fee. This 10% value as calculated by the formula could be $4.56. To ensure the Inspection Penalty Fee is always a round number, you can choose to round the item up.
Required If you want to require users to complete the Quantity field, choose Y; otherwise, choose N. Auto Invoiced If you want to automatically invoice the fee item, select Y, otherwise, choose N. No indicates that you want to manually invoice the fee items in Civic Platform. Note:This field does not effect the Fee Item display on the Fee Page or Fee Estimate Page in Citizen Access.
Auto Assess If you want the fee to add automatically when you save the application for the first time, select Y, otherwise, chose N. Quantity Enter the number of items you want to apply to the fee. Priority Enter a number to determine the order of payment for the fee item. This field is only necessary if you enable Standard Choice option FULL_PAY_ALLOCATION_OPTIONS. For more information see Prioritizing Fees Using Pay Allocation. Minimum Enter the minimum value of the calculated fee value. Maximum Enter the maximum value of the calculated fee value. Seq for Calculation Enter a number to determine the position of the fee item within the fee calculation sequence. Display Order Enter a number to determine the position of the fee item within the fee schedule. For example, if you want the fee item to display before any other fee items, enter 1. Display in ACA This field defines permissions for the Fee Item Quantity field in Citizen Access. Options are Y/N/Read-only. Y- Yes indicates the fee item displays on the Citizen Access Fee page.
N- No indicates the fee item does not display on the Citizen Access Fee page.Read-Only indicates the fee item displays on the Citizen Access Fee page, but the quantity field is read-only.
Required in ACA This field becomes active when you set the Display in ACA field to Yes or Read-Only. After the field becomes activate, you can choose Y or N. Y indicates the Fee Item quantity must have a value greater than zero. N indicates you do not require the Fee Item quantity. The value of this field is compatible with EMSE. Assess Adjustment on Recalculation If you want to adjust the assessment when recalculating the fee, mark the Y option; otherwise, mark N. Adjustment Credits Allowed If you want to allow adjustment credits, mark the Y option; otherwise, mark N. Status If you want to make the fee item available to users in Civic Platform, mark Enable; otherwise, mark Disable. Payment Period Choose the payment period to which the fee item belongs. For example, if you want to assess and invoice the fee item during the inspection phase of a project, choose Inspection. A payment period is a subset of the fee schedule. For a point of sale item, you must choose Final.
Subgroup Enter the code for the subgroup to which this fee item belongs. A fee item can belong to multiple subgroups. If you want this fee to belong to more than one subgroup, separate each group with a delimiter such as a comma. Fee Allocation This field defines whether and how to split the total fee in the fee item among up to three account codes. Options are No Allocation, Percentage, and Fix Amount and Residual. No Allocation - You do not want to split the fee between account codes.
Percentage - You want to split the fee between two or three account codes by percentage.Fix Amount and Residual - You want to split the fee between two or three account codes by fix amount. If you select Percentage or Fixed Amount and Residual in this field, go to the Account Code field to configure the account codes and the allocations.
Note:When public users assess fees, Citizen Access allocates the total fee amount to the account code(s) associated with the fee items as configured. Public users are unaware of the allocation because it happens in the background.
Account Code If you select Percentage in the Fee Allocation field, enter up to three account codes here, and specify the percent of the fee amount each account code gets. You must make sure that the sum of the percent add up to 100. If you select Fix Amount and Residual in the Fee Allocation field, enter up to three account codes here.
You can specify the dollar amount that the first one or two account codes can get, but you cannot specify the dollar amount for the last account code, because the last one gets the residual amount.
Calculated If you want to use the calculation records to determine a fee value, select Y, otherwise, select N. Calculation Record # Click Select to choose the calculation record you want to use to evaluate a fee value. You can call other calculation records from the initial calculation record.
Searching for a Fee Item
Administrators can search for a fee item to view its associated details or make any modifications to it. You can enter a variety of search criteria including the fee code, fee schedule, payment period, subgroup, or the fee description. Civic Platform returns all fee items when you do not enter any search criteria and then Click Submit.
To search for a fee item
Access the Classic Administration page (Accessing Classic Administration).
Navigate to .
Civic Platform displays the Fee Item-Search page.
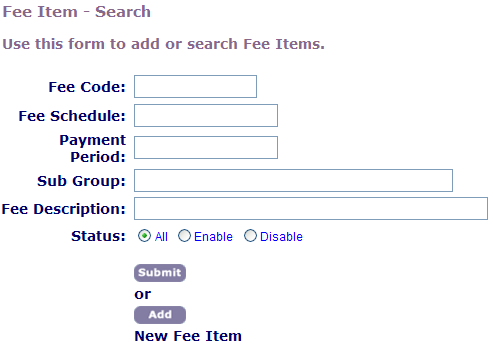
Enter your search criteria. For information about Fee Item Fields, see Understanding Fee Items.
Click Submit.
Civic Platform returns a list of fee items meeting the search criteria.
Select the fee item you want to work with by clicking the red dot next to the fee item code.
Copying a Fee Item
You can create a new fee item by copying an existing one. After you copy the fee item, you must provide a new fee item name and define the fee item details including the fee schedule, pay period, and the fee formula parameters.
To copy a fee item
Access the Classic Administration page (Accessing Classic Administration).
Navigate to .
Civic Platform displays the Fee Item—Search page.
Search for the fee item that you want to copy. For instructions on how to search for a fee, see Creating Fees with Fee Calculation and Custom Fields Data.
Civic Platform displays the Fee Item—Edit page.
Click Copy.
Civic Platform displays the Fee Item-Add page with field information copied from the previously selected fee item.
Update the necessary fields as described in Understanding Fee Items.
Click Save.